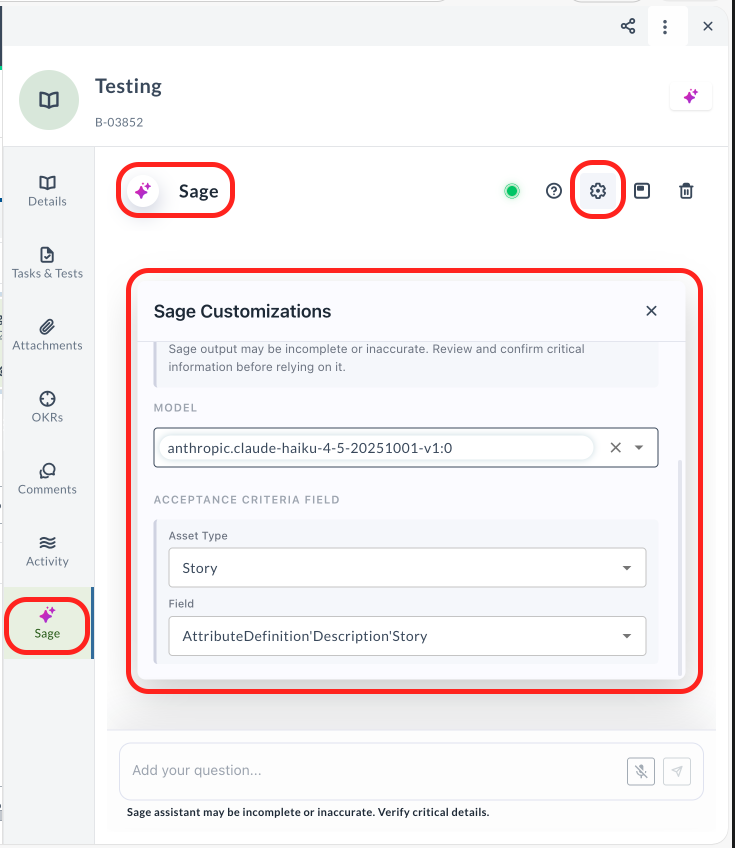
Sage Customizations
Configure Sage AI settings to control which model generates content and which field stores acceptance criteria. Sage customizations are user-specific and persist across your sessions.
Before You Begin
Sage must be enabled in your system preferences before you can access Sage Customizations. To enable Sage, go to your profile icon > Agility Preferences > User Preferences and select the Sage checkbox.
Access Sage Customizations
- Open any backlog item (Story, Defect, Epic, etc.) in the detail view.
- Click the Sage tab in the asset detail drawer.
- Click the Sage Customizations icon (gear icon) in the Sage panel header.
Result: The Sage Customizations panel opens, displaying available configuration options.
Understanding AI Models
Your selected AI model influences how Sage responds. The default model is recommended for most users and standard scenarios.
Changing models may result in differences in:
- Suggestions
- Generated descriptions
- Summaries
- Response quality, detail, and style
Sage output may be incomplete or inaccurate. Review and confirm critical information before relying on it.
Configure AI Model
Select which AI model Sage uses to generate content such as acceptance criteria, descriptions, and summaries.
- Open Sage Customizations following the steps above.
- In the Model section, click the model dropdown.
- Select your preferred model from the available options.
- The model selection saves automatically.
Result: Sage uses the selected model for all future content generation. The selected model applies across all backlog item types (Stories, Defects, Epics, etc.).
Available models vary by deployment and may change over time as new models are added or older models are deprecated. The default model is recommended for most users and standard scenarios. Model names display the full technical identifier.
Configure Acceptance Criteria Field
Specify which field Sage uses to store generated acceptance criteria. By default, Sage inserts acceptance criteria into the Description field, but you can select a custom field if your team uses a dedicated acceptance criteria field.
Select Acceptance Criteria Field
- Open Sage Customizations following the steps above.
- In the Acceptance Criteria Field section:
- Asset Type: Select the backlog item type (Story, Defect, Epic, etc.)
- Field: Select the field where acceptance criteria should be inserted
- The field selection saves automatically.
Result: When you generate acceptance criteria using Sage, the content is inserted into your selected field instead of the default Description field.
Field Selection Tips
- Default behavior: If no custom field is selected, Sage inserts acceptance criteria into the Description field.
- Custom fields: Select any text field configured for your organization, such as "Acceptance Criteria", "AC", or custom fields.
- Per asset type: Field selection is specific to each asset type. Configure separately for Stories, Defects, and other item types if needed.
Verify Your Settings
To confirm your Sage customizations are working:
- Open a backlog item of the configured asset type.
- Click the Sage tab in the asset detail drawer.
- Click the Sage Customizations icon (gear icon) in the Sage panel header.
- Verify the Model section displays your selected model.
- Generate acceptance criteria using Sage.
- Check that the acceptance criteria appear in your configured field.
Best Practices
- Start with defaults: Use the default model and Description field until you understand how Sage generates content for your team.
- Test before adopting: If changing models, test with a few items to compare output quality before switching permanently.
- Custom fields: If your team uses a dedicated acceptance criteria field, configure Sage to use it consistently across all team members.
- Review all output: Always review and edit Sage-generated content before finalizing backlog items.
Related Topics
- Change Your System Preferences - Enable Sage in your preferences