TeamRoom Basics
Everything you need to know to get started using TeamRooms.
Overview
TeamRooms provide a centralized workspace for teams to track sprint progress, manage backlog items, and collaborate on work. This guide covers the essential features and operations for using TeamRooms effectively.
Add Calendar Panel in TeamRooms
The Team Calendar enables team members to view and manage important dates for their team. With this option, you can visualize team schedules and set reminders for important dates, such as holidays, time offs, and other tasks associated with your team. You can track daily or monthly events associated with your team.
Prerequisites
You must have Agility administrator privileges.
Add the Calendar Panel
- Click the hamburger menu
 > Rooms > All TeamRooms.
 - Click the name of the TeamRoom.
- Click the gear icon next to the TeamRoom name.
- Navigate to the Panels tab.
- Search for Calendar panel and click Add.
The Calendar Panel is added to the TeamRooms.
Calendar Event Fields
| Option | Description |
|---|---|
| Title | Displays the title of the calendar event. |
| Start Date | Displays the start date of the of the calendar event. The default start date is current date. |
| End Date | Displays the end date of the of the calendar event. |
| Category | Displays the category of the calendar event . The available options are: - Day off - Other The categories option can be customized by users with administrator privileges. |
| Viewable by My Other Rooms | If selected, displays the calendar events of the user from this room and the calendar events of the user from other team rooms. |
| Today Events | Lists the calendar events created for the day. |
Add Calendar Events in TeamRooms
Agility lets you add calendar events to your team rooms in two ways. This section provides instructions so you can choose the one that works best for you.
Add Events from the Side Panel
You can only add events from the side panel for the current day.
- Click the hamburger menu > Rooms > All TeamRooms.
- Click the name of the TeamRoom.
- Click the gear icon next to the TeamRoom name.
- Navigate to the Panels tab and select Calendar.
- In the side panel, click Add Event.
- Specify the event details and click Create.
The Calendar event is added to the TeamRoom.
Add Events from the Calendar Page
- Select a date where you want to create an event, the Calendar Event dialog is displayed.
- Specify the calendar details and click Create.
The Calendar event is added to the TeamRoom.
Modify Calendar Events in TeamRooms
Agility allows you to edit or delete calendar events created by you. You can extend or move the calendar events from one date to another using the drag option.
Edit Calendar Events
You can only edit or delete calendar events created by you.
To edit a calendar event:
- Navigate to the Calendar panel in your TeamRoom.
- Select an Event which you want to edit.
- Make the required changes and click Update.
The Calendar event is updated in your TeamRoom.
Delete Calendar Events
Agility allows you to delete calendar events created by you.
To delete a calendar event:
- Navigate to the Calendar panel in your TeamRoom.
- Select an Event which you want to delete and click Delete.
- Do you want to delete event? message is displayed.
- Click Delete again.
The Calendar event is no longer visible in your TeamRoom.
Add New Backlog Items
Add stories, defects, or templates directly from a TeamRoom.
- Click the hamburger menu > Rooms > All TeamRooms.
- Click a TeamRoom name and click Backlog to open the Backlog panel.
- Click the add icon
 , and select Backlog Item, Defect, Backlog Item From Template, or Defect From Template.
 - Enter values for the new backlog item and click Save.
Add and Remove Panels
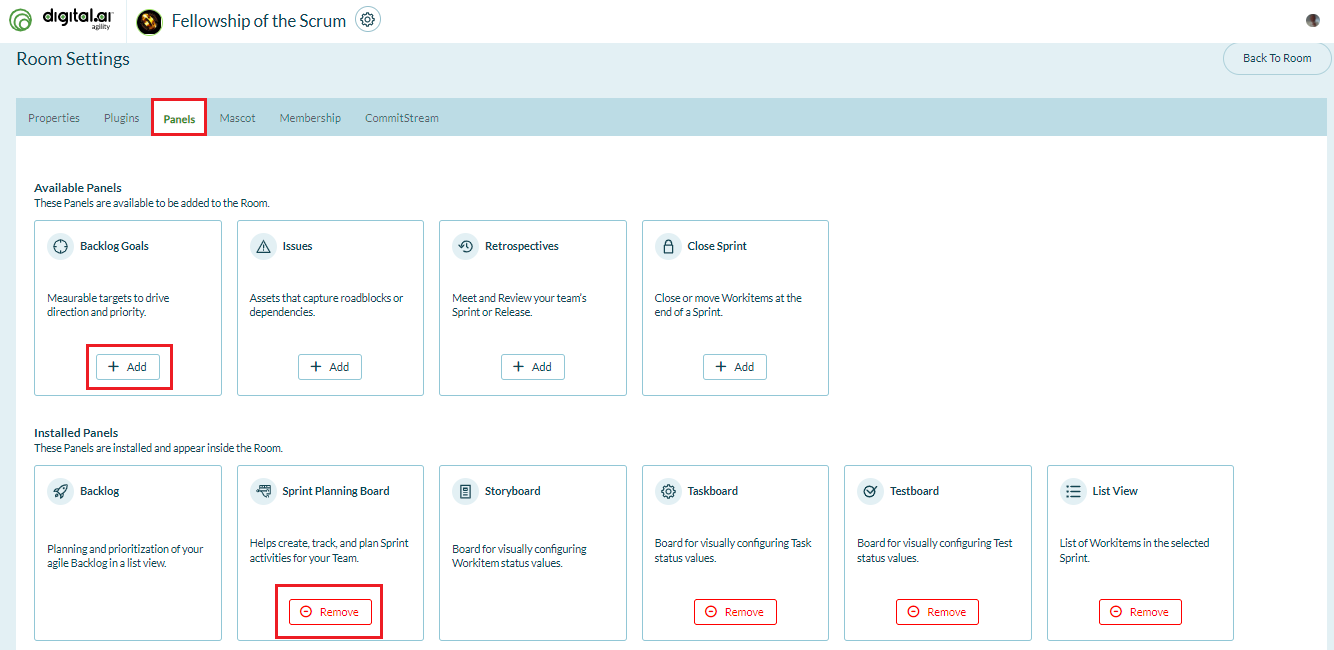
Each TeamRoom displays a set of tabs just below the member avatars. These are toggle tabs that can be turned on or off to display panels that show different types and levels of detail about a sprint.

- Click the hamburger menu > Rooms > All TeamRooms.
- Click on a TeamRoom to open it.
- Click the gear icon
 at the top of the page to open TeamRoom settings.
 - On the Room Settings page, click the Panels tab.
- In the Available Panels section, click the Add button under a panel to add it to the TeamRoom.
- In the Installed Panels section, click the Remove button under a panel to remove the panel from the TeamRoom.
- Once done, click Back to Room at the top-right corner.
Filter a TeamRoom by Release
A TeamRoom scopes its work items by planning level. If your team plans with releases rather than using a release as a planning level, you can assign a value stream to the TeamRoom and then filter the backlog by release.
Prerequisites
- Release Planning must be enabled in the admin settings. For more information, see How to Enable or Disable Release Planning.
- At least one value stream must exist. For more information, see Release Planning.
Assign a Value Stream to a TeamRoom
- Click the hamburger menu > Rooms > All TeamRooms.
- Click the name of the TeamRoom you want to configure.
- Click the gear icon next to the TeamRoom name to open Room Settings.
- On the Properties tab, select a value stream from the ValueStream list. The list shows all active value streams and defaults to Select a value stream.
- Click Save, and then click Back to Room.
You can also assign a value stream when you create a TeamRoom by selecting a value stream in the Add TeamRoom window.
Filter the Backlog by Release
After a value stream is assigned, a release list appears in the TeamRoom header next to the Start Standup button. The list shows the active releases that belong to the assigned value stream and defaults to Select Release.
Select a release from the list to filter the Backlog panel to the work items assigned to that release.
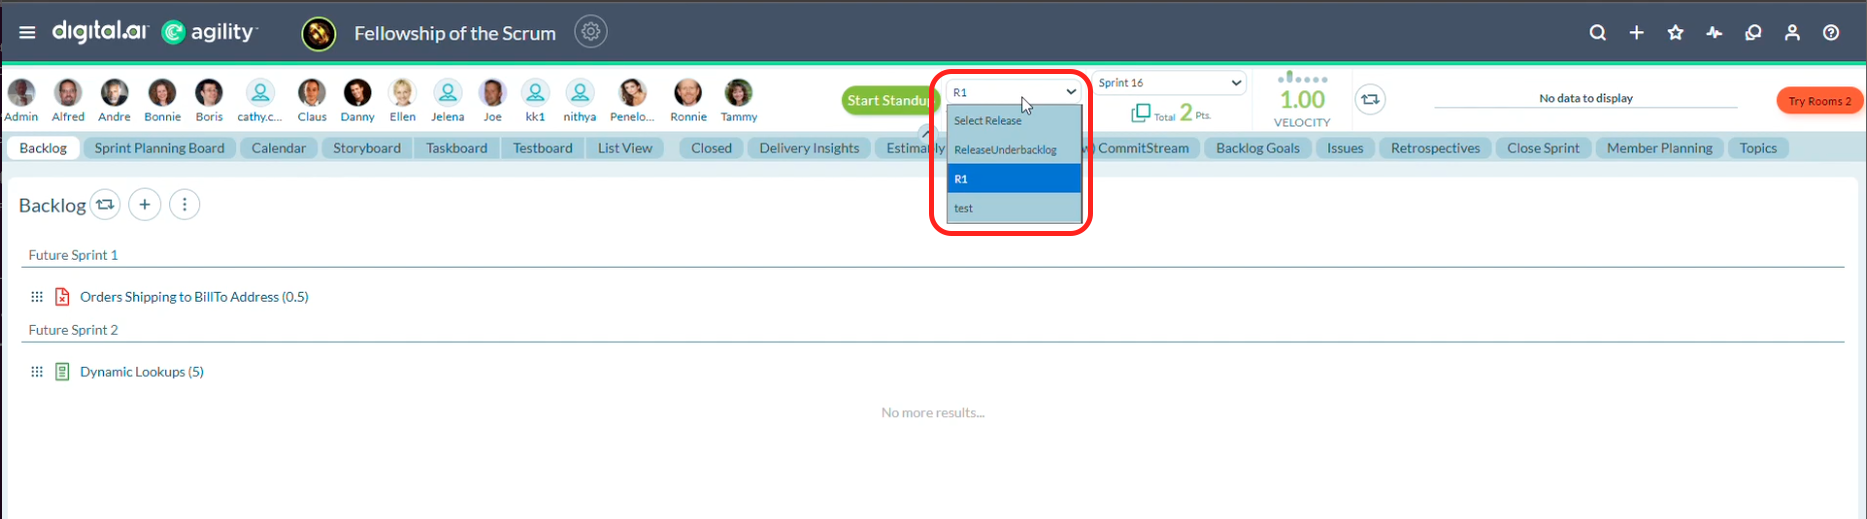
The release filter applies to the Backlog panel only, as noted by the *Backlog panel only label below the list. Other panels, such as the Storyboard, Taskboard, and List View, continue to show all work items in the TeamRoom.
The same Release filter is available in Rooms 2, where it narrows both the Backlog panel and the Sprint Planning Board. You can select a release from either Agility Core or Rooms 2. For more information, see Filter by Release in Sprint Planning.
Edit Workitems
Edit stories, backlog items, defects, tests, and other workitems directly from within a TeamRoom.
- Click the hamburger menu > Rooms > All TeamRooms.
- Click a TeamRoom name and click Backlog to open the Backlog panel.
- Click on the vertical ellipsis in the top right corner of a story card, and then select Edit.
- Make the desired updates and click Save.
Update Effort or To Do
Log or update "effort" or "to do" values for workitems in a TeamRoom.
- Click the hamburger menu > Rooms > All TeamRooms.
- Click a TeamRoom name and choose one of the following:
- Click Storyboard to track work at the workitem level
- Click Taskboard to track work at the task level
- Click Testboard to track work at the test level
- Click the vertical ellipsis at the top-right corner of a workitem tile and click Track.
- Add necessary information in the pop-up window and click Save.
Tips:
- To simplify the list of workitems displayed, click on a team member's avatar to filter by team member.
- With the "Track" option on the Task or Testboard, effort can be specifically allocated to a task owner.
Update Workitem Status
Update workitem status by dragging and dropping workitems through the Storyboard, Taskboard, and Testboard views.
- Click the hamburger menu > Rooms > All TeamRooms.
- Click on a TeamRoom name and choose one of the following:
- Click Storyboard to track work at the workitem level
- Click Taskboard to track work at the task level
- Click Testboard to track work at the test level
- Click the vertical ellipsis at the top-right corner of a workitem tile and click Edit.
- In the pop-up window, update the Status field and click Save.
Tips:
- To simplify the list of workitems displayed, click on a team member's avatar to filter by team member.
- With the "Track" option on the Task or Testboard, effort can be specifically allocated to a task owner.
View Member Details
The top left corner of any TeamRoom displays the avatars of all the members who have access to the TeamRoom. Filter the TeamRoom to see work assigned to each member or access their account details.
Filter by Member
- Click the hamburger menu > Rooms > All TeamRooms.
- Click a TeamRoom name.
- Click on an avatar to filter the TeamRoom to display only the items assigned to that member.
- Click the member's name to view the member details page, where you can see and edit account and other associated information.
Remove Members from TeamRoom
- Click on the Settings
 icon.
icon. - On the Edit TeamRoom Properties page, click Membership on the left-hand side.
- In the Assigned Members section, click the Remove button next to a member to remove them from the TeamRoom.
Remove Inactive Members from TeamRoom
- Click on the Settings icon.
- On the Edit TeamRoom Properties page, click Membership on the left-hand side.
- Click the filter dropdown arrow and check the Show Inactive Members checkbox.
- Click the Remove button next to an inactive member to remove them from the TeamRoom.
To avoid having inactive members in a TeamRoom, it is a good practice to remove members from the TeamRoom before deactivating them.