Sprint-based TeamRooms
Configure Sprint-based TeamRooms for teams working in regular iterations or sprints using classic Scrum or XP approaches.
Overview
Sprint-based TeamRooms provide a dedicated team environment designed to facilitate daily activities by allowing teams to plan, track, and collaborate in a central, consolidated view. This guide covers setup, metrics, sprint selection, and the Sprint Planning Board for effective sprint management.
Understanding Sprint TeamRoom Metrics
The upper right corner of the TeamRoom page displays metrics to provide insight into the work being delivered. The values seen here are based on the TeamRoom configuration and do not consider any work filters.

The following metrics provide insight into your TeamRoom's project context:
- Planned Velocity: The sum of estimates included in the selected sprints or iterations.
- Average Velocity: The average of the past six sprints or iterations.
- Velocity Chart: A graphical representation of the past six sprints or iterations.
- Sprint Burndown: Shows the sum of open ToDo remaining over time for the currently selected sprints or iterations.
The planned velocity and sprint burndown are generated based on the selected sprint.
Other TeamRoom Metrics
In addition to these metrics, you can enable the Scorecard panel for additional metrics about the work items in this TeamRoom.
Set Up a Sprint TeamRoom
Follow these instructions to configure your TeamRoom if your team works in regular iterations or sprints. This setup shows sprint-based metrics that indicate how well your team is performing in the sprint.
Create a New TeamRoom
To create and configure a TeamRoom, your project role must be "Project Lead" or higher for the top-level project assigned to the TeamRoom.
- Click the hamburger menu
 > Rooms > All TeamRooms.
 - Click Add TeamRoom on the right-hand side of the page.
- In the Add TeamRoom window, enter or select the team configuration options.
- Add a description for the TeamRoom, if required.
- Click Save.
Configure TeamRoom Properties (Optional)
Customize an existing TeamRoom to reflect the team it represents. Note that customizations apply only to TeamRoom, not the project as they do in the Sprint Tracking boards. This is useful when two teams working on the same project want to use different WIP limits on their storyboards.
- Click the hamburger menu > Rooms > All TeamRooms.
- On the TeamRooms page, click the name of the TeamRoom you want to configure.
- Click the gear icon
 next to the TeamRoom name.
 - In the Edit TeamRoom Properties page, change the team configuration options as needed, and click Save.
Add or Remove a TeamRoom Mascot
Add a mascot to create a unique identity for your TeamRoom.
- Click the hamburger menu > Rooms > All TeamRooms.
- Click the name of the TeamRoom you want to configure.
- Click the gear icon
 next to the TeamRoom name.
 - In the Edit TeamRoom Properties page, click Mascot on the left-side menu.
- On the Add a Mascot page, click Browse to select the image you want to upload. Note that the file must be saved in .jpg or .png format and must be smaller than 2 MB. To avoid distortion, keep your image as close to square as possible. The system will automatically resize the image to 96 x 96 pixels.
- To remove an existing mascot, click Remove.
Add Members to the TeamRoom
Your TeamRoom is not complete without members. Follow these steps to add members.
- Click the hamburger menu > Rooms > All TeamRooms.
- Click the name of the TeamRoom.
- Click the gear icon next to the TeamRoom name.
- Click Membership in the left-side menu.
- In the Unassigned Members list, click the Add button next to each member you want to add to the TeamRoom.
- Click Assign Members To Project at the bottom of the page.
- In the Members window, select new members, define their new project roles, and click Save to add the selected members.
Install and Manage TeamRoom Plugins (Optional)
Plugins are a dynamic way of adding optional capabilities into a specific TeamRoom. Plugins are registered with your instance then installed in a TeamRoom. By default, Digital.ai Agility ships with a Web Panel plugin.
Install a Plugin
- Click the hamburger menu > Rooms > All TeamRooms.
- Click the name of the TeamRoom.
- Click the gear icon next to the TeamRoom name.
- Click Plugins on the left-side menu.
- In the Available Plugins section, hover over a plugin, and then click Install.
- Enter the required information, and then click OK.
- Note that you can install multiple Web Panels (e.g., if you want to show a team calendar in one panel and a retrospective commitment page in another, you would install two Web Panel plugins).
Configure an Existing Plugin
- Click the hamburger menu > Rooms > All TeamRooms.
- Click the name of the TeamRoom.
- Click the gear icon next to the TeamRoom name.
- Click Plugins in the left-side menu.
- In the Installed Plugins section, hover over a plugin, and then click Configure.
- Enter the required information, and then click OK.
- Note that you can install multiple Web Panels (e.g., if you want to show a team calendar in one panel and a retrospective commitment page in another, you would install two Web Panel plugins).
Enable CommitStream (Optional)
Before CommitStream details can be added to the TeamRoom, a system administrator must enable CommitStream in your Digital.ai Agility instance. Once enabled, click on the CommitStream panel in the TeamRoom. Refer to CommitStream for additional information.
Select a Sprint in TeamRoom
To view the workitems related to a particular sprint, select a sprint from the drop-down list at the top of the TeamRoom.
Use the Sprint Planning Board
The Sprint or Iteration Planning Board helps you create, track, and plan sprint/iteration activities for your team from within the TeamRooms screen. This feature is perfect for a SAFe® PI Planning session where multiple teams work together to plan for a 10-week program increment.
The Iteration planning board is part of the Winter 2021 v 21.0 release and will not be available in older releases.
Access the Sprint Planning Board
- Click the hamburger menu Rooms > All TeamRooms.
- Click the name of the TeamRoom.
- Click the Sprint or Iteration Planning Board toggle to enable it. The Sprint or Iteration Planning Board appears with all work items planned for various sprints for the selected project.

Plan Sprints
- To create a new sprint or iteration from this board, click the Add Iteration button at the top-right corner of the board.
- To add a workitem to a sprint or iteration, drag it from the Backlog section of the TeamRoom and drop it on to a sprint or iteration in the Sprint or Iteration Planning Board.
- To remove a workitem from a sprint or iteration, drag it from the Sprint or Iteration Planning Board and drop it to the Backlog section of the TeamRoom.
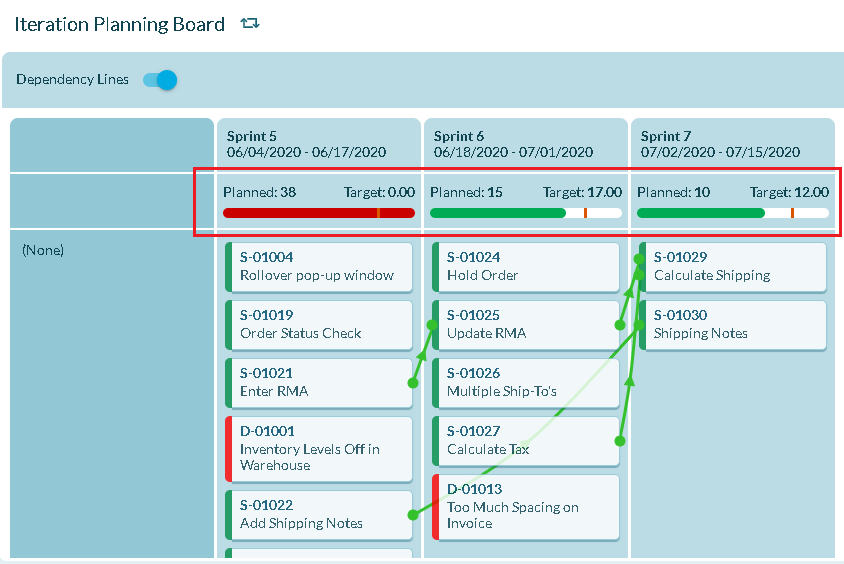
Track Sprint Progress
- To view downstream dependencies between different workitems in the same sprint or iteration or across different sprints or iterations, enable the Dependency Lines toggle.
- The color of the progress bar on the second row of the sprint grid indicates the difference between the Planned Estimate and Target Estimate. This is same as the progress bar displayed in the Sprint or Iteration Scheduling page.
If the Show by Workitem Count option is enabled in Agility Preferences, this bar indicates the difference between the number of planned and target workitems.
- Red indicates that the Target Estimate meets or exceeds the Planned Estimate.
- Green indicates that the Target Estimate is less than the Planned Estimate.
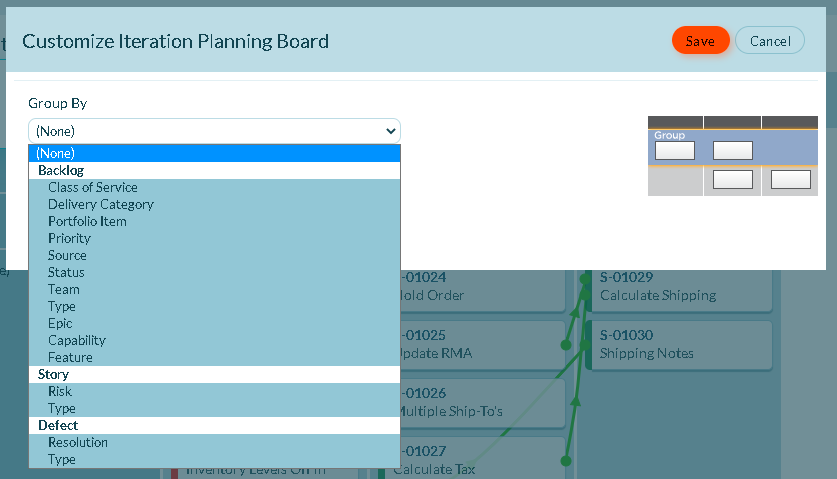
Customize the Planning Board
The story cards displayed in the Sprint or Iteration Planning Board can be grouped based on different criteria such as Team, Epic, Priority, and so on.
By default, the grouping criteria is set to Team.
To change this:
- Click the wrench icon
 at the top-right corner of the board.
 - In the Customize Iteration Planning Board dialog box, select a Group By option and click Save.