Ideas Administration Guide
This artilce explains how to use the Ideas feature in Agility.
Overview
From the sidebar (left-pane menu options) Administration menu, you can access all of the administrative functions needed to manage your Ideas system.
To manage the Ideas add-on system, your Admin Privileges role must be set to System Administrator.
Accessing Ideas Administration
To access the Ideas Administration functions, click the hamburger menu ![]() > Admin > Ideas. Note that the Ideas menu option only displays if the Ideas system is enabled.
> Admin > Ideas. Note that the Ideas menu option only displays if the Ideas system is enabled.
Managing Ideas Administrators
Ideas Administrators can manage all the content and users within Ideas system.
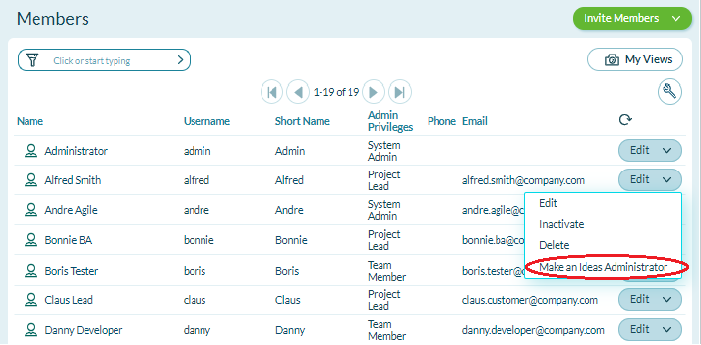
Adding an Ideas Administrator
- Click the hamburger menu
 > Admin > Members.
 - For each member you want to designate as an Ideas Administrator, select Make an Ideas Administrator from the Edit drop-down.
Removing an Ideas Administrator
- Click the hamburger menu > Admin > Members.
- To the right of a member's name, select Remove as Ideas Administrator from the Edit drop-down.
If the Ideas Role column does not display, you can add it by customizing the grid.
Enabling and Defining Terms of Use Policy
Although optional, we recommended that you add your organization's Terms of Use policy to your Ideas system. This policy displays in a pop-up window during the registration process and requires that users accept them in order to complete the process. Note that a link to the policy also displays in the page footers along with your Privacy Policy. To see an example, go to Digital.ai Agility's IdeaSpace page and click on the Terms of Use link in the footer.
Adding Terms of Use Policy
- Click the hamburger menu > Admin > Ideas > Legal.
- In the Terms of Use section, select Enabled, and then upload an HTML file containing your policy.
- If you want to add custom content, enter it in the custom footer content.
- Click Save Terms of Use.
The direct link to your Terms of Use policy uses this format: https://(yoursite.com)/terms-of-use.html. This is helpful if you want reference this page in external documents or sites.
Updating Terms of Use Policy
- Click the hamburger menu > Admin > Ideas > Legal.
- In the Terms of Use section, upload an new HTML file containing your policy.
- Click Save Terms of Use.
Removing Terms of Use Policy
- Click the hamburger menu > Admin > Ideas > Legal.
- In the Terms of Use section, select Disabled, and click Save Terms of Use.
Defining the Privacy Policy
In addition to the Terms of Use, a link to your privacy policy is also displayed at the bottom of all your Ideas pages.
- Click the hamburger menu > Admin > Ideas > Legal.
- In the Privacy Policy section, upload a file (in HTML format) containing your privacy policy.
- Click Save Privacy Policy.
The direct link to your Privacy policy uses this format: https://(yoursite)/privacy-policy.html. This is helpful if you want reference this page in external documents or sites.
Updating Privacy Policy
- Click the hamburger menu > Admin > Ideas > Legal.
- In the Privacy Policy section, upload an new HTML file containing your policy.
- Click Save Privacy Policy.
Removing Privacy Policy
- Click the hamburger menu > Admin > Ideas > Legal.
- In the Privacy Policy section, click Remove Privacy Policy.
Branding and Customizing Ideas
Follow the steps below to personalize the look and feel of your Ideas site.
Adding a Header and Logo
- From the sidebar, click Admin > Ideas > Branding.
- Click Choose File to upload your logo.
- (Optional) If you want to add custom header content, type the HTML in the Custom HTML box. Refer the to pre-populated content in the header for examples of how to reference the variables below:
- (forum) - Links back to the 'Latest' view in the forum, which is the forum's home page.
- (logo) - References the image tag for the logo you've uploaded. Set the class='logo' for the image to provide a standard padding around the image, otherwise leave this class off to display the logo flush with the upper and left edges of the page.
Adding a Custom Footer
- From the sidebar, click Admin
 > Ideas > Branding.
 - Click Choose File to upload your logo.
- If you want to add custom footer content, type the HTML in the Custom HTML box. Refer the to pre-populated content in the header for examples of how to reference the variables below:
- (forum) - Link back to the 'Latest' view in the forum, which is the form's home page.
- (footer-logo) - References the image tag for the logo you've uploaded in the custom footer.
- (terms-of-use) - Link to the Terms of Use, if enabled.
- (privacy-policy) - Links to the Privacy Policy, if enabled.
Here's an example of the HTML code that could be used in the footer:
    <img src="{footer-logo}" alt="footer logo" />

    <a href="http://www.YourCompany.com">Corporate Website</a>

    <a href="{terms-of-use}">Terms of Use</a>

    <a href="{privacy-policy}">Privacy Policy</a>
Enabling and Customizing Email Notifications for Ideas
When enabled, Ideas automatically sends email notifications to users when changes occur to the ideas on which they have interacted, including the following:
- forgotten passwords
- when someone votes for, or comment on an idea
- the status of an idea changes
Note that users can opt out of notification emails on the Ideas Preferences page.
For On-Premise instances, the SMTP settings must also be configured in Digital.ai Agility.
-
From the sidebar, click Admin
> Ideas > Email. -
In the Email Settings section, do the following:
-
- Enter a name in the From Name field which shows up as the sender of notification emails. You can change it to something that identifies your company as the sender.
- Select Enable Notifications and click Save.
-
In all the subsequent sections, modify the fields as required and click Save.
Related concepts
Related tasks
Using the Customer-Facing Ideas Site
Configuring and Testing SMTP Settings