Managing Ideas and Forums
This topic explains how to manage the day-to-day operations of the Ideas system, including working with customer-submitted ideas, managing forums, and handling moderation tasks.
Overview
The Ideas grid is the internal Digital.ai Agility view that lists all ideas submitted through your customer-facing Ideas site. Ideas administrators can manage the flow of information between the customer-facing site and the core Digital.ai Agility system.
Key points:
- The Ideas menu options are only visible to members designated as Ideas Administrators or Forum Administrators
- Ideas Administrators can manage all ideas within the entire Ideas system
- Forum Administrators can only manage ideas in the forums to which they are assigned
- Each forum is completely independent - ideas in one forum are not related to ideas in another
- Idea counts, vote counts, and searches are at the forum level
- You can have an unlimited number of forums
To manage forums and ideas, your Ideas Role must be set to Ideas Administrator or Forum Administrator.
Accessing the Ideas List
To access the list of ideas that users have submitted through your customer-facing Ideas site, go to Product > Ideas.
Searching for Ideas
Using the Find filter in the Ideas grid, you can search for specific ideas based on the information you enter.
- Click Product > Ideas.
- Click on the Filter drop-down menu, and then select Find.
- Enter your search criteria, and then click Apply Filters.
Note that you can use advanced search functions, such as keywords, And/Or, wildcards, and so on for a more precise search results.
Viewing or Adding Idea Comments
Follow these steps to see the comments that have been submitted by users and to add additional comments to an idea.
- Click Product > Ideas.
- Click the on an idea, and then click Show Relationships in the details window.
- Click Add Comment and add your information.
Comments from a forum administrator are highlighted in the Comments list.
Generating a Story or Backlog Item, Portfolio Item, or Request from an Idea
If you want to move an idea into your development process and share it with your internal audience, you can do so by following these steps:
-
Click Product > Ideas.
-
Next to an idea, select one of the following options:
-
- To create a new Story or Backlog item, click Generate Story (or Generate Backlog Item).
- To create a new Request, click Generate Story (or Generate Backlog Item) drop-down arrow, and then select Generate Request.
- To create a new Portfolio Item, click the Generate Story (or Generate Backlog Item) drop-down arrow, and then select Generate Portfolio Item.
-
Enter the appropriate information and click OK.
You can also generate new ideas from an existing story to help populate a brand new Ideas system or to get customer feedback on ideas that have been generated by the team and logged directly into the backlog.
Changing the Status of an Idea
If you would like to communicate to your users the progression of an idea as it moves forward in the planning and delivery process, you can change the status. In the users' view, the "planned" and "completed" tabs display only when ideas are marked as such.
- Click Product > Ideas.
- Next to an idea, click Generate Story (or Generate Backlog Item), and select Mark as Planned, Mark as Completed, or Mark as Candidate.
Viewing Idea Votes
You can see the list of votes that an idea has received on the Details page of an idea. You can also see the name and email address of each voter. This can be handy if you want to ask users to participate in deeper discovery activities such as reviewing mockups or prototypes.
- Click Product > Ideas.
- Click on an idea title to open the Details page and click on the Votes tab.
Idea Details Page
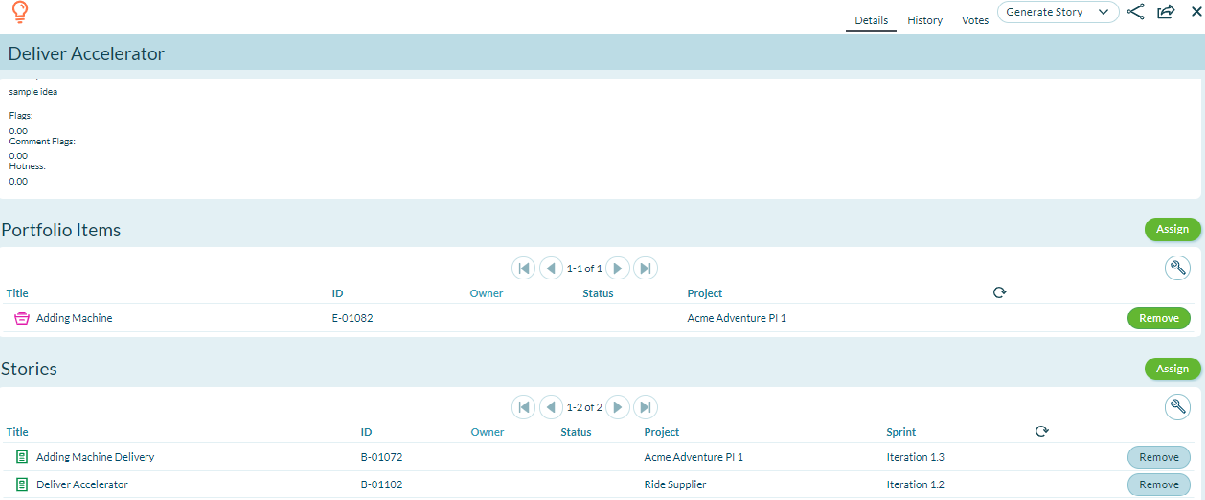
The Idea Details page allows you to view and manage all details related to an idea.
Accessing Idea Details
To access the Idea Details page:
- Go to Product > Ideas.
- Click on an idea title. The Idea Details page displays.
Managing Idea Details
From the Idea Details page, you can perform the following high-level functions using the tabs at the top of the window:
| If you want to... | Do this... |
|---|---|
| View and update all idea details | Click the Details tab |
| View the change history for idea details | Click the History tab |
| See voter details | Click the Votes tab |
| Convert an idea to a story or backlog item, request, or portfolio item | - To generate a backlog item, click the Generate Backlog Item (or Generate Story) button - To generate a request, select Generate Request from the Generate Backlog Item (or Generate Story) dropdown menu - To generate a portfolio item, select Generate Portfolio Item from the Generate Backlog Item (or Generate Story) dropdown menu |
| Mark an idea as inappropriate or appropriate | Select one of the following from the Generate Backlog Item (or Generate Story) dropdown menu: - Mark as Inappropriate - Mark as Appropriate |
| Suspend or enable a user | Select one of the following from the Generate Backlog Item (or Generate Story) dropdown menu: - Suspend Author - Enable Author |
| Change the status of an idea | Select one of the following from the Generate Backlog Item (or Generate Story) dropdown menu: - Mark as Candidate - Mark as Planned - Mark as Completed |
| Change the category | Select Edit Category from the Generate Backlog Item (or Generate Story) dropdown menu, choose a category, and then click OK |
Viewing or Assigning Idea Relationships
Click the Show Relationships button at the bottom of the Idea Details page to perform the following actions by clicking the Assign or Add buttons for the associated action. For any items you add or assign, you can click Remove in the grid to remove them from the idea:
| If you want to... | Do this... |
|---|---|
| Assign the idea to an existing story or backlog item | Click the Assign button |
| Assign the idea to an existing request | Click the Assign button |
| Assign the idea to an existing portfolio item | Click the Assign button |
Moderating Ideas, Comments, and Users
You have several options for moderating ideas, comments, and users within the system to help when a user is behaving inappropriately.
| If you want to... | Then... |
|---|---|
| Flag Inappropriate ideas | 1. Click Product > Ideas. 2. Next to an idea, click on the Generate Story (or Generate Backlog Item) button, and then select one of the following options: 3. Mark as Inappropriate - Removes an inappropriate idea Suspend Author - Suspends the user's accounts |
| Flag inappropriate comments | 1. Click Product > Ideas. 2. Click on the name of an idea, on the Ideas Details page, click on the Generate Story (or Generate Backlog Item) drop-down arrow, and then select: Mark as Inappropriate - Removes an inappropriate idea Suspend Author - Suspends the user's accounts |
| Suspend a user | 1. Click Product > Ideas. 2. Click on the Suspend button next to user's name. |
Working with Forums
A forum is an area within the Ideas system where users can submit and collaborate on feature requests, enhancements, and feedback related to a specific topic. Digital.ai Agility members designated as Ideas Administrators and Forum Administrators can perform all functions required to manage the forums to which they are assigned and the customer-submitted ideas contained within.
Accessing Forums
To access the internal view of the Ideas system, click Product > Ideas > Ideas Forums.
Viewing Forum Details
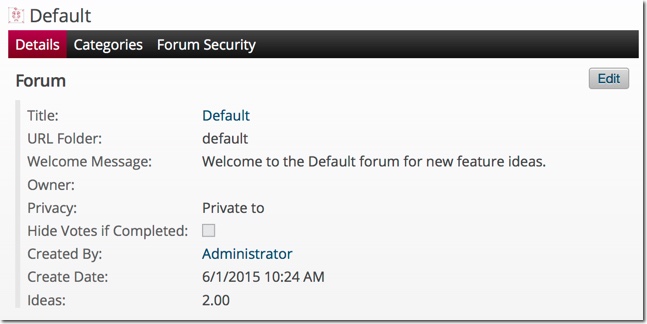
To access the Idea Forum Details page:
- Go to Product > Ideas Forums.
- Click on a forum title. The Forum Details page displays.
Creating a New Forum
-
Click Product > Ideas > Ideas Forums.
-
In the Forums page, click Add Forum, and enter the following information the resulting Forum window:
-
- Title: The name of the forum that displays in the Welcome message and in the forums list
- URL Folder: Displays in the URL (Cannot be changed later). It is tied to the title of the forum and the URL folder name is appended to the base URL of the Idea's forum
- Welcome Message: The message that displays at the top of the forum
- Public (default): Allows all users unrestricted access to the forum's content
- Private: Restricts all access to this forum except for the users or domains listed in the Privacy field below
- Privacy: The list of email addresses (separated by commas) or domains (e.g., ourcompany.com) of the users who can access to the forum. Leave this field blank if you want to restrict all access. This can be helpful when setting up a new forum. See Creating a Private Forum below for more details
- Owner: The designated internal point of contact for the forum
- Hide Votes if Completed: Displays the completed icon instead of vote totals for completed ideas to prevent invalid comparisons to historical totals
-
Click OK.
Editing a Forum
- Click Product > Ideas > Ideas Forums.
- In the Forums page, click Edit next to a forum name, and then modify the details as appropriate.
- Click OK.
Creating a Private Forum
By default, all forums are public. This means that anyone can browse and search all forum content anonymously without registering. "Private" forums, however, are restricted and can only be viewed by selected users. Note that users are required to register before they can access the forum content.
To create a new private forum, follow the steps in Creating a New Forum above.
If you want to make an existing forum private, follow these steps:
- Click Product > Ideas > Ideas Forums.
- In the Forums page, click Edit next to a forum name.
- In the resulting Forums window, select the Private radio button, and then enter the email addresses (separated by commas) or domain names (example, yahoo) of the users who should have access to this forum.
- Click OK.
Private Forums are intended for a limited audience, such as employees in your organization or a particular segment of customers. For this reason, the Private email address field is limited to 4000 characters. It is recommended that you use domain names unless you absolutely need the field limited to specific individuals.
Managing Forum Details
From the Forum Details page, you can perform the following high-level functions using the tabs at the top of the window:
| If you want to... | Do this... |
|---|---|
| View and update all idea details | Click the Details tab |
| Edit forum details | Click the Edit button |
| Add or edit forum categories | Click the Categories tab |
| Assign Forum Administrators | Click the Forum Security tab, and then enter a member's name to search |
Managing Forum Administrators
Forum Administrators can manage what happens within a forum and the flow of information between Digital.ai Agility and the Ideas add-on. Note that Forum Administrators can only manage the forums to which they are assigned. Ideas Administrators, however, can manage all forums within the system. Refer to Ideas Administration Guide for additional details about administrator roles.
Adding a Forum Administrator
- Click Product > Ideas > Ideas Forums.
- Click on a forum name, and then click on the Forum Security tab.
- In the Add Forum Administrator field, start typing the member name to search.
- In the Create Ideas User Account dialog box, enter the member's name and email address.
- Click OK.
Removing a Forum Administrator
- Click Product > Ideas > Ideas Forums.
- Click on a forum name, and then click on the Forum Security tab.
- Click Remove next to the member you want to remove.
Ideas Administrators (shown in gray text) can also manage all of the forums within the Ideas system. They cannot be removed from the Forum Administrator's list. If you want to view an individual member's Ideas Administration role, you can do so on the Member Details page.
Managing Forum Categories
Categories allow you to segment the collection of ideas within a forum. Note that external users are required to select a category when they submit an idea.
Creating and Assigning a Forum Category
- Click Product > Ideas > Ideas Forums.
- Click on a forum name and click on the Categories tab.
- Click Add a Category Inline.
- Enter the category name and click Save.
Categories cannot be deleted but can be edited.