Customizing the Storyboard
Digital.ai Agility lets you customize the storyboard to match your team's workflow and requirements. You can change the look and feel of the Storyboard or story cards, set Work-In-Progress (WIP) limits, and configure Kanban-style boards. To customize a Storyboard, you must have the "Project Lead" role or higher.
The look and feel of each Storyboard can be completely customized in the manner that works best for your project team. This allows teams who follow the traditional Agile approach to peacefully coexist with teams on other projects who follow more hybrid approaches (e.g., Kanban, Scrumban, etc.).
Customize Storyboard Layout
Access Storyboard Customization
- Click the hamburger menu
 > Sprint > Storyboard.
 - In the top right corner of the page, click the wrench icon, and click Customize.
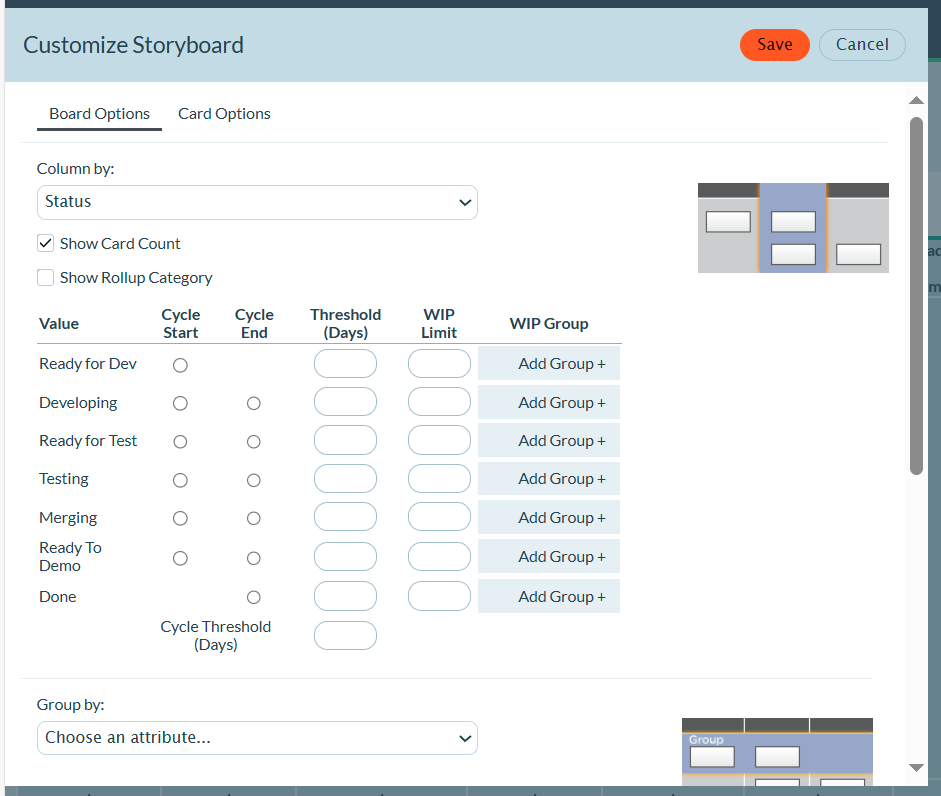
- On the Customize Storyboard window, click on the Board Options tab
Board Customization Options
| Option | Description |
|---|---|
| Column by | By default, Storyboards use Status as the measure of progress. Cycle Start or Cycle End Used in the Workitem Cycle Time report and to define card aging. Note that the selected end of the cycle represents the first column that is beyond the cycle, so cards sitting in the end column are no longer considered within the cycle. Cycle aging is visible on any card that has reached the cycle by hovering over the time indicator on the card. Threshold (Days) Set the maximum total number of days an item is expected be in a column or in the defined cycle. A warning highlight display on the card when the card's time reaches 75% of the threshold value. A violation highlight displays for any card that reaches the threshold. Cycle warnings and violations do not display for cards that have moved outside of the defined cycle. Time is calculated as a running clock, so an item that moves out of and then back into the column or cycle will continue to accumulate time where it left off previously. WIP Limit Specify a Work-In-Progress (WIP) limit for individual columns or groups of columns. Note that the system highlights cases where the number of items exceeds the column's limit. User-applied filters do not impact the WIP limits (which are always applied against the total number of items under the selected project). All columns displayed within the group's boundaries count against the group's WIP limit. This can include a column that is not explicitly configured as part of the group within the customize view, but display on the board between the group's start and end columns as the result of a difference in a lower level project workspace. You can add new columns by adding a new List Value to the Status list type and then enabling that value for use in this project in the Project Workspace settings on the Display Fields page. You can also select a different drop-down field for your board columns to view cards by a different angle. |
| Group by | Groups the horizontal swim lanes by the attribute selected. The "Group By" values are any dropdown fields from the correlating asset type. So, for example with Backlog, you'll see group by options that include any dropdown fields on the backlog asset, like Status, Type, Priority, etc. This includes custom fields that are dropdown fields. |
| Dot Colors | Displays color dots on story cards. Select any field to use for dot coloring. Hover over a dot to see the value. Note that the story ID color indicates the asset type: backlog item (green), Defect (red) or Test Set (blue). |
| Policies | Define specific project team policies to remind board users of the agreed upon rules and definitions. You can use policies to specify entrance or exit criteria for board columns, daily review times, and other team norms that are helpful to keep close at hand. |
Customize Story Cards
To make a storyboard, Taskboard, or Testboard match your organization's workflow, you can choose from a variety of customization options to change the way the story cards display. Note that these changes only apply to the Backlog Items, defects, and test sets in the selected project.
Steps
- Click the hamburger menu > Sprint > Storyboard.
- In the top right corner of the page, click on the wrench icon, and then select Customize.
- In the Customize Storyboard window, click on the Card Options tab, and select from the available customization options.
- Click Save.
Set Up WIP Limits
Work In Progress (WIP) limits help teams identify, manage, and elevate constraints by setting maximum numbers of work items allowed in each status column. When teams exceed these limits, the system highlights the violation, making it easy to see when optimal capacity levels have been exceeded.
WIP limits are useful for:
- Scrum teams wanting to limit work in progress during sprints
- Scrumban teams combining iterative sprints with flow-based constraints
- Kanban teams managing continuous flow without sprint boundaries
Prerequisites
- Your project role must be Project Lead or higher for the project
- Access to the Sprint Storyboard
Configure WIP Limits
Follow these steps to configure WIP limits for your team's storyboard:
- Click the hamburger menu > Iteration > Storyboard.
- In the top right corner of the Storyboard page, click the wrench icon (customize).
- Click Customize from the dropdown menu.
- In the Customize Storyboard dialog, click the Board Options tab.
- In the Column by section, locate each status column where you want to set a WIP limit.
- For each column, enter a number in the WIP Limit field:
- The WIP limit represents the maximum number of work items allowed in that column
- You can set limits for individual columns or groups of columns
- Leave the field empty if you don't want a limit for that column
- Click Save to apply your changes.
Understanding WIP Limit Violations
After you set WIP limits, the storyboard provides visual feedback:
- Normal state: When the number of items is below the limit, the column header displays normally
- Violation state: When the number of items exceeds the limit, the system highlights the column to indicate a WIP limit violation
- User filters: Filters you apply do not impact WIP limit calculations. WIP limits are always applied against the total number of items in the selected project, regardless of any filters in use.
Set WIP Limits for Column Groups
Create a WIP Group when you want a single limit to apply to several adjacent columns:
- Follow steps 1-4 above to open the Board Options tab.
- In the Column by section, click Add Group +. A WIP Group row appears with a name field, start and end column selectors, and a WIP Limit field.
- Give the group a short, descriptive name, so team members understand which columns the limit covers.
- Select the starting and ending columns. All columns between those selections are part of the group and count toward the limit.
- Enter the maximum number of work items allowed in the WIP Limit field. Leave the value at
0if you need a placeholder while you finalize the configuration. - Click the x icon to remove a group, or add another group as needed.
- Click Save.
All columns between the selected start and end points count against the group's WIP limit, even if those columns are not explicitly configured elsewhere in the storyboard setup.
Set WIP Limits Using Team Process
If your organization uses the Team Process Management feature, you can set WIP limits when defining status values:
- Click the hamburger menu >
 Admin > Teams.
 - Click on a team to open the Team Details page.
- Click the Process tab.
- Click the + icon for the appropriate status value.
- Enter a Title, Threshold, WIP Limit, and Description.
- Click Save.
The WIP limit is immediately available on the team's storyboard.
Set Up a Kanban Storyboard
Teams can leverage a Kanban-style Storyboard to manage a project in Digital.ai Agility. The Storyboard allows teams to configure status values specifically for the Kanban team to use. Teams can view and update status using the board, set work-in-process (WIP) limits, and conduct cycle time analysis. Kanban settings work on a project-by-project basis so your organization can combine a mix of Scrum teams and Kanban teams in the same system. Teams practicing lean methods within an iterative framework, for example "Scrumban", can also leverage the Storyboard to support their process.
An easier solution for a Kanban team that doesn't require a sprint schedule is to use a TeamRoom with Kanban flow.
Steps
-
Click the hamburger menu
> Sprint > Storyboard. -
Setup a new project (or sub-project). Setup a new sprint schedule by navigating to the Admin section by clicking the icon
on the side bar and clicking Sprint Schedules in the Projects section. -
If separate status values are needed for the Kanban board, use Project Workspaces to create a status list specific to this project.
-
Click the
icon on the side bar and click Backlog in the List Types section. Add new status values in the Backlog Status section.- Navigate to the Display Fields tab to enable the new list values for display in your project workspace. Select your project and find the Status field under Backlog Item. Enable the desired status values for your Project Workspace.
-
Navigate to the Storyboard, select the wrench icon to customize the Storyboard, and set work in process limits for each status.
-
Move the current set of backlog items onto the Kanban Board using multi-select or via drag and drop on the Sprint Scheduling page.
-
Execute your Kanban using the Storyboard by moving backlog items and paying attention not to exceed work in process limits for the various status values.
-
Track the Time in Status and Time in Cycle metrics directly on the Storyboard by hovering over the clock icon on any card.
-
Review cycle time periodically using the Workitem Cycle Time report right on the Storyboard page itself.
Agile teams use the storyboard to track the status of an entire backlog item from the time it is pulled into the sprint until it is accepted by the Product Owner. The storyboard keeps progress highly visible and helps the team identify which backlog items have been pulled into the sprint and where they are in the product development lifecycle. Kanban teams use the story board to track the status of a backlog item and set work-in-process limits to help the team identify, manage, and elevate constraints. Rather than track velocity, Kanban teams rely on cycle time to understand the rate of flow through the development organization.