Getting Started with Sage
Sage is Agility's AI-powered assistant. It integrates into your Agile workflow and analyzes what you are working on to give practical suggestions that make Stories, Defects, Tasks, and Tests clearer and more actionable.
What Does Sage Do?
Sage analyzes your team's current work and offers proactive guidance on key Agile artifacts such as:
- Stories: Ensuring user stories are well-defined, clear, testable, and aligned with overall objectives.
- Defects: Helping to clarify defect descriptions, severity, and reproducibility steps for faster resolution.
- Tasks: Providing recommendations for breaking down tasks, estimating effort, and identifying potential dependencies.
- Test Cases: Guiding the creation of comprehensive and effective test cases that adequately cover requirements.
- Release Notes: Automatically generating structured release notes from stories and defects associated with a release.
- Child Assets: Creating child work items (Tasks, Tests, Stories, Defects, Portfolio Items) for Epics, Stories, and Defects while validating required fields.
Sage improves the quality and clarity of your Agile work items by:
- Analyzing the content of work items like stories, defects, etc.
- Recommending improvements (example: clarity, formatting, missing acceptance criteria).
- Ensuring consistency with Agile principles.
How to Enable Sage
Before you can use Sage, it must be enabled by an Agility administrator at both the system level and the user level.
Enable Sage at the System Level
Only Agility users with administrator privilege can enable Sage at the system level.
- Click the hamburger icon
 > Admin > System.
 - In the Enable Features section, select Sage.
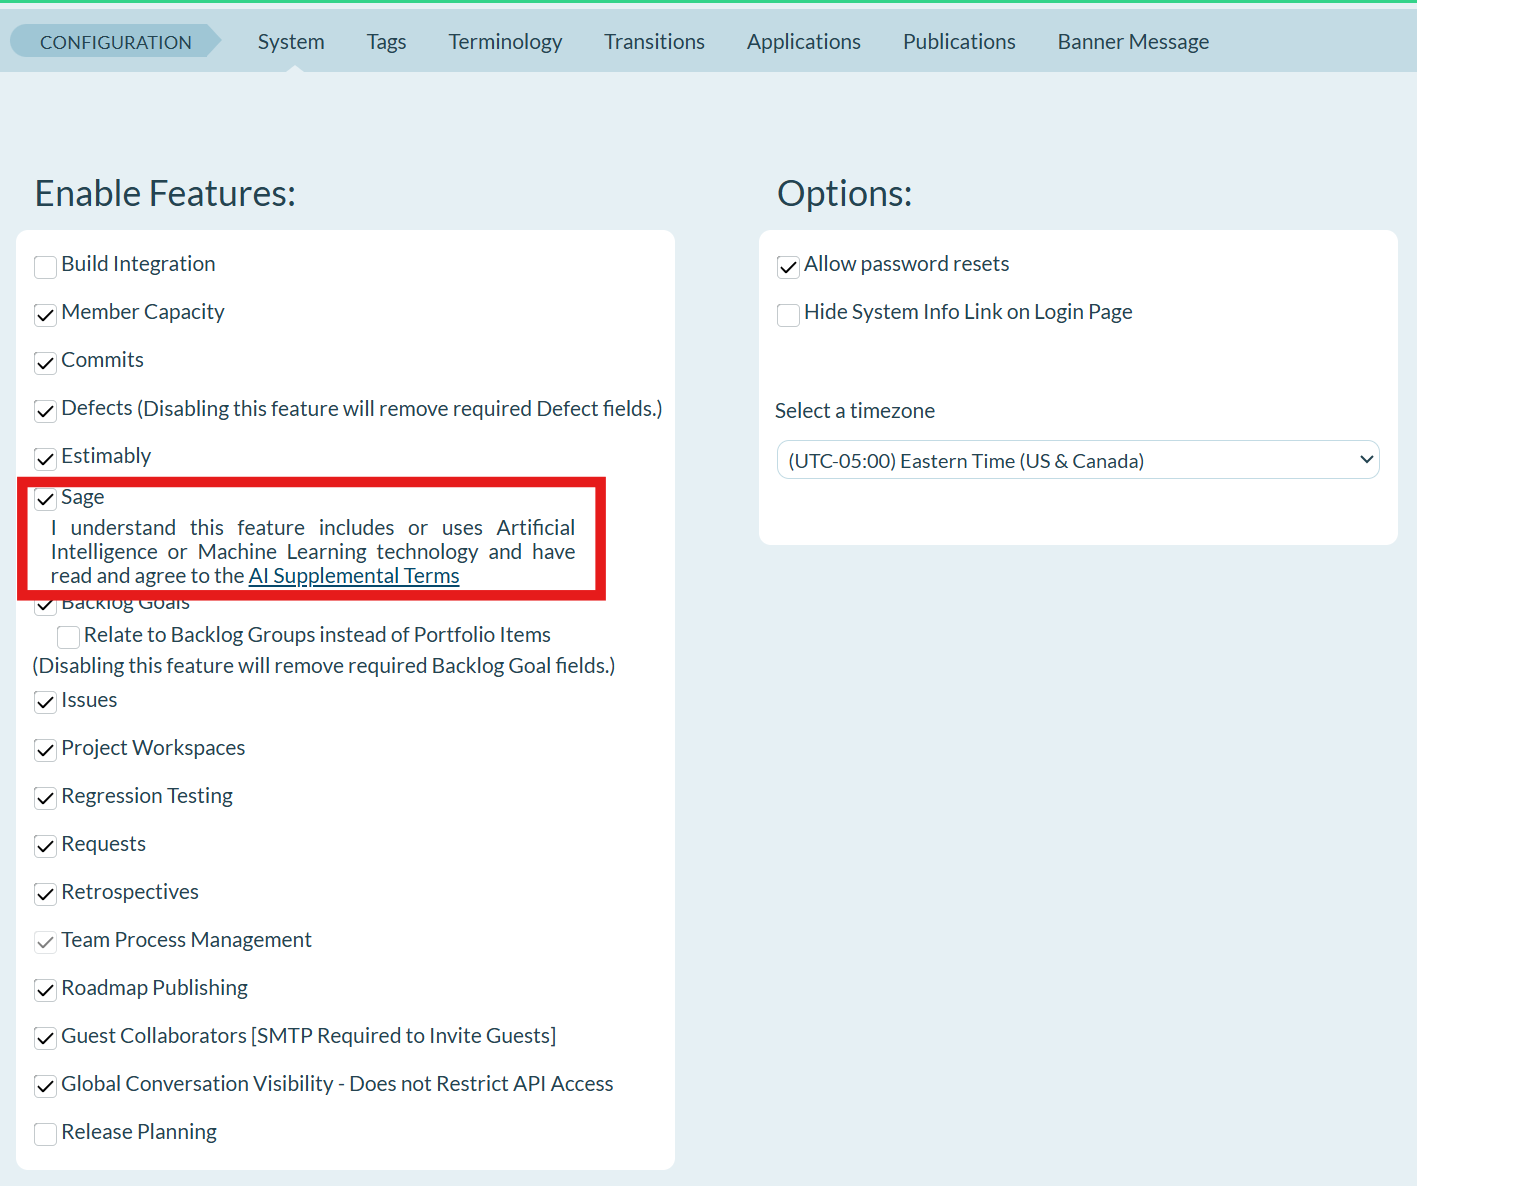
- Click Save.
Enable Sage for Your User Account
After an administrator enables Sage at the system level, each user must enable it in their personal preferences.
- Click your Agility Profile icon.
- From the pop-up menu, select Agility Preferences.
- Click on AI Supplemental Terms and read provided information.

- If you've read and agree to the AI Supplemental Terms, you can now enable Sage.
How to Access Sage
- Click the hamburger menu
> Rooms > All Team Rooms.
- Select a Team Room name and click Try Rooms 2 button
 on the right side of the selected Team Room.
 - Open a Story or Defect. Sage is available on the right side panel.
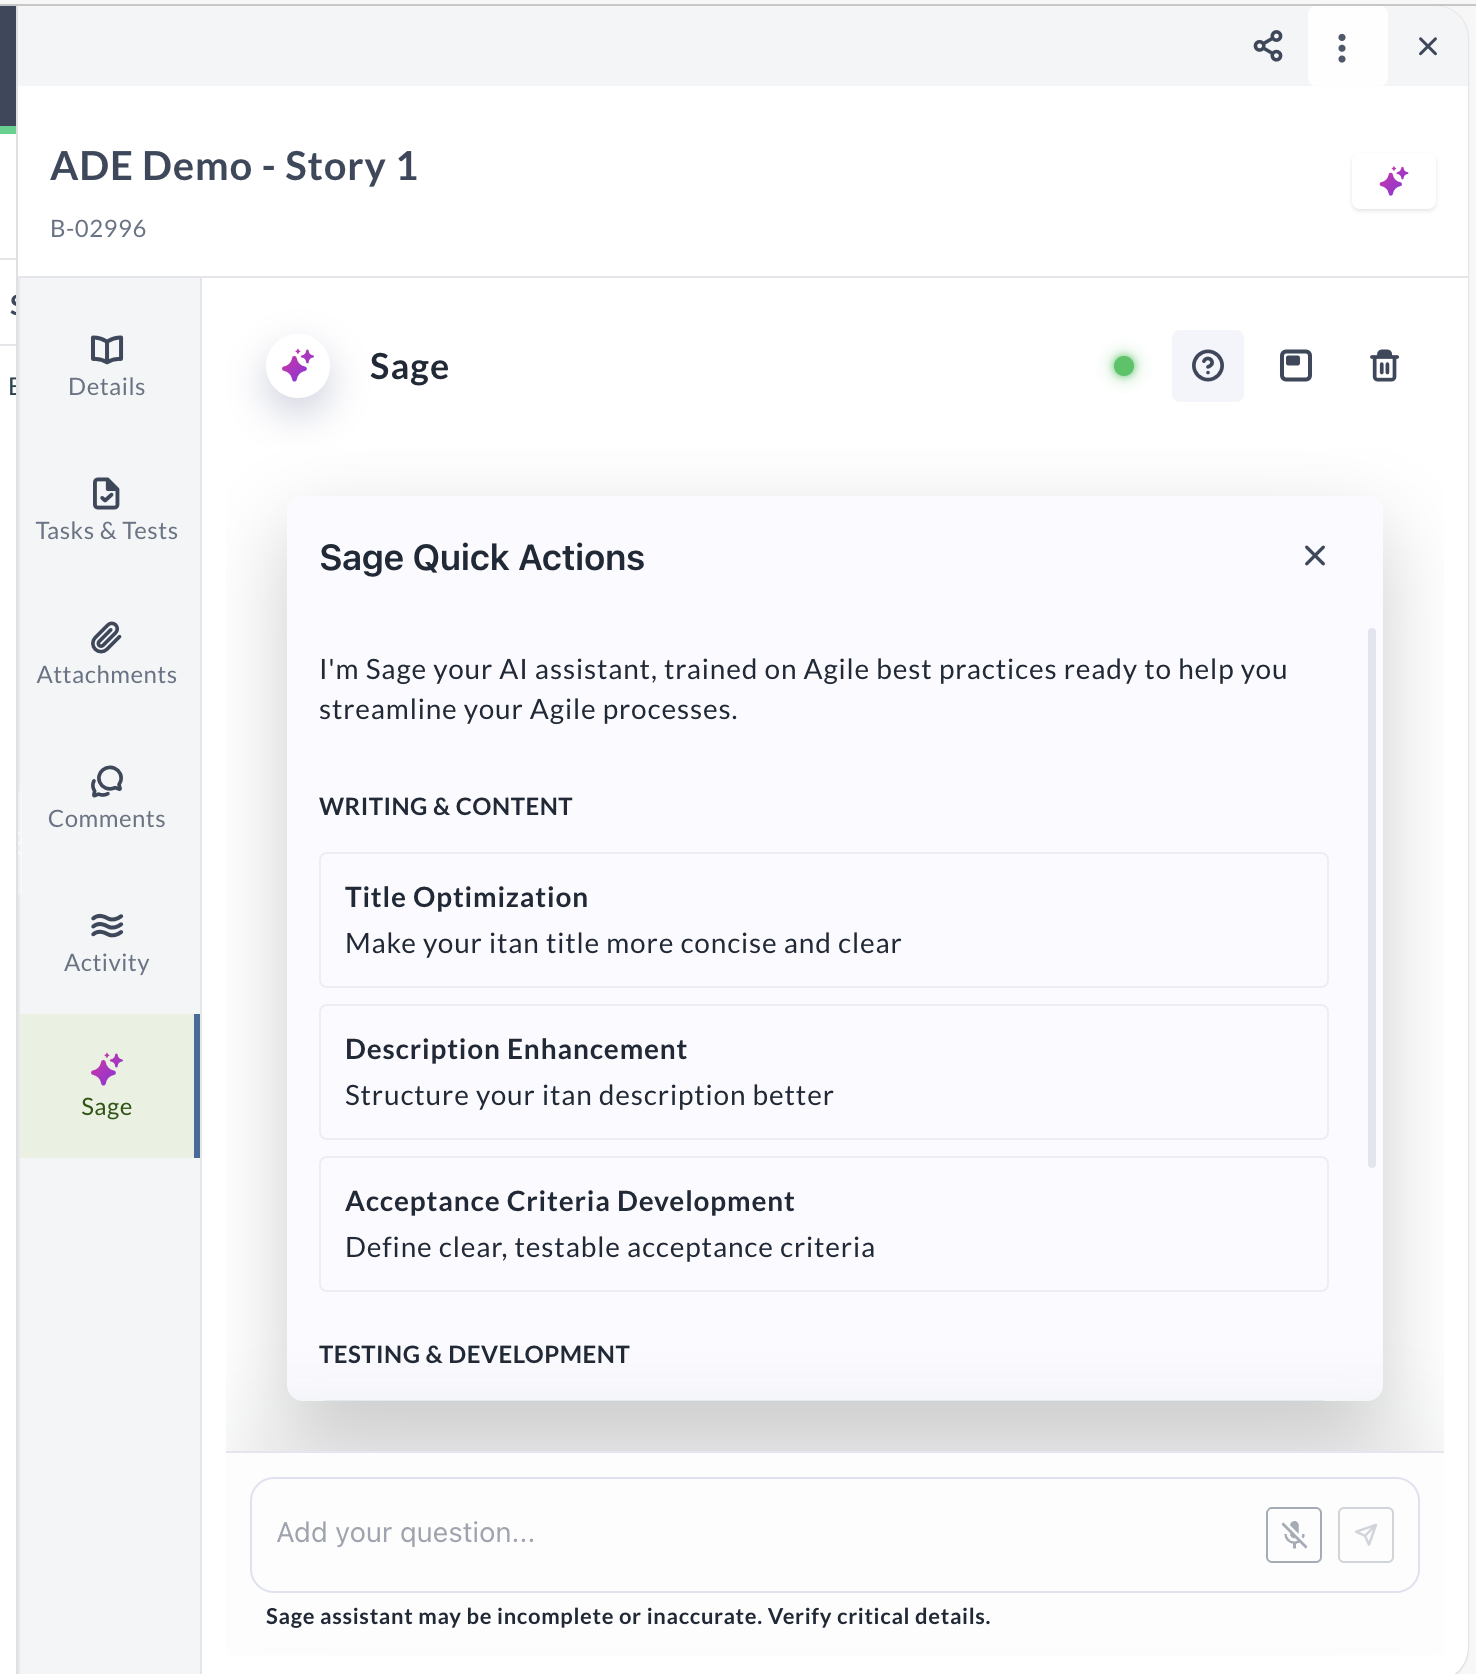
- Check the LLM availability indicator at the top of the Sage panel to confirm the AI service is ready to respond.
- Type your question or instruction in the message box (for example: Improve the description, Add acceptance criteria) or click the microphone icon to use voice input with speech recognition.
- Press Enter or click Send.
- Follow prompts. Sage responds conversationally and guides you on what can be improved.
- Sage can help you:
- Improving work item title to be more concise and clear
- Enhancing Description to include more technical information
- Define clear, testable Acceptance Criteria
- Suggest specific implementations for Tasks
- Recommend comprehensive Test cases
- Create child assets (Tasks, Tests, Stories, Defects) with required field validation
- Review and apply Sage's suggestions.
Use Voice Input with Speech Recognition
Sage supports speech recognition, allowing you to interact with the AI assistant using your voice instead of typing.
Supported browsers:
- Google Chrome — Fully supported
- Microsoft Edge — Fully supported
- Safari — Supported with a limitation: you must manually stop the speech-to-text process when using voice input
- Firefox — Not supported
Use Google Chrome or Microsoft Edge for full Sage functionality, including voice input.
To use voice input:
- Click the Sage icon in the Asset Detail Drawer to open the Sage panel.
- Click the microphone icon in the message box.
- Speak your question or instruction clearly.
- Sage converts your speech to text and processes your request.
- Review the AI-generated response and apply suggestions as needed.
Voice input is useful when you need hands-free interaction or prefer speaking to typing, especially during collaborative sessions or when working through multiple work items quickly.
Use Sage in Floating Window Mode
Sage can be opened in a floating window, allowing you to access the AI assistant while navigating different sections of your work item or switching between work items.
To open Sage in floating window mode:
- Click the Sage icon in the Asset Detail Drawer to open the Sage panel.
- Click the floating window icon in the top right corner of the Sage panel (next to the help icon).
- Sage opens in a separate floating window that stays on top of your workspace.
- Continue working in the Asset Detail Drawer or navigate to other work items while keeping Sage accessible.
To return Sage to sidebar mode:
- In the floating window, click the > icon.
- Sage returns to the sidebar panel within the Asset Detail Drawer.
Floating window mode is useful when you need to reference Sage suggestions while editing multiple fields, switching between tabs (Details, Tasks & Tests, Activity), or working across different work items without losing your conversation context.
Add Child Assets with Sage
Sage can create child assets for Epics, Stories, and Defects while respecting required field validations. Ask Sage to add child work items using natural language, and the AI assistant handles the creation process including validation of all required fields.
Supported Parent Asset Types
Sage can create child assets for the following parent work item types:
- Epics — Create child Portfolio Items, Stories, or Defects
- Stories — Create child Tasks or Tests
- Defects — Create child Tasks or Tests
Add a Child Asset
- Open the parent work item (Epic, Story, or Defect) in the Asset Detail Drawer.
- Click the Sage icon to open the Sage tab.
- Type your request using natural language. Examples:
- "Add a story to this epic"
- "Create a task for this story"
- "Add a test to this defect"
- Press Enter or click Send.
- Sage analyzes your request and presents a creation form with pre-filled fields:
- Title field populated based on your request or parent work item context
- Description field with relevant details derived from the parent work item
- Additional required fields if applicable to the asset type
- Review the pre-filled information in the form.
- Choose an action:
- Click Accept to create the child asset with the pre-filled values
- Click the edit icon to modify fields before creating the asset
- Click Reject to cancel the creation
- If you accept or complete editing, Sage creates the child asset and confirms the creation.
The new child asset is automatically linked to the parent work item and appears in the appropriate section of the Asset Detail Drawer.
Required Field Validation
Sage validates all required fields before creating child assets:
- Sage analyzes the parent work item and your request to pre-fill required fields
- The creation form displays all fields with suggested values
- If required fields cannot be pre-filled, they appear empty in the form for you to complete
- You can review and edit any field before clicking Accept
- Sage prevents creation if required fields remain empty
This ensures child assets are created correctly with all mandatory information.
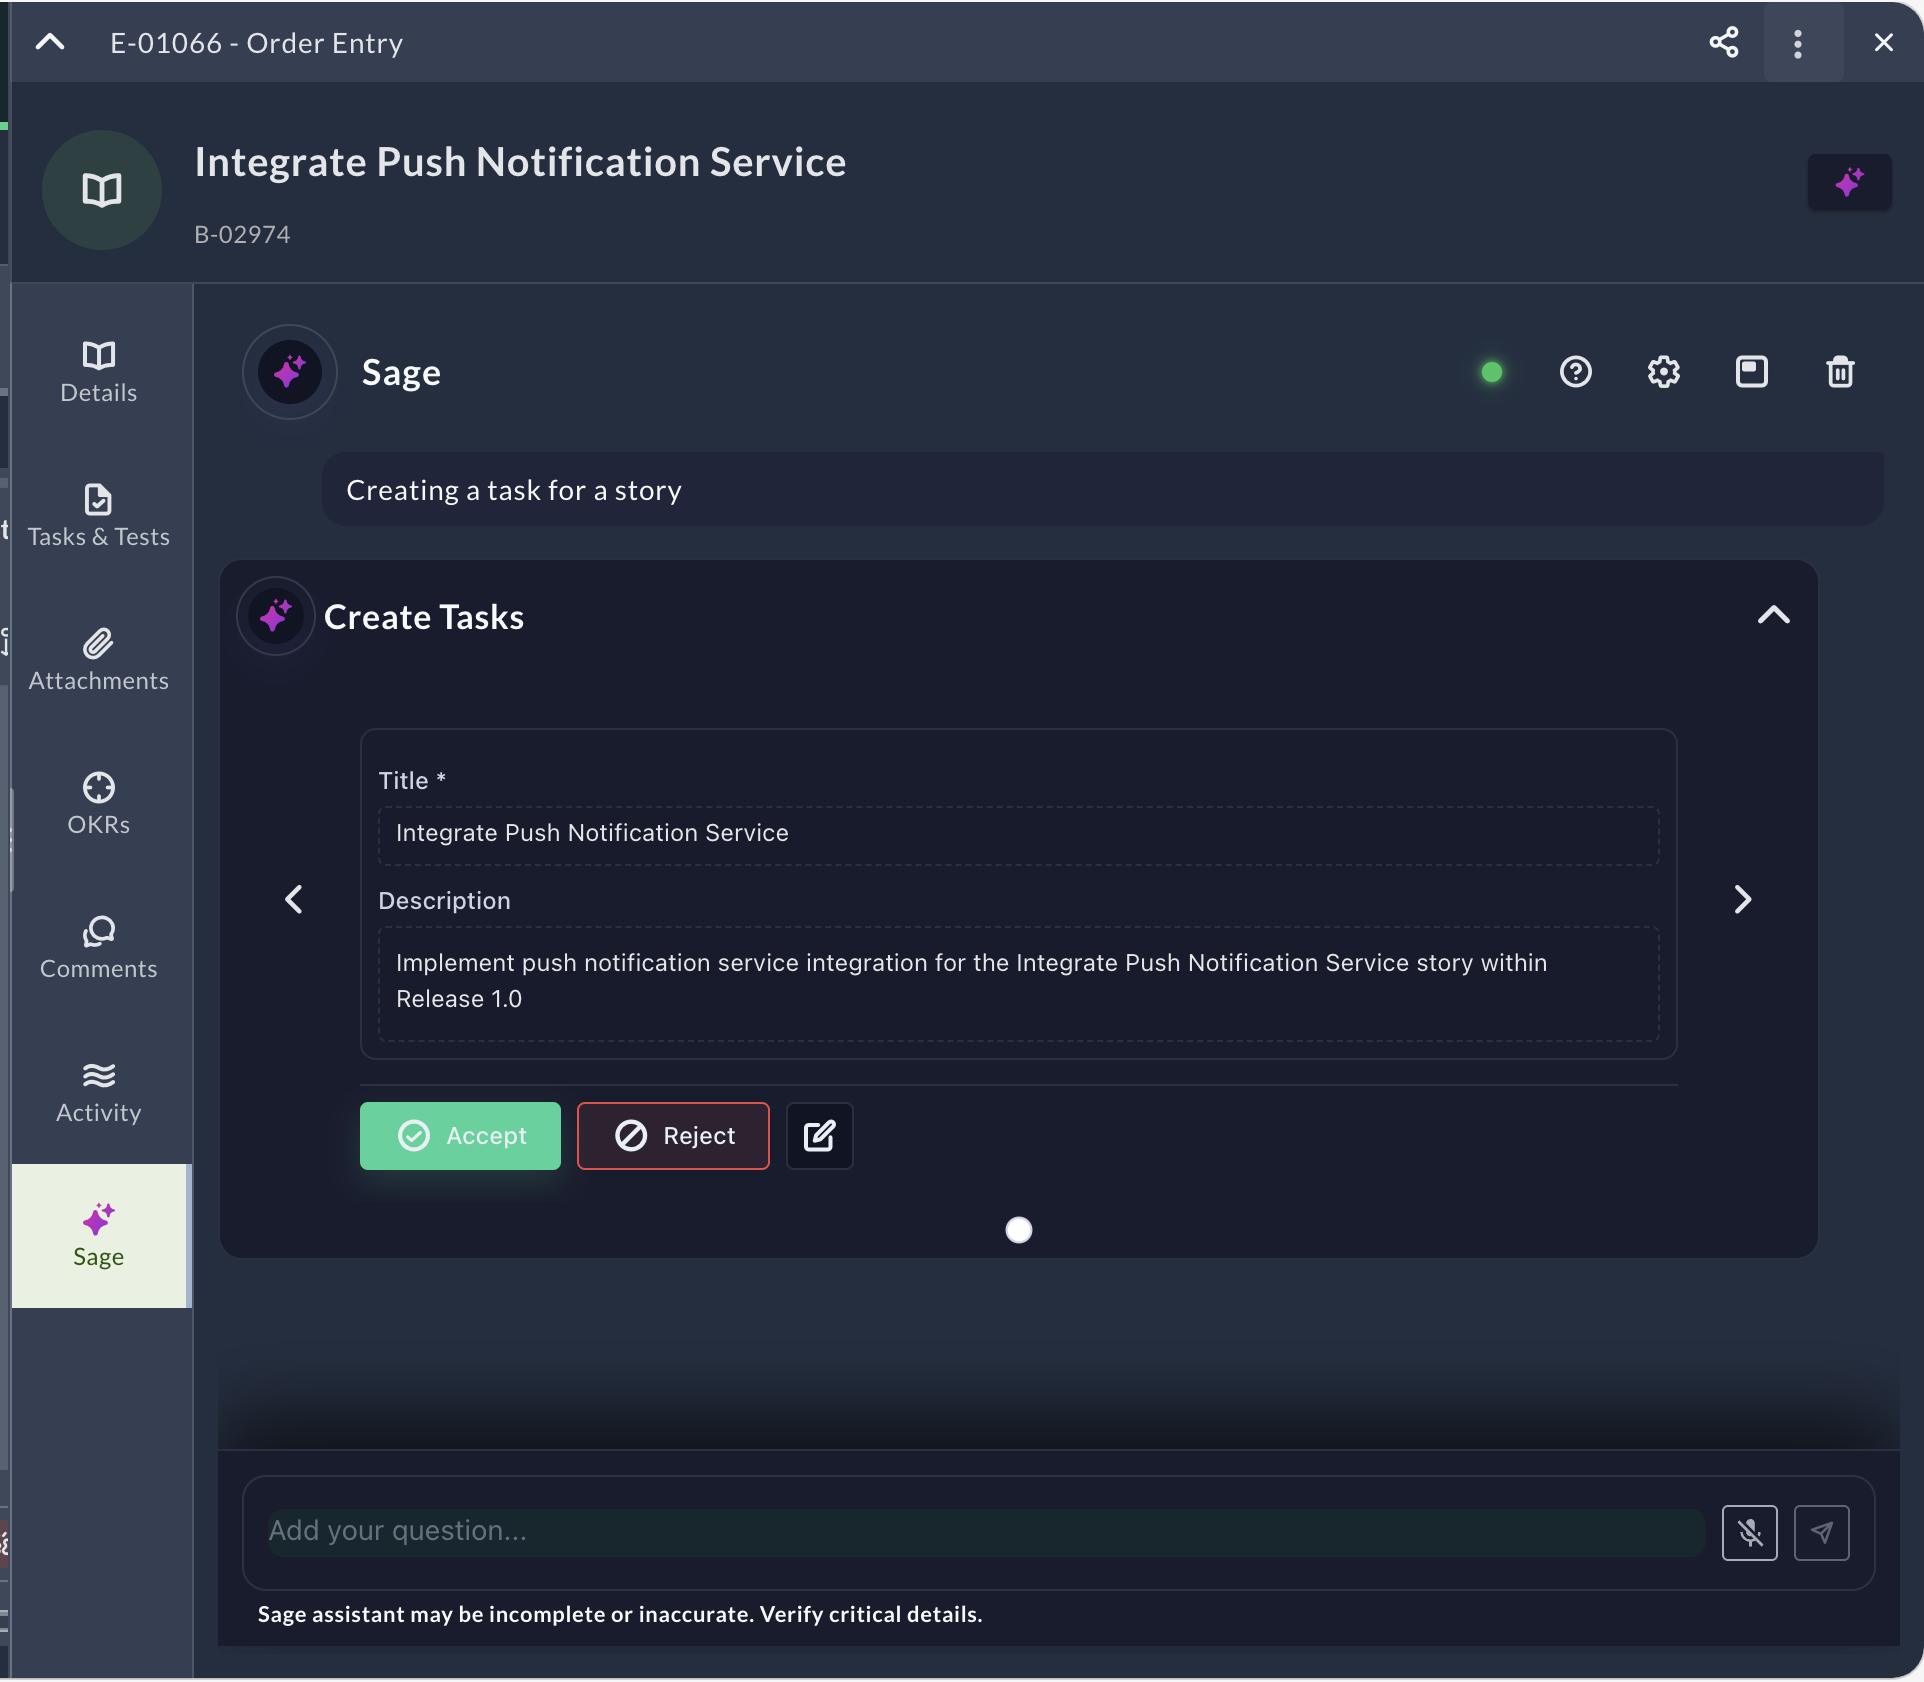
Example Workflow
Creating a task for a story
- Open a Story in the Asset Detail Drawer.
- Open the Sage tab.
- Type: "Create a task for this story"
- Press Enter or click Send.
- Sage presents a Create Tasks form with:
- Title pre-filled (for example, "Complete Rooms 2 updates for May 22 - Documentation")
- Description pre-filled with context from the parent story
- Any additional required fields displayed
- Review the pre-filled information.
- Click Accept to create the task, or click the edit icon to modify fields first.
- Sage creates the task and confirms the creation.
The new task appears in the Tasks & Tests tab of the parent story.
Tips and Notes
- Check the LLM availability indicator before interacting with Sage to ensure the AI service is online.
- Verify suggestions—AI-generated output may not be accurate.
- Use Sage during story refinement to improve clarity and quality.
- Use voice input for faster interaction when reviewing multiple work items.
- Use floating window mode to keep Sage accessible while navigating between work item sections or switching work items.
Generate Release Notes
Sage automatically generates structured release notes for your releases based on the stories and defects included in the release.
Prerequisites
Before you can generate release notes:
- Sage must be enabled at the system level and for your user account
- The release must contain at least one story or defect
- You need permission to view the release and its associated work items
Generate Release Notes for a Release
- Navigate to Release Planning Board by clicking the hamburger menu > Release Planning.
- Select your Value Stream from the list.
- Click on a release name to open the release details drawer.
- Click the Sage tab to open the Sage panel.
- Click Release Notes Generation in the Quick Actions section.
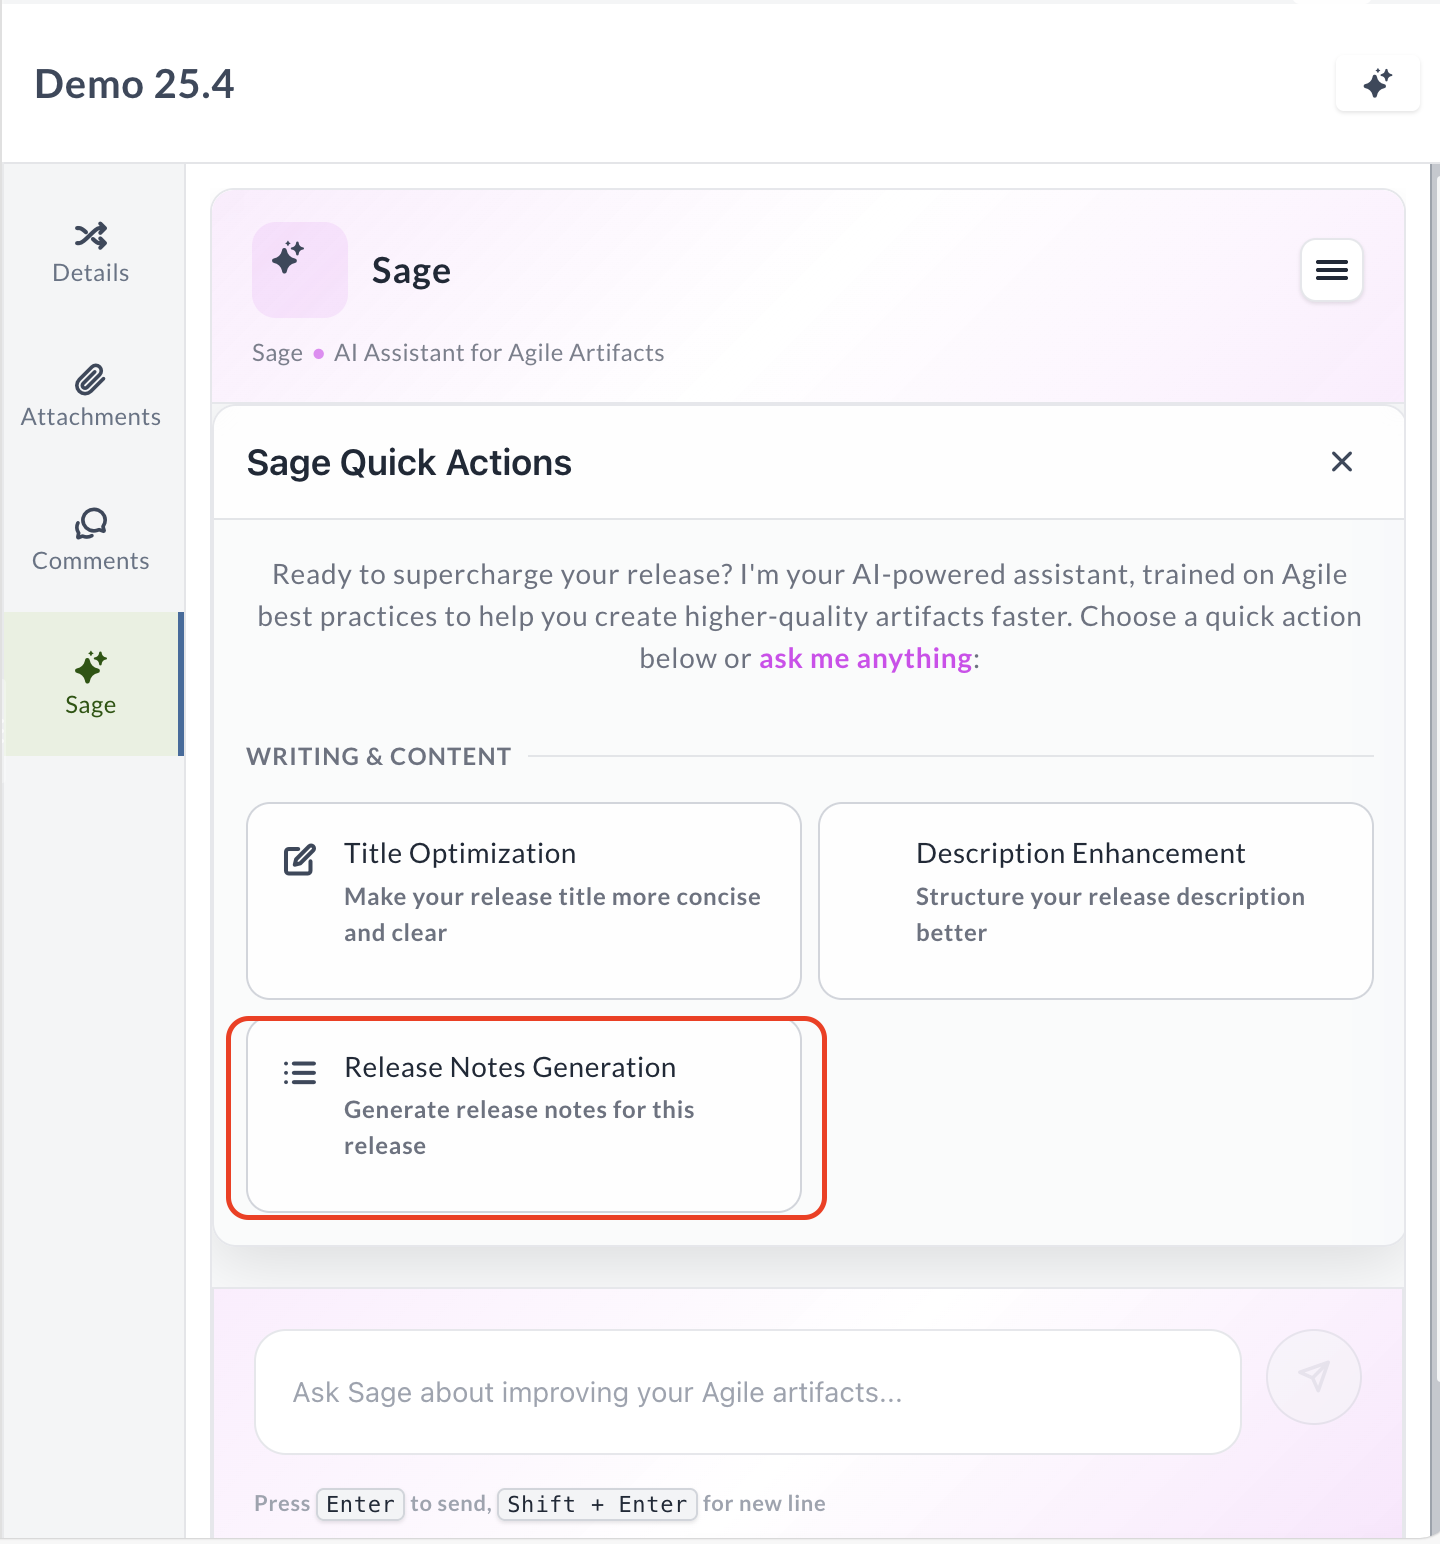
Sage analyzes all stories and defects associated with the selected release and generates comprehensive release notes.
Understand the Generated Content
The generated release notes include:
- New Features & Enhancements — Key features and improvements delivered in the release
- Critical Fixes — Important defect fixes and resolutions
- Technical Updates — Technical improvements and system changes
The release notes are formatted in a professional structure ready for distribution to stakeholders.
Refine the Generated Notes
After Sage generates the release notes:
- Review the generated content in the Release Notes Generator dialog.
- Type instructions in the message box to refine the output (for example: "Make it shorter" or "Add more technical details").
- Press Enter or click Send.
- Copy the final release notes for use in your release communications.
Tips for Release Notes Generation
- Ensure stories and defects have clear, descriptive titles and descriptions for better quality release notes.
- Review and verify the generated content—AI-generated output may not be accurate.
- Use this feature to save time creating release documentation for stakeholders.
Troubleshooting
Sage panel doesn't appear in release details
Verify Sage is enabled at the system level and in your user preferences. If you haven't enabled Sage in your Agility Preferences, you won't see the Sage panel.
Release Notes Generation option is missing
Ensure the release contains at least one story or defect. The release notes generation feature requires work items to analyze.
Generated notes are incomplete or missing items
Check that all stories and defects are properly associated with the release. Items without clear titles or descriptions may not be included in the generated output. Verify you have permission to view all work items in the release.
Generated content isn't accurate or relevant
Review the titles and descriptions of your stories and defects. Sage relies on this content to generate release notes. Clearer, more descriptive work items produce better release notes. You can also ask Sage to refine the output with specific instructions.