SeeTestAutomation- Troubleshooting for Android 6 (Marshmallow)
Please note that this tool is classified as a Legacy tool. We recommend transitioning to our updated solutions to maintain optimal performance and security in your workflows. For more information on this matter, please reach out to technical support .
You may experience difficulties when connecting Android 6 Nexus devices after following the instructions in SeeTestAutomation - Connecting An Android Device.
To resolve this issue please follow these instructions:
-
Connect your device to the USB port - Android 6 supports 4 USB modes. You must choose 'charging' mode when the device is connected to your PC.

-
Check the status of the device using 'adb devices' command:
Open Command Prompt and Go to: <installation folder>\bin\adb\ and run the command 'adb devices'.
After doing that you will get one of the following results:-
If the device status is "device" the device is successfully connected.
-
If the device status is 'Error' or 'Unauthorized' please follow the instructions at SeeTestAutomation - Troubleshooting Android Connectivity.
-
If the device SN is not showing at all, continue to the next step.
-
-
Install Android SDK tool - download the latest version of Android SDK from http://developer.android.com/sdk/installing/index.html?pkg=tools
-
Install Google USB Drivers:
-
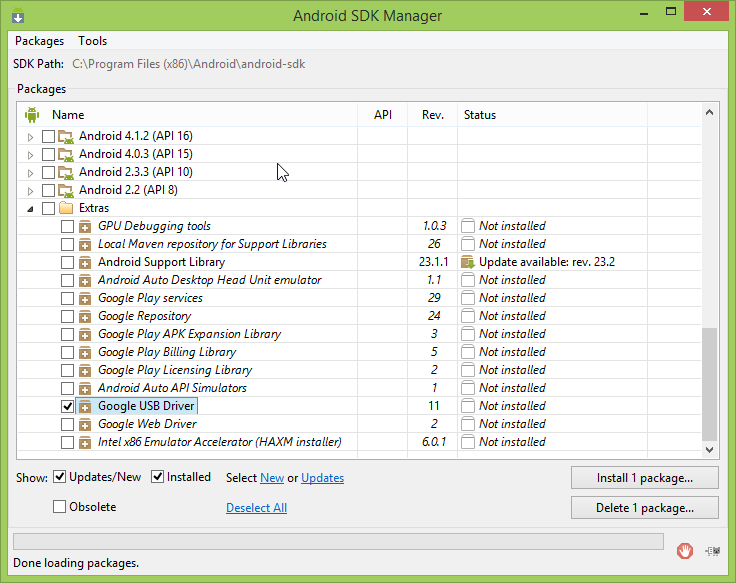
Open Android SDK Manager as an admin user (can be found in the Android SDK installation folder).
-
In the package "Extras" select "Google USB Driver".
-
Click on the install button.

-
-
Reinstall device driver:
-
Open Device Manager.
-
Under 'Android Devices' right click on 'Android Composite ADB Interface'.

-
Click 'Uninstall' and check the box. Click 'OK'.

-
-
Reconnect the device - disconnect the device from the PC and connect it again. Wait for windows to install the driver of the device.
-
Verify that the device has been successfully connected by repeating step 2.