Update Dates using Roadmap
Update planned delivery dates for portfolio items using drag and drop on roadmap layouts or by editing date fields directly on the portfolio item details page.
Permission requirement: Updating portfolio item dates requires modify permissions on the portfolio items being updated.
Who Updates Portfolio Item Dates
Date management on roadmaps supports different planning scenarios:
- Portfolio Managers adjust portfolio item dates to reflect strategic priority changes and coordinate delivery across programs.
- Product Owners update planned dates based on capacity constraints, dependencies, and stakeholder commitments.
- Program Managers modify dates during PI planning to align portfolio items with program increment boundaries.
- Release Managers adjust portfolio item dates to balance workload across releases and ensure realistic delivery timelines.
Drag and Drop on Board Layout
Quickly adjust delivery dates by dragging portfolio items to different time period columns on the Board layout.
- Click the hamburger icon
 > Portfolio > Roadmaps.
 - If not already selected, choose a project from the Project Navigator.
- Click the Board
 layout button.
 - Select a portfolio item and drag it to the desired time period column.
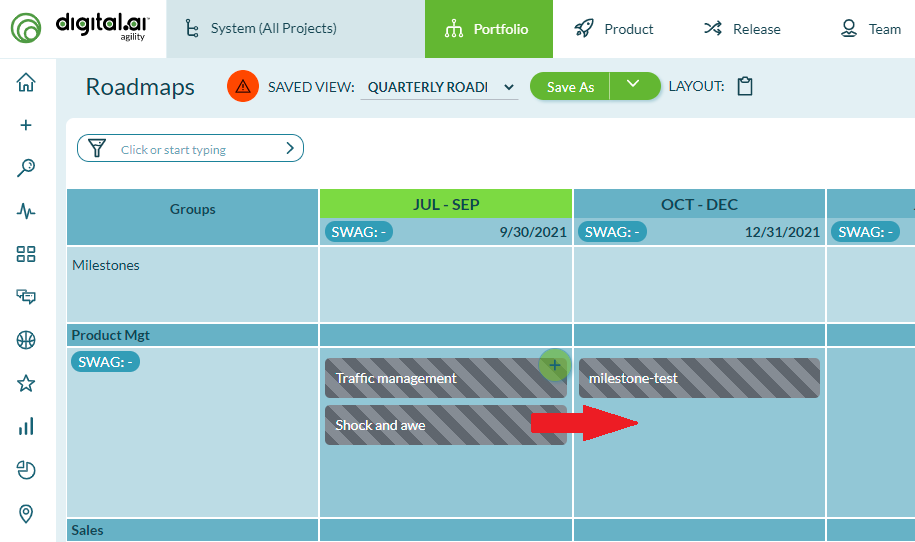
The portfolio item's planned begin and end dates are updated to match the target time period.
Drag and Drop on Timeline Layout
Adjust start and end dates by dragging portfolio items along the timeline to visualize scheduling changes.
- Click the hamburger icon > Portfolio > Roadmaps.
- If not already selected, choose a project from the Project Navigator.
- Click the Timeline
 layout button.
 - Select the portfolio item you want to modify.
- Drag the item and drop it on the new date position.
The planned begin and end dates on the portfolio item are modified based on the new timeline position.
Edit Dates on Portfolio Item Details Page
Set specific planned begin and end dates by editing the portfolio item directly.
- Click the hamburger icon > Portfolio > Roadmaps.
- If not already selected, choose a project from the Project Navigator.
- Click Layout (Timeline) or (Board).
- Click on a portfolio item to open the details page.
- Click Edit and scroll to the Planned Begin and Planned End date fields.
- Select the desired dates from the pop-up calendar.
- Click Save.

These directly assigned dates override any dates inherited from the parent project.
Assign Portfolio Item to a New Release
If a portfolio item has no directly assigned planned dates, its date range is determined by the project (release) dates. Moving the portfolio item to a different release automatically updates its roadmap position.
To reassign a portfolio item to a new release:
- Navigate to the Release Scheduling page.
- Select the portfolio item.
- Move it to the target release.
The portfolio item's position on the roadmap updates automatically to reflect the new release dates.
Reset to Project Dates
To remove directly assigned planned dates and return to using project/release dates:
- Open the portfolio item details page.
- Click Edit.
- Clear the Planned Begin and Planned End date fields.
- Click Save.
The portfolio item now inherits dates from its parent project.
Best Practices
Use drag and drop for quick adjustments: When you need to rapidly shift delivery timelines, use drag and drop on either layout for immediate visual feedback.
Set explicit dates for fixed commitments: For portfolio items with firm delivery dates that shouldn't change with project dates, set explicit planned begin and end dates.
Leverage project dates for flexibility: Leave planned dates empty on portfolio items that should automatically adjust when project timelines change.
Visualize impacts on Timeline: Use the Timeline layout to see how date changes affect workload distribution and identify potential capacity issues.
Troubleshooting
Why can't I drag portfolio items to new dates?
Drag and drop requires modify permissions on the portfolio item. Verify you have appropriate permissions. Also confirm the portfolio item isn't closed—closed items cannot be moved. If you're viewing a published roadmap, you're in read-only mode and cannot make changes. Switch to the editable roadmap view to modify dates.
Why do dates revert after I drag an item to a new position?
If a portfolio item has no explicit planned dates and inherits dates from its parent project, dragging the item sets explicit dates. However, if someone subsequently clears those explicit dates, the item reverts to project dates. To maintain your date changes, ensure explicit planned begin and end dates are set on the portfolio item and not cleared.
Why does moving an item on Board layout change both begin and end dates?
Board layout columns represent time periods (weeks, months, quarters). Dragging an item to a different column adjusts both planned begin and end dates to fit within that period. The duration may change based on column size. For precise date control, use Timeline layout where you can drag items along a continuous timeline, or edit dates directly on the portfolio item details page.
Why don't date changes on the roadmap sync to other views immediately?
Date changes save automatically but may require a page refresh to appear in other views. If you update dates on a roadmap and don't see changes in the Portfolio Tree or Kanban board, refresh those pages. In some cases, browser caching may delay updates—clear your cache or use a hard refresh (Ctrl+Shift+R or Cmd+Shift+R) if changes don't appear after refreshing.
Related Topics
- Roadmapping - Overview of roadmapping concepts and capabilities
- Customize Roadmap Views - Switch between Board and Timeline layouts
- Add Portfolio Items to Roadmap - Create new portfolio items on roadmaps
- Portfolio Planning - Overview of portfolio planning capabilities
- Milestones - Mark important delivery dates for portfolio items