Customize Roadmap Views
Customize roadmap views by accessing roadmaps, switching between Board and Timeline layouts, configuring display options, and applying filters to focus on specific portfolio items.
Access Roadmaps
Navigate to the Roadmaps feature to view and manage your portfolio item delivery plans.
- Click the hamburger icon
 > Portfolio > Roadmaps.
 - If not already selected, choose a project from the Project Navigator.
- Click Layout
 (Timeline) or
  (Board).
Who Can Access Roadmaps
Access rights to Roadmaps are the same as that of portfolio items. A member's access to a roadmap is driven by their project role, as follows:
- All project members can view the roadmaps for the projects to which they have access.
- Only members with the following project roles can create, manage, and publish the roadmap: Admin, Project Lead, and Customer.
- All users with "view" access have the ability to filter and configure a roadmap they are viewing. This includes the ability to:
- Select Board layout or Timeline layout view
- Filter the contents of the roadmap
- Configure the row groupings, color options, and so on
- Configure the time scale of the Columns displayed on the Board layout
Switch Between Layouts
Choose between Board and Timeline layouts based on your planning needs.
Switch to Board Layout
Use the Board layout to focus on planned delivery across time periods organized in columns.
- Click the hamburger icon > Portfolio > Roadmaps.
- If not already selected, choose a project from the Project Navigator.
- Click the Board layout.
The Board layout displays portfolio items organized by configurable time periods (weeks, months, quarters, or years), making it easy to see what's planned for delivery in each time period.
Switch to Timeline Layout
Use the Timeline layout to see the duration of work and understand scheduling over time.
- Click the hamburger icon > Portfolio > Roadmaps.
- If not already selected, choose a project from the Project Navigator.
- Click the Timeline layout.
The timeline opens with a red vertical line centered on the current date.
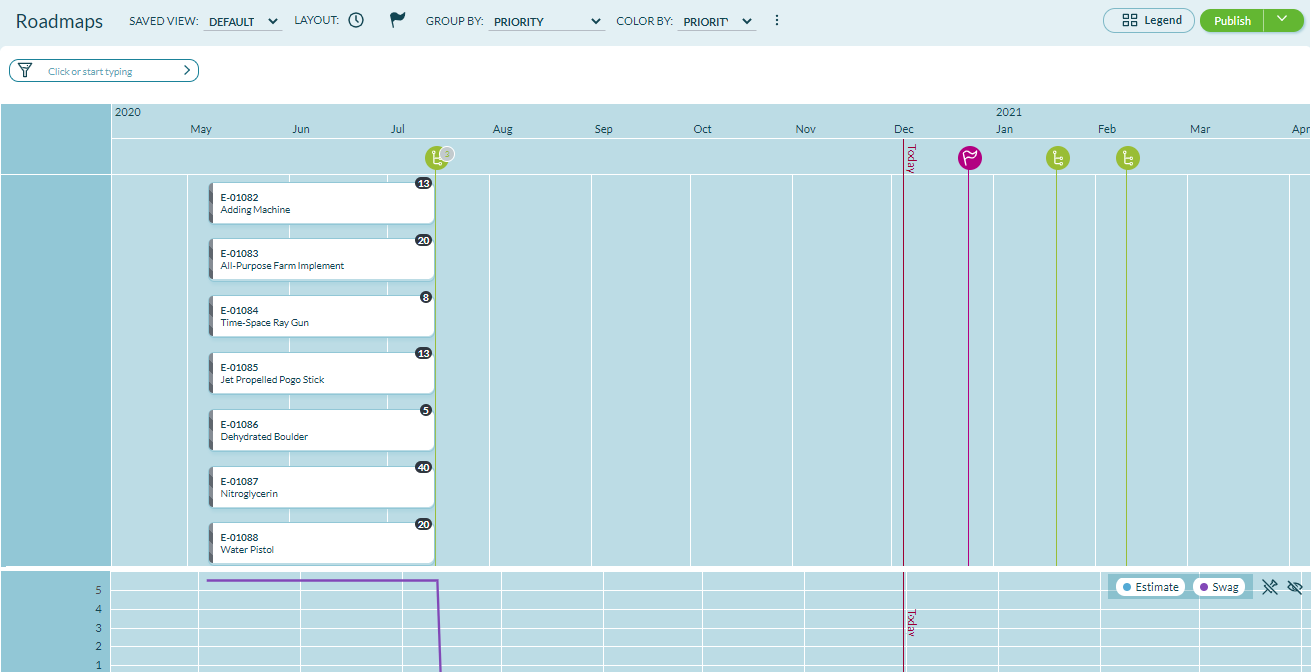
Use the Timeline Layout
The Roadmap Timeline shows portfolio items in a project as they pertain to the scheduling and delivery of work initiatives, features, and sub-features. Use it to track and drive portfolio item scheduling over a range of time.
You can use the Roadmap Timeline in the following ways:
- Plan and communicate: Show current and future portfolio item delivery
- View history: See historical delivery of portfolio items
- Drill down: View the next level of detail, priorities, and progress from a single view
- Analyze workload: Use the graph at the bottom to see daily totals of Estimate (rolled up from contained backlog), Swag (from included estimates), or both
- Use organizational velocity as a guide in planning future high-level work
- Understand the organizational velocity achieved in delivering past portfolio items
- Identify peaks or valleys in expected organizational workload
- Adjust schedule: Drag items on the timeline to change dates
If a portfolio item has no Planned Begin Date, it is placed on the timeline starting on the Project Start Date.
Expand or Narrow the Timeline View
You can adjust the timeline granularity by dragging the timeline table to the left or right:
- Wider date range: Expand the timeline to see monthly or quarterly views
- Granular view: Narrow the date range to see week-by-week details
- Historical data: Go back in time to check historical portfolio item data
- Future plans: Scroll forward to analyze planned portfolio items
If the planned portfolio item's beginning and ending dates are not set, the timeline defaults to the start and end dates on the portfolio item's project/release.
Note: When viewing the timeline layout of the roadmap, if no items are displaying, confirm the Windows System Font size is set at 100%, and the browser is not zoomed past 100%. Reset and refresh the page.
Configure Board Layout
Configure the columns, time periods, grouping, and display options for the Roadmap Board layout to match your planning needs.
Access Configuration
When using the Board layout, you can control the size and number of columns displayed. Use the gear icon to access the configuration.
- Click the hamburger icon > Portfolio > Roadmaps.
- If not already selected, choose a project from the Project Navigator.
- Click the Board layout.
- Click the Configuration
 icon to open configuration options.
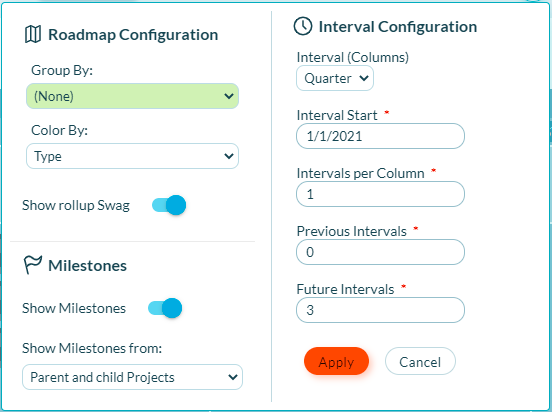
Configuration Options
| Option | Description |
|---|---|
| Group By | Displays Portfolio Items in groups. Available options include Status, Priority, Project, Planned Release, Objective, Key Result, Strategic Themes, and others. See Group By Options below for details. Note: When you choose "Project - Level" or "Strategic Themes - Level" group by options, you cannot create a new portfolio item on the roadmap. |
| Color By | Displays Portfolio Items by color type. |
| Show Rollup Swag | Toggle to enable or disable the ability to display the row-wise and column-wise SWAG rollups on the Roadmap |
| Show Milestones | Toggle to enable or disable the ability to display milestones on the Roadmap |
| Show Milestones from | Toggle to choose if milestones are displayed for both parent and child projects or for child projects only |
| Interval (Columns) | Specify the time period represented in each column. Choose between Weeks, Months, Quarters and Years. This option is used in combination with the Intervals per Column option to determine the length of each columnar period. |
| Interval Start | The anchor date for the roadmap. Enter the beginning date of the current period. You won't need to update the Start Date as time moves on. The roadmap is smart enough to understand when the current period starts based on the originally entered Start Date, so this is really a 'set it and forget it' entry. |
| Intervals per Column | The number of intervals in a column. Allows you to have intervals of 1 Quarter or 10 Weeks. This option is used in combination with the Interval (Columns) option to determine the length of each columnar period. |
| Previous Intervals | It is often helpful to see what was scheduled for at least the last period. Some groups want to understand more of the recent history. This allows you to keep some amount of history visible when using your roadmap by controlling the number of periods to show before the current period. |
| Future Intervals | How far out do you want to plan? This sets the number of periods you will see after the current period. |
Group By Options
The Group By dropdown provides several options for organizing portfolio items on your roadmap. Different grouping options have specific behaviors:
Objective and Key Result Grouping:
- When you select Objective or Key Result, only the objectives or key results that have associated portfolio items are displayed
- Portfolio items associated with multiple objectives or key results appear in separate rows for each association
Planned Release Grouping:
- When you select Planned Release, only the releases that have associated portfolio items are displayed
For step-by-step instructions on using these grouping options, see the sections below.
Group Portfolio Items by Objectives
You can organize your roadmap by Objectives to see which portfolio items contribute to specific strategic outcomes.
- Click the Hamburger icon > Portfolio > Roadmaps
- Click the Configuration icon.
- From the Group By dropdown, select Planned Release.
Result: The roadmap displays portfolio items organized by their associated planned releases. Only releases that have associated portfolio items appear on the roadmap.
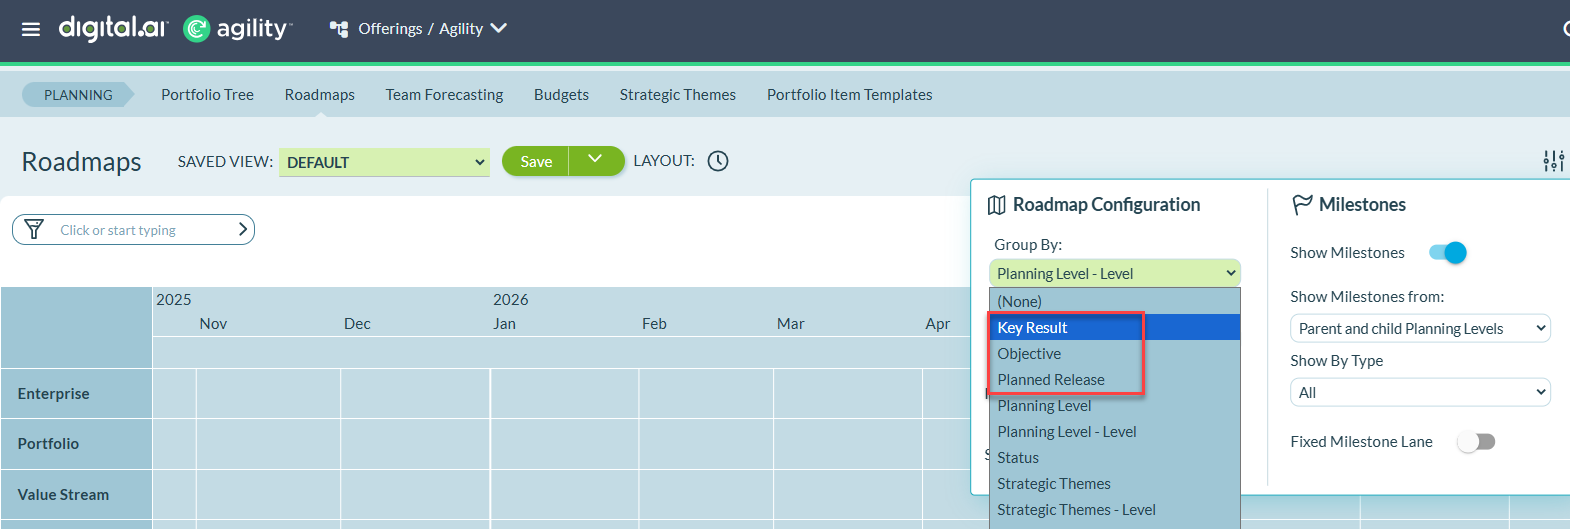
Group Portfolio Items by Key Results
You can organize your roadmap by Key Results to understand how planned work aligns with measurable outcomes.
- Click the Hamburger icon > Portfolio > Roadmaps
- Click the Configuration icon
- From the Group By dropdown, select Key Result
Result: The roadmap displays portfolio items organized by their associated key results. Only key results that have associated portfolio items appear on the roadmap.
If a portfolio item is associated with multiple key results, it appears in a separate row for each key result. :::
Group Portfolio Items by Planned Release
You can organize your roadmap by Planned Release to see how portfolio items align with each release.
- Click the Hamburger icon > Portfolio > Roadmaps
- Click the Configuration icon
- From the Group By dropdown, select Planned Release
Result: The roadmap displays portfolio items organized by their associated planned releases. Only releases that have associated portfolio items appear on the roadmap.
Configuration Tips
- Use Group By to organize portfolio items by project, strategic theme, or other attributes
- Enable Show Milestones to see key dates on your roadmap
- Adjust Previous Intervals to show recent history for context
- Set Future Intervals based on your planning horizon (quarterly, annual, etc.)
- The Interval Start date is "set it and forget it", the roadmap automatically adjusts as time progresses
Apply Filters
Use filters to expand or narrow the data on a roadmap so you can see specific portfolio item data.
Apply a Filter
- Click the hamburger icon > Portfolio > Roadmaps.
- If not already selected, choose a project from the Project Navigator.
- Click Layout (Timeline) or (Board).
- Click or start typing in the filter field, and then select any of the filter options.
- Repeat the previous step to select more than one filter.
- Click Apply when done.
Available Filters
| Filter | Action | Result |
|---|---|---|
| Portfolio Item | Type a portfolio item ID or title. | All child portfolio items display. |
| Portfolio Item Root | ||
| Rollup Category | Select an appropriate category that the portfolio items roll up to: Not Started, In Progress, or Completed, and then click Apply. | All portfolio items that are in the selected category |
| Status | Choose Status and select an available portfolio item status from the pick list. | Shows items in selected status. For example, you could look at only portfolio items having a 'Ready to Deploy' or 'Testing' status. |
| Strategic Theme | Select/search for a strategic theme. | Narrows the view to focus on the items that support a specific strategic theme. |
| Tags | Specify any tags associated with the portfolio item. | Displays the corresponding tagged portfolio items |
| Target Team | ||
| Teams | Specify the team associated with your project. | Lists all portfolio items associated with the selected teams. |
| Type | Choose a portfolio item type from the list. Key values are: - Initiative - Feature - Sub-Feature - Non-Functional | The highest-level matching portfolio items types display. For example, in a multi-level portfolio tree, you could view all top-level initiatives or focus your view to show child portfolio items that are features scheduled in releases. |
| Owner | Choose Owner and select an owner from the pick list. Click Apply Filters. | Shows parent and child portfolio items owned by the selected owner. |
| My Filters | If you have created a custom filter, select one from this list. | Shows results based on the criteria established in a custom filter. |
| Find | Enter at least 3 characters of the item name or ID | Shows items matching the search terms you entered. |
| More Filters | Click the More Filters button, and then select the filters you want to apply. | Shows the additional filters that are available for this report. |
| Include Closed Items | Select the Include Closed Items check box. | Displays work items that are in Closed status. |
Clear Filters
To clear a single filter, click the - symbol next to the name of the filter.
To remove all filters that have been applied and restore the default settings, click Clear All Filters in the top right corner of the page.
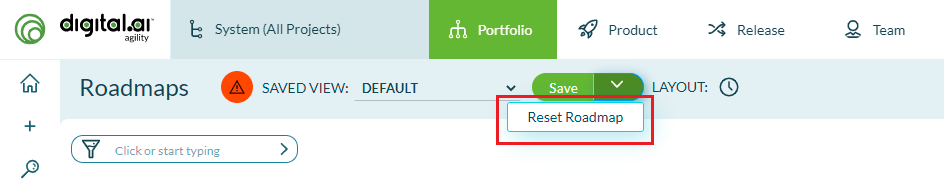
Reset to Default View
To return the roadmap to the default layout, select the Reset Roadmap option in the Save action menu. Note that any filters that have been applied will not be affected.
Troubleshooting
Why don't my filter changes persist when I navigate away?
Filters are session-based and reset when you leave the roadmap page. To preserve filter settings, save the filtered roadmap as a custom view using the Save button. Saved views capture all configuration including filters, grouping, layout, and time periods. Load the saved view to quickly restore your preferred configuration.
Why don't I see certain portfolio items after applying filters?
Filters hide portfolio items that don't match the selected criteria. If expected items are missing, review your active filters—check status filters (may be excluding open items), type filters (may be hiding specific portfolio item types), or date range filters (items may fall outside visible periods). Click "Clear All Filters" to reset and see all items.
Why does the roadmap display show different data than other users see?
Each user can apply different filters, grouping, and layout options to the same roadmap. Your view reflects your personal configuration choices. If you need everyone to see the same view, create a saved view with the desired configuration and share the saved view name with your team. All users can then load that saved view to see identical roadmap data and layout.
Why can't I configure certain roadmap options?
Configuration options depend on your permissions and the roadmap state. If you're viewing a published roadmap, you're in read-only mode and cannot change configuration. Switch to the editable roadmap to customize views. Some configuration options may also be limited based on your project role—view access allows filtering but not saving permanent views, while admin roles have full configuration capabilities.
Related Topics
- Roadmapping - Overview of roadmapping concepts and capabilities
- Add Portfolio Items to Roadmap - Create new portfolio items on roadmaps
- Update Dates using Roadmap - Modify planned delivery dates
- Save and Export Roadmaps - Save custom views and export to PDF
- Publish and Share Roadmaps - Share roadmaps with stakeholders via URL
- Portfolio Planning - Overview of portfolio planning capabilities