SeeTestAutomation - Connecting An iOS Simulator
Please note that this tool is classified as a Legacy tool. We recommend transitioning to our updated solutions to maintain optimal performance and security in your workflows. For more information on this matter, please reach out to technical support .
In addition to working with physical devices, you can also work on simulators to create and run tests.
Supported OS
iOS 10.3 and 11+ are supported
Minimum requirements
Mac machine with XCode 8+ is required.
Preliminary setup
Before working with simulators in the studio, the desired simulators must be installed through XCode.
Add simulator in the Studio
-
Click on 'Add device'
-
Choose 'iOS simulator'
-
The supported simulators will be listed in the Simulator box
-
Select a simulator from the list
-
Click OK


The simulator will be booted immediately. The first time a simulator is booted, boot might take up to 10 minutes, because it needs to be set up. Next boots should take about 1 minute, depending on your Mac's specifications.
- The first time a simulator is booted, the simulator is set up and the boot could take a long time and fail in Studio.
- Therefore, it is recommended to boot the simulator outside of the Studio first. This can be done by opening the Simulator application on the Mac machine and booting the simulator. After shutting it down, boot the simulator again in the Studio.
- Note that upgrading XCode might update iOS SDK and will require the simulator to booted as mentioned above.
Delete simulator
Deleting a simulator from the Device Manager will shut it down. A progress bar will be displayed while the shutdown is in progress.
Automating from code environment
To run automated tests on a simulator, the target simulator must be present in the Device Manager.
Currently, simulators are not saved in the Device Manager when the studio is closed.
Adding and booting simulator
If the studio is launched as part of the test running process, the addDevice command should be used.
addDevice will add the simulator to the Device Manager and boot the simulator.
After a simulator was added successfully, a test can run on it like a physical device, using setDevice and so on.
Add simulator and boot
final String simulatorSerialnumber = "AAAAAAAA-BBBBBBBBB-CCCC-DDDDDDDDDDDD";
client.addDevice(simulatorSerialnumber , "Simulator_name");

// at this point, simulator is booted and present in the Device Manager

client.setDevice("ios_app:" + simulatorSerialnumber );

/*... YOUR TEST HERE ... */

client.releaseClient();
Set or wait for simulator
When starting a test, the setDevice command can be used in the same way as it's used for physical devices.
Another option is to use the waitForDevice command. In this case, the query must contain the property @emulator='true'.
Code examples
// set device by simulator serial number
final String simulatorSerialnumber = "AAAAAAAA-BBBBBBBBB-CCCC-DDDDDDDDDDDD";
client.setDevice("ios_app:" + simulatorSerialnumber);

// set device by simulator name
final String simulatorName = "my iPhone simulator";
client.setDevice("ios_app:" + simulatorName );

// wait for any iOS simulator
client.waitForDevice("@os='ios' and @emulator='true'", 10000);
Removing and shutting down
If a simulator is already present in the Device Manager, the releaseDevice command can be used to shut it down and remove it from the Device Manager.
When executing the command, the argument RemoveFromDeviceList should be true.
Remove simulator and shutdown
final String simulatorSerialnumber = "AAAAAAAA-BBBBBBBBB-CCCC-DDDDDDDDDDDD";
// 3rd parameter is RemoveFromDeviceList
client.releaseDevice(simulatorSerialnumber , false, true, false);
- A single Client should be used for a single Simulator.
- If you want to remove a simulator and add another one, release the client the was used for removal and create a new Client for the other simulator.
Simulator applications
Building applications
iOS simulators running on your Mac run on a different architecture than physical devices. This means 'regular' application files won't work on simulators.
To build your applications for simulators:
-
Open the application project in XCode
-
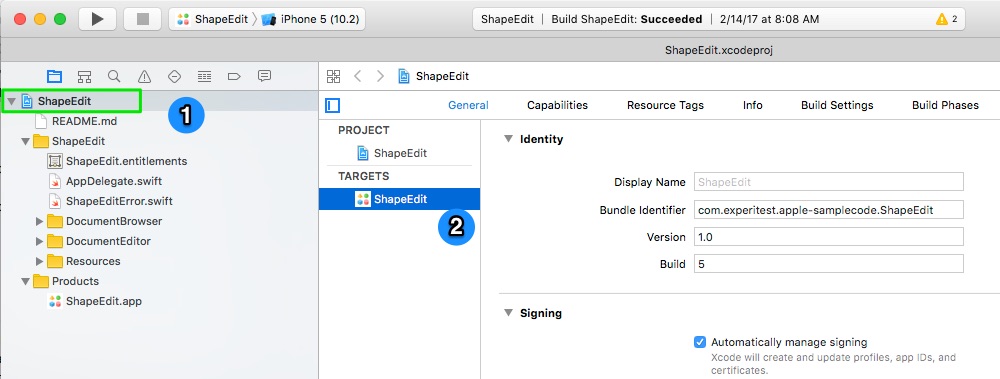
Open the project settings (1), by clicking the root file in the Project Files left pane
-
Select a build Target (2)

-
Click on Build Settings (1)
-
Under Architectures, select No in Build Active Architectures Only (2)
-
Select a simulator from the devices list (3)

-
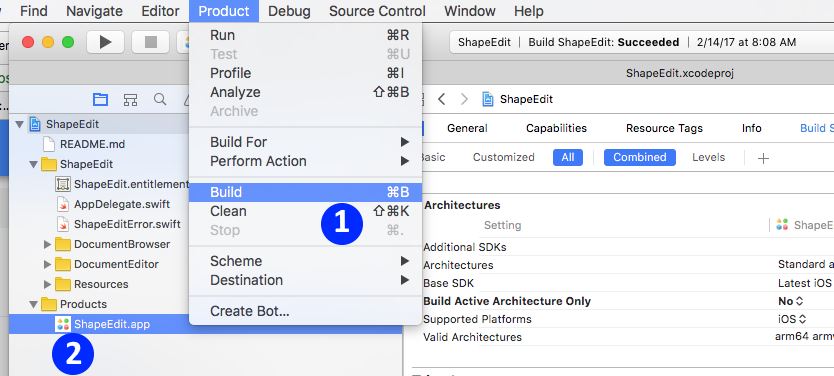
Build your application, from the Product menu click Build. (1)
-
When the build ends successfully, the output file (.app) can be taken from the Products folder (2).
-
Right-click the application under Products and select Show in Finder.
This .app file can be used for installation on simulators in the studio.
Import application to studio
Click 'Import' from the application manager and select the .app application file
Instrumentation on simulator
Instrumentation takes place on the 'launch' phase, unlike physical devices where it happens in the 'install'.
This means that even if an application is already instrumented, it will not load its instrumentation unless it will be specified in the 'launch' command to do so:
        client.install("com.experitest.UICatalog", true, false); // --> instrument parameter is not relevant
        // For instrumenting app set 'instrumentation' to true
        client.launch("com.experitest.UICatalog", true, true);
        // Same app can be launched again without instrumentation. Will update when app is relaunched so set 'stopIfRunning' to true
        client.launch("com.experitest.UICatalog", false, true);
Add new simulator
-
Open XCode
-
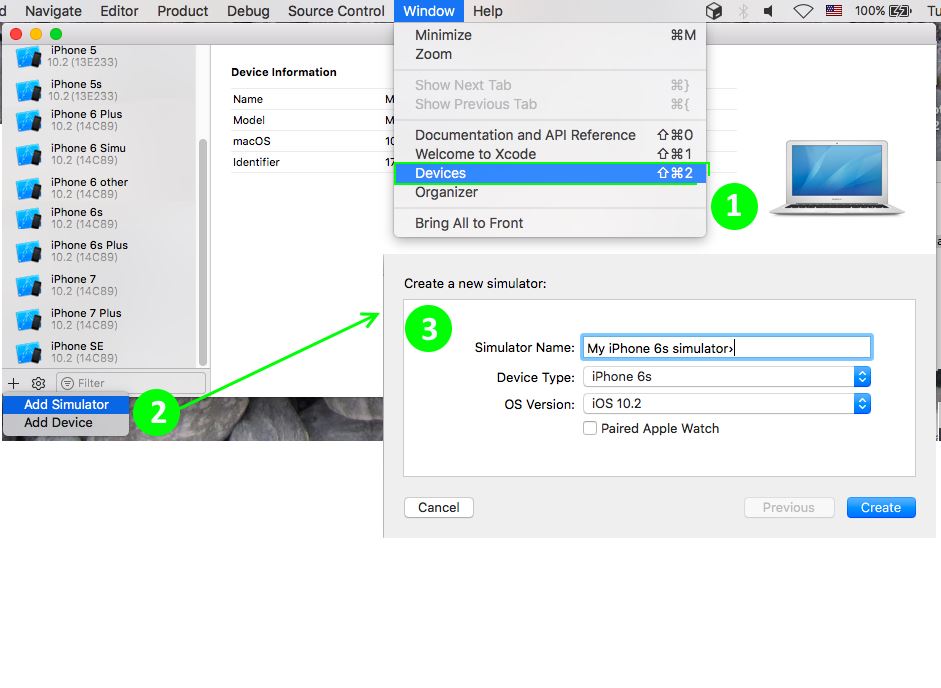
In the Window menu select Devices (1)
Currently installed simulators are listed in the left pane. -
Click on the + sign at the bottom of the list and then Add Simulator (2)
-
In the new dialog (3), choose a name for your simulator, it's iOS version and click on Create

Add new iOS version
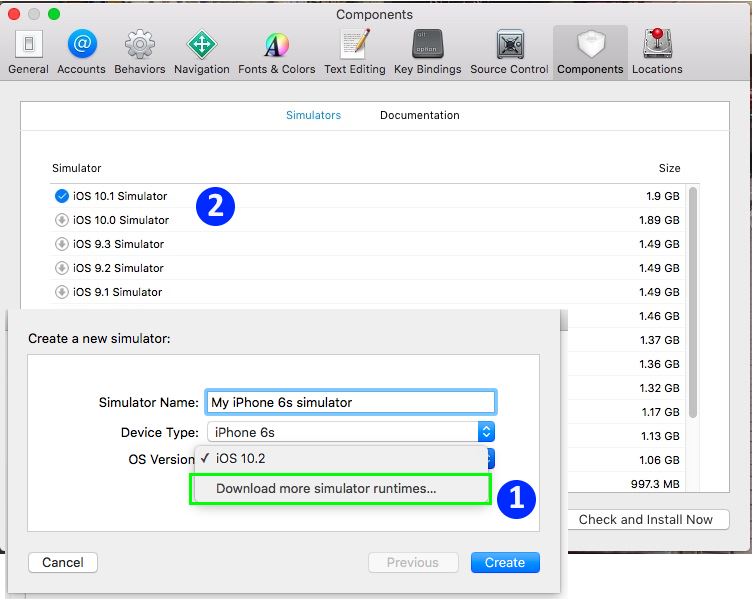
- From the 'Create a new simulator' dialog, click on the OS Version box
- Click the arrow next to the versions you wish to download

Simulator Limitations
-
Only a single simulator can be on 'Device manager' at a time. The Add Device dialog won't allow adding more simulators if there already is a simulator added.
-
To use a different simulator, the current simulator must be deleted first from the Device Manager.
-
Monitoring is not supported.
Some commands are not supported. An error message is written in the log accordingly.