Dashboards
Dashboards are created by adding and configuring different panels. A panel is build with one of the following content types:
- Pre-defined reports - Canned reports that provide a quick view of a user's most:
- Frequently Viewed Reports
- Recently View Reports
- Favorites - A user specified list of reports contained with a folder accessible from the My Personal Reports page.
- URL - Any valid URL the user has access to.
- Reports - A user specified report accessible from the My Personal Reports or Shared Reports pages.
Panels are organized into columns in the dashboard. A column may contain none to many panels but as a minimum, a dashboard must contain at least one panel to be saved.

The Dashboard Builder Panel Interface

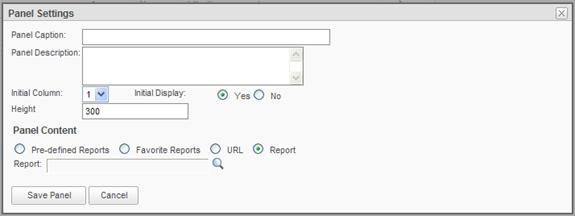
The Dashboard Panel definition dialog
To add a dashboard panel:
An unlimited number of panels can be added to a dashboard. The panels can be configured to appear in the dashboard layout using panel settings and the panel drag feature controls provided.
- Click the Add button to view the Panel Settings panel.
- Type a Name and Description for the panel in the fields provided.
- Change the Initial Column value based on where the panel should appear in the dashboard. The default value is 1.
- Change the Initial Display setting based on:
Yes - display the panel at initial viewing of the dashboard (default).
No - do not display the panel at initial viewing of the dashboard.
Note: If Initial Display = No, then the user has the option to add the panel via the Change Dashboard option within the dashboard viewer.
- Adjust the panel Height. Default value is 300 pixels. The value range of possible settings is 10 to 5000 pixels.
- Select the Panel Content type (default is Report).
- Specify the report, folder or URL in the field provided.
a. If Pre-defined reports, then select one of the listed reports and click OK.
b. If Favorites, then locate and select a Personal Reports folder and click OK.
c. If URL, then specify a URL address. Click Test URL to confirm that the URL can be viewed.
d. If Reports, then locate and select a report located in the Personal Reports or Shared Reports.
- Click Save Panel and return to the Dashboard Builder interface.
- If the dashboard had not been previously saved, then type a name for the dashboard in the field provided.
- Rearrange panels as necessary with the up/down arrows
- Click Save to store the dashboard.
Hint: The dashboard may be previewed at any time by clicking Preview Dashboard, as long as the Panel Settings panel is not being viewed.
To modify a dashboard panel:
- Hover the mouse over the
icon for the report and select Modify Dashboard Panel from the drop-down list.
- Modify the panel as desired.
- Click Save Panel and return to the Dashboard Builder interface.
- If the dashboard had not been previously saved, then type a name for the dashboard in the field provided.
- Click Save to store the dashboard definition.
To delete one or more dashboard panels:
- Select the desired panel(s) by enabling its respective check box(es).
- Click the Delete button.
- Click OK to confirm the removal.
- If the dashboard had not been previously saved, then type a name for the dashboard in the field provided.
- Click Save to store the dashboard definition.
Note: At least one dashboard panel must exist in order to save the dashboard.
To modify a Dashboard's Settings:
Click on the icon for the Dashboard Settings to expand the page and allow general dashboard appearance to be customized.
The Dashboard Settings panel, offers the ability to configure a dashboard's general appearance and provide an optional description. A panel's appearance is controlled by the selected Dashboard Style, which gives the dashboard a specific "look and feel". The available dashboard styles are:
- (None)
- Classic
- Gray
- Harmony
- LemonLime
- Light
- Mocha
- Nature
- Ocean
- Panel
- Professional
- RedWine
- Technology
- Tropical
- VersionOne
- Black Pearl
- Clarity
- Professional Blue
- Professional Green
- Rounded
- Silver
- Simple Blue
- Transit
Note: The Dashboard Style will not control the appearance of any of the reports viewed in a panel.
As necessary, specify or modify the Description, Dashboard Expiration Date and Header content.
In the Dashboard Header section you can choose to include the following information at the top of the Dashboard page:
- Title
- Description
- Date
- Time
TheDashboard Body attributes control the initial functional behavior of the dashboard.
- Free-Form Layout - Thisoption presents the panels in a non-columnar layout and allows the user to reposition the panels anywhere on the page.
- Dashboard Adjustable - This optiondetermines whether panel positions may be adjusted by the end user.
- Dashboard Tabs - This option determines whether the end user can rearrange the panels into different browser tabs.
- Dashboard Columns - This optionsets the lattice framework for the panels. This attribute is disabled if the Free-Form Layout option is enabled.
Click the icon for the Dashboard Settings collapse/hide the Dashboard Settings panel.
Note: The description appears under the dashboard's name in the Reports list in the Personal Reports and Shared Reports areas.