Exercise 4: Create your own Story (Backlog Item) within a Scope
This topic explains how to Create your own Story (Backlog Item) within a Scope.
Overview
This tutorial guides you through the process of creating a story inside of the Digital.ai Agility UI using the Rest API.
Prerequisites
- Access to a Digital.ai Agility 17.0 instance or newer. We are using
https://www16.v1host.com/api-examples
from our previous exercises.
-
A thorough understanding of all material found the previous exercises:
-
VersionOne REST API Tutorial
-
Exercise 1: Basic Use of the API Console
-
Exercise 2: Find a Scope (Project) OID Token in the UI
-
Exercise 3: Query a Scope (Project) for Specific Attributes
-
-
Basic knowledge of the Agility API Console
-
Basic Knowledge of XML
What you'll learn
This exercise is will walk you through the process of creating a Story in a specific project in your Agility instance.
Step 1: Select a destination project that will hold your new story
Creating stories is fairly straight forward and it is also easy to create in the API. Note that stories, also considered Primary Work items just like defects and issues, must be created within a scope (also called a project).
Here is a simple methodology that ensures clean and easy creation of a story.
-
Examine the metadata to see what attributes must be populated prior to creating the story.
Open up a browser tab and enter
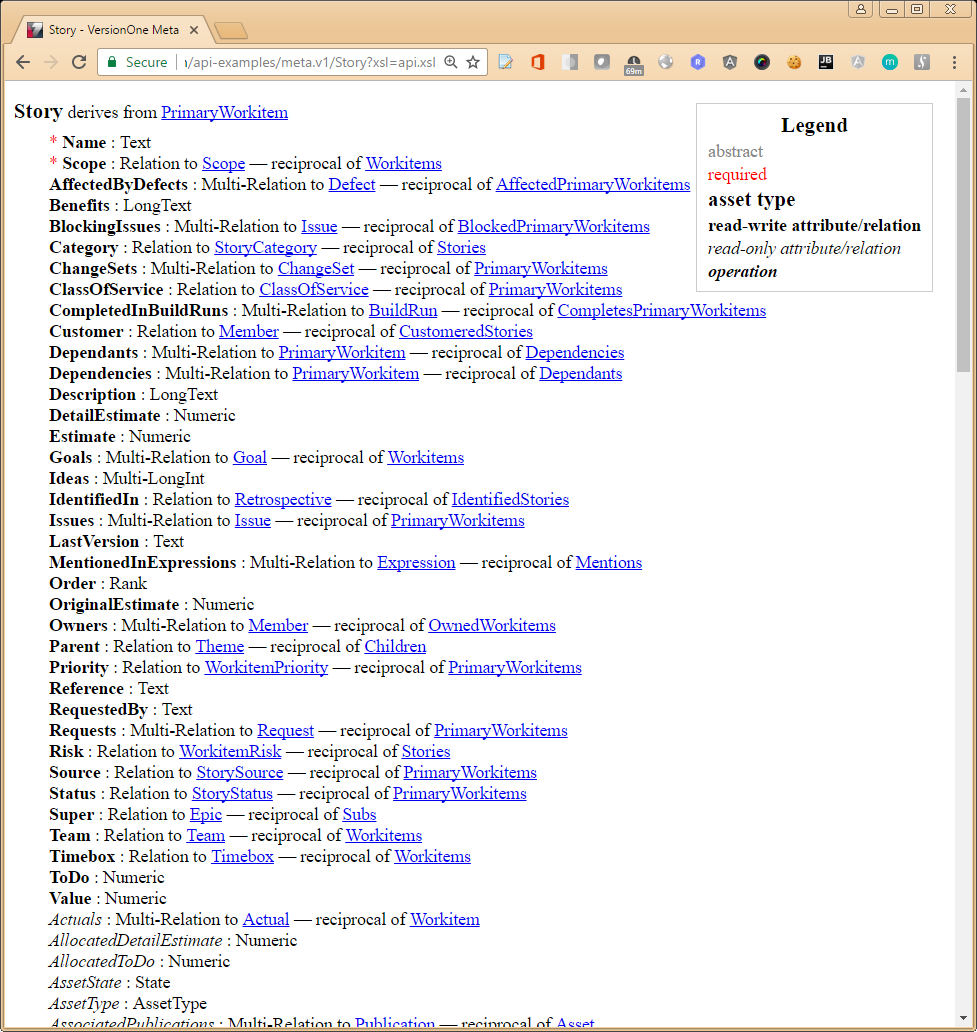
https://www16.v1host.com/api-examples/meta.v1/Story?xsl=api.xslThis is what the output of the query looks like. This page is a way to examine the composition or the schema of the Story asset.

You will spend a good amount of examining the output from a metadata query to discover what attributes inside of Agility assets are important to your project's requirements. This is available in every instance of Agility. In the screenshot above, you will see two attributes with next to them. These are the required attributes that need to be populated before you can create your new asset. For our example, we're going to populateName, Scope and Description.
-
Understand what types and what data can be legally entered in these attributes.
Name, Scope and Description have their types in the metadata listing above and they are Text, (Scalar), Single-Relation and Text respectively. Recall from exercise3 on how a Single-Relation works.
-
Select the scope that will be the destination for your new story. For our example, we are going to add to the Scope called Agility Rest APIs 101.
There are two ways to find the OID of the project that you are interested in using to hold your new story. You can find the project OID from the Agility UI or you can query the project from the API. Both methods are described here.
Method 1 - Query for a destination project using the VersionOne UI
-
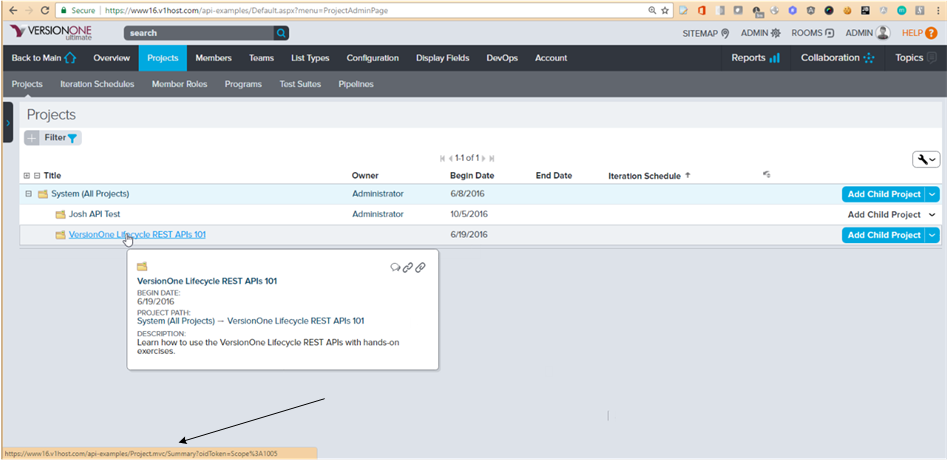
Go to your projects view and locate the project that you are wan to add your story to.
-
Hover your mouse over the project and examine the status bar bottom of the screen. You will see the OID appended at the end of the URL. In this case, it is Scope:1005. Keep this since we are going to use this value to update the scope attribute on the new story.

 (this is the blown up view)
 -
-
We now have a project OID to use hold our story.
Method #2 Query for a destination project using the VersionOne Rest API
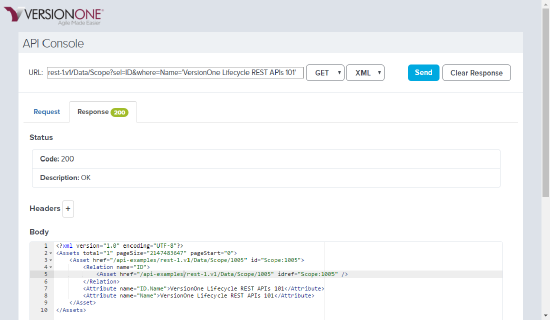
This method allows you to query the Agility database and find the OID that is associated with the human readable text. Modify your URL in the API Console to look like the URL below, and click Send.
rest-1.v1/Data/Scope?sel=ID&where=Name='VersionOne REST APIs 101

I have taken the liberty to click Send so if you look at the body which is the response, you will see id="Scope:1005". Scope:1005 is your OID.
Step 2: Construct your payload.
                <Asset>
                <Attribute name="Name" act="set">My New Story</Attribute>
                <Attribute name="Description" act="set">My New story rocks!</Attribute>
                <Relation name="Scope" act="set">
                <Asset idref="Scope:1005" />
                </Relation>
                </Asset>
-
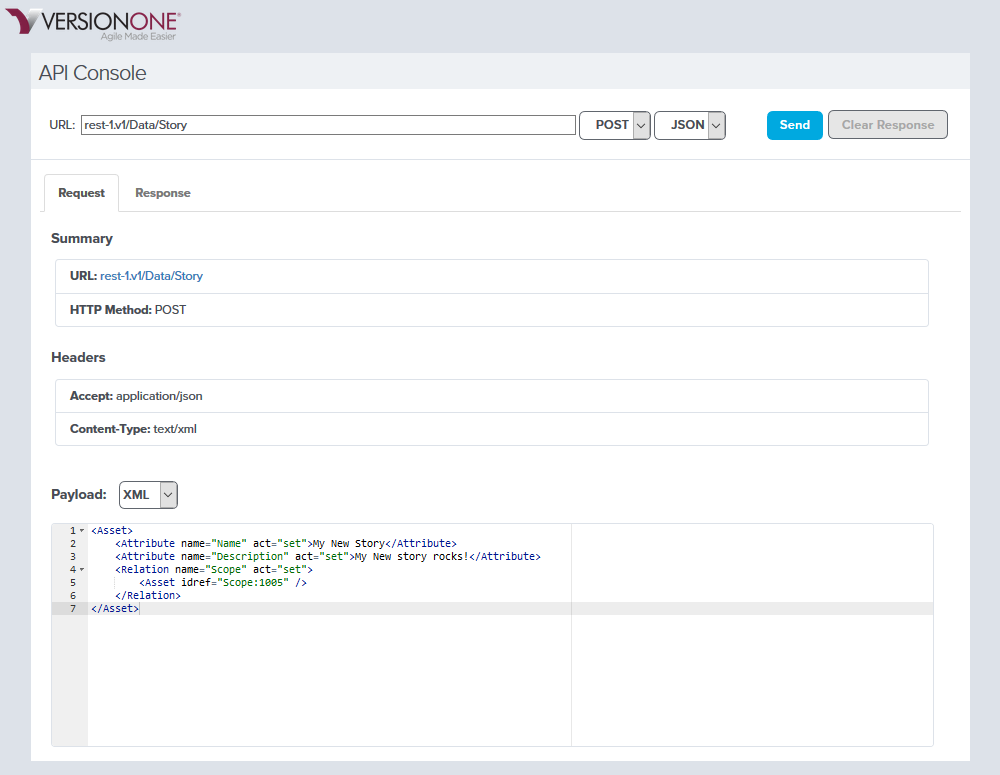
Select the GET drop and change it to POST then observe the editor at the bottom.
-
Construct your payload.
-
Enter the above payload into the editor and change the URL so it looks like this
rest-1.v1/Data/Storyand press Send.

-
Examine the response.

Step 3: A Closer Look at the Payload
-
Lines 1 & 7:
<Asset> basically states to the Rest API, "Hey, I am sending you an Asset type to create for me". -
Line 2:
**name="Name"**is where we declaring that we are going to modify the name attribute with the contents inside of the <Attribute> tag. Setting act="set" indicates that we are going to write a single value to the Name attribute. -
Line 3:
This has the same behavior and pattern as line 3. -
Lines 4-6:
Recall that the <Asset> tag is a way to tell the Rest API that you are sending it an asset type. The <Relation> tag tells the API "Hey, this is not an ordinary scalar value but a complex value. It has a name, action, and the reference (idref) to specific scope.
The set of values that theact keyword can be assigned is (add, set, remove).
In summary, a payload used for creating a story via the Rest API is a combination of Attributes and Relations wrapped in a <Asset> tag. Within the context of each Attribute and Relation are their names along with instructions on what kind of "action" should be performed on the individual Attribute or Relation.
Review
-
Learned two ways to search for a project (Scope) OID.
-
Created a new story.
-
Examined the details of a <Relation>.
Quiz
What two ways to find the Scope's OID did we explore?
Query in Agility UI
Query via Query.v1 endpoint
Query via Rest-1.v1