Portfolio Tree View in Rooms 2
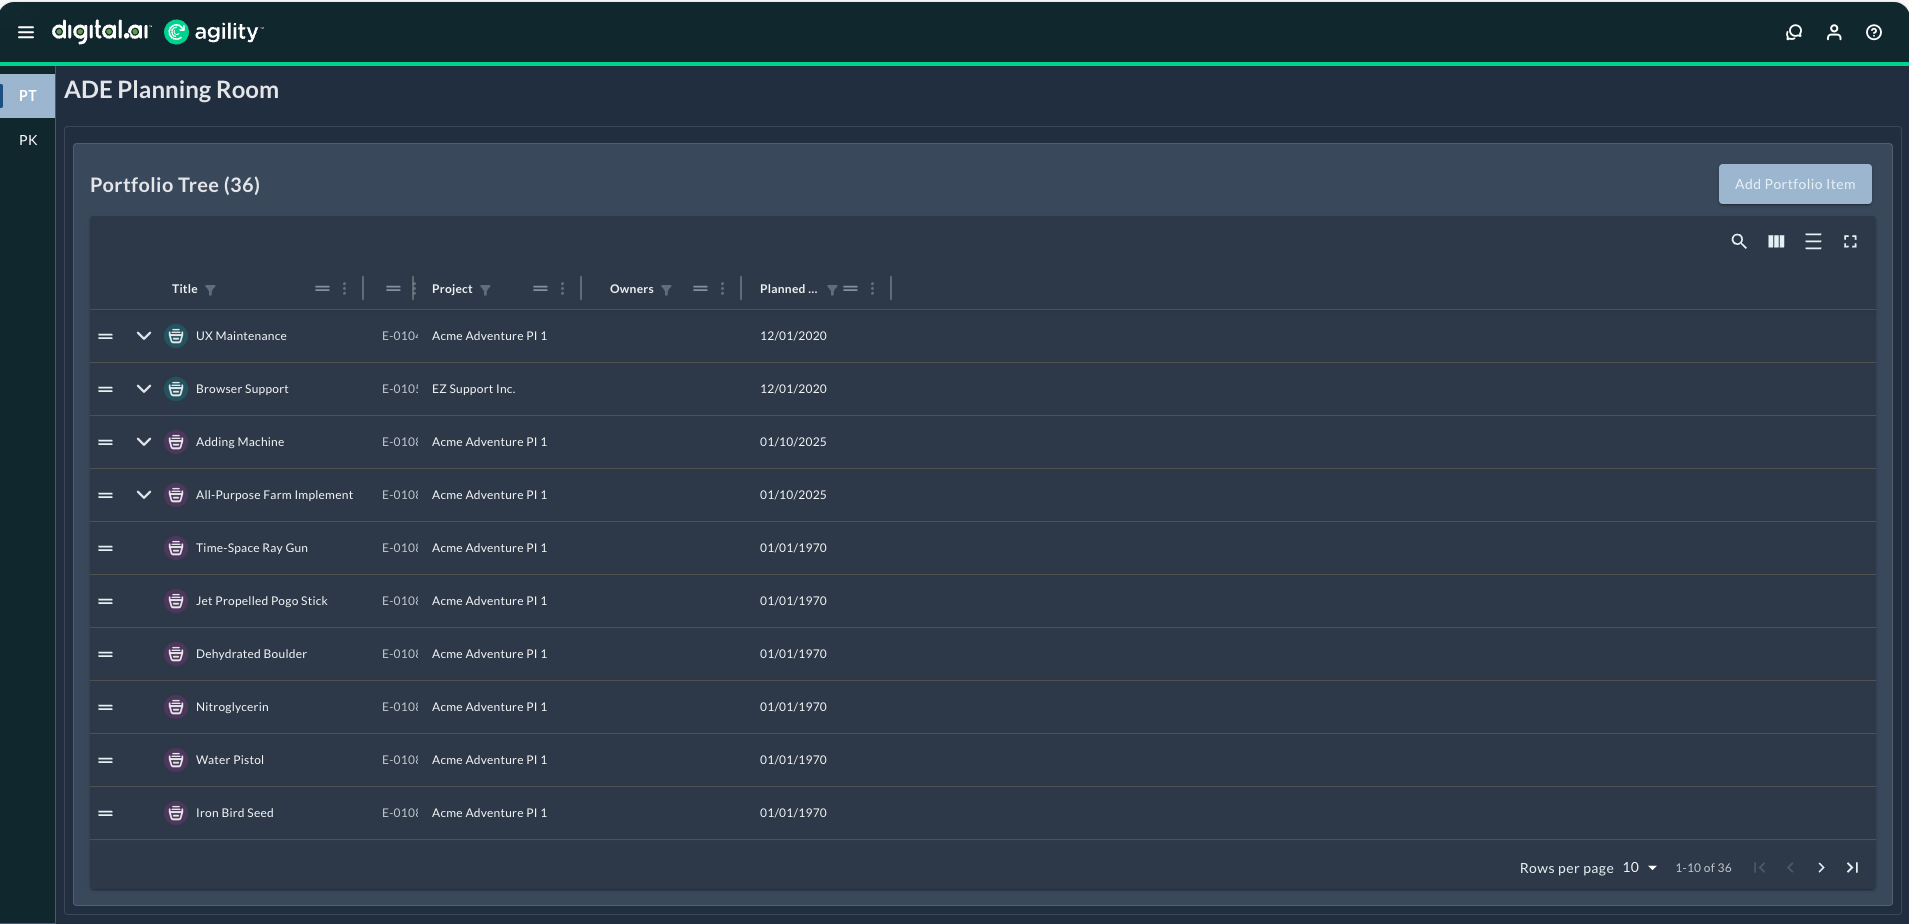
The Portfolio Tree view displays portfolio items in a hierarchical grid with multi-level nesting, advanced search and filtering, and drag-and-drop capabilities. Use this view to manage complex portfolio structures with unlimited depth while keeping your Planning Room context.
Portfolio Tree Capabilities
- Planning Room context: Automatically filters to show only portfolio items matching your room's planning level, schedule, program, and strategic theme
- Multi-level nesting: View Initiatives, Epics, Features, and Sub-Features in a single hierarchical grid with unlimited depth
- Advanced search and filtering: Find items with global search across multiple fields, plus column-specific filters
- Drag-and-drop: Reparent and reorder portfolio items directly in the grid to restructure your portfolio hierarchy
The Portfolio Tree automatically applies your Planning Room's configuration as a filter, showing only the subset of portfolio items that match your room's planning level, schedule, program, and strategic theme settings. This ensures you see only the portfolio items relevant to your planning context.
Multi-Level Nesting Support
The Portfolio Tree supports unlimited nesting depth, allowing you to view Initiatives, Epics, Features, and Sub-Features in a single hierarchical grid. Expand and collapse levels to focus on specific areas. Collapsed/expanded states persist across sessions for consistent navigation.
Grid Features and Interface
The Rooms 2 Portfolio Tree provides:
- Planning Room context: The Planning Room name displays in the header with item count (e.g., "Portfolio Tree (14)")
- Quick detail access: Click Title or ID to open the asset detail drawer (hover shows underline and pointer cursor)
- Drag-and-drop: Reparent and reorder portfolio items within the hierarchy
- Density control: Adjust row spacing for compact or comfortable viewing
- Show/Hide columns: Customize which columns appear; Expand and Title columns always visible
- Built-in filtering: Filter by title, ID, planning level, owners, and other attributes
- Text overflow handling: Long titles show ellipsis with full text on hover
Key interface elements:
- Add Portfolio Item button: Located in the top-right corner to create new portfolio items
- View controls: Toggle between different view layouts using the icons in the upper-right toolbar
- Search icon: Access global search
- Grid view icon: Switch between grid layouts
- List view icon: Toggle list display options
- Fullscreen icon: Expand to fullscreen view
- Expand/collapse controls: Use the expand controls (>) in the leftmost column to show or hide child items
- Pagination: Navigate through large datasets using the "Rows per page" control and pagination arrows at the bottom
Grid Customization
Show or Hide Columns
Customize your view by showing or hiding specific columns:
- Click the column visibility icon in the grid toolbar (typically represented by columns/grid icon).
- The column selector panel displays all available columns.
- Use the Hide all toggle button at the top to quickly hide all hideable columns, or the Show all toggle to display all columns.
- Alternatively, check or uncheck individual columns to show or hide them.
The Expand and Title columns are always visible and cannot be hidden. This ensures you always have context about which portfolio items you're viewing. The drag-and-drop handles are automatically hidden when all other columns are concealed.
View Density
Adjust row spacing by cycling through three density levels:
- Click the Toggle Density icon in the grid toolbar to cycle through the density levels
- Each click progressively reduces the row spacing:
- Comfortable: Maximum spacing between rows for easier reading
- Standard: Medium spacing for balanced viewing
- Compact: Minimum spacing to view the most items on screen
- After the compact view, clicking again returns to the comfortable view
- The selected density applies to all rows in the grid
Resize Columns
Adjust column widths to accommodate longer text fields or make better use of available screen space:
- Position your cursor over the right edge of any column header
- When the cursor changes to a resize icon, click and drag left or right to adjust the column width
- Release the mouse button when the column reaches your desired width
- The new column width is automatically saved and restored in future sessions
Resize the Title column to display longer portfolio item names without truncation, or narrow columns with short values to maximize visible columns.
Reorder Columns
Rearrange columns to prioritize the information most important to your workflow:
- Click the = icon (drag handle) next to any column header
- Drag the column left or right to a new position
- Drop the column in its new location
- The new column order is automatically saved and restored in future sessions
Visual Hierarchy
The grid uses alternating row shading to help distinguish nested levels in the hierarchy. After 3-4 levels of nesting, the shading pattern continues to maintain visual distinction between parent and child items.
Pagination and Navigation
The Portfolio Tree includes pagination controls at the bottom of the grid for navigating large datasets:
- Rows per page: Dropdown to select how many items display per page (default: 10)
- Page indicator: Shows current range (e.g., "1-10 of 140") indicating which items are currently visible
- Navigation arrows:
- Previous page (
<) - Next page (
>) - First page (
<<) - Last page (
>>)
- Previous page (
Pagination helps maintain performance when working with large portfolio hierarchies by loading items in manageable chunks.
Search and Filter Portfolio Items
Use Global Search
The global search bar searches multiple fields simultaneously:
- Locate the Search field in the top-right toolbar
- Type your search term (e.g., "Maintenance", "01047", "defect")
- The grid filters in real-time to show only matching items
- Click the X icon in the search field to clear the search
How Global Search Works:
- Searches multiple fields: Searches Title, Name, Description, and ID fields simultaneously (aligns with core Agility search behavior)
- Returns child items as top-level results: When a child portfolio item matches your search, it appears as a top-level result for easy access, even if it's deeply nested in the hierarchy
- Example: If you have "Test Story Agility" with a child "Test Defect Agility" and another item "Defect", searching for "defect" displays both "Test Defect Agility" and "Defect" as if they were top-level items
- Real-time filtering: Results update as you type
- Case-insensitive: Search is not case-sensitive
- Partial matches: Supports partial text matching (e.g., "stick" finds "Jet Propelled Pogo Stick")
- Numeric matching: Works with ID numbers (e.g., "01047" finds "E-01047")
Search tips:
- Use global search to quickly find items anywhere in your portfolio hierarchy, regardless of nesting depth
- Child items matching the search are "flattened" in results, making them easier to find and access
- Combine global search with column filters for more precise results
- Clear the search to restore the full hierarchical view
Filter by Column
Apply filters to specific columns for more precise results:
To filter by Title or ID:
- Click the filter icon next to the Title or ID column header
- Enter text in the Filter by Title field
- The grid shows only items matching your text
- Click outside the filter or press Enter to apply
To filter by Project:
- Click the dropdown arrow in the Project column header
- Select one or more projects from the list:
- System (All Projects): Shows items from all projects
- Specific project names: Shows items from selected projects only
- Click outside the dropdown to apply the filter
- Click the X icon next to a selected project to remove that filter
To filter by Owners:
- Click the filter icon next to the Owners column header
- The Owners filter panel opens with a searchable list of team members
- Check the boxes next to the owners you want to filter by
- Selected owners appear with checkmarks
- Click Clear All to remove all owner filters
- Click outside the panel to apply the filter
To filter by Planned Begin date:
- Click the calendar icon next to the Planned Begin column header
- The date range selector opens
- Set a date range using the calendar picker:
- Select a start date (minimum)
- Select an end date (maximum)
- Or set only one boundary to filter items before/after a specific date
- Click outside the date picker to apply the filter
Combine Multiple Filters
You can apply filters to multiple columns simultaneously:
- Apply a filter to one column (e.g., filter by Project = "Acme Adventure PI 1")
- Apply additional filters to other columns (e.g., filter by Owner = "Administrator")
- The grid shows only items matching all active filters
- Each filtered column displays a visual indicator
Clear Filters
To remove active filters:
- Clear a single column filter: Click the filter icon on that column and clear the criteria, or click the X icon next to selected values
Combine global search with column-specific filters for maximum precision. For example, search for "Adventure" globally, then filter by a specific Owner to find all Adventure-related items assigned to that person.
Add Portfolio Items
To add a new portfolio item to the Portfolio Tree:
- Click the Add Portfolio Item button in the top-right corner of the Portfolio Tree.
- In the Add Portfolio Item dialog, enter the required information:
- Title: Name of the portfolio item (required)
- Planning Level: Scope where the portfolio item will exist (required)
- Click Save.
The new portfolio item appears in the Portfolio Tree at the root level. You can then:
- Add child portfolio items beneath it
- Associate stories and other work items with it
- Edit additional details through the asset detail drawer
Required fields for creating portfolio items may vary based on your system configuration and custom field settings.
Edit Portfolio Items
The Rooms 2 Portfolio Tree offers flexible editing options for portfolio items through drag-and-drop operations and the asset detail drawer.
Reparenting and Reordering Portfolio Items
The Rooms 2 Portfolio Tree supports drag-and-drop actions for restructuring your portfolio hierarchy. You can both move items to different parents (reparenting) and change their order within the same level (reordering).
To reparent a portfolio item (move it under a different parent):
- Click and hold the drag handle on the left side of the portfolio item row
- Drag the item to the desired parent portfolio item
- Release to drop the item as a child of the new parent
Result: The portfolio item moves under the new parent in the hierarchy.
To reorder portfolio items (change priority sequence):
- Click and hold the drag handle on the left side of the portfolio item row
- Drag the item up or down within the same hierarchical level
- Release to drop the item in the new position
Result: The portfolio item's Order value updates automatically to reflect its new position, and the grid reorders accordingly. All sibling items adjust their order values to maintain the sequence.
You can both reparent and reorder portfolio items using drag-and-drop, similar to the traditional Portfolio Tree functionality. These actions provide flexible portfolio structure management directly from the grid view.
Common use cases:
- Move Epics or Features under different parents as priorities shift
- Reorder portfolio items to reflect changing business priorities
- Group related items under a common parent for better organization
Access Portfolio Item Details
To view or edit full details for any portfolio item:
- Locate the portfolio item in the grid (at any nesting level).
- Click on either:
- The Title text (e.g., "UX Maintenance", "Cloud Call Center")
- The ID text (e.g., "E-01047", "E-01048")
- The asset detail drawer opens on the right side of the page.
Visual indicators:
- Hover effect: When you hover over Title or ID text, it displays an underline and the cursor changes to a pointer (clickable link style)
- Clickable anywhere: Both top-level and expanded child portfolio items have clickable Title and ID fields
- Non-intrusive: Clicking Title or ID does not affect expand/collapse or drag-and-drop functionality
Asset Detail Drawer Panels
The drawer provides multiple panels accessible from the left sidebar:
- Details: View and edit portfolio item fields including title, description, status, planning level (scope), owners, tags, and custom fields; view the Information section displaying Created by, Changed by, Created date, and Changed date
- Child Items: View and manage child portfolio items and associated work items
- Attachments: Upload and manage file attachments; supports drag-and-drop or file selection with a 4MB maximum file size limit and 1 file maximum per upload
- Comments: View and add comments for collaboration
- Sage: Access AI Assistant for Agile Artifacts with Quick Actions for title optimization, description enhancement, and acceptance criteria development; includes chat interface for custom requests
Asset Detail Drawer Menu
Click the menu icon (three dots) in the top-right corner of the drawer to access:
- Configure Fields: Customize which fields display in the detail drawer
- Copy: Create a copy of the portfolio item
- Delete: Remove the portfolio item (requires appropriate permissions)
To configure field placement:
- Click the menu icon (three dots) in the asset detail drawer header.
- Select Configure Fields.
- In the Configure Fields Placement dialog:
- Use the Search field to find specific fields quickly.
- Check the boxes next to fields you want visible above the "Show More" button.
- Uncheck boxes for fields you want hidden or placed below the "Show More" button.
- Click Save to apply your changes, or Cancel to discard them.
Result: Checked fields display prominently in the detail drawer above the "Show More" button, while unchecked fields are hidden or require expanding the "Show More" section.
Available fields for configuration include:
- Planning Level, Status, Owners, Target Team
- Portfolio Item, Tags, Description
- Planned Release, Planned Completion By, Planned End
- Code Complexity Rank, Time Criticality (0-100), Risk Reduction (0-100)
- Strategic Themes
- Custom fields (based on your configuration)
Field visibility preferences are saved per user and persist across sessions.
The asset detail drawer provides editing capabilities while keeping you in the context of the Portfolio Tree. This is especially useful when you need to make changes to multiple portfolio items without losing your place in the hierarchy.
Unlike the traditional Portfolio Tree, the Rooms 2 version does not support inline editing of the planning level (Scope) field directly in the grid. To edit the planning level, use the asset detail drawer. This prevents accidental changes to critical fields like planning level.
Manage Epic Dependencies
The asset detail drawer for Epics provides dependency management capabilities, allowing you to track relationships and dependencies across your portfolio. Rooms 2 Planning Rooms support the following dependency types for Epics:
- Links: General relationships between portfolio items
- Upstream Dependencies: Items that must be completed before this Epic
- Downstream Dependencies: Items that depend on this Epic's completion
- Test Sets: Test collections associated with the Epic
- Blocking Issues: Issues preventing Epic progress
- Requests: Customer or stakeholder requests linked to the Epic
- Backlog Goals: Goals that this Epic helps achieve
- Split To: Items created when this Epic was split into smaller parts
Add a Dependency to an Epic
- Click on an Epic's Title or ID in the Portfolio Tree to open the asset detail drawer.
- Scroll to the dependency section you want to update (e.g., Test Sets, Blocking Issues, Upstream Dependencies).
- Click Add in the section header.
- Search for the item you want to link by typing in the search field.
- Select the item from the search results.
- Click Save or outside the dialog to confirm.
Result: The dependency appears in the Epic's detail drawer under the appropriate section.
Remove a Dependency from an Epic
- Open the Epic's asset detail drawer.
- Navigate to the dependency section containing the item you want to remove.
- Click the delete icon next to the dependency item.
- In the confirmation dialog, click Delete to confirm removal.
Result: The dependency is removed from the Epic.
Dependency management features:
- Search capabilities: Quickly find items to link by searching across title, ID, and description fields
- Multiple dependency types: Organize relationships by category for better tracking
- Quick access: View all dependencies in a single location within the asset detail drawer
- Real-time updates: Changes to dependencies are immediately visible to all Planning Room members
Use dependency types strategically to maintain clear relationships across your portfolio. For example, use Upstream Dependencies to track prerequisite work, Blocking Issues to identify impediments, and Backlog Goals to maintain strategic alignment.
Panel Support: Currently, only the Portfolio Tree and Portfolio Kanban panels are supported in Rooms 2 Planning Rooms. Additional panels will be added in future releases.
Sage Support for Portfolio Items
The Sage panel provides an AI Assistant trained on Agile best practices to help create higher-quality portfolio item content. Sage offers Quick Actions for common tasks and a chat interface for custom requests.
Access Sage
- Open a portfolio item's asset detail drawer.
- Click the Sage panel in the left sidebar.
- The Sage interface displays with Quick Actions and a chat field.
Sage Quick Actions
Sage provides three Quick Actions under the WRITING & CONTENT category:
- Title Optimization: Make your portfolio item title more concise and clear
- Description Enhancement: Structure your portfolio item description better
- Acceptance Criteria Development: Define clear, testable acceptance criteria
To use a Quick Action:
- Click on one of the Quick Action cards.
- Sage analyzes the current content and provides AI-generated improvements.
- Review the suggestions and accept, modify, or regenerate as needed.
Ask Sage Anything
Use the chat interface for custom requests beyond the Quick Actions:
- Click in the text field at the bottom (placeholder: "Ask Sage about improving your Agile artifacts...").
- Type your question or request.
- Press Enter to send (or Shift + Enter for a new line).
- Sage responds with AI-generated suggestions based on your request.
- Click the ask me anything link for open-ended assistance.
Sage Menu Options
Click the menu icon (three horizontal lines) in the Sage panel header to access:
- Hide Quick Actions: Collapse the Quick Actions section to focus on the chat interface
- Clear Conversation: Remove the current chat history and start fresh
- Pop Out Chat: Open Sage in a separate window for easier multitasking
Benefits
- Faster content creation: Quickly draft and refine portfolio item content with AI assistance
- Improved quality: Enhance clarity, completeness, and strategic alignment of portfolio items
- Consistency: Maintain consistent formatting and terminology across your portfolio
- Best practices: Leverage AI trained on Agile best practices for strategic-level planning
- Flexible assistance: Use Quick Actions for common tasks or ask custom questions for specific needs
Please review the output carefully, as AI-generated suggestions may not be accurate.
Sage understands portfolio item context and provides suggestions appropriate for strategic-level planning. Use Quick Actions for common enhancements, or ask custom questions in the chat for specific organizational needs.
Keyboard shortcuts: Press Enter to send messages, Shift + Enter to add new lines in your chat input.
Related Topics
Planning Room Capabilities in Rooms 2
Portfolio Kanban View in Rooms 2