Create a Single User Account
If your TeamForge site uses LDAP authentication, TeamForge administrators cannot create new user accounts. On a site with LDAP authentication, each user must log into TeamForge using his or her LDAP credentials.
On sites with LDAP/SAML/SAML+LDAP integrations, site administrators can designate select users that do not have a SAML or LDAP account as local users. Local users can log on to TeamForge using just the TeamForge credentials while bypassing the SAML/LDAP/SAML+LDAP authentication realms. A local user can also change and reset his password. For more information, see ALLOW LOCAL USER.
-
Go to My Workspace > Admin.
-
Click USERS from the Projects menu.
-
Click the drop-down arrow next to Create and click Single User.
-
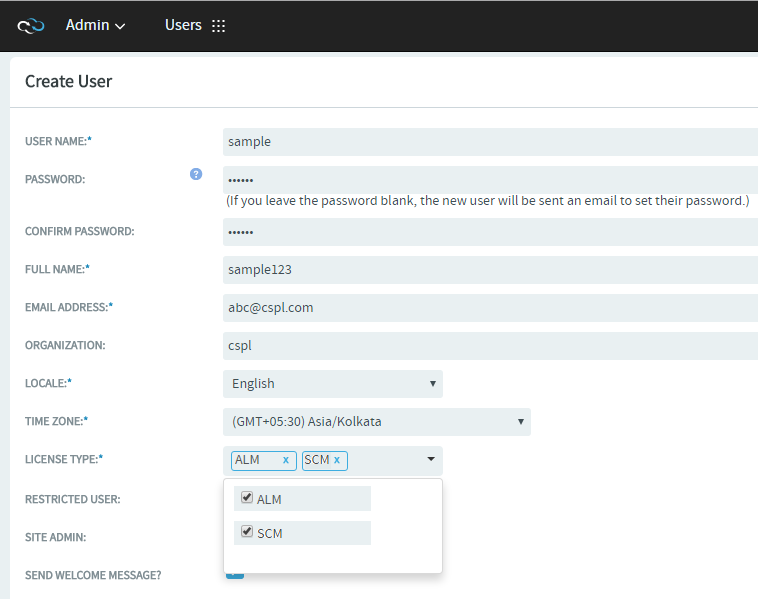
On the Create User page, enter the field values appropriately.
-
Enter a user name for the user.
Your user name must meet these criteria:
- User name is case-sensitive. However, to make usernames case-insensitive set the site-options token ALLOW_CASE_INSENSITIVE_LOGIN to
true. - Minimum number of characters as specified in the site-options.conf file.
- No spaces.
- Should have at least one letter.
- The first character is a letter.
- User name is case-sensitive. However, to make usernames case-insensitive set the site-options token ALLOW_CASE_INSENSITIVE_LOGIN to
-
Enter and confirm a password for the user, if you prefer to set the user's password yourself.
tipTo invite users to create their own password, leave the PASSWORD field blank. A password ticket email will be sent to users to let them create a password.
-
Enter the FULL NAME and EMAIL ADDRESS of the user.
tipYou can add more email addresses for the user after you finish creating their profile.
-
Enter the user's organization.
Organization can be a geographic designation, a corporate division, or whatever you want. It's advised to keep it consistent across your site.
-
Select the language from the LOCALE drop-down list.
noteTeamForge supports English, Chinese, Japanese and Korean languages.
-
From the TIME ZONE drop-down list, select the preferred time zone for the user.
importantSelecting the time zone overrides the default time zone set by the site options token, DISPLAY_TIMEZONE. It reflects in all the email notifications and TeamForge pages excluding integrated application pages.
-
Choose the user's TeamForge LICENSE TYPE.
- You can assign users a combination of multiple license types such as ALM and SCM.

- You can assign users a combination of multiple license types such as ALM and SCM.
-
Choose a user type. You can choose only one user type for each user.
- SITE ADMIN: Administrators have unlimited access to all the data in TeamForge.
- RESTRICTED USER: Restricted users can only access projects of which they are members.
important
If you do not select RESTRICTED USER, the user will be unrestricted and able to access all projects that have not been made private by a project administrator.
-
To send a welcome message to the user, select SEND WELCOME MESSAGE?.
-
-
Click Create.
The user account is created.