SeeTestAutomation- Using The Application Manager
Please note that this tool is classified as a Legacy tool. We recommend transitioning to our updated solutions to maintain optimal performance and security in your workflows. For more information on this matter, please reach out to technical support .
The Application Manager is located just under the device tab and is used to manually instrument and manage the different applications imported into SeeTestAutomation.
Note:
All actions performed manually from the Application Manager can also be integrated into your automation scripts by means of the equivalent utility commands.

When a device is selected on the device tab, the Application Manager will display all imported applications which are compatible this device’s operating system.
Using the Command Icons and Pop-up Menu Commands
Clicking the appropriately numbered icon (above) performs the following actions:
-
Install Application - Installs the selected application on the selected device. Can be automated in scripts using the Install command.
-
Launch Application - Launches the selected application (in the instrumented mode) on the selected device. Can be automated in scripts using the Launch command.
-
Close Application - Closes the selected application on the device (if it is open). Can be automated in scripts using the ApplicationClose command. Note: The application will still be available in the background apps
-
Clear Application Data - Clear Application Data [Compatible only with Android devices]. Clears the data of the selected application on the device. If the application is open, activating this command will also close it. Can be automated in scripts using the ClearData command.
-
Uninstall Application - Uninstalls the selected application from the device. Can be automated in scripts using the Uninstall command.
-
Delete Application - Deletes the selected application from the Application Manager. Invoking this command will not affect the device itself.
-
Import/Sign Application - Imports an application into the SeeTestAutomation and instruments it. Can be automated in scripts using the Install command (with the sign parameter set to true). For more on this process, see SeeTestAutomation - Preparing Native Applications For Testing.
Import an applications from Android cloud device:
-
Click on the 'Import application' icon
-
You will then see the following pop-up:
-
Choose "Import application from Android device"
-
The application will be found in the device applications list - import it.
-
The application will then be found in the applications list.
Import an application from Android cloud device not enable by default, For more information see Cloud Security.
-
-
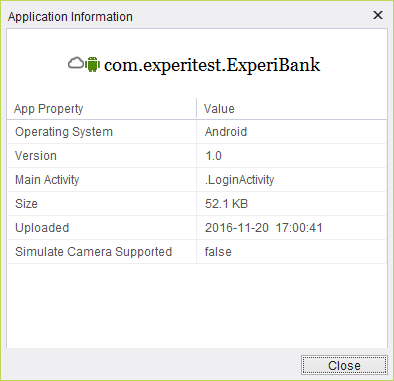
Application info - will open a detailed app information window.


When you right-click on the name of a selected application the following commands are displayed:
-
Re-instrument Application - Updates the instrumented version of the imported application. We recommended that you perform this operation on all imported applications when upgrading the version of SeeTestAutomation. Doing so will ensure that each application is instrumented with its latest framework.
-
Copy Name - Copies the name of the selected application to the clipboard.
-
Copy name with version - Copies the name of the selected application and its version number to the clipboard.
-
Import Language Files - Imports the all the various languages files packaged with the selected application. After having imported these files, you can create a test set that will run on different languages versions of the application. For details on using this feature, see SeeTestAutomation - Using Language Properties Files.
-
Show App Info - open the detailed app information window.
Managing multi-version app
SeeTest Cloud supports multiple version application handling.
Multiple versions of the same application can be uploaded to SeeTestCloud (you can find instructions on how to upload an app to the cloud here)
Once the application was uploaded (with multiple version) there will be a list of versions to select from next to the application in the application manager.

Once a version is selected from the list, the install command (from code environment or from SeeTest Automation) and the install button (from The application manager) will install the selected version.
To install with the install command (from code environment or from SeeTest Automation) add ":" and the version number of the app after the package\bundle name.
For example: client.install("cloud:com.experitest.uicatalog/.MainActivity:2.1210", true, false)
The Launch command will not refer to the selected version but to the application that is already installed on the device.