Configure the Agility Sync Plugins
This topic explains how to configure the Agility Sync plug-ins.
Prerequisites
You must create a service account user (for use in Agility Sync plug-in configuration) in tools you want to integrate using Agility Sync—with all the required permissions to access to all the projects—and configure Webhooks.
For example, if you integrate Agility and Jira, the service accounts you create in Agility and Jira must meet the following criteria respectively.
Agility—The service account user must have System Admin permissions to create and manage Webhooks in Agility.
Jira—The service account user must have Global Admin permissions in Jira to create and manage Webhooks in Jira.
Note that the Jira service account user (for use in Agility Sync plugin configuration) need not necessarily be a Jira Site Admin.
Here's a list of permissions required for the service account user on other tools:
Azure DevOps—The service account user must have Project Admin permission for all the Azure DevOps projects to create and manage Servicehooks in Azure DevOps.
ServiceNow—The service account user must have the following roles assigned to be able to—create and manage Webhooks—and fetch and view ServiceNow asset details in Agility Sync.
- sn_change_write
- sn_problem_write
- sn_incident_write
- project_user
- resource_user
- timecard_user
- delegated_developer
- atf_test_designer
- personalize_choices
- personalize_responses
- personalize_decision_table_input
- personalize
- business_rule_admin
Configure the Agility Sync Plugins
-
Log on to Agility Sync.
-
On the sidebar, click the Manage Plugins
icon. The Manage Plugins page appears.
You can add new instances of the following tools from the Manage Plugins page.
- Digital.ai Agility
- Jira
- TeamForge
- ServiceNow
- Azure DevOps/ TFS
- Micro Focus ALM/Quality Center
- Salesforce/SFDC
Plugins with no instances added yet are listed in the Unused Plugins section. Plugins with at least one instance added show up in the Installed Plugins section.
-
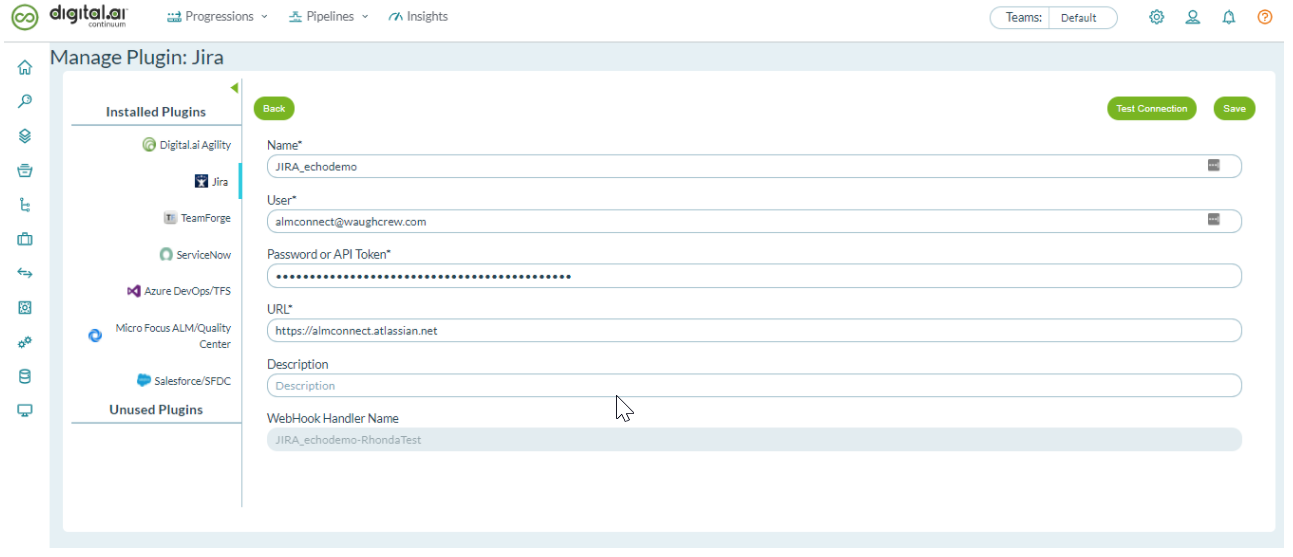
Click the tool for which you want to add an instance— Jira for example—and click New Instance.
-
Type a:
- Name (required)—used as the name of the instance; also used as the WebHook Handler Name.
- User name/Password or API token (required)—to be used for authentication with the tool. Some tools such as Agility would only use an API token in lieu of a user name and password.
- URL (required)—the URL for accessing the tool
- Description (optional)—the description of the tool

-
Some tools such as (Undefined variable: Global Variables.sfdc.long) use specific fields such as Consumer Key, Consumer Secret, Security Token, etc., to authenticate and hence you must gather values for such fields from the respective tools.
-
Click Test Connection.
-
Click Save if the connection is successful.
You must not create or update work items using the Admin user account (that has access to all the projects in a Jira or Agility instance, for example) used to set up the Agility Sync plug-ins. Sync events in Agility Sync fail if you do so.
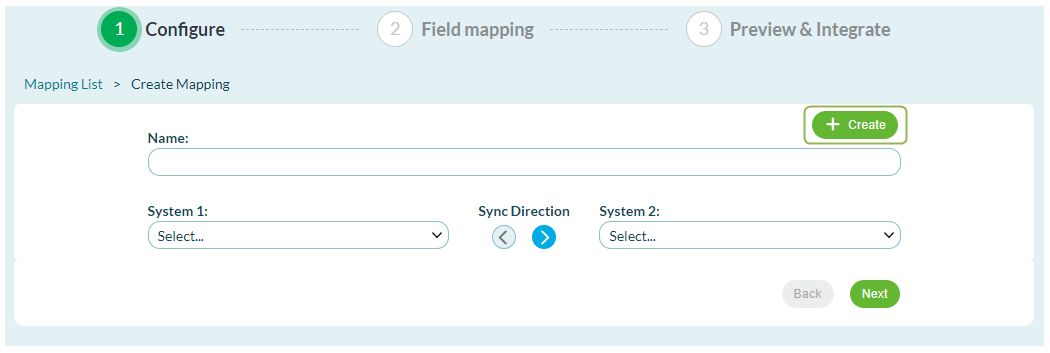
Alternatively, you can also click + Create from the Create Mapping page to configure or modify the Agility Sync-supported plug-ins.

Delete an instance
- Log on to Agility Sync.
- On the sidebar, click the Manage Plugins
icon. The Manage Plugins page appears.
- Select the tool from the Installed Plugins section.
- Click the Delete icon of the instance you want to delete.
- Click OK to confirm.