Cloud Applications
The Cloud tab lists all applications uploaded to the cloud, including those added by you and other members of your project. Supported file formats include .zip, .ipa,.apk, and .aab.
Each uploaded application can have multiple versions, which you can easily view and select from a convenient dropdown list.
Upload an Application
Uploading and Installing an application can also be done without having to open a mobile device in the Mobile Studio view. For additional information, refer to the following resources:
For best results, use clear, environment-based naming (such as -QA, -Staging, or -Prod) for your applications. Do not use technical suffixes such as .test as part of the application name, as this can affect how applications are discovered and managed within the platform.
To upload an application, follow these steps:
-
Open Mobile Studio and connect to a device.
-
Open the Application Manager panel.
-
Click Upload Application.
a. Browse - click on the browse button to open your file directory, and select the application file you want to upload.
b. Drag and Drop - drag the application file from your file directory and drop it into the designated area within the dialog box.
-
Select the application file:
.apkfor Android applications.zipfor iOS simulator (virtual device)applications.ipafor iOS dedicated devices applications
-
(Optional) Enter a Unique Name for the application.
-
For iOS applications, optionally enable Allow Profile Resign and select a provisioning profile.
-
Click Upload.
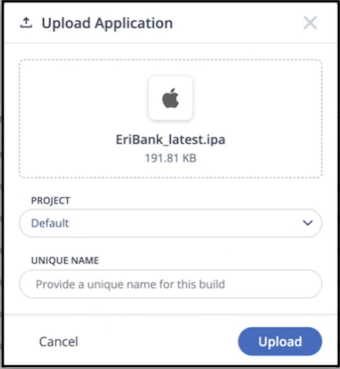
Unique Name for Application Upload
The Unique Name field allows you to distinguish different uploads of the same application within a project.In some development workflows, teams generate multiple builds of the same application. Even if the internal code changes, the build version or release version may remain the same. The unique name helps identify and upload multiple builds without conflicts.
How Unique Name Works
- The unique name must be unique within the project.
- Once a unique name is used, it cannot be reused for another application upload in the same project.
- The unique name is not specific to a single application, but applies across all uploaded applications in the project.
When to Use a Unique Name
Providing a unique name is useful in the following situations:
- When testing multiple builds of the same application
- When the application version or build number has not changed, but the internal code has been modified
- When you want to label builds for specific testing scenarios such as regression testing or feature validation
Example unique names:
login-feature-testqa-build-mar12regression-suite-build
Example Scenarios
| Scenario | Result |
|---|---|
| Uploading an application for the first time without a unique name | Upload succeeds |
| Uploading the same application again without a unique name | Upload fails with an "Application already exists" error |
| Uploading the same application with a new unique name | Upload succeeds |
| Reusing a previously used unique name | Upload fails with a "Unique name already exists" error |
:::tip Best practice
Provide a unique name for each build (for example, build-101, qa-test-mar10, or login-feature-build) to help identify different builds during testing.
:::
Upload Errors
During application upload, you may encounter the following errors.
| Error | Description |
|---|---|
| Application already exists | The same application was previously uploaded. Provide a unique name to upload another instance. |
| Unique name already exists | The entered unique name is already used in the project. Choose a different unique name. |
| Upload failed | The upload failed due to network issues or other system errors. |
Upload failures may occur due to network connectivity issues or temporary system problems. Retry the upload if the issue persists.
Troubleshooting Upload Issues
If application upload fails, check for the following common issues:
- Verify the application file format (
.apkor.ipa). - Check your network connection.
- Ensure the unique name has not been used previously in the project.
- Retry the upload if the failure was caused by a temporary network issue.
Allow Profile Resign for iOS Applications
For iOS applications, Mobile Studio provides the Allow Profile Resign option during application upload. iOS applications must be signed with a valid provisioning profile and certificate before they can run on devices. The profile resign feature allows Mobile Studio to re-sign the application using an available provisioning profile so it can be installed on the selected device.
Enable Profile Resigning
-
Upload an iOS
.ipafile. -
Enable Allow Profile Resign.
-
Choose a provisioning profile from the list.
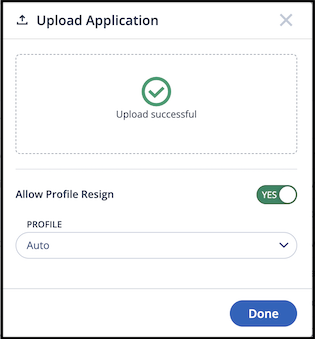
If enabled, the system automatically selects a compatible provisioning profile (Auto mode). You can also manually select a specific provisioning profile.
Provisioning Profiles
Provisioning profiles are stored in the system and are available across projects. If the required profile does not appear in the list, you can upload it from the Provisioning Profiles configuration page.
For more information, see Creating Provisioning Profiles
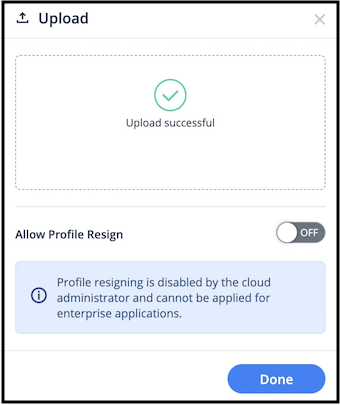
If required, administrators can disable automatic signing of enterprise applications by the Cloud Server. This is useful when you want to manage application signing outside of the platform.
For instructions, see Prevent the Cloud Server from signing enterprise applications in the provisioning profile management documentation. :::
Disable Profile Resigning
Some environments require preventing the platform from resigning enterprise applications. To support this requirement, administrators can disable profile resigning by setting the ct.ios.sign-distribution-apps property to false.
When the iOS signing for distribution apps property is set to false, profile resigning is automatically disabled. This means that when uploading an iOS application, the Allow Profile Resign option will be unavailable, and applications will not be re-signed during installation.
Auto Trust (Enterprise Apps Only)
The Auto Trust feature allows you to automatically trust enterprise iOS applications during installation, eliminating the need for manual intervention on the device.
When enabled, Digital.ai Testing executes a script during app installation that trusts the enterprise developer profile on the device.
Why it matters
- Reduces manual steps during test execution
- Enables smoother automation workflows
- Improves reliability in CI/CD pipelines
When to use it
- When testing enterprise-distributed iOS applications
- When automation workflows require zero manual interaction
- When using environments with MDM support
How It Works
-
During app upload, you can enable Auto Trust (if applicable).
-
When the app is installed on a device:
A script runs to trust the enterprise developer profile
-
If supported:
The trust process completes automatically
-
If not supported:
The user must manually trust the app via device settings
iOS Version Support
-
Supported on:
- iOS 17.x and below
-
Not supported on:
- iOS 18 and above
Due to Apple platform restrictions, automated trust is not supported for iOS 18 and later.
Before You Begin
Ensure that:
- The application is an Enterprise iOS application
- You are uploading to real devices (not simulators)
- Profile Re-sign is disabled (Auto Trust cannot be used together with it)
-
Click Upload Application, then select your iOS application file (.ipa).
-
After upload, verify that the application is identified as an Enterprise app.
If the app is not Enterprise, the Auto Trust option is not available.
-
In the upload configuration, locate the Allow Auto-Trust option.
-
If Profile Re-sign is enabled, disable it, then enable Allow Auto-Trust.
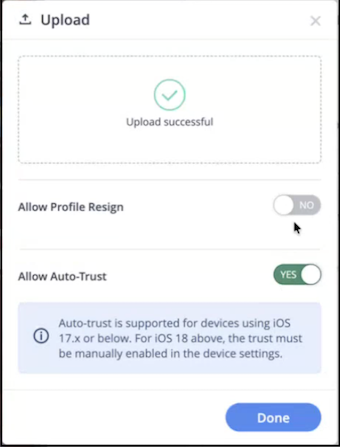
Auto Trust and Profile Re-sign cannot be enabled at the same time.
- If an informational banner is displayed below the toggle, review the message.
This indicates that MDM is not configured and Auto Trust may have limitations.
- Click Done to complete the upload.
- Install the application on a device and verify that it launches without trust warnings (for supported iOS versions).
Important Notes
- Auto Trust is applied during application installation, not during upload
- The toggle value is passed as part of the application configuration
- Auto Trust is supported only for Enterprise apps
- Auto Trust and Profile Re-sign are not available for iOS Simulators
- Android application flows are not impacted
Summary of Behavior
| Condition | Behavior |
|---|---|
| Enterprise app | Auto Trust available |
| Non-enterprise app | Auto Trust hidden |
| iOS ≤ 17 | Auto Trust works |
| iOS ≥ 18 | Manual trust required |
| MDM enabled | Fully automated trust |
| MDM not enabled | Banner displayed |
| Profile Re-sign enabled | Auto Trust disabled |
Behavior based on MDM
| Condition | Behavior |
|---|---|
| MDM configured | Auto Trust is handled automatically |
| MDM not configured | Banner is shown and manual steps may be required |
Manual Trust (iOS 18 and later)
For iOS 18 and later, you must manually trust the application on the device.
Steps:
- Open Settings on the device
- Navigate to General > VPN & Device Management
- Select the enterprise developer profile
- Tap Trust
Install an Application
To install an application, follow these steps:
- Click the Install button for a standard installation.
- Alternatively, click the three-dot menu next to the application and select Install Instrumented for a more in-depth installation that supports specific testing needs.
When to Use Each Option
-
Install: Use this option if you want to install the application as-is.
-
Install Instrumented: Use this option if you are testing an app that requires user authentication, works with camera-facing activities, or needs network traffic monitoring.
Cache Information: When you reinstall an application that is already on the mobile device, the data from the previous application cache will remain by default. If you need to start with a clean slate, it is best to uninstall the application first before reinstalling it.
iOS Enterprise Distributed Builds: If an iOS Enterprise Distributed Build is uploaded via the API with allowResign=false and autoTrustEnterpriseDeveloper=true, the Enterprise Developer profile will be automatically trusted during the application installation process. For more information on correctly uploading iOS applications, refer to the Auto Trust iOS Enterprise Applications page.
Launching an Application
To launch an application, follow these steps:
-
Select the application you want to launch from the list.
-
Click the Launch button.