SeeTestAutomation - Native Recording
Please note that this tool is classified as a Legacy tool. We recommend transitioning to our updated solutions to maintain optimal performance and security in your workflows. For more information on this matter, please reach out to technical support .
The Native Recording mode is using the Native properties of elements on the screen. It can be used for instrumented applications. Also, there is the possibility to record on non-instrumented mode.
To record a script in the Native Recording mode:
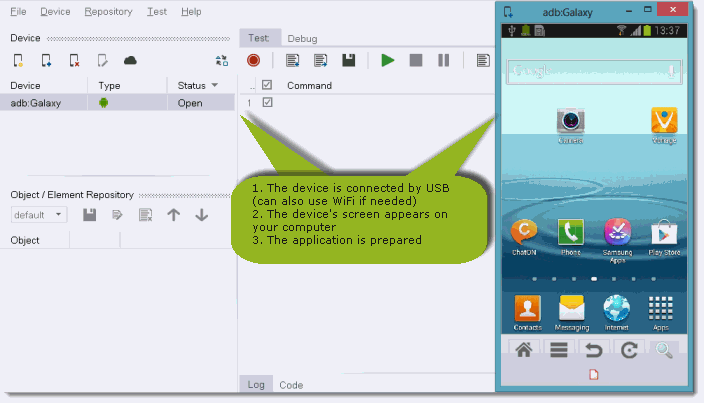
Step 1: Get ready for the recording.
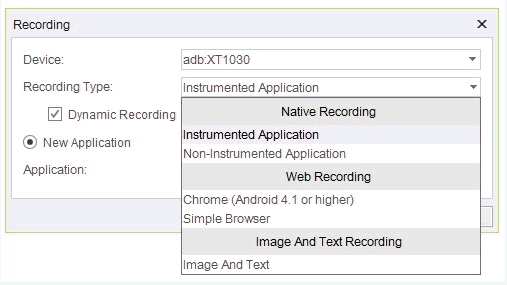
Step 2: On the Recording dialog box now displayed, set the following parameters:
-
Device to be recorded.
-
Recording Type: for Native recording, select:
- Instrumented Application
- Non-Instrumented Application

Step 3: Click the start button.
Step 4: Perform the actions to be recorded on the reflection of the device.
Some recommendations regarding the recording:
- Click the center of the image/icon/link
- Record slowly
Step 5: Once recording is completed, click the stop record button
You will see a progress bar indicating that the record data is being analyzed, and the test script will then appear in the Script area.
Note: The script you recorded can be edited later. (For instructions on how to edit, see the "Edit Test Commands" & "Edit Test Objects" section in the guide).
Step 6: Click the Play button to run the script.
Instrumented Application Options
This option enables you to perform recording on instrumented Application.
Fields for this option:
-
Dynamic Recording - checkbox field
- If checked: No elements will be extracted to Object repository during recording.
- If not checked: All elements used during recording will be extracted to object repository.
Both image recognition and Native recognition will be enabled for the Element.
-
New Application/Current Application radio button
New Application option enables you to choose any of the application available on the Application manager list which suits the device to record with.
The application will be instrumented as part of the recording preparation.
Current Application option enables you to continue recording with an already instrumented application running on the device.

Example:
We choose to record on an android device with the eBay application.
The application will be instrumented before recording all elements will be extracted to the repository during the recording.

Note: The second step (after setting the device under test) is launching the instrumented application and it was automatically added.
Non-Instrumented Application Option
This option enables you to perform recording on non-instrumented Applications such Settings of device, system applications etc.

Example:
Test recorded on the Android device settings.
The test is dynamic by default and uses XPath to identify the elements.

Step 7: The application will then be launched on your device. Go to the device reflection appearing on your computer screen, and do the exact sequence of actions you want in the test.
Some recommendations regarding the recording:
-
- Click the center of the image/icon/link
- Record slowly
Step 8: Return to SeeTestAutomation and click on the "stop recording" button.
You will see a progress bar indicating that the record data is being analyzed, and the test script will then appear in the Script area.
- The script you recorded be edited later on. (please refer to the "Edit Test Commands" & "Edit Test Objects" section in the guide for instructions on how to edit)..
- The second step (after setting the device under test) is launching the application in instrumented mode, and it was automatically added.
Step 9: Click the Play button to run the script.