Move Backlog Items Between Projects
Move backlog items between projects using multiple methods to transfer stories when organizational needs change or to correct project assignments.
Who moves backlog items between projects: Product owners relocate stories when team structures change or priorities shift across projects. Scrum masters coordinate moves during project reorganizations or team rebalancing. Admins perform bulk moves when restructuring projects or consolidating work.
Permission requirement: Moving backlog items requires edit permissions in both the source and destination projects (typically Team Member role or higher in both). The destination project must accept the backlog item type being moved. Moving items in closed projects or sprints requires reopening them first. Specific permissions depend on your organization's role configuration.
Before You Move Backlog Items
Important: When moving backlog items between teams or projects, all status values or rollup categories defined in the team process are cleared. This ensures consistency with the destination project's workflow, but you may need to reassign statuses after the move.
Move Backlog Items
Choose the method that works best for your situation. You can move individual items, multiple items at once, or use bulk editing.
Option 1: Use Move to Project Button in the Grid
Use this option to move multiple backlog items at once from any grid view.
- Click the hamburger icon
 > Product > Backlog.
 - Locate the items you want to move in the backlog grid.
- Click on the check-box to select one or more backlog items.
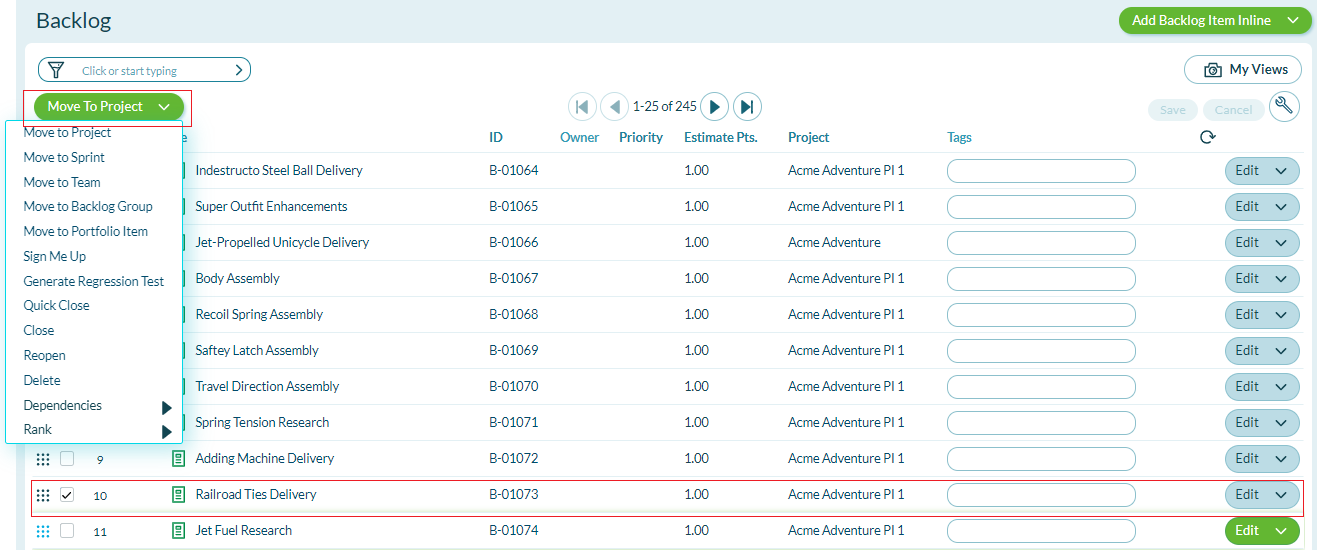
- Click the down arrow on the Move to Project button.
- In the resulting pop-up, select the destination project.
- Click Move.
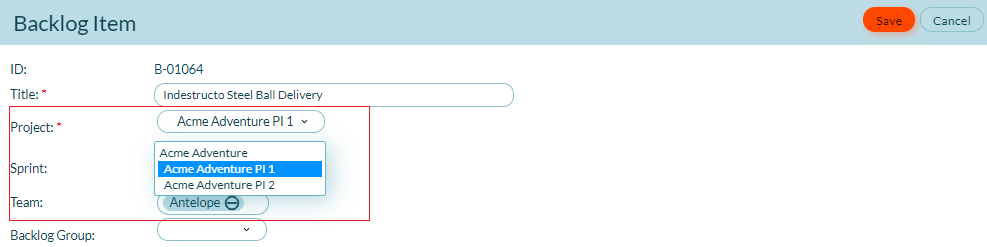
Option 2: Change the Project on the Details Page
Use this option to move a single backlog item while viewing its full details.
- Click the hamburger icon > Product > Backlog.
- Navigate to the backlog item you want to move.
- Open the Details view of the backlog item.
- Click the Edit button.
- Click the drop-down on the Project field and select the destination project.
- Click Save.
Option 3: Make the Project Field Editable in the Grid
Use this option to quickly reassign multiple backlog items to different projects from a grid view.
- Click the hamburger icon > Product > Backlog.
- On the backlog item grid, double-click the Project column header. The Project field will now be editable for all items listed.
- In each row, click the Project field and select the destination project from the drop-down list.
- Click Save for each item.

What Happens When You Move a Backlog Item
Understanding the impact of moving backlog items helps you prepare for necessary follow-up actions:
- Status Values Cleared: All team-specific status values and rollup categories are reset
- Relationships Preserved: Dependencies, attachments, links, tasks, and tests remain intact
- History Maintained: The move is logged in the backlog item's history
- Permissions Applied: The item is subject to the destination project's security settings
- Sprint Assignment: If the item was in a sprint, it may need to be reassigned to a sprint in the new project
Best Practices
- Verify Permissions: Ensure you have edit permissions in both the source and destination projects before moving items.
- Check Dependencies: Review upstream and downstream dependencies before moving to avoid breaking relationships with items in other projects.
- Update Status After Move: Immediately update the status on moved items since team-specific statuses are cleared during the move.
- Communicate with Teams: Notify both the source and destination teams when moving backlog items to ensure continuity of work.
- Move Before Sprint Planning: Avoid moving backlog items that are already assigned to active sprints, as this can disrupt sprint commitments.
- Use Bulk Move for Reorganizations: When restructuring projects or teams, use the grid selection method to move multiple items efficiently.
- Verify Sprint Assignment: After moving, check if the item needs to be assigned to a sprint in the destination project.
- Review Backlog Groups: If the item was part of a backlog group, determine if it should join an equivalent group in the destination project.
- Update Documentation: If your team maintains project-specific documentation, update references to moved backlog items.
- Audit After Large Moves: After moving many items, use reports to verify all items landed in the correct project with appropriate statuses.
Troubleshooting
Why is the Move to Project button disabled or missing?
You must have edit permissions in both source and destination projects for the Move to Project button to be enabled. If you lack permissions in the destination project, the button appears disabled. Also verify you've selected at least one backlog item using the checkboxes - the button only activates when items are selected. If the button is completely missing, check your project role - you may only have view access to the current project.
Why can't I select the destination project in the Move dropdown?
The destination project may not appear in the dropdown for several reasons: (1) You lack membership or permissions in that project. (2) The project is closed - reopen it before moving items to it. (3) The project doesn't accept the backlog item type you're moving (check project configuration). (4) The project uses a different schedule that's incompatible. Verify your access to the target project and ensure it's configured to accept the item types you're moving.
Why did my backlog item's status clear after moving it?
Status values clearing after a move is expected behavior when projects use different workflows. Each project can define unique status values through its workspace configuration. When you move a backlog item to a project with a different status set, team-specific statuses reset to prevent invalid status values in the destination project. After moving, immediately update the status to match the destination project's workflow. This ensures status reporting remains accurate.
Why can't I move a backlog item that's in an active sprint?
Backlog items in active sprints can be moved, but you should avoid it to prevent disrupting team commitments. If you must move an item from an active sprint, the sprint assignment typically clears during the move because the destination project likely uses a different schedule with different sprints. After moving, reassign the item to an appropriate sprint in the destination project. Best practice: move items before sprint planning or after sprint closure to minimize disruption.
Related Topics
- Managing Stories and Backlog Items - Overview of story management concepts and capabilities
- Create, View, Edit, and Close Backlog Items - Learn core CRUD operations for backlog items
- Delete and Recover Backlog Items - Delete and recovery procedures
- Split Backlog Items - Divide partially completed stories across sprints
- Troubleshoot Backlog Item Access - Resolve permissions and visibility issues
- Managing Projects or Releases - Learn project management fundamentals