How to use the Podman Plugin
The Deploy Podman plugin allows integration with Podman, enabling you to create, manage, and deploy containerized applications using Digital.ai Deploy. This plugin supports both API and CLI-based connections to interact with Podman.
Connection Methods
- API-based Connection: The Deploy Podman plugin allows connecting to Podman through APIs. This connection leverages the Podman System Service to create and manage resources in Podman
- CLI-based Connection: The CLI-based connection requires the Podman CLI to be set up on a remote host. In this setup, the Deploy application connects to the Podman CLI using an Overthere connection, which is secured through SSH or SMB.
Setting Up an API-Based Connection to Podman
To set up an API-based connection to Podman using the Deploy interface, do the following:
Create a Podman Engine CI
- Hover over Infrastructure, click
, and select New > Podman > Engine.
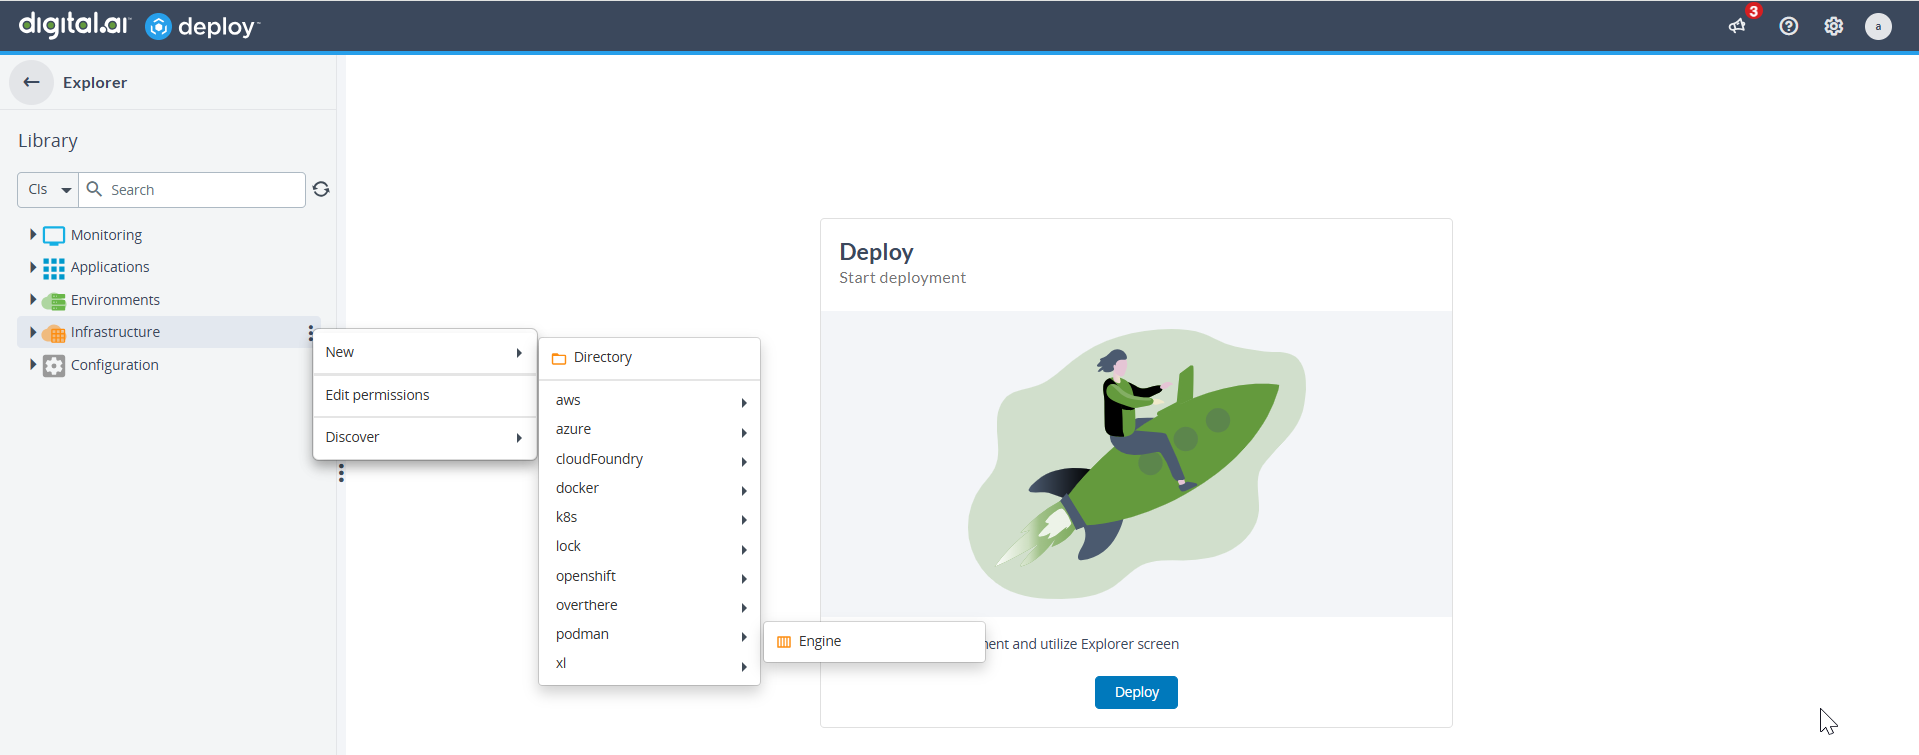
- Enter the details as required, and click Save.
- Test the connection to ensure the API connection is working correctly.
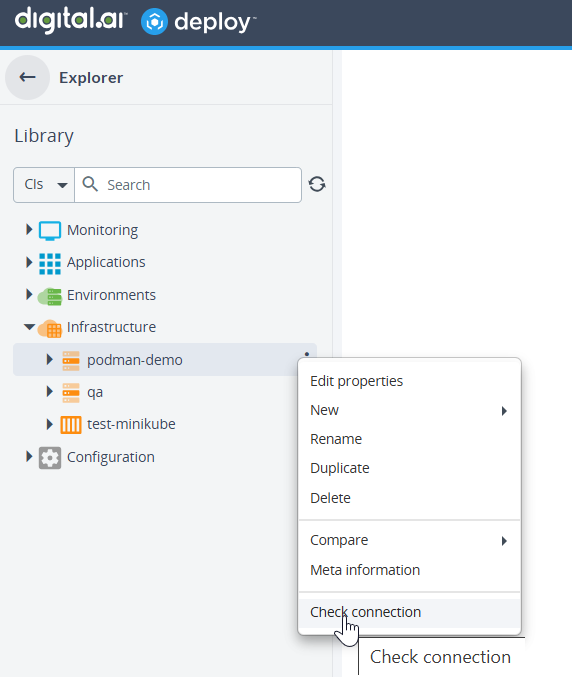
Deploy a Podman Container
- Create an application and a deployment package.
- Hover over the deployment package, click
> New, and select
podman.ContainerSpec. - Hover over the deployment package containing the new
podman.ContainerSpec, click> Deploy, and select the target environment.
- Click Continue > Deploy to execute the plan.
Sample Manifest
<?xml version="1.0" encoding="UTF-8"?>
<udm.DeploymentPackage version="1.0" application="Test-Container-Spec">
    <application />
    <orchestrator />
    <deployables>
        <podman.ContainerSpec name="/newcont">
            <tags />
            <containerName>sample-newcontainer2505</containerName>
            <image>docker.io/library/tomcat:latest</image>
            <labels />
            <environment />
            <showLogsAfter>1</showLogsAfter>
            <networks />
            <dnsOptions />
            <links />
            <portBindings />
            <volumeBindings />
        </podman.ContainerSpec>
    </deployables>
    <applicationDependencies />
    <dependencyResolution>LATEST</dependencyResolution>
    <undeployDependencies>false</undeployDependencies>
    <templates />
    <boundTemplates />
</udm.DeploymentPackage>
Deploy a Podman Pod
- Create an application and a deployment package.
- Hover over the deployment package, click
> New, and select
podman.Service. - Hover over the deployment package containing the new
podman.Pod, click> Deploy.
- Click Continue > Deploy to execute the plan.
Sample Manifest
<?xml version="1.0" encoding="UTF-8"?>
<udm.DeploymentPackage version="1.0" application="Test-Pod-Spec">
    <application />
    <orchestrator />
    <deployables>
        <podman.PodSpec name="/newpod">
            <tags />
            <PodName>sample-newpod2505</PodName>
            <labels />
            <cpu_period>1</cpu_period>
            <cpu_quota>1</cpu_quota>
            <infra_command />
            <no_infra>true</no_infra>
            <no_manage_hosts>true</no_manage_hosts>
            <start_pod>false</start_pod>
            <pod_create_command />
            <pod_devices />
            <portmappings />
        </podman.PodSpec>
    </deployables>
    <applicationDependencies />
    <dependencyResolution>LATEST</dependencyResolution>
    <undeployDependencies>false</undeployDependencies>
    <templates />
    <boundTemplates />
</udm.DeploymentPackage>
Note: You can deploy a podman Pod.
Deploy a Podman Volume
Create an Independent Volume
- Create an application and a deployment package.
- Hover over the deployment package, click
> New, and select
podman.VolumeSpec. - Enter a name for the service in the Name field and specify a Volume Name for the volume.
- Hover over the deployment package containing the new
podman.VolumeSpec, click> Deploy and select the target environment.
- Click Continue > Deploy to execute the plan.
- To check if the volume is created, run this command:
podman volume ls
Sample Manifest
<?xml version="1.0" encoding="UTF-8"?>
<udm.DeploymentPackage version="1.0" application="Test-Volume-Spec">
    <application />
    <orchestrator />
    <deployables>
        <podman.VolumeSpec name="/newvol">
            <tags />
            <volumeName>sample-newvol2505</volumeName>
            <driver>local</driver>
            <driverOptions />
            <labels />
        </podman.VolumeSpec>
    </deployables>
    <applicationDependencies />
    <dependencyResolution>LATEST</dependencyResolution>
    <undeployDependencies>false</undeployDependencies>
    <templates />
    <boundTemplates />
</udm.DeploymentPackage>
Attach a Volume to a Podman Container
- Hover over the created container, click
> New, and select MountedVolumeSpec.
- Enter a name for the application version, specify a name for the volume, enter the directory of the Podman container where the volume will be attached in the Mountpoint field, and set the default value to false in the Read Only field.
- Deploy the created package to the target environment.
The Podman container is created with the mounted volume attached at the mount point.
Create a Podman Network
- Create an application and a deployment package.
- Hover over the deployment package, click
> New, and select
podman.NetworkSpec. Perform the same action again to create apodman.ContainerSpec. - In the Network Name field, specify the name of the private network that will be created.
- Click Save to create the network.
- For the created container, go to the Network tab and add the name of the network, which will bind the
containers. - Deploy the application to the target environment.
- Log in to your Podman host and run this command:
podman network inspect <network_name> - To verify if the network is created with the Podman host, run this command:
podman network ls
Sample Manifest
<?xml version="1.0" encoding="UTF-8"?>
<udm.DeploymentPackage version="1.0" application="Test-Network-Spec">
    <application />
    <orchestrator />
    <deployables>
        <podman.NetworkSpec name="/netspec">
            <tags />
            <networkName>sample-newnet2505</networkName>
            <driver>bridge</driver>
            <networkOptions />
        </podman.NetworkSpec>
    </deployables>
    <applicationDependencies />
    <dependencyResolution>LATEST</dependencyResolution>
    <undeployDependencies>false</undeployDependencies>
    <templates />
    <boundTemplates />
</udm.DeploymentPackage>
Map a Podman Container Port to a Podman Host
Port mapping is used to map the host port with the container port.
Create a Port Mapper
- Create a container inside an application with a deployment package.
- Hover over the created container, click
> New, and select PortSpec.
- Enter a name for the application version.
- In the Host Port field, enter the port of the Podman host that is to be mapped to the container, the container port, and specify the protocol over which the connection will be established.
- Deploy the application to the target environment.
- Log in to your podman host and run this command:
podman network inspect <network_name> - To verify if the network is created with the Podman host, run this command:
podman network ls
Create a Podman Secret
-
Create an application and a deployment package.
-
Hover over the deployment package, click
> New, and select
podman.SecretSpec. -
Enter a name for the service in the Name field and specify a Secret Name for the Secret.
-
Specify a Secret for the Secret value, which needs to be stored.
-
Specify a Driver for the Secret, if required.
-
Hover over the deployment package containing the new
podman.SecretSpec, click> Deploy and select the target environment.
-
Click Continue > Deploy to execute the plan.
-
To check if the secret is created, run this command:
podman secret ls
Sample Manifest
<?xml version="1.0" encoding="UTF-8"?>
<udm.DeploymentPackage version="1.0" application="podapp">
  <application />
  <orchestrator />
  <deployables>
    <podman.SecretSpec name="/secretspec">
      <tags />
      <secretName>secretname</secretName>
      <driver>file</driver>
      <secret>secretvalue</secret>
    </podman.SecretSpec>
  </deployables>
  <applicationDependencies />
  <dependencyResolution>LATEST</dependencyResolution>
  <undeployDependencies>false</undeployDependencies>
  <templates />
  <boundTemplates />
</udm.DeploymentPackage>
Deploy a File to Container in Podman
- Create an application and a deployment package.
- Hover over the deployment package, click
> New, and select
podman.File. Perform the same action again to create apodman.File. - In the Name field, specify the name of the CI that will be created.
- In the Choose file, specify the file location.
- In the Target Container, Specify the Target Container ID.
- In the Target Path, Specify the Target Path inside the Container.
- Click Save to create
podman.File. - Deploy the application to the target environment.
- To verify if the file is created with the Podman host, go inside the container with bash and verify the file.
Sample Manifest
<?xml version="1.0" encoding="UTF-8"?>
<udm.DeploymentPackage version="1.0" application="podapp">
  <application />
  <orchestrator />
  <deployables>
    <podman.File name="/filetype" file="/filetype/wls-issue.docx">
      <tags />
      <scanPlaceholders>true</scanPlaceholders>
      <preScannedPlaceholders>false</preScannedPlaceholders>
      <placeholders />
      <checksum>225ced63f77e38e436c7c595fbdbc882be239580f892a3cbdf29f1d12b11b0ef</checksum>
      <fileEncodings>
        <entry key=".+\.properties">ISO-8859-1</entry>
      </fileEncodings>
      <isRescanned>false</isRescanned>
      <targetContainer>conatinerId</targetContainer>
      <targetPath>/tmp</targetPath>
    </podman.File>
  </deployables>
  <applicationDependencies />
  <dependencyResolution>LATEST</dependencyResolution>
  <undeployDependencies>false</undeployDependencies>
  <templates />
  <boundTemplates />
</udm.DeploymentPackage>
Deploy a Folder to Container in Podman
- Create an application and a deployment package.
- Hover over the deployment package, click
> New, and then select
podman.Folder. Perform the same action again to create apodman.Folder. - In the Name field, specify the name of the CI that will be created.
- In the Choose file, specify the folder location (Folder should be Zipped and uploaded as a File).
- In the Target Container, Specify the Target Container ID.
- In the Target Path, Specify the Target Path inside the Container.
- Click Save to create
podman.Folder. - Deploy the application to the target environment.
- To verify if the foler is created with the Podman host, go inside the container with bash and verify the folder.
Sample Manifest
<?xml version="1.0" encoding="UTF-8"?>
<udm.DeploymentPackage version="1.0" application="podapp">
  <application />
  <orchestrator />
  <deployables>
    <podman.Folder name="/folderfile" file="/folderfile/podapp-1.0 (5).zip">
      <tags />
      <scanPlaceholders>true</scanPlaceholders>
      <preScannedPlaceholders>false</preScannedPlaceholders>
      <placeholders />
      <checksum>5e7cc41f1f5068f967f70a41ba19d1b9618eecaf778a46fb948a0b4e197bc7f9</checksum>
      <fileEncodings>
        <entry key=".+\.properties">ISO-8859-1</entry>
      </fileEncodings>
      <isRescanned>false</isRescanned>
      <targetContainer>containerID</targetContainer>
      <targetPath>/tmp</targetPath>
    </podman.Folder>
  </deployables>
  <applicationDependencies />
  <dependencyResolution>LATEST</dependencyResolution>
  <undeployDependencies>false</undeployDependencies>
  <templates />
  <boundTemplates />
</udm.DeploymentPackage>
Setting Up an CLI-Based Connection to Podman (SSH Connection)
Podman plugin supports SSH-based CLI connections using the Overthere to connect to both local and remote Podman hosts.
Create a Podman CLI Specification
- Create an application and a deployment package. For more information, see Add a Package to Deploy.
- Hover over the deployment package, click the
, and select > New > Podman > cli > Command.
- Enter the details as required, and click Save.
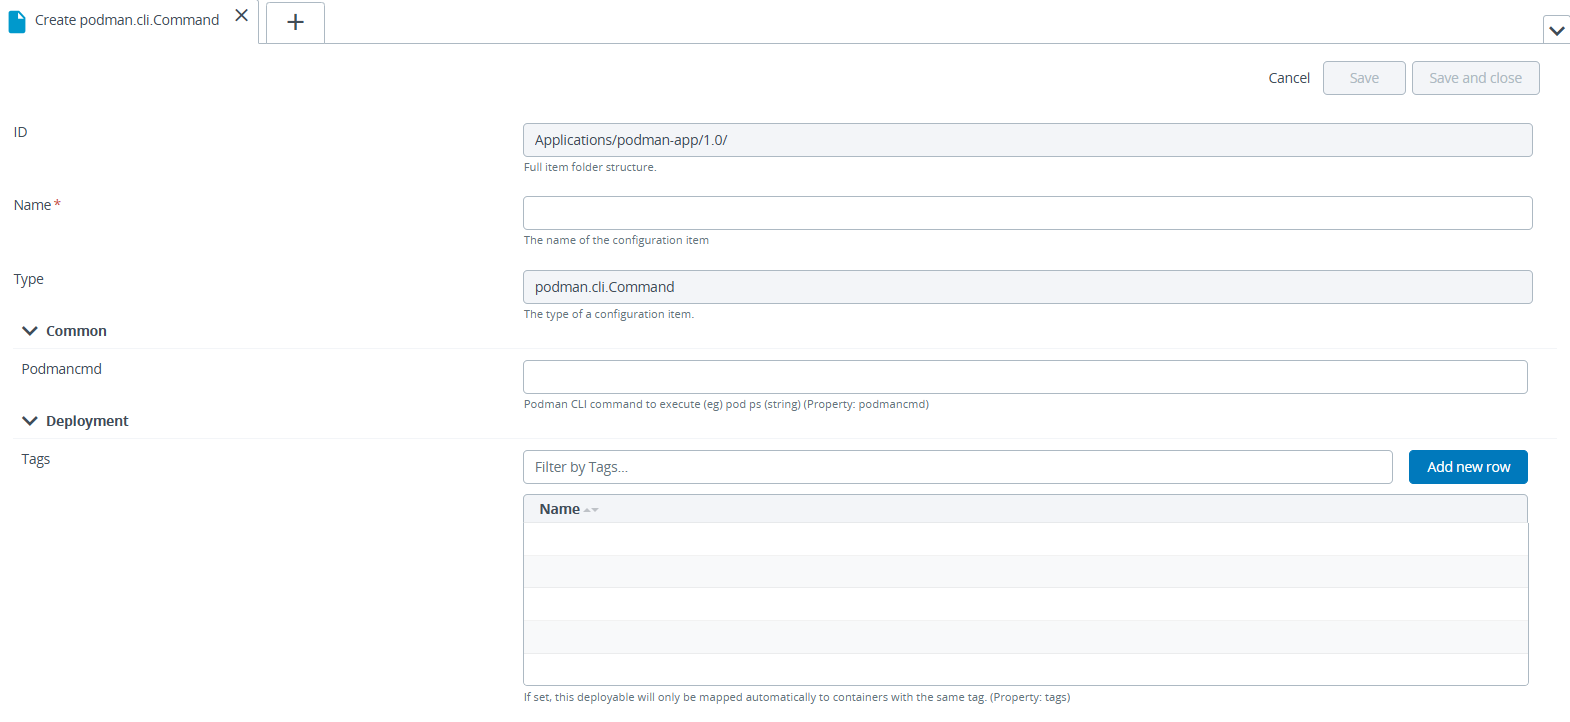
Here's an example specification for the clispec.
<?xml version="1.0" encoding="UTF-8"?>
<udm.DeploymentPackage version="1.0" application="Test-CLI-Spec">
    <application/>
    <orchestrator/>
    <deployables>
        <podman.cli.Command name="/testclispec">
            <tags/>
            <podmancmd>podman ps</podmancmd>
        </podman.cli.Command>
    </deployables>
    <applicationDependencies/>
    <dependencyResolution>LATEST</dependencyResolution>
    <undeployDependencies>false</undeployDependencies>
    <templates/>
    <boundTemplates/>
</udm.DeploymentPackage>
Deploy a Podman Container Using CLI
- Create an application and a deployment package. For more information, see Add a Package to Deploy.
- Hover over the deployment package, click
, and select > New > Podman > cli > ContainerSpec.
- Enter the container details as required, and click Save.
Here's an example specification for the podman.ContainerSpec.
 <?xml version="1.0" encoding="UTF-8"?>
<udm.DeploymentPackage version="1.0" application="Test-Container-Spec">
    <application/>
    <orchestrator/>
    <deployables>
        <podman.ContainerSpec name="/newcont">
            <tags/>
            <containerName>sample-newcontainer2505</containerName>
            <image>docker.io/library/tomcat:latest</image>
            <labels/>
            <environment/>
            <showLogsAfter>1</showLogsAfter>
            <networks/>
            <dnsOptions/>
            <links/>
            <portBindings/>
            <volumeBindings/>
        </podman.ContainerSpec>
    </deployables>
    <applicationDependencies/>
    <dependencyResolution>LATEST</dependencyResolution>
    <undeployDependencies>false</undeployDependencies>
    <templates/>
    <boundTemplates/>
</udm.DeploymentPackage>
- Hover over the deployment package, click the vertical ellipsis icon and select Deploy.
- Select the target environment.
- Click Continue and Deploy.
- To verify if container is created, run the following command:
podman container ps
Deploy to a Podman Volume Using CLI
- Create an application and a deployment package. For more information, see Add a Package to Deploy.
- Hover over the deployment package, click the
, and select New > podman > cli > VolumeSpec.
- Type the details of the volume such as the volume name, driver, and so on and click Save.
Here's an example specification for the
podman.VolumeSpec.
   <?xml version="1.0" encoding="UTF-8"?>
<udm.DeploymentPackage version="1.0" application="Test-Volume-Spec">
    <application/>
    <orchestrator/>
    <deployables>
        <podman.cli.VolumeSpec name="/testvolumespec">
            <tags/>
            <volumeName>test-volume</volumeName>
            <driver>local</driver>
            <labels/>
            <mountOptions>rw</mountOptions>
        </podman.cli.VolumeSpec>
    </deployables>
    <applicationDependencies/>
    <dependencyResolution>LATEST</dependencyResolution>
    <undeployDependencies>false</undeployDependencies>
    <templates/>
    <boundTemplates/>
</udm.DeploymentPackage>
-
Hover over the deployment package, click
and select Deploy.
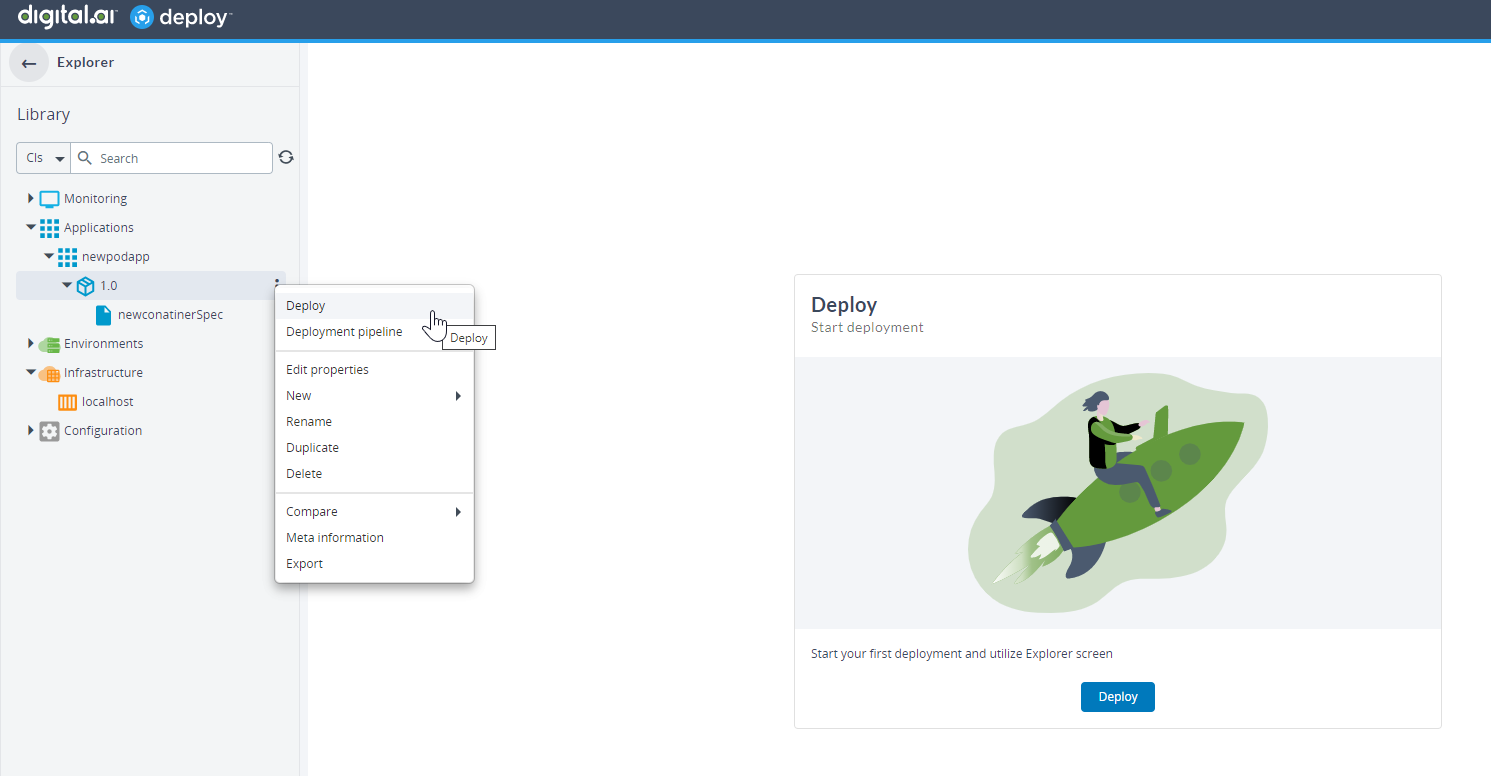
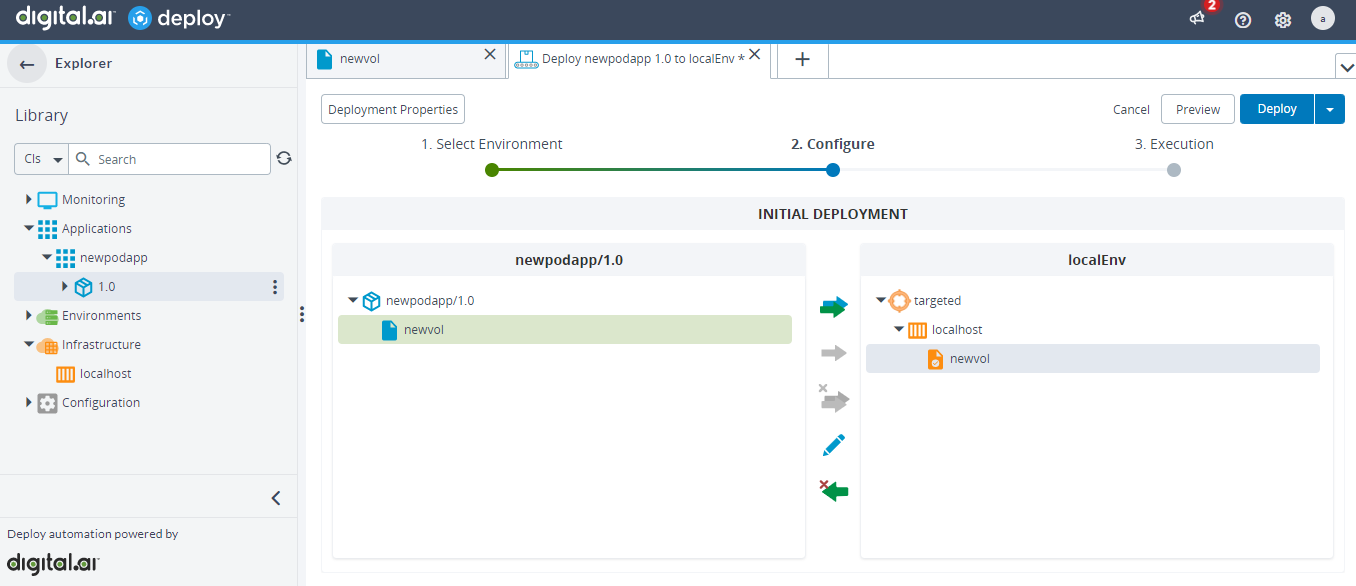
-
Select the target environment, and click Continue.
-
Click Deploy.
-
Run the following command to verify if the volume is created.
podman volume ls
Create a Podman Network Using CLI
-
Create an application and a deployment package. For more information, see Add a Package to Deploy.
-
Hover over the deployment package, click the
, and select New > podman > cli > NetworkSpec.
-
Enter the details as required, and click Save.
Here's an example specification for the
podman.NetworkSpec.
 <?xml version="1.0" encoding="UTF-8"?>
<udm.DeploymentPackage version="1.0" application="Test-Network-Spec">
    <application/>
    <orchestrator/>
    <deployables>
        <podman.cli.NetworkSpec name="/testnetworkspec">
            <tags/>
            <networkName>test-network</networkName>
            <driver>bridge</driver>
            <internal>false</internal>
            <labels/>
            <ipv6Enabled>false</ipv6Enabled>
            <ipamDriver>default</ipamDriver>
        </podman.cli.NetworkSpec>
    </deployables>
    <applicationDependencies/>
    <dependencyResolution>LATEST</dependencyResolution>
    <undeployDependencies>false</undeployDependencies>
    <templates/>
    <boundTemplates/>
</udm.DeploymentPackage>
-
Hover over the deployment package, click the
, and select Deploy.

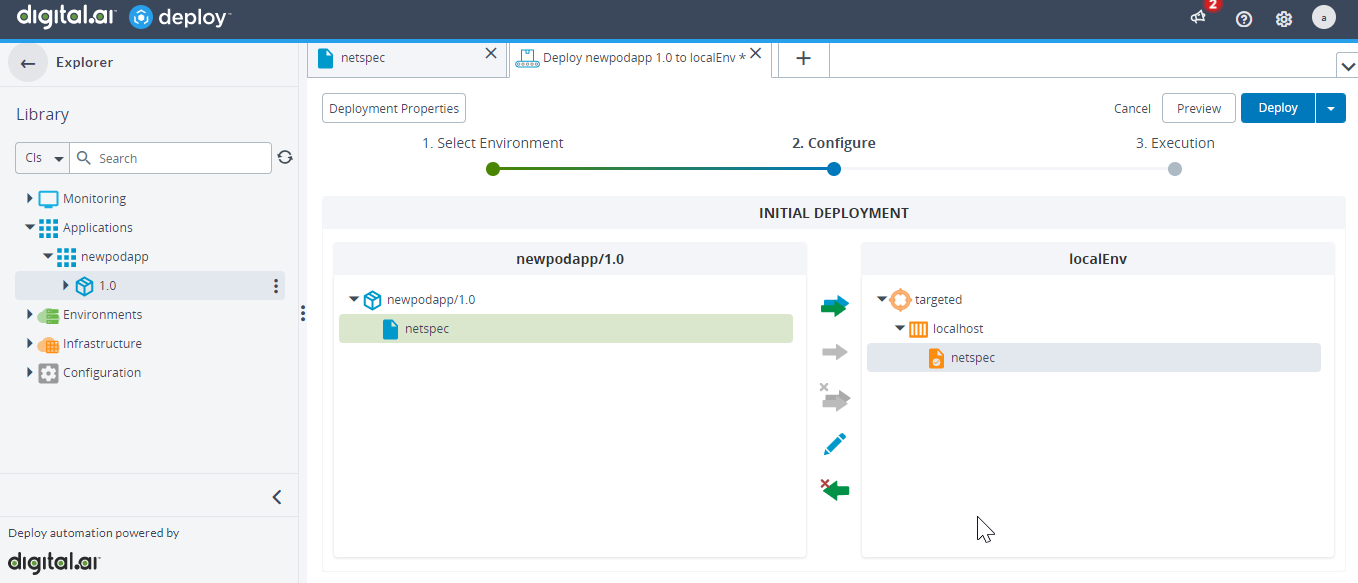
-
Select the target environment, and click Continue.
-
Click Deploy.
-
Log on to your podman host and run the following command.
podman network inspect <network_name> -
Run the following command to verify if the network is created.
podman network ls
Create a Podman Secret Using CLI
- Create an application and a deployment package. For more information, see Add a Package to Deploy.
- Hover over the deployment package, click the
, and select New > podman > cli > SecretSpec.
- Type the details of the secret such as the Secret Name, Driver (optional), Secret (a value for the secret), and click Save.
Here's an example specification for the
podman.SecretSpec.
   <?xml version="1.0" encoding="UTF-8"?>
<udm.DeploymentPackage version="1.0" application="Test-Secret-Spec">
    <application/>
    <orchestrator/>
    <deployables>
        <podman.cli.SecretSpec name="/testsecretspec">
            <tags/>
            <secretName>sample-secret</secretName>
            <key>username</key>
            <value>admin</value>
        </podman.cli.SecretSpec>
    </deployables>
    <applicationDependencies/>
    <dependencyResolution>LATEST</dependencyResolution>
    <undeployDependencies>false</undeployDependencies>
    <templates/>
    <boundTemplates/>
</udm.DeploymentPackage>
-
Hover over the deployment package, click the
, and select Deploy.

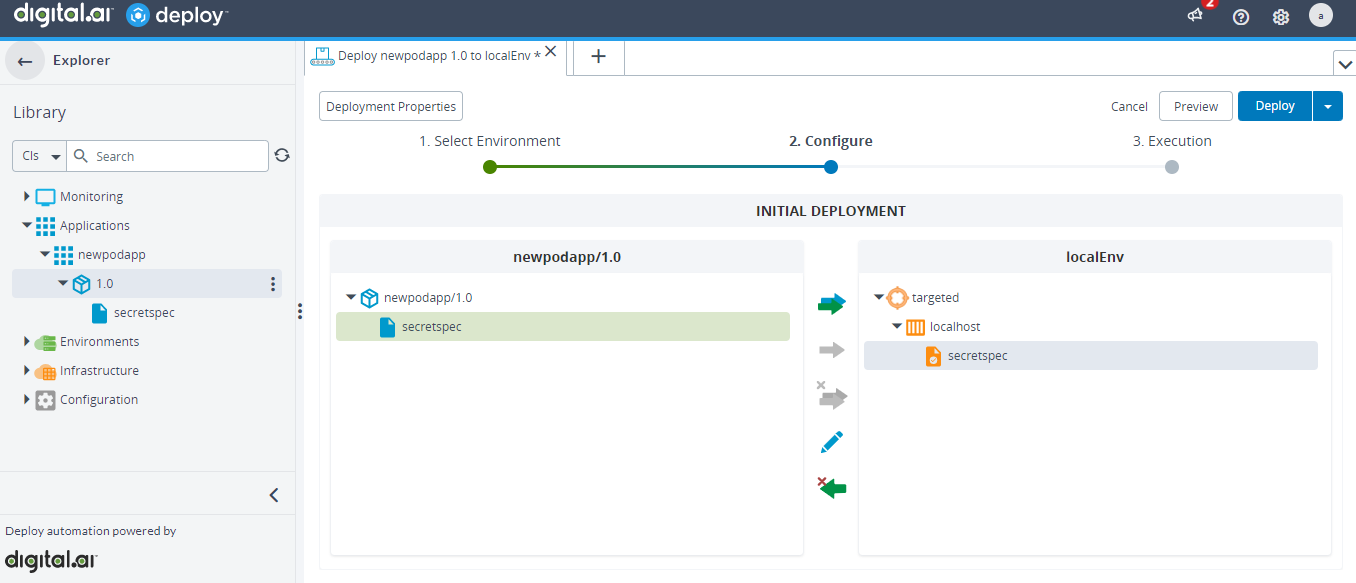
-
Select the target environment, and click Continue.
-
Click Deploy.
-
Run the following command to verify if the secret is created.
podman secret ls
Deploy a File to a Podman Container Using CLI
- Create an application and a deployment package. For more information, see Add a package to Deploy.
- Hover over the deployment package, click the
, and select New > podman > cli > File.
- Enter a FileSpec name.
- Enter the File URI (or click Browse from the Choose File field and select the file), Target Container (specify the container ID), Target Path (specify the path to the directory inside the container), and click Save.
Here's an example specification for the
podman.File.
  <?xml version="1.0" encoding="UTF-8"?>
<udm.DeploymentPackage version="1.0" application="Test-File-Spec">
    <application/>
    <orchestrator/>
    <deployables>
        <podman.cli.File name="/filespec" file="/filespec/build.gradle">
            <tags/>
            <scanPlaceholders>true</scanPlaceholders>
            <preScannedPlaceholders>false</preScannedPlaceholders>
            <placeholders/>
            <checksum>837d641bac2cb1be3c10d74c3460900691805bdc4c50bdaa04c9757e8e63a5b4</checksum>
            <fileEncodings>
                <entry key=".+\.properties">ISO-8859-1</entry>
            </fileEncodings>
            <isRescanned>false</isRescanned>
            <targetContainer>mycontainer</targetContainer>
            <targetPath>/tmp</targetPath>
        </podman.cli.File>
    </deployables>
    <applicationDependencies/>
    <dependencyResolution>LATEST</dependencyResolution>
    <undeployDependencies>false</undeployDependencies>
    <templates/>
    <boundTemplates/>
</udm.DeploymentPackage>
- Hover over the deployment package, click the
, and select Deploy.
- Select the target environment, and click Continue.
- Click Deploy.
- To verify if the file is deployed to the podman container, log on to the container with bash and verify the deployment.
Deploy a Folder to a Podman Container Using CLI
You must have the folder zipped before you deploy the folder to the container.
- Create an application and a deployment package. For more information, see Add a package to Deploy.
- Hover over the deployment package, click the
, and select New > podman > cli > Folder.
- Enter a FolderSpec name.
- Enter the Folder URI (or click Browse from the Choose File field and select the zip file of the folder), Target Container (specify the container ID), Target Path (specify the path to the directory inside the container), and click Save.
Here's an example specification for the podman.Folder.
  <?xml version="1.0" encoding="UTF-8"?>
<udm.DeploymentPackage version="1.0" application="Test-Folder-Spec">
    <application/>
    <orchestrator/>
    <deployables>
        <podman.cli.Folder name="/folderspec" file="/folderspec/test.zip">
            <tags/>
            <scanPlaceholders>true</scanPlaceholders>
            <preScannedPlaceholders>false</preScannedPlaceholders>
            <placeholders/>
            <checksum>c4b3ed8637bdce64362e89c0e76c158c6a8b36f3208c43c0504746f2a013e313</checksum>
            <fileEncodings>
                <entry key=".+\.properties">ISO-8859-1</entry>
            </fileEncodings>
            <isRescanned>false</isRescanned>
            <targetContainer>mycontainer</targetContainer>
            <targetPath>/tmp/</targetPath>
        </podman.cli.Folder>
    </deployables>
    <applicationDependencies/>
    <dependencyResolution>LATEST</dependencyResolution>
    <undeployDependencies>false</undeployDependencies>
    <templates/>
    <boundTemplates/>
</udm.DeploymentPackage>
- Hover over the deployment package, click the
, and select Deploy.
- Select the target environment, and click Continue.
- Click Deploy.
- To verify if the folder is deployed to the podman container, log on to the container with bash and verify the deployment.