Kubernetes plugin
This topic covers the Deploy Kubernetes (K8s) plugin, which supports creating and managing Kubernetes resources such as Namespaces, Pods, Deployments, ConfigMaps, Secrets, and more, using various authentication methods.
The Deploy Kubernetes (K8s) plugin supports:
- Discovering and auto-creating CIs such as pods, namespaces, and deployed services in a cluster
- Creating Namespaces
- Deploying Kubernetes Namespaces and Pods
- Deploying Deployment Configs
- Adding an assumed role to fetch the resources from the cluster
- Adding service account based authentication
- Mounting volumes on Kubernetes Pods
- Deploying containers in the form of Pods, Deployments, and StatefulSets including all the configuration settings such as environment variables, networking, and volume settings, as well as liveness and readiness probes
- Deploying volume configuration through PersistentVolumes, PersistentVolumeClaims, and StorageClasses
- Deploying proxy objects such as Services and Ingresses
- Deploying configuration objects such as ConfigMaps and Secrets
For more information about the Deploy Kubernetes plugin requirements and the configuration items (CIs) that the plugin supports, see the Kubernetes Plugin Reference.
Using the Deploy Kubernetes Plugin
The Deploy Kubernetes plugin can create and destroy Kubernetes resources on a Kubernetes host. To use the plugin:
- Download the Deploy Kubernetes plugin ZIP from the distribution site.
- Unpack the plugin inside the
XL_DEPLOY_SERVER_HOME/plugins/directory. - Restart Deploy.
With this plugin, Kubernetes host types and tasks specific for creating and removing Kubernetes resources are available to use in Deploy.
Set Up the k8s.master With Minikube
-
Hover over Infrastructure, click
 , click New, and select
 k8s.Master. -
Set up the
k8s.Masterauthentication using one of these methods:-
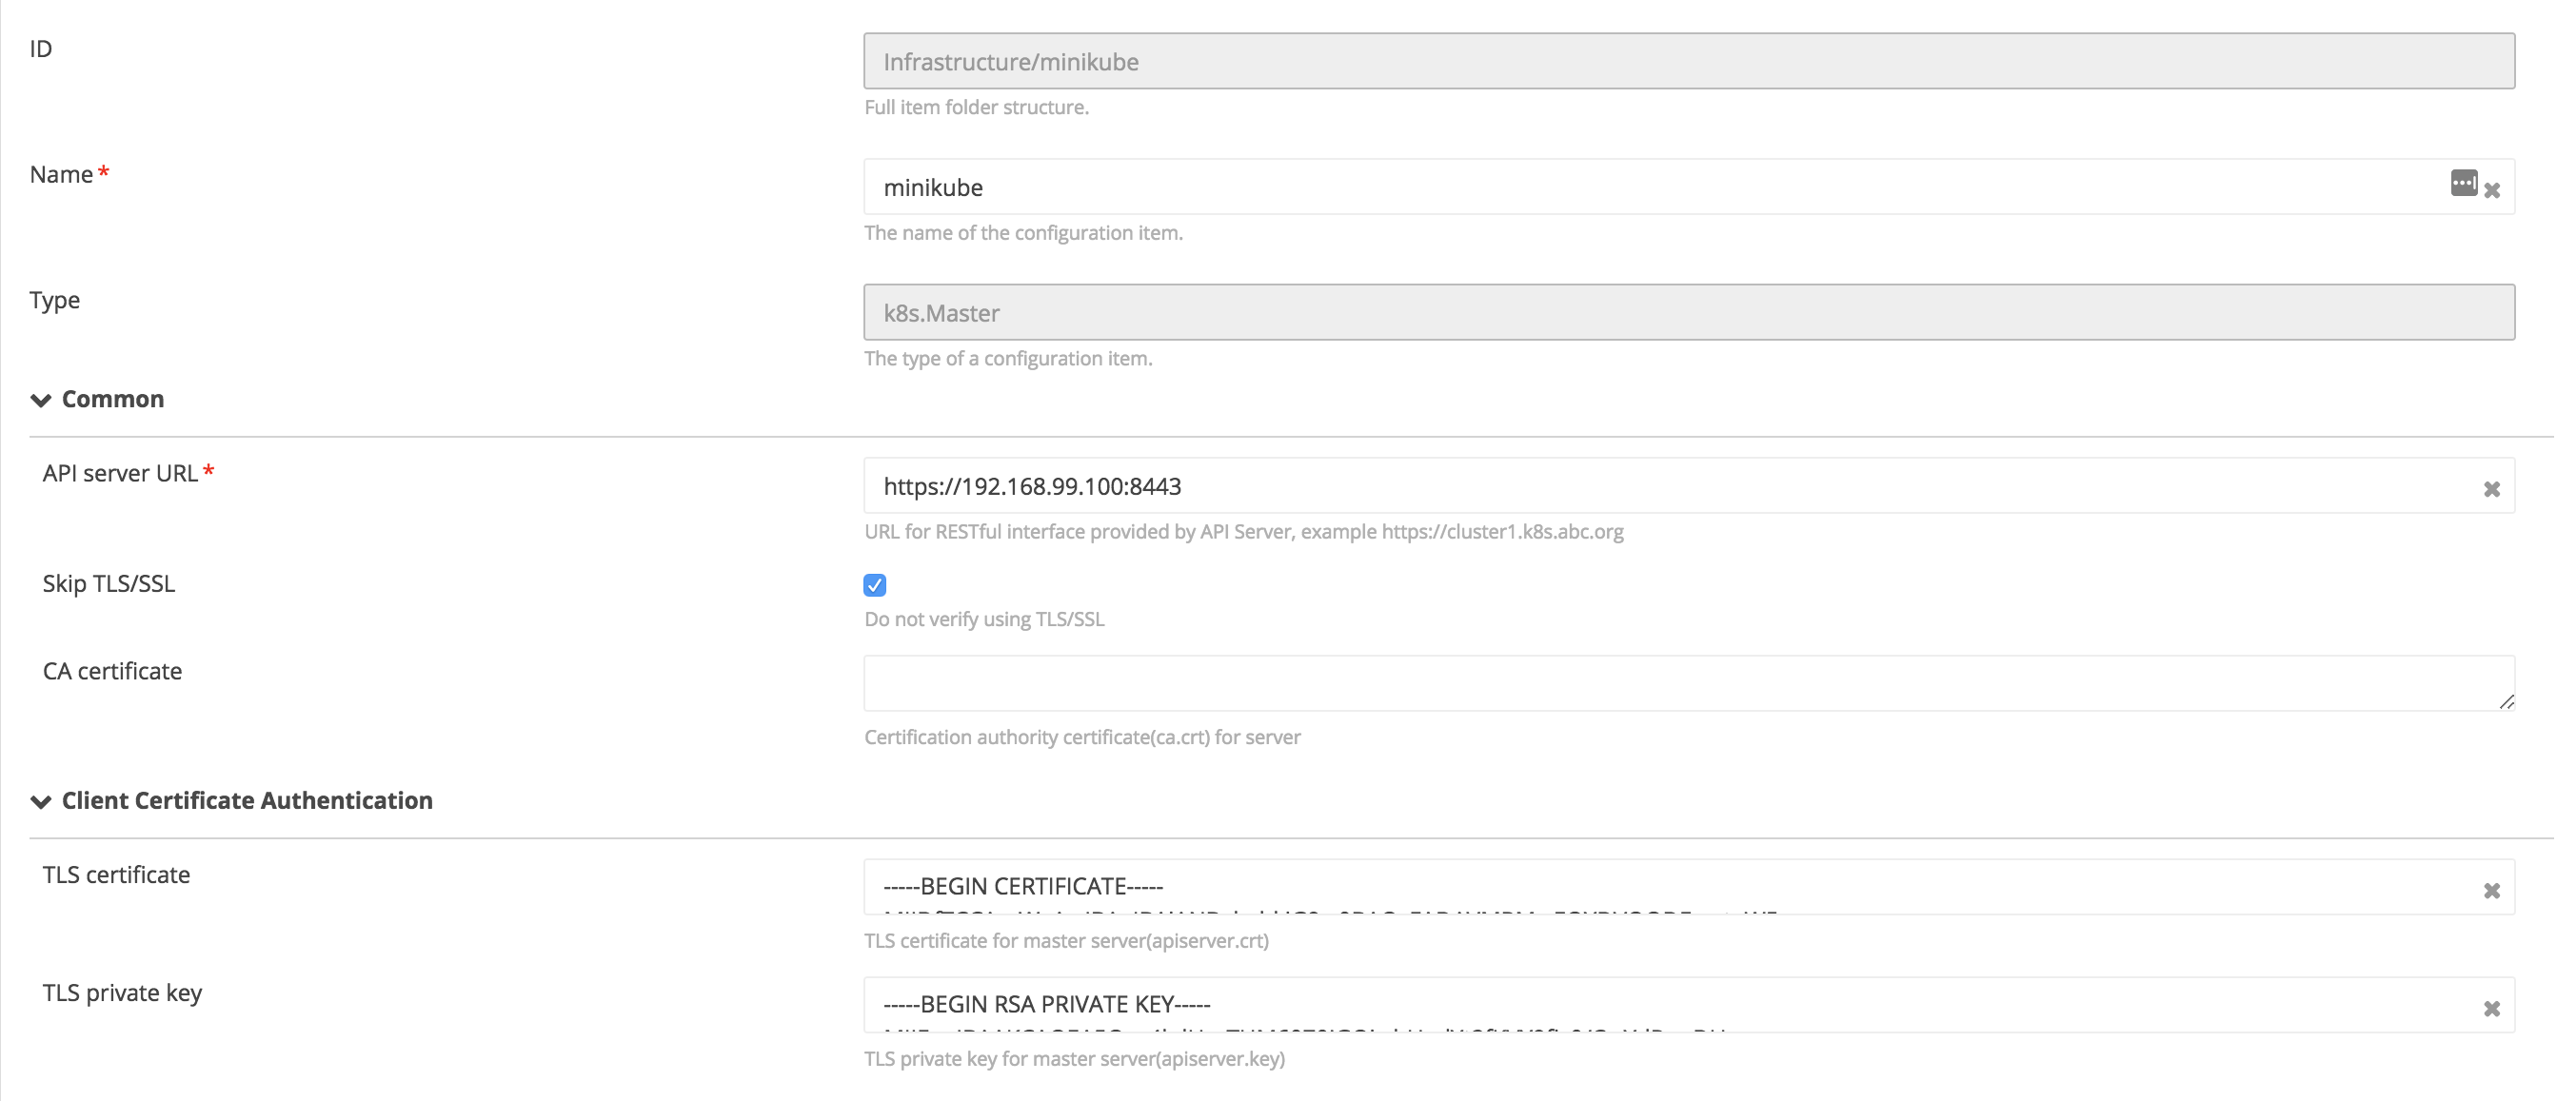
Client certificate authentication. Specify the following required properties:
apiServerURL: The URL for RESTful interface provided by the API ServerskipTLS: Do not verify using TLS/SSLcaCert: Certification authority certificate for server (example:.../.minikube/ca.crt)tlsCert: TLS certificate for master server (example:.../.minikube/apiserver.crt)tlsPrivateKey: TLS private key for master server (example:.../.minikube/apiserver.key)
-
Username/password authentication
username: Username used for authenticationpassword: Password used for authentication

-
Token authentication
token: Token used for authentication

-
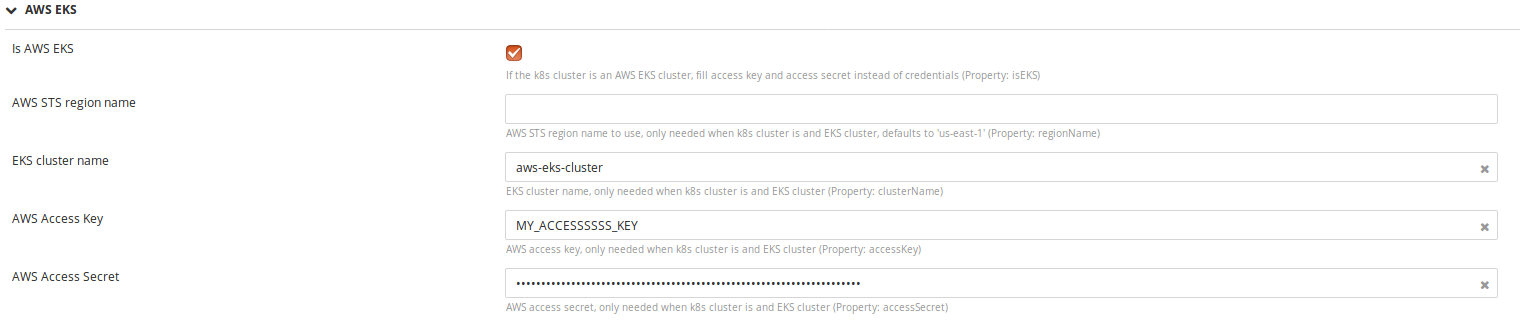
AWS EKS authentication. For an AWS EKS cluster, specify the following required properties:
isEKS: Check if the K8s cluster is an AWS EKSclusterName: The AWS EKS cluster nameaccessKey: The AWS Access KeyaccessSecret: The AWS Access Secret
-
Set Up the k8s.Master With GKE
- Hover over Infrastructure, click , click New, and select
k8s.Master. - Set up the
k8s.Masterauthentication using one of these methods:- Client Certificate Authentication
- Username/password Authentication
- Token Authentication
- Follow the instructions described in Set up the
k8s.Masterwith minikube. Collect the authentication information from the Google Cluster and create thek8s.Master.
Using Service Account Based Authentication functionality with GKE
-
Hover over Infrastructure, click
, click New, and select k8s.Master. -
In the Create k8s.Master page, select the is Google GKE check box and fill details of the Google Project ID, Google client Email, and Google Private Key fields. Collect the authentication information from google cluster and create
k8s.Masteras described in Setting up thek8s.Masterwith GKE section.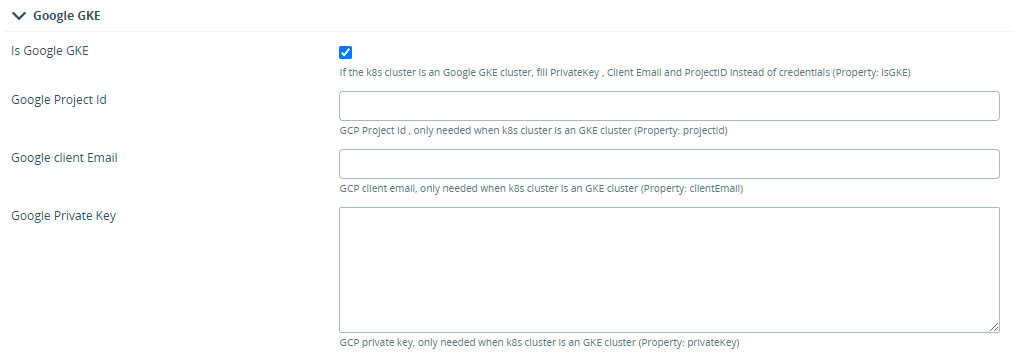
Set Up the k8s.Master With AWS EKS
- Hover over Infrastructure, click , click New, and select
k8s.Master.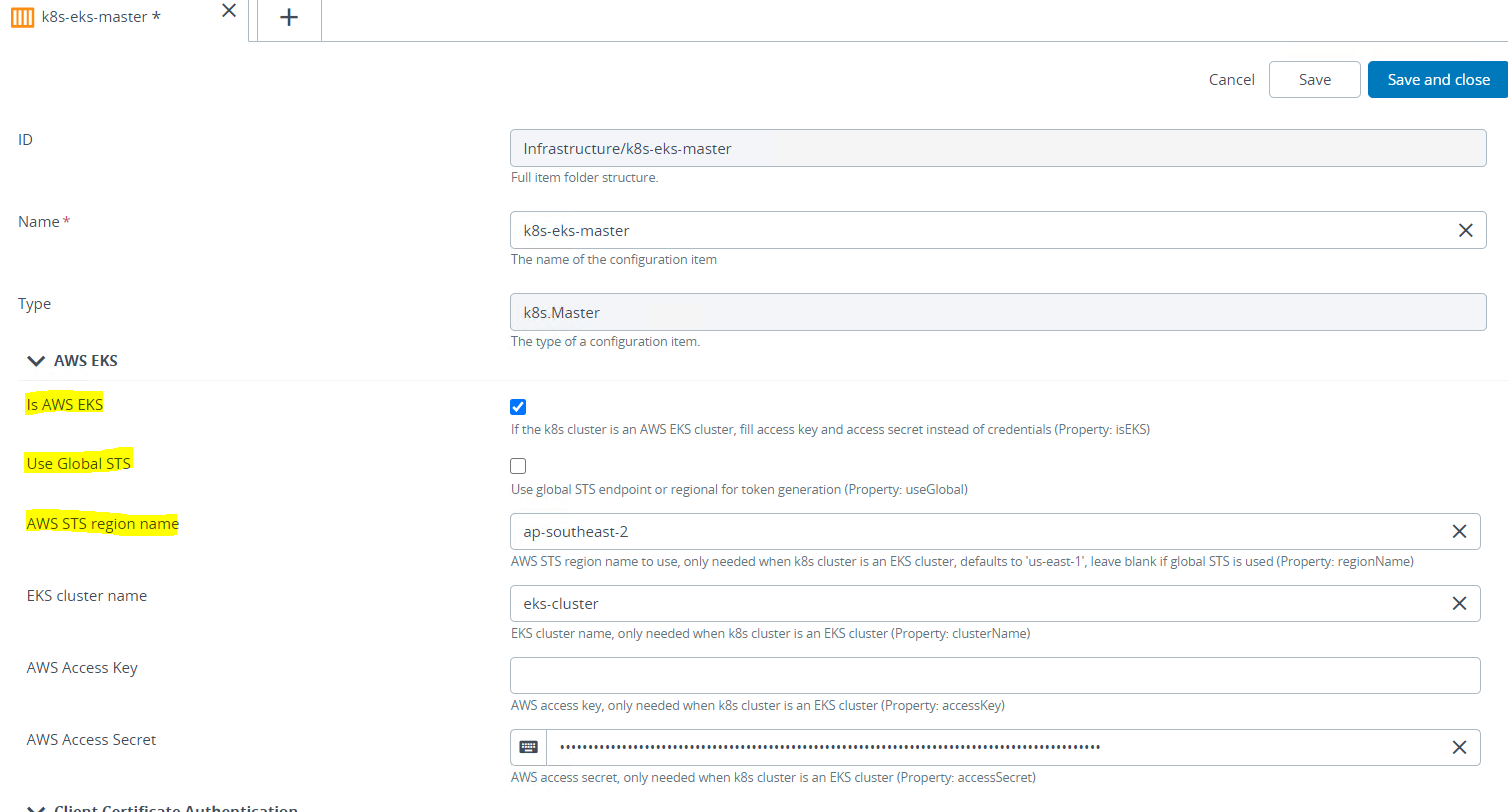
- Expand the AWS EKS section, select the Is AWS EKS check box to inform Deploy that it is an EKS cluster.
- Select the Use Global STS check box if you want to use the global STS endpoint for token generation. However, if you want to use a regional STS endpoint (for example, sts.ap-southeast-2.amazonaws.com) for token generation, then clear the check box and provide the region name in the AWS STS region name field.
You must also ensure that the region you provide as the AWS STS region name should have the STS token enabled.
- Provide the values for fields, such as EKS cluster name, AWS Access Key and AWS Access Secret.
- Under the Common section:
apiServerURL: The API server endpoint. Can be found in the Amazon Container Services EKS Control PanelskipTLS: Do not verify using TLS/SSLcaCert: Certificate authority. Can be found in the Amazon Container Services EKS Control Panel (the CA certificate is base64 encoded by default in EKS Control Panel. Make sure is decrypted before copying to Deploy).
- Click Save or Save and close to save or save and proceed testing your configuration.
Using an AWS CLI Profile for EKS Authentication
Instead of providing the AWS Access Key and AWS Access Secret directly on the k8s.Master CI, you can authenticate to an EKS cluster using a named profile defined in your AWS CLI configuration. This is useful when credentials are already managed on the host through the AWS shared configuration and credentials files.
-
On the host running the connection (the Deploy server or the satellite that connects to the cluster), define the profile in the AWS CLI configuration file located at
$HOME/.aws/configwith the corresponding credentials in$HOME/.aws/credentials. For example:[profile eksprofile]region = eu-west-1 -
Hover over Infrastructure, click
, click New, and select k8s.Master. -
Expand the AWS EKS section and select the Is AWS EKS check box.
-
In the AWS Profile Name field, enter the name of the profile defined in
$HOME/.aws/config. -
Provide the remaining EKS details, such as the EKS cluster name, as described in Setting up the
k8s.Masterwith AWS EKS. -
Click Save or Save and close.
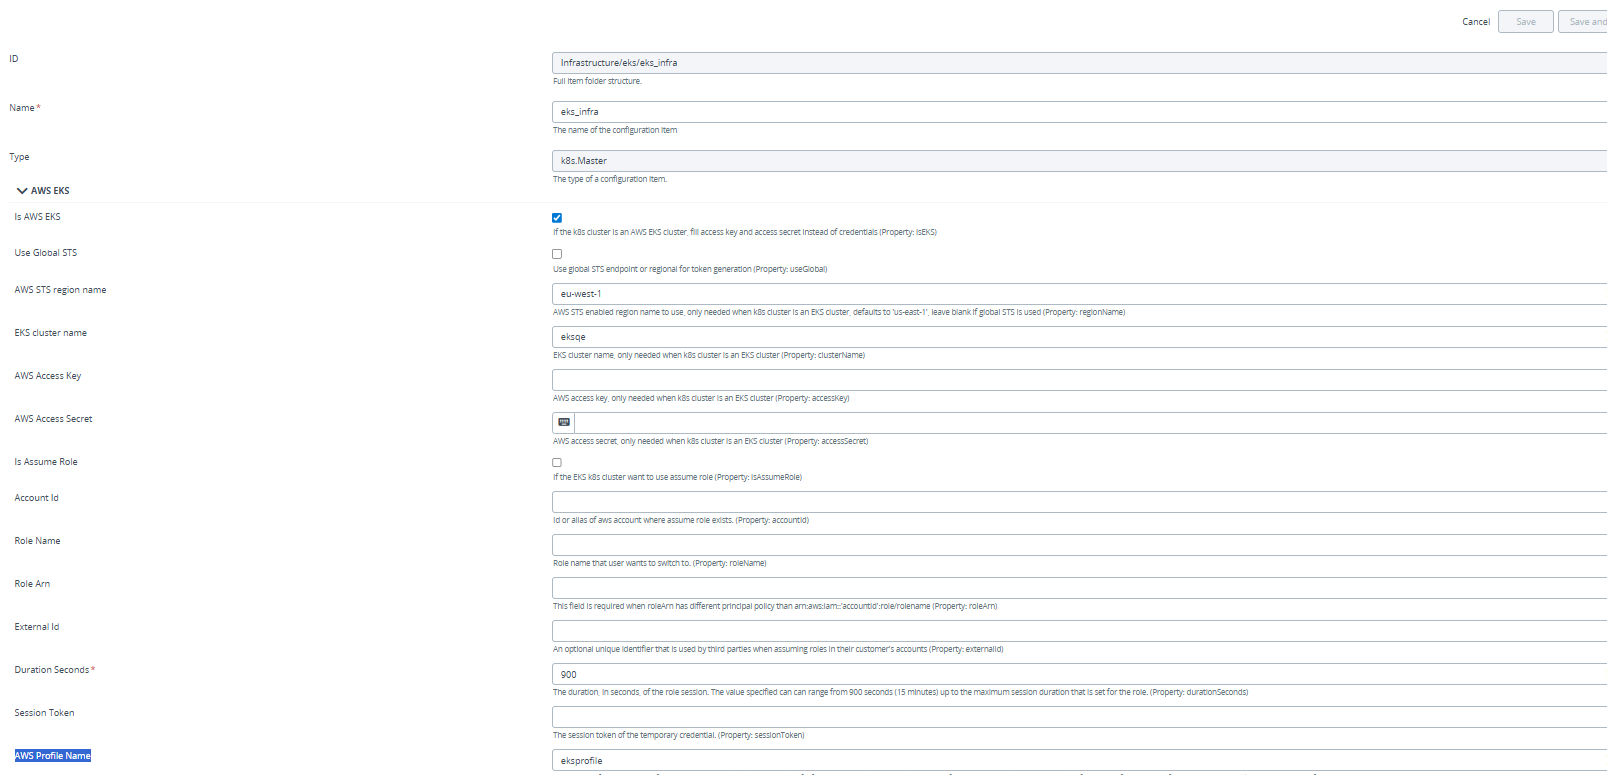
When a profile name is provided, Deploy uses that profile to generate the EKS authentication token during the Check Connection control task and during deployments of all Kubernetes resource types. The AWS Profile Name can be used on its own or together with AWS credentials configured on the CI.
The profile must exist in the AWS CLI configuration on the host that performs the connection. If the specified profile is not found, the connection fails.
Using Assume Role Functionality With EKS
-
Hover over Infrastructure, click
, click New, and select k8s.Master. -
Fill in the required information as mentioned in Setting up the
k8s.Masterwith AWS EKS section. -
Select the is Assume Role check box and fill details of the Account Id, Role Name, External ID, Role Arn, Duration Seconds and Session Token fields. Collect the authentication information from AWS cloud IAM dashboard and create
k8s.Masteras described above.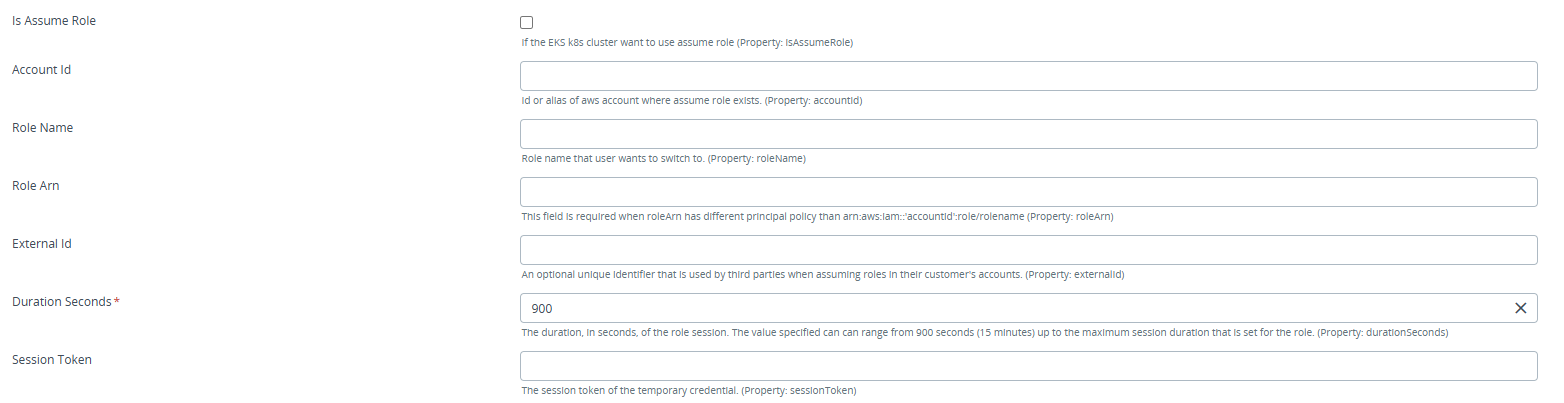
External ID is an optional unique identifier that is used by third parties when assuming roles in their customer's accounts. This provides an additional layer of security for cross-account access.
Override Assume Role Details at the k8s.Namespace Level
By default, the External ID and Role Arn used to assume a role on an EKS cluster are taken from the parent k8s.Master CI. You can override these values for an individual k8s.Namespace CI, allowing different namespaces under the same cluster to assume different IAM roles.
The k8s.Namespace CI provides the following optional properties:
externalId: The External ID used when assuming the role for operations in this Namespace.roleArn: The Amazon Resource Name (ARN) of the IAM role to assume for operations in this Namespace.
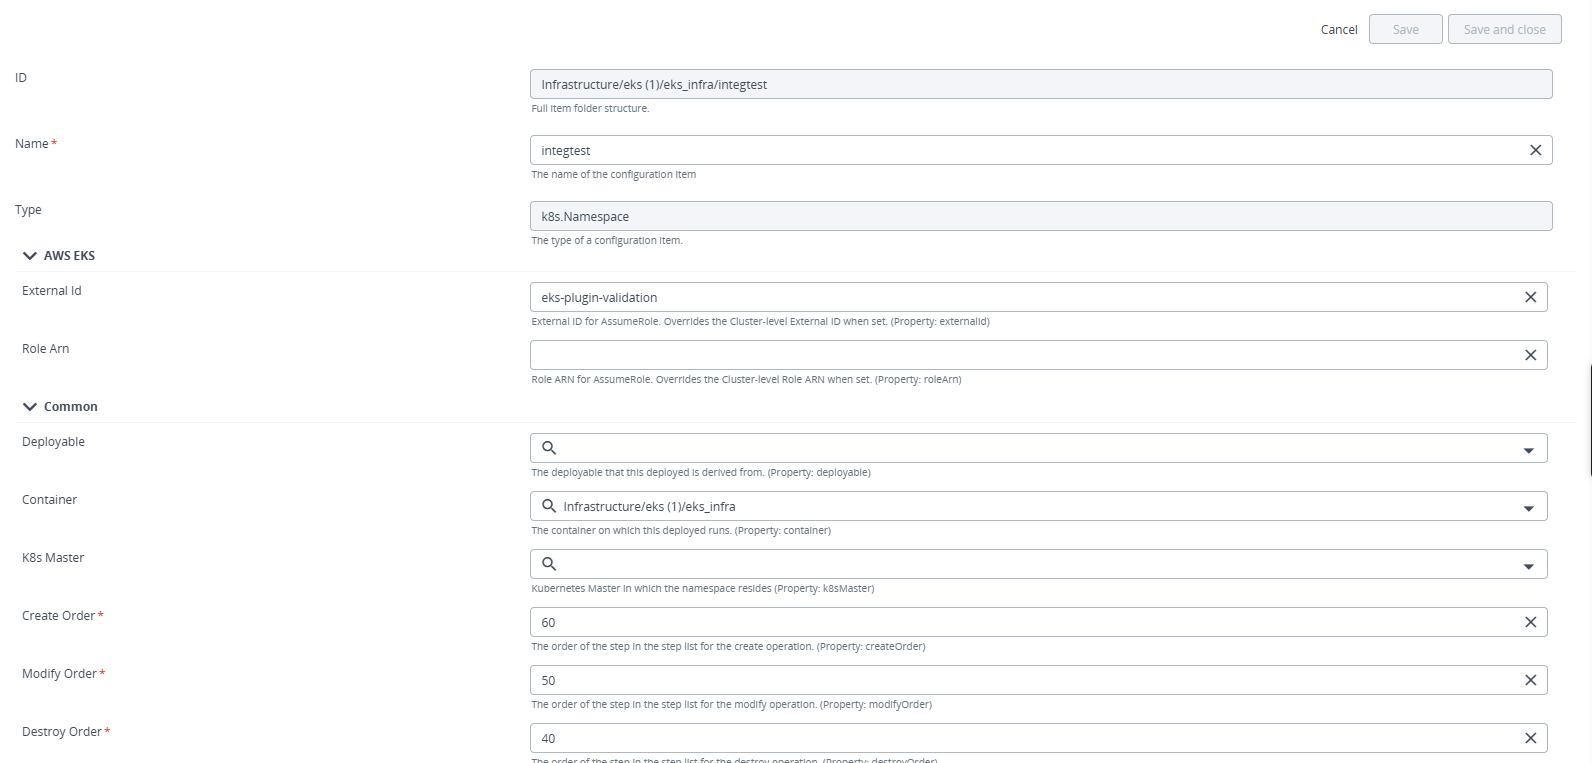
Deploy resolves the Assume Role credentials as follows:
- If External ID and Role Arn are set on the
k8s.NamespaceCI, Deploy uses the Namespace-level values when generating the EKS authentication token. - If they are not set on the
k8s.NamespaceCI, Deploy falls back to the External ID and Role Arn configured on the parentk8s.MasterCI.
This resolution applies to the Check Connection control task on the k8s.Namespace CI and to all resources deployed into that Namespace, including the following deployable types:
k8s.NamespaceSpeck8s.ConfigMapSpeck8s.DeploymentSpeck8s.CronJobSpeck8s.SecretSpeck8s.ServiceSpeck8s.StatefulSetSpeck8s.PersistentVolumeClaimSpeck8s.ResourcesFile
The Namespace-level override works with all supported Assume Role configurations, including assuming a role with a session token, without a session token, and using a profile.
Only the External ID and Role Arn can be overridden at the Namespace level. The remaining EKS and Assume Role settings such as cluster name, credentials, Account Id, Role Name, and Duration Seconds are always taken from the parent k8s.Master CI.
Set Up the k8s.Master With Azure Kubernetes Service (AKS)
- Hover over Infrastructure, click , click New, and select
k8s.Master. - Expand the Azure Kubernetes Service section.
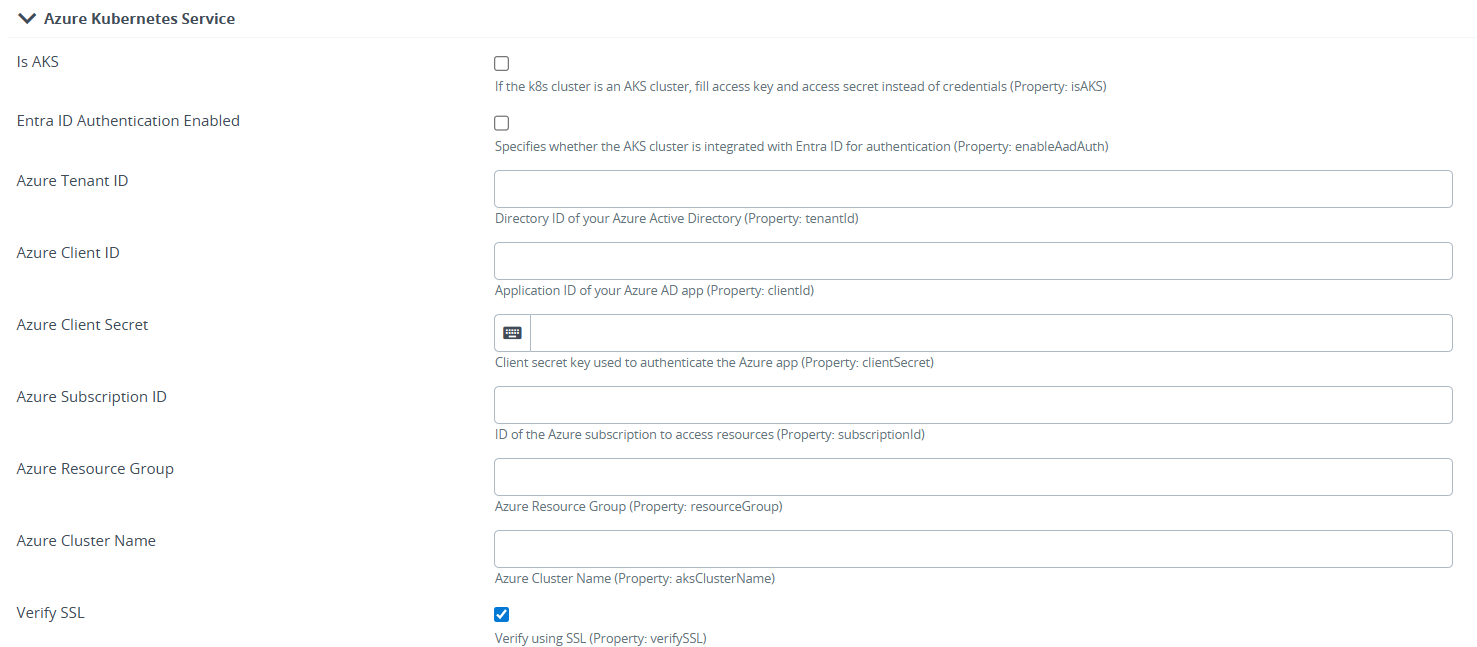
- Provide the following details:
-
Is AKS: Select this box if the Kubernetes cluster is an AKS cluster.noteWhen this is enabled, the configuration uses Azure Service Principal credentials instead of standard Kubernetes credentials. For example, tenantID, clientID, and clientSecret.
-
Entra ID Authentication Enabled: Specifies whether the AKS cluster is integrated with Entra ID for authentication. Select this checkbox if your AKS cluster uses Entra ID (formerly Azure AD) for authentication. -
Azure Tenant Id: Enter the Azure tenant ID associated with the AKS cluster. -
Azure Client Id: Provide the Azure client ID used to authenticate to the AKS cluster. -
Azure Client Secret: Enter the secret key. -
Azure Subscription Id: Specify the Azure subscription ID. -
Azure Resource Group: Enter the Azure resource group name that contains the AKS cluster. -
Azure Cluster Name: Provide the name of the AKS cluster to connect to. -
Verify SSL: If selected, the system verifies using SSL.
-
- Verify the Kubernetes cluster connectivity.
Verify the Kubernetes Cluster Connectivity
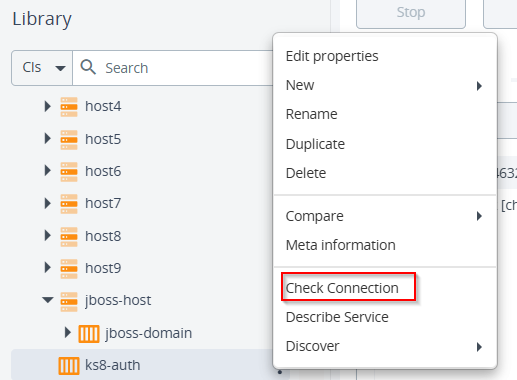
To verify the connection with the k8s.Master, use the Check Connection control task. If the task succeeds, the connectivity is working.
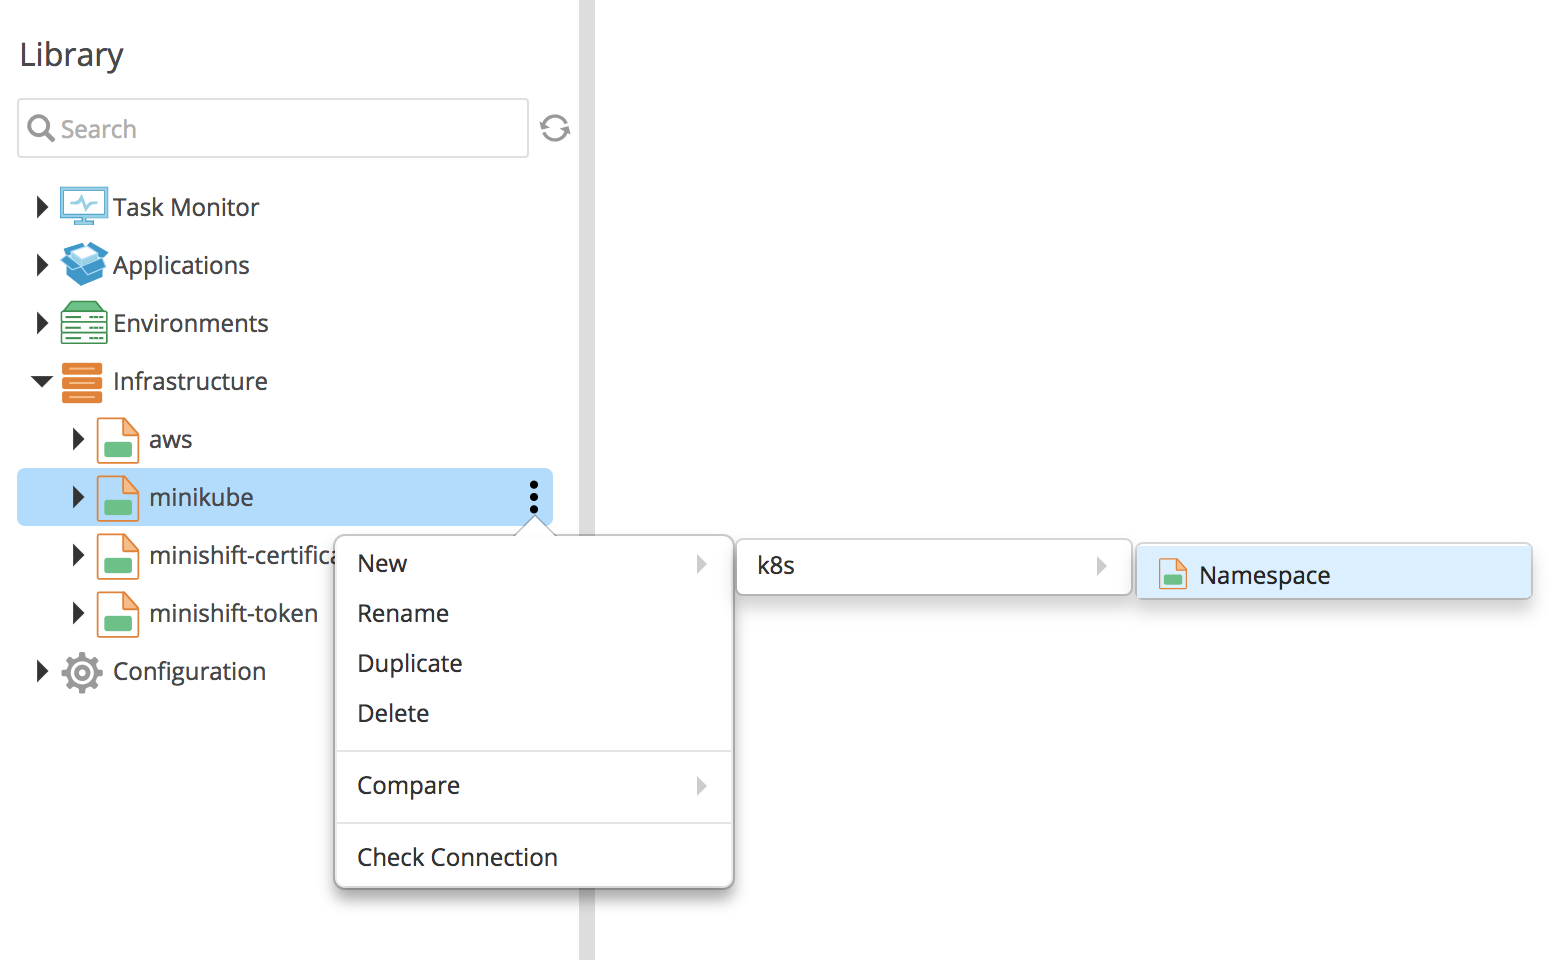
Create a New k8s.Namespace Before Any Resource Can Be Deployed to It
- The
k8s.Namespaceis the container for all Kubernetes resources. You must deploy the Namespace through Deploy. The target Namespace must be deployed in different package than the one containing other Kubernetes resources such as Pod and Deployment. - The
k8s.NamespaceCI only requires the Namespace name. If the Namespace name is not specified, Deploy uses the CI name as namespace name. - The
k8s.NamespaceCI does not allow namespace name modification. - For EKS clusters, the
k8s.NamespaceCI can override the Assume Role External ID and Role Arn inherited from the parentk8s.Master. For more information, see Override Assume Role Details at thek8s.NamespaceLevel.
Use an Existing or Default Namespace Provided by the Kubernetes Cluster
The Kubernetes cluster provides pre-created namespaces such as the default namespace. To use these existing namespaces in Deploy:
- Under Infrastructure, create the
k8s.NamespaceCI ink8s.Master. - Provide the
defaultNamespace name when default Namespace is required so that there is no need to have a provisioning package containing a Namespace.
Configure Kubernetes Resources Using YAML-Based Deployables
- With the Kubernetes cluster, you can configure Kubernetes resources in Deploy.
- You can configure YAML-based Kubernetes resources using the
k8s.ResourcesFileCI. This CI requires the YAML file containing the definition of the Kubernetes resources that will be configured on the Kubernetes cluster. - The deployment order of Kubernetes resources through multiple YAML based CI is:
- Separate YAML files for Kubernetes resources.
- Deployment order and YAML files should match the resources dependency.
- The
k8s.ResourcesFileCI supports multiple API versions in the resource file. The plugin parses the file and creates a client based on the API version for each Kubernetes resource. - The YAML-based Kubernetes resources support multi-document YAML file for multiple Kubernetes resources in one file. Each resource within the YAML file is separated with dashes (---) and has its own API version.
The deployment step order of the Kubernetes resources within the YAML based CI can be generated in two ways:
- The plugin parses the YAML file and automatically generates the deployment step order for each resource within the file, based on the type of the resource.
- For the resources of the same type within the file, the step order is generated on the basis of occurrence in the file. The step for the resource that occurs first is generated first and so on.
Example of a multi-document YAML with multiple API versions:
apiVersion: extensions/v1beta1
kind: Deployment
metadata:
  name: hello-openshift
spec:
  replicas: 7
  template:
    metadata:
      labels:
        app: hello
        tier: backend
        track: stable
    spec:
      containers:
        - name: hello
          image: "gcr.io/google-samples/hello-go-gke:1.0"
          ports:
            - name: http
              containerPort: 80

---

apiVersion: v1
kind: Secret
metadata:
  name: mysecret
type: Opaque
data:
  username: YWRtaW4=
  password: MWYyZDFlMmU2N2Rm
Use CI-Based Deployables To Configure Kubernetes Resources
Deploy also provides CIs for Kubernetes resource deployment (example: k8s.Pod and k8s.Deployment). Deploy handles the asynchronous create/delete operation of resources. The CI based deployables support the latest API version, based on the latest Kubernetes version.
Configure the Readiness Probe Polling Interval
After deploying a Kubernetes resource, Deploy polls the cluster until the readiness probe check passes. Two properties on the k8s.Resources and k8s.ResourcesFile CIs control how long Deploy polls and how often.
| Property | Default | Description |
|---|---|---|
readinessProbeRetry | 36 | Number of retries until the readiness probe check passes. |
readinessProbeInterval | 5 | Number of seconds Deploy waits between each retry. |
The maximum time Deploy waits is readinessProbeRetry multiplied by readinessProbeInterval. The default values give 36 retries at 5 second intervals, for a maximum wait of 180 seconds.
Increase readinessProbeInterval when you deploy many resources at the same time and each one takes minutes to become ready. A longer interval reduces the number of status calls made to the Kubernetes API server. Lower readinessProbeRetry proportionally if you want to keep the same maximum wait time.
Deploy uses both properties in the deployment and the deletion workflows. If you do not set readinessProbeInterval, Deploy polls every 5 seconds, which matches the fixed interval used in earlier versions.