Azure Plugin
The Deploy Azure plugin enables Deploy to work with the Microsoft Azure cloud computing service. You can provision Virtual Machines, Containers, and Deploy functionApp and WebApp from Deploy.
For information about requirements and the configuration items (CIs) that the Azure plugin provides, refer to the Azure Plugin Reference.
From version 10.2.0 Azure plugin is compatible with Digital.ai Deploy 10.2.0 or higher version.
Deploy Azure Plugin Features
- Create resource groups and storage accounts
- Define security groups and associated security rules
- Setup public IP addresses
- Define virtual networks (VNet) and their route tables
- Provision virtual machines associated to their network interface (NIC) and deploy applications to those virtual machines
- Support Windows Virtual Machines (VMs)
- Automatically
Blob Storagescalable object storage for unstructured data - Create web apps with built-in auto-scale and load balancing
- Create function apps based on an event-driven, serverless compute experience
- Run containers (ACI) without managing virtual machines
- Safeguard cryptographic keys and other secrets using Key Vault
- Configure load balancer (Layer 4 TCP and UDP) to deliver high availability and network performance to your applications
- Deploy network configurations such as virtual networks (VNets), subnets, routing tables, network interfaces, and public IP addresses
- Deploy load balancing configurations such as load balancers and availability sets
- Deploy storage configurations such as storage accounts and blob containers
- Deploy content to blob containers
- Deploy security configurations such as security groups and associate security roles with them
- Configure app service plans and deploy web apps and web jobs
- Deploy functions to Azure Functions
- Deploy container groups and containers to Azure Container Instance
- Create artifact feeds and upload packages to the created feeds
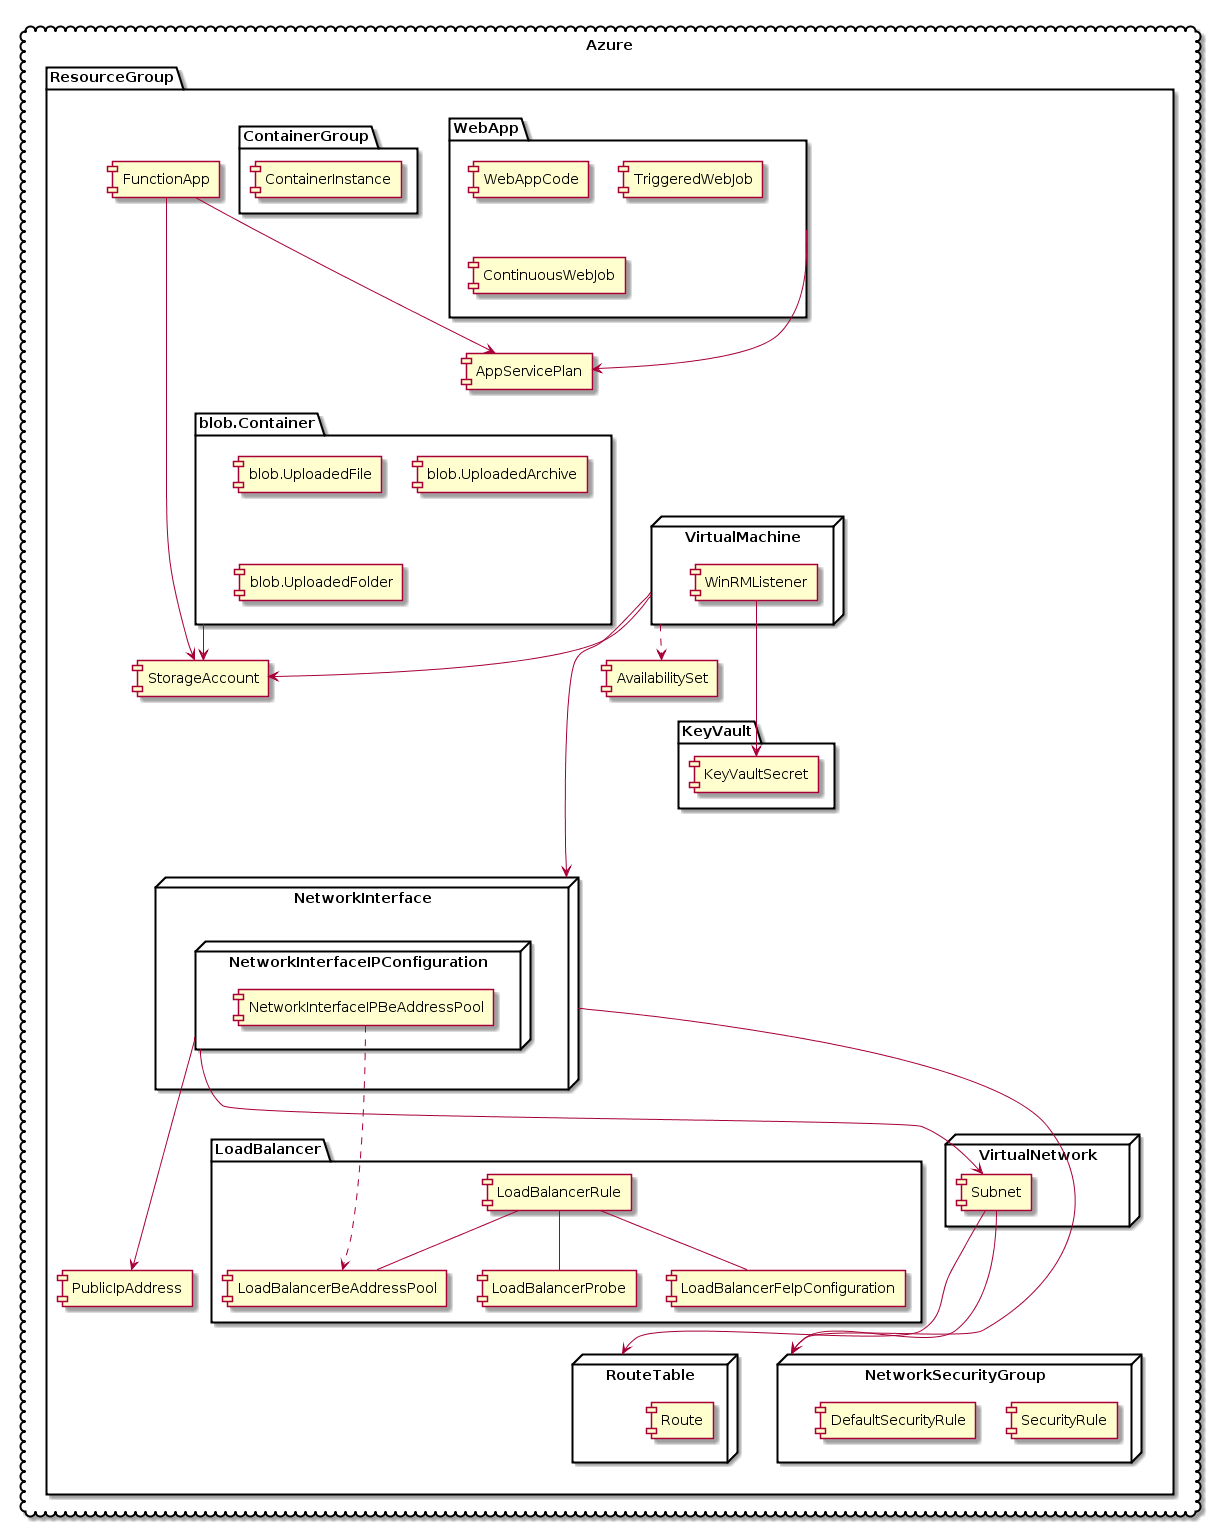
This is a diagram representing all the resource types Deploy Azure plugin supports and their dependencies:
Before You Get Started
Before you begin using the Azure plugin you must have:
- Access to a Microsoft Azure account.
- Digital.ai Deploy version 22.3.0 or later running with Azure plugin.
- Azure CLI (to create artifact feed and upload packages). For more information, see Azure CLI Installation Guide.
Make sure your Azure account is correctly configured, with the following elements:
- Subscription ID
- Service principal
- Tenant ID
- Client ID
- Client secret value
- Resource group to create
- An Azure region to create the resource group (e.g.
westus) - Name of the Azure app. This will also be used as the name of the Release and Deploy CIs.
- Username and password for the admin account.
Set Up an Azure Cloud Connection
To set up a connection to Azure Cloud:
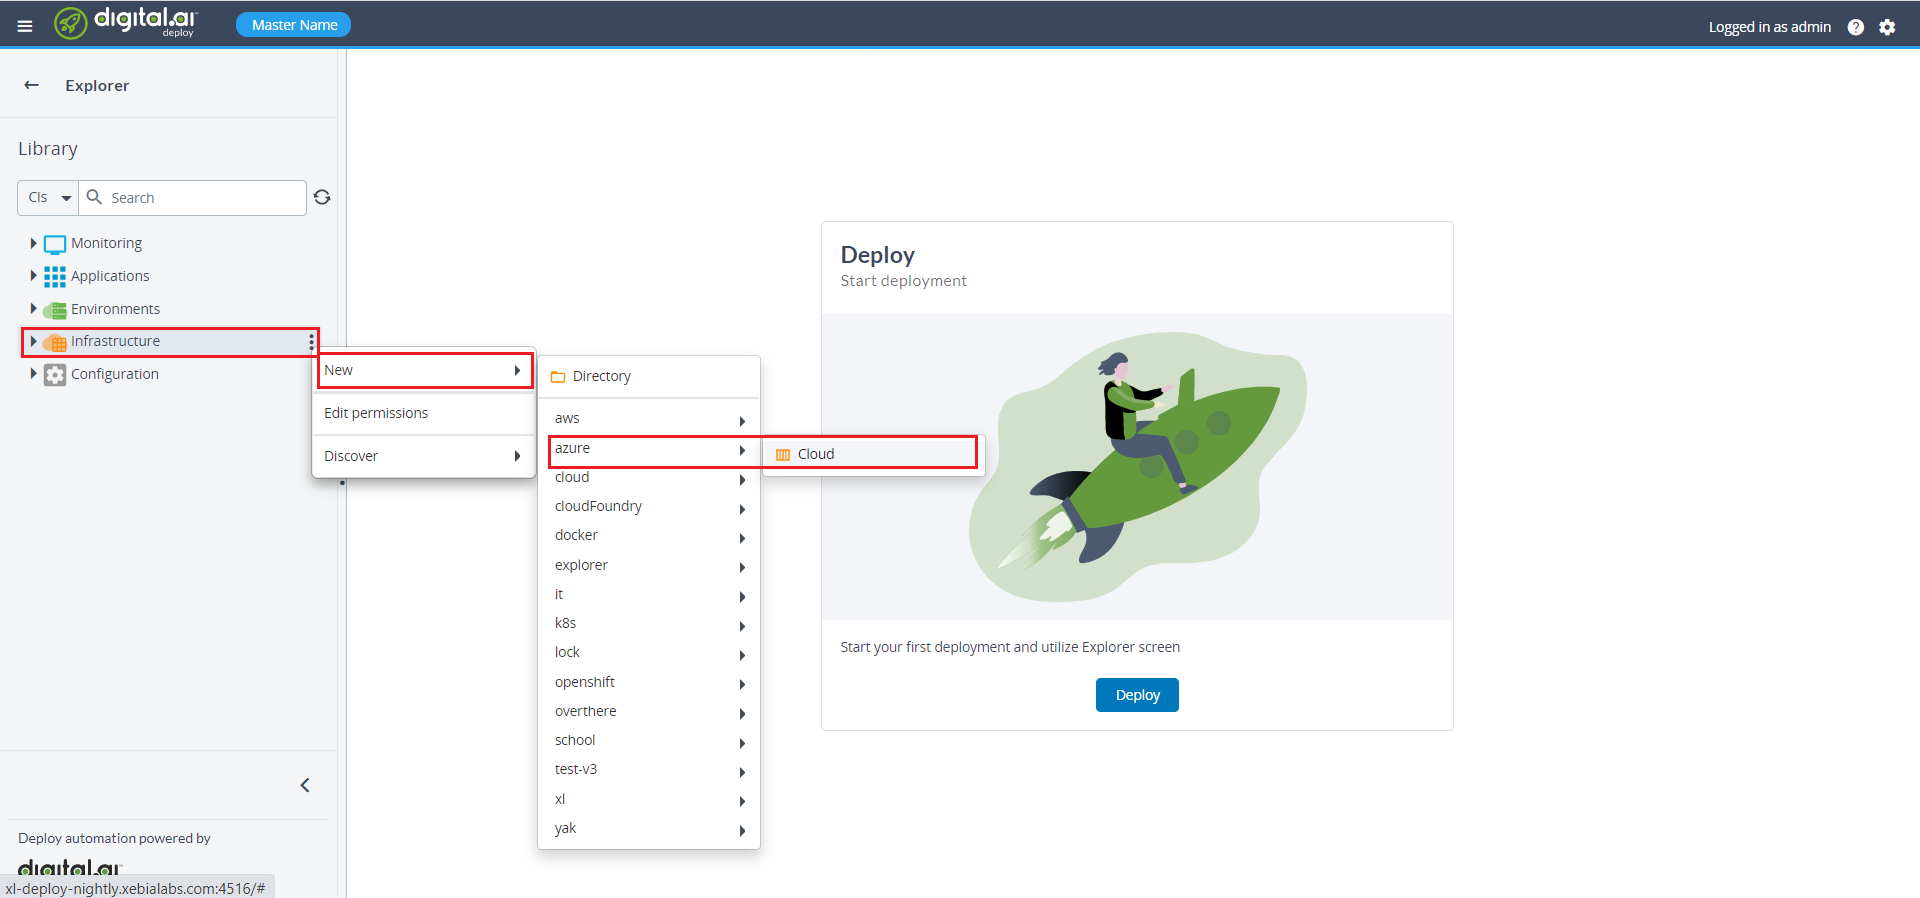
- In the side navigation bar, click Explorer.
- Hover over Infrastructure, click
, and select New > Azure > Cloud.
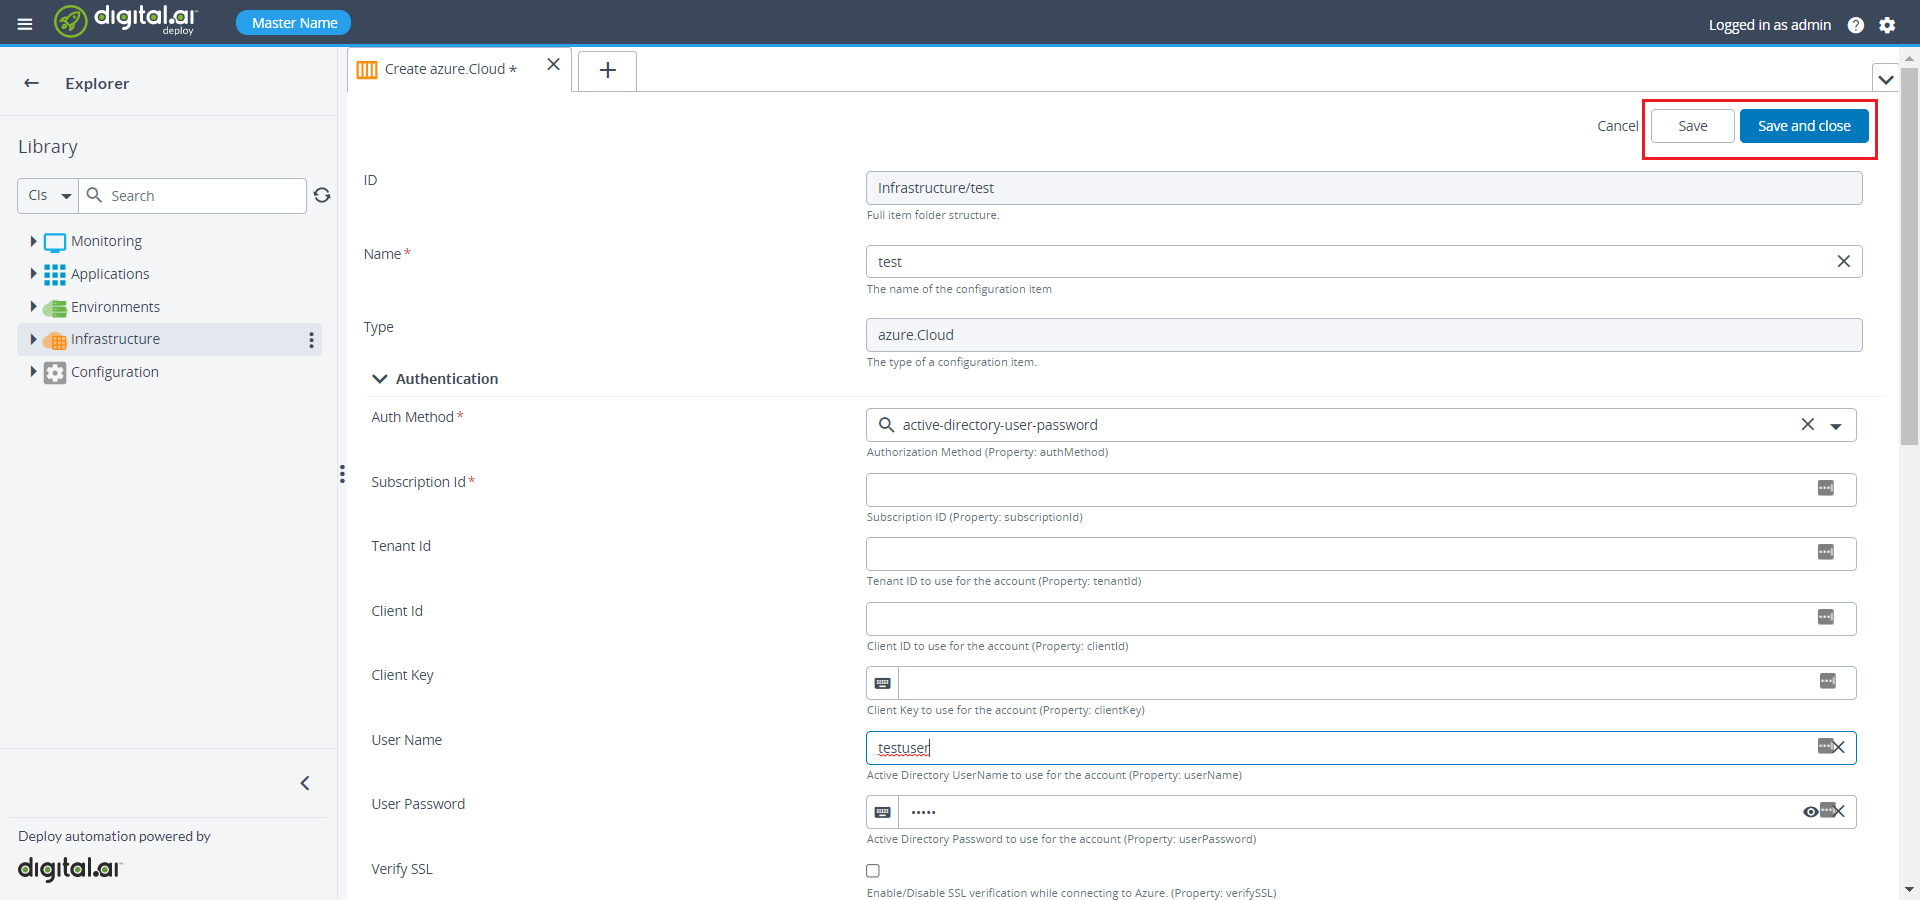
- Enter the subscription id (which you will found in Azure portal under subscriptions) in the Subscription ID field.
- Enter the user name in the User Name field.
- Enter the user password in the User Password field.
- Click Save or Save and close.
Verify the Azure Cloud Connectivity
To verify the connection with the azure.Cloud, do the following steps:
-
In the side navigation bar, click Explorer.
-
Expand the Infrastructure, hover over the newly created infrastructure and click
, and select Check Connection.
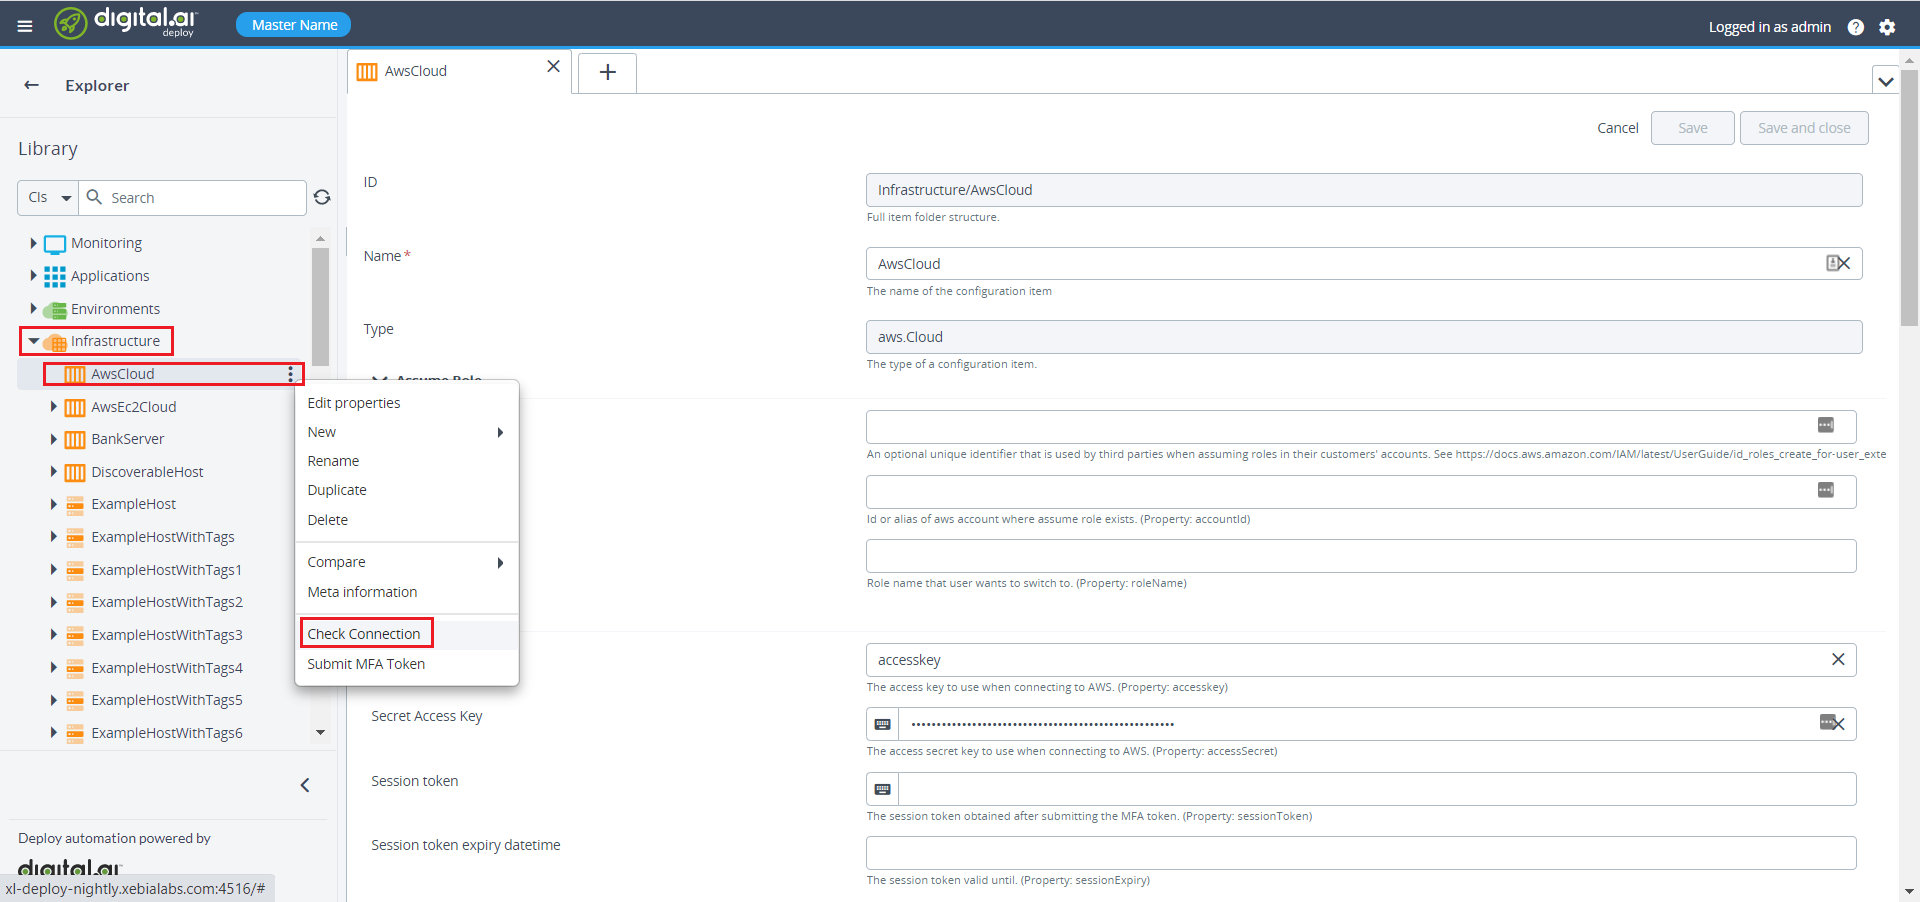
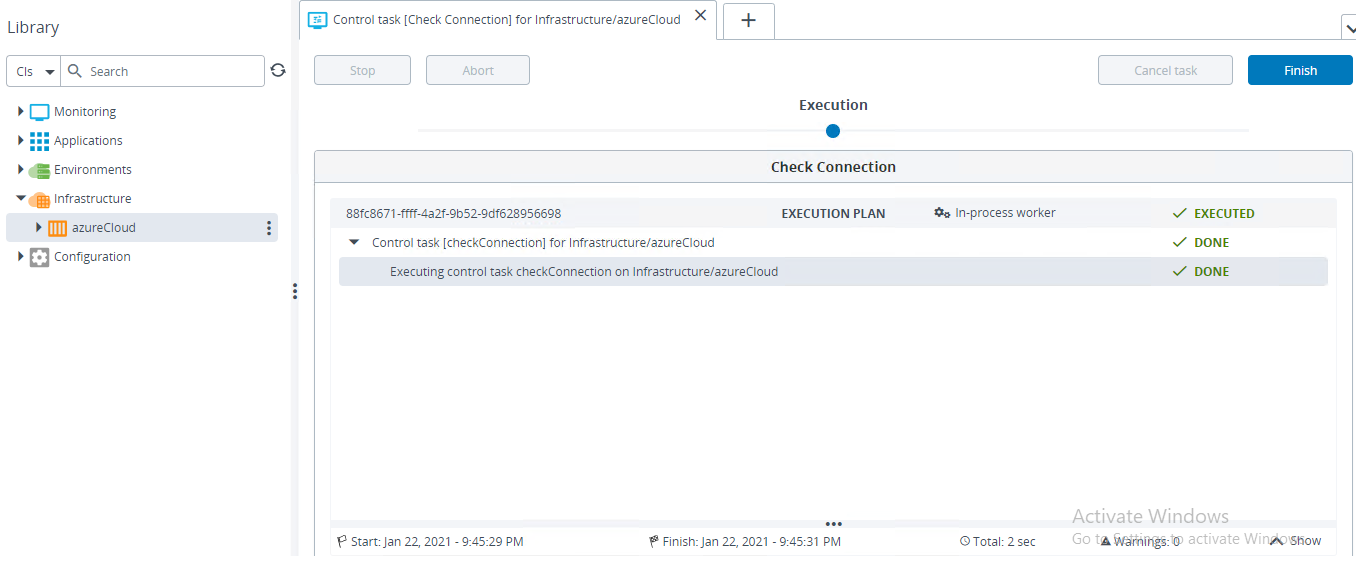
Execute the task. If the task succeeds, the connectivity is working fine and we are able to use Azure through Digital.ai Deploy.
This topic describes using a CI tool plugin to interact with Deploy. However, as a preferred alternative starting with version 9.0, you can utilize a wrapper script to bootstrap XL CLI commands on your Unix or Windows-based Continuous Integration (CI) servers without having to install the XL CLI executable itself. The script is stored with your project YAML files and you can execute XL CLI commands from within your CI tool scripts. For details, see the following topics:
Cloud Service Spec
To create a cloud service spec, do the following steps:
- In the side navigation bar, click Explorer.
- Hover over Applications, click
, then select New > Application. A new tab displays.
- Enter the name in the Name field.
- Click Save and close.
- Click
on the newly created then select New > Provisioning Package
- Enter the name in the Name field.
- Click Save and close.
Before creating Cloud Service create the following:
Set Up a Virtual Network
To set up a virtual network, do the following steps:
- In the side navigation bar, click Explorer.
- Under the Application, expand the newly created application.
- On the newly created package, click
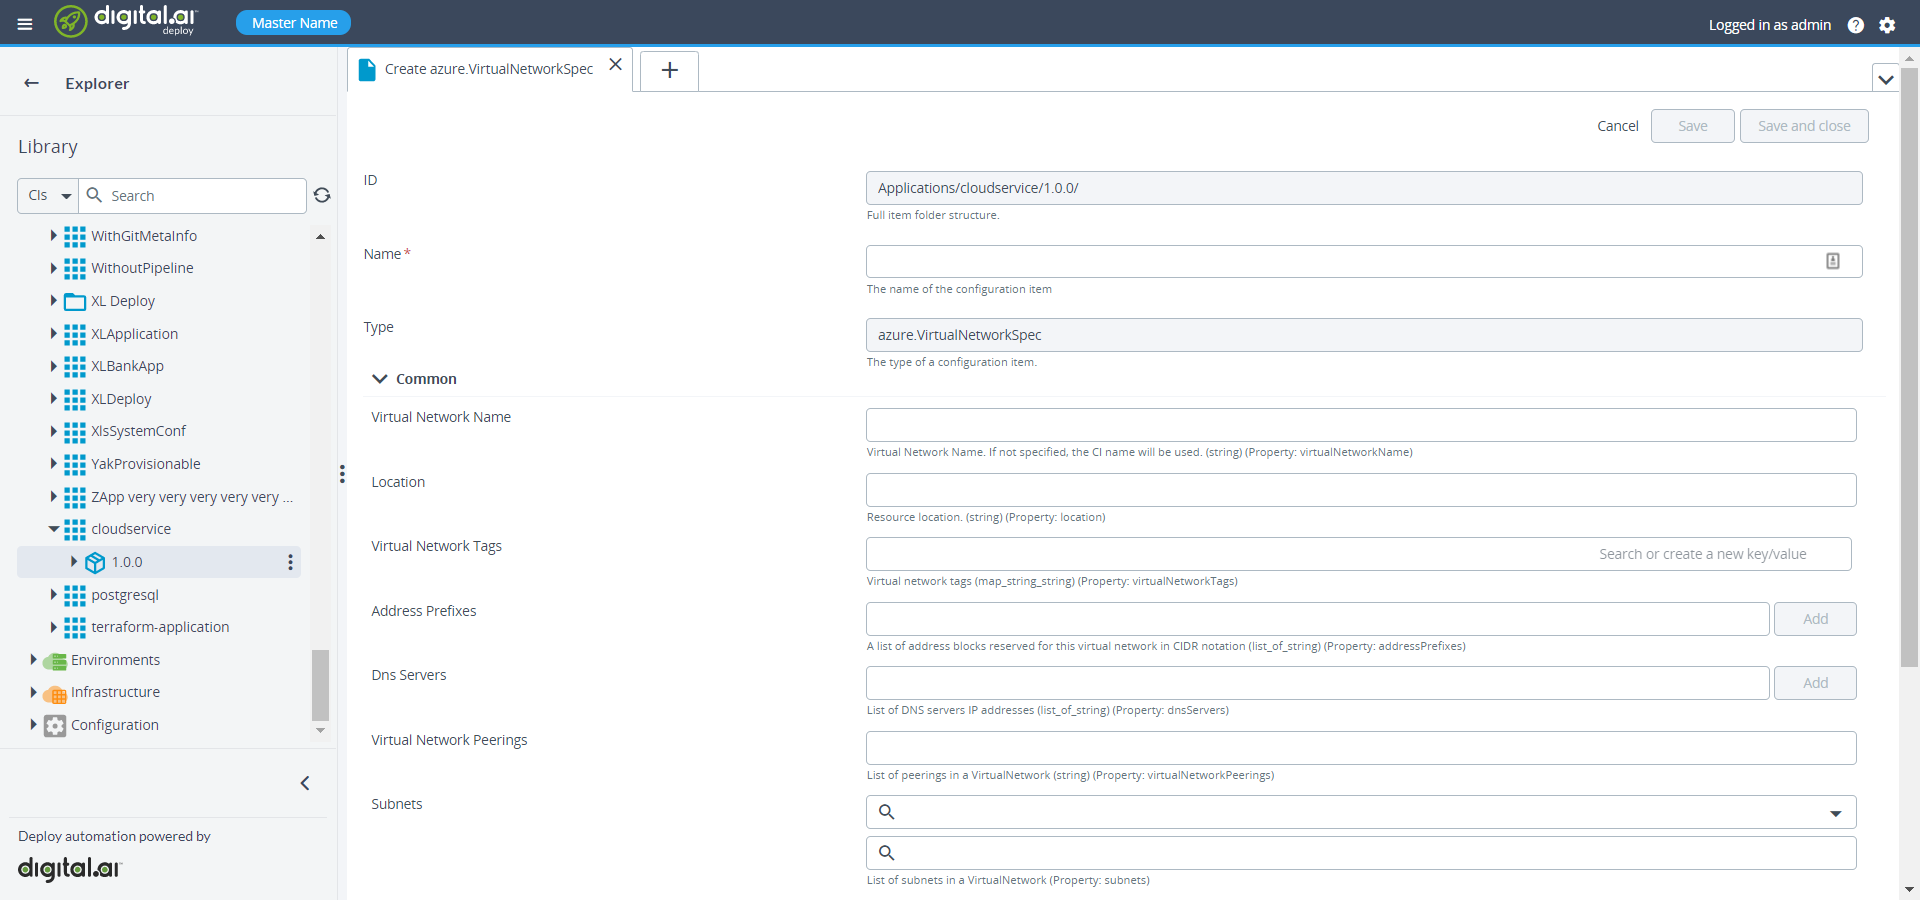
then select New > azure > VirtualNetworkSpec. A new tab displays.
- Specify the required properties under the VirtualNetworkSpec.
- Click Save and close.
Set Up a Storage Account
To set up a storage account, do the following steps:
- In the side navigation bar, click Explorer.
- Under the Application, expand the newly created application.
- On the newly created package, click
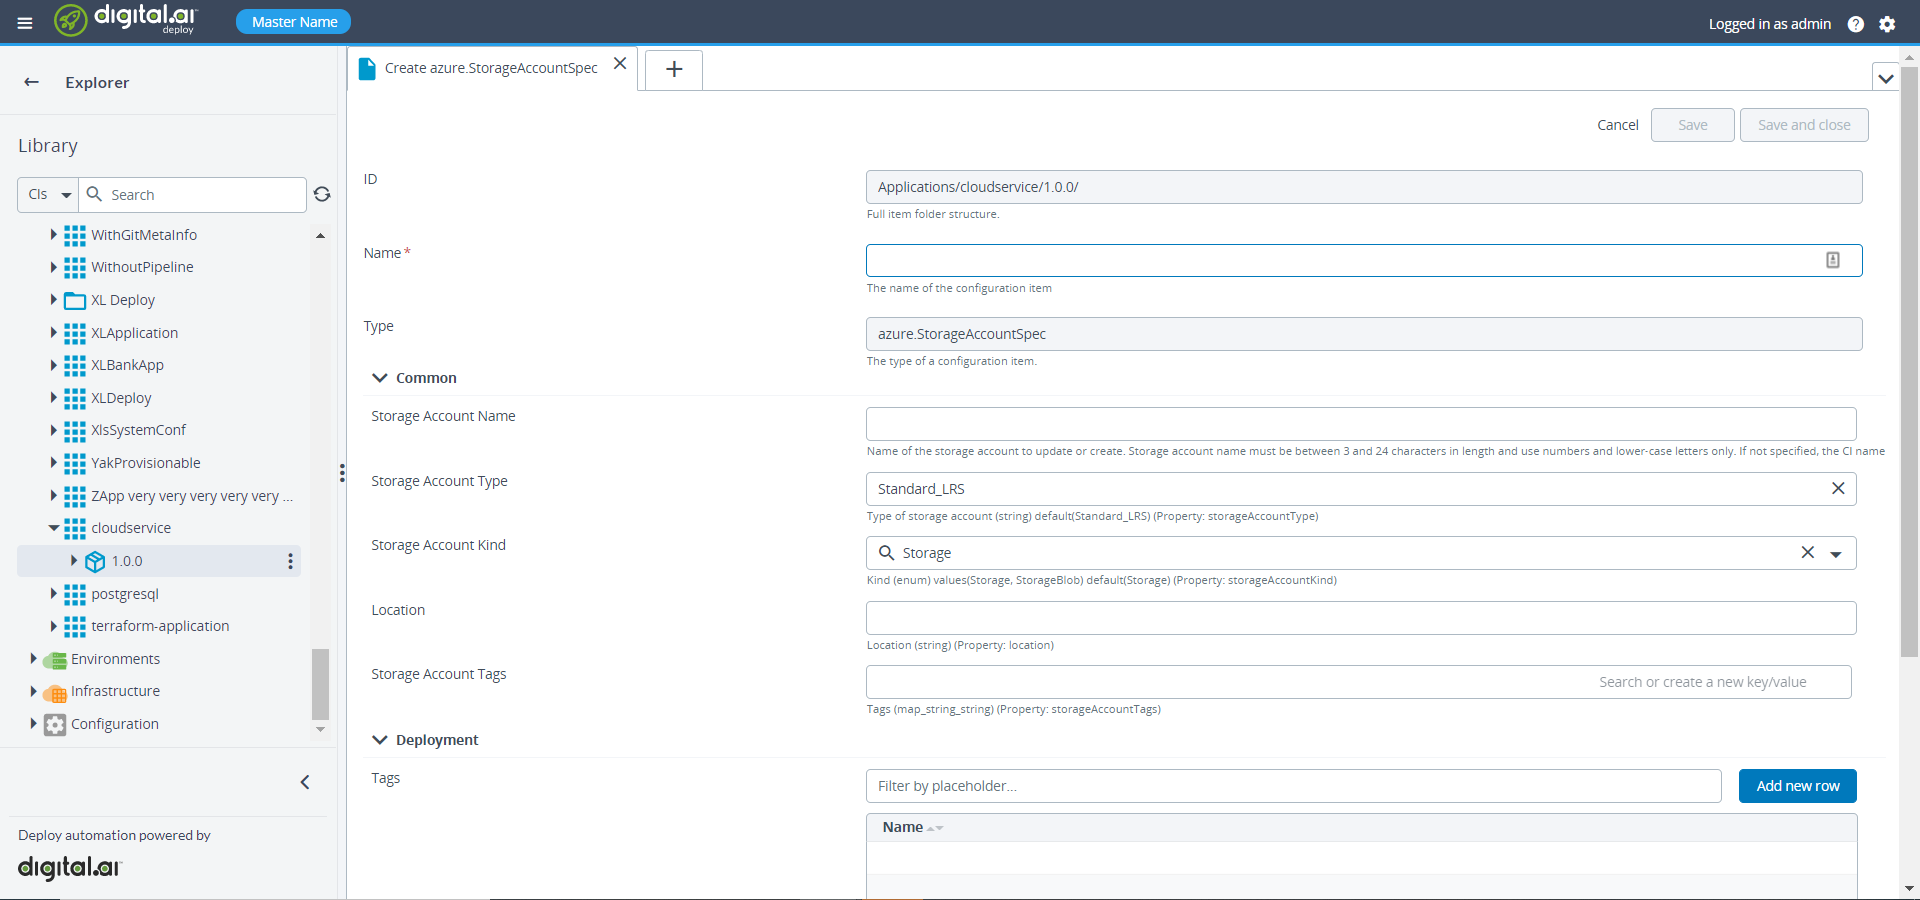
then select New > azure > StorageAccountSpec. A new tab displays.
- Specify the required properties under the StorageAccountSpec.
- Click Save and close.
Create a Blob container inside the storage account
To create a blob container, do the following steps:
- On the newly created package, click
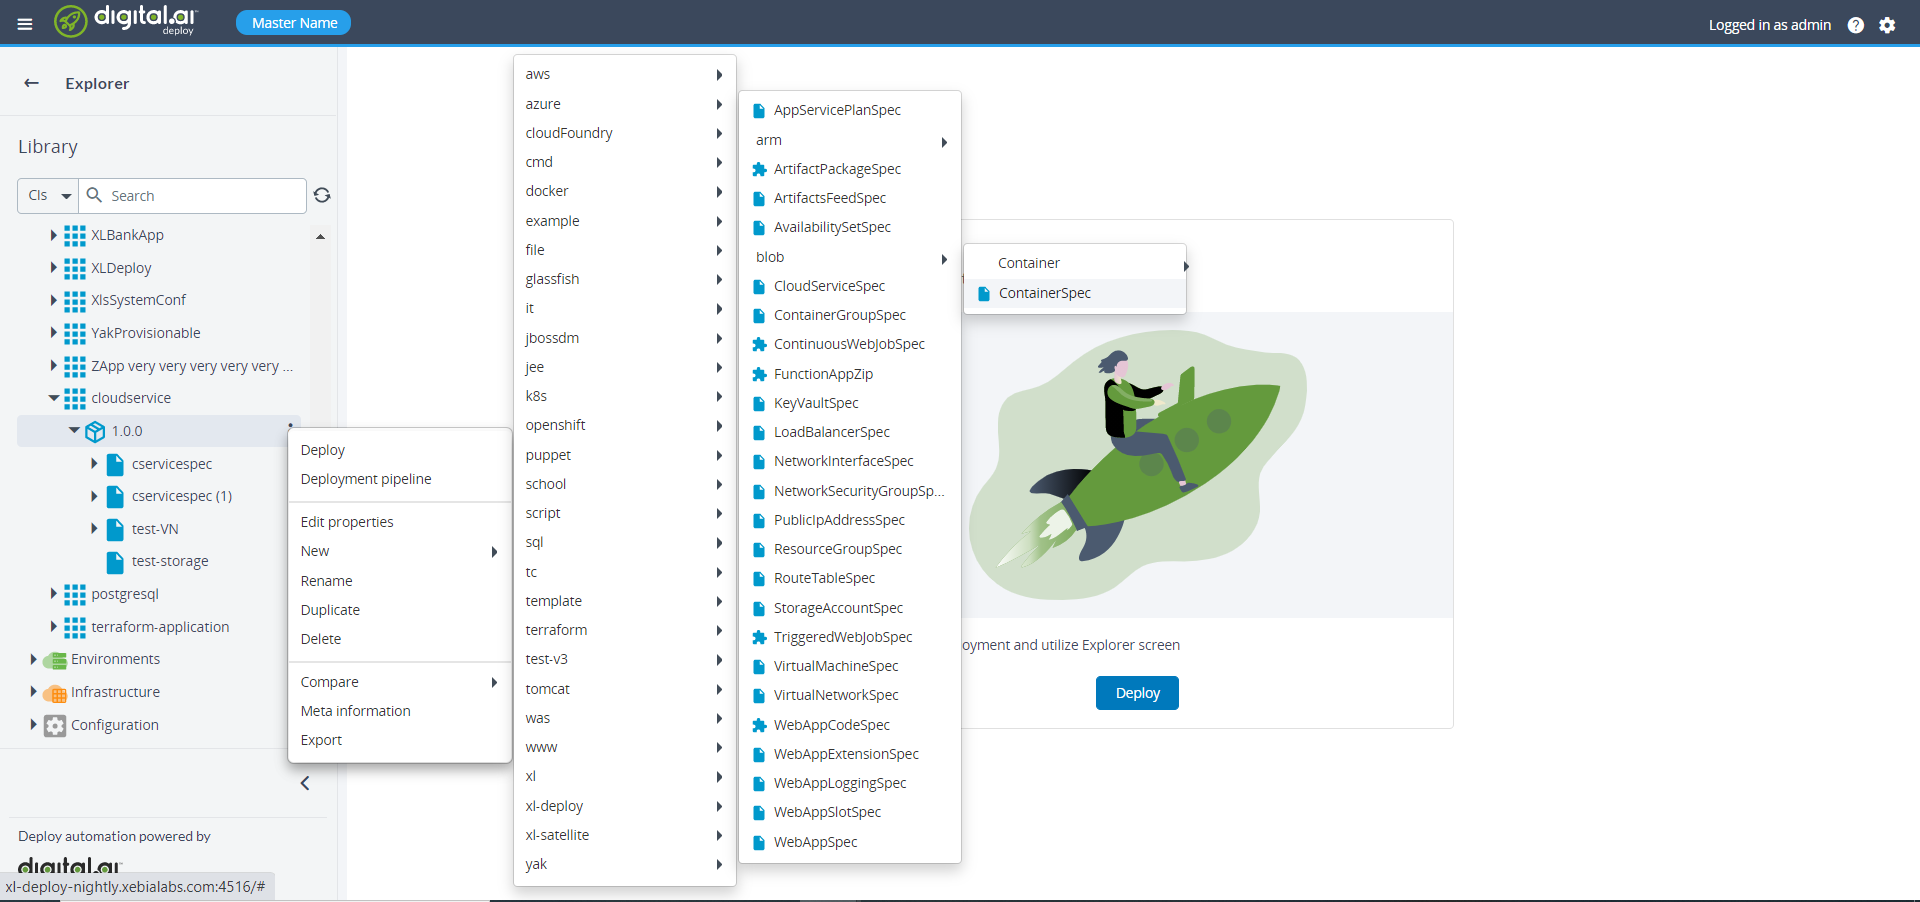
then select New > azure > blob > ContainerSpec. A new tab displays.
- Specify the required properties under the StorageAccountSpec.
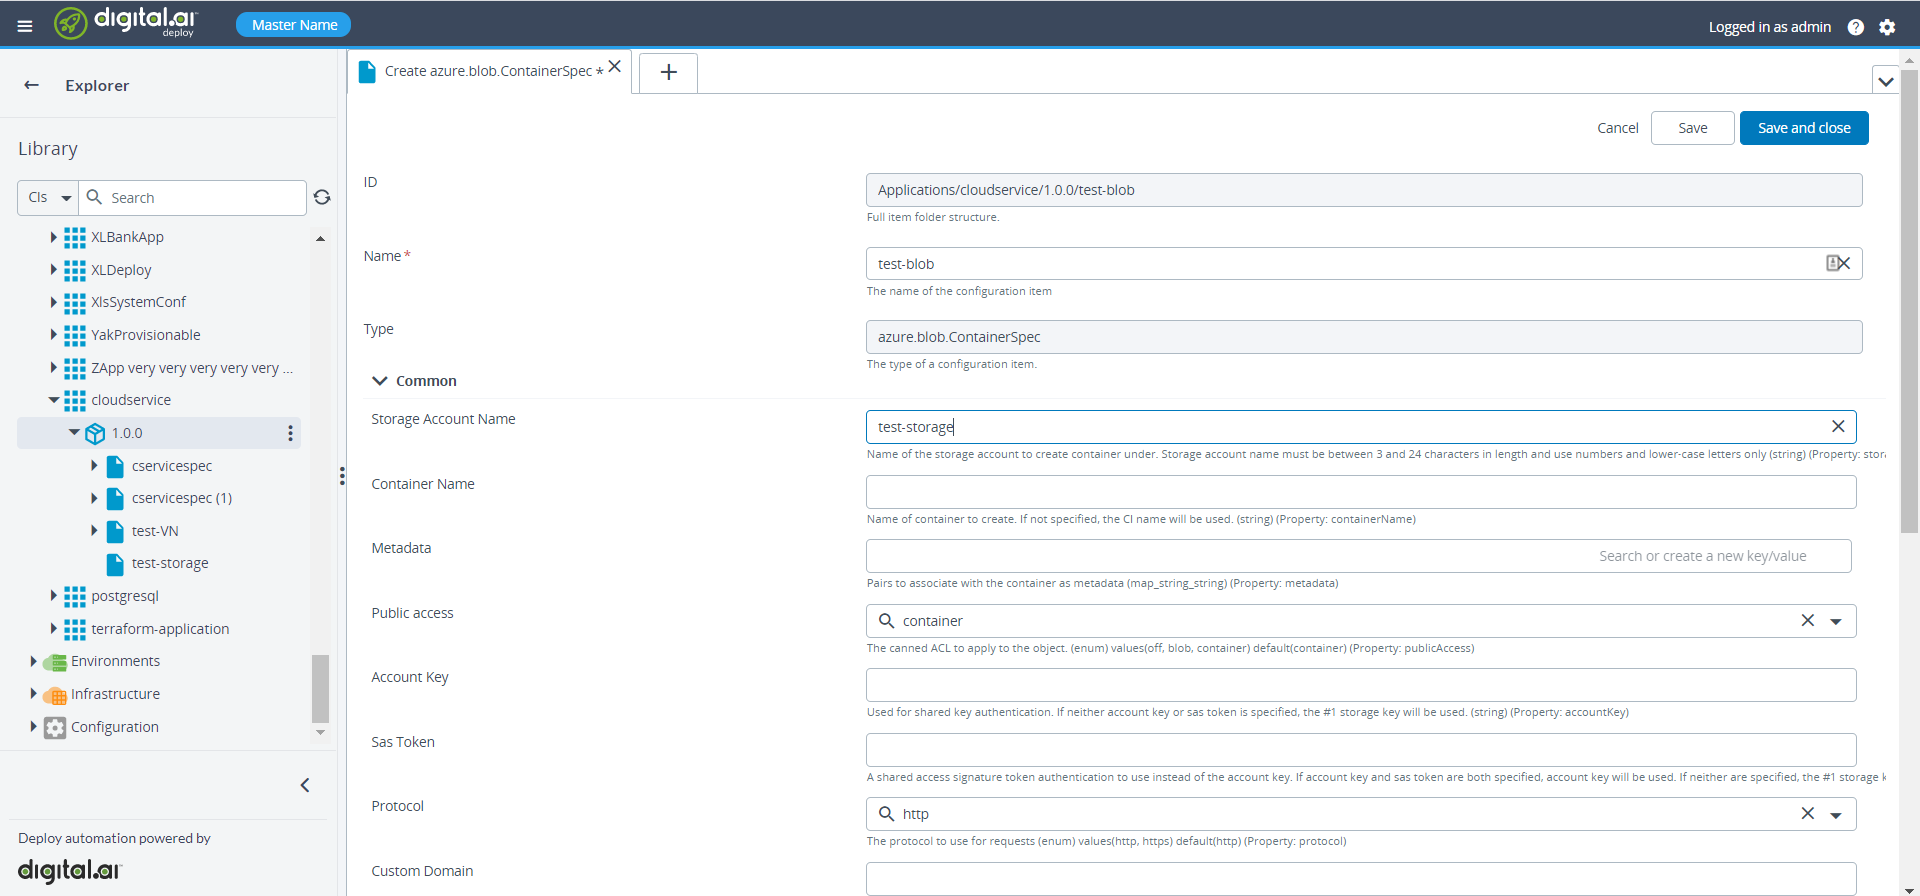
- Verify the newly created storage account and the blob container on the azure portal.
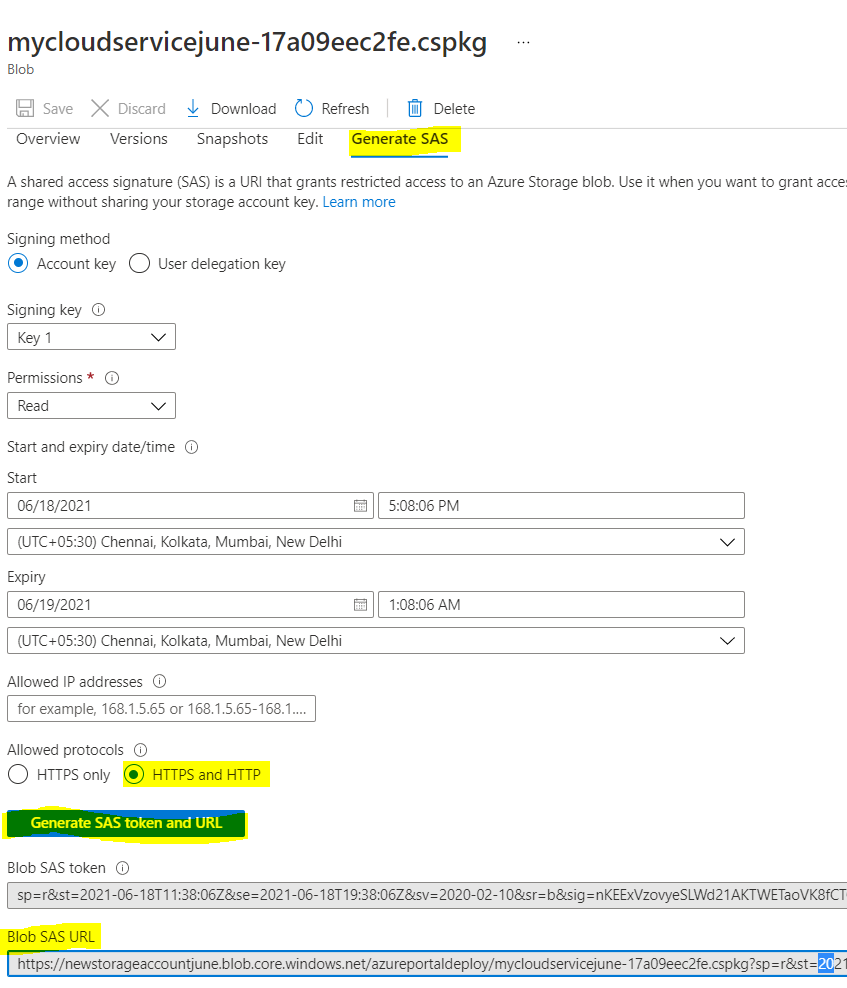
- Upload the required files (.cspkg, .csdef, and, .cscfg) in the newly created container by clicking Upload button from the Azure portal.
 Note: To generate the package (.cspkg) file, Refer Create an Azure cloud service project and after making required changes in ServiceDefinition.csdef and ServiceConfig.cscfg files, run the application and then package it. See Package of Azure Cloud Service model for more information.
 - Click on
.cspkgfile and then click on Generate SAS. - Select HTTPS and HTTP in Allowed protocal.
- Copy the Blob SAS URL and paste it in the required fields of cloudservicespec.
Create a Public IP address
To create a public IP address, do the following steps:
- In the side navigation bar, click Explorer.
- Under the Application, expand the newly created application.
- On the newly created package, click
then select New > azure > PublicIpAdressSpec. A new tab displays.
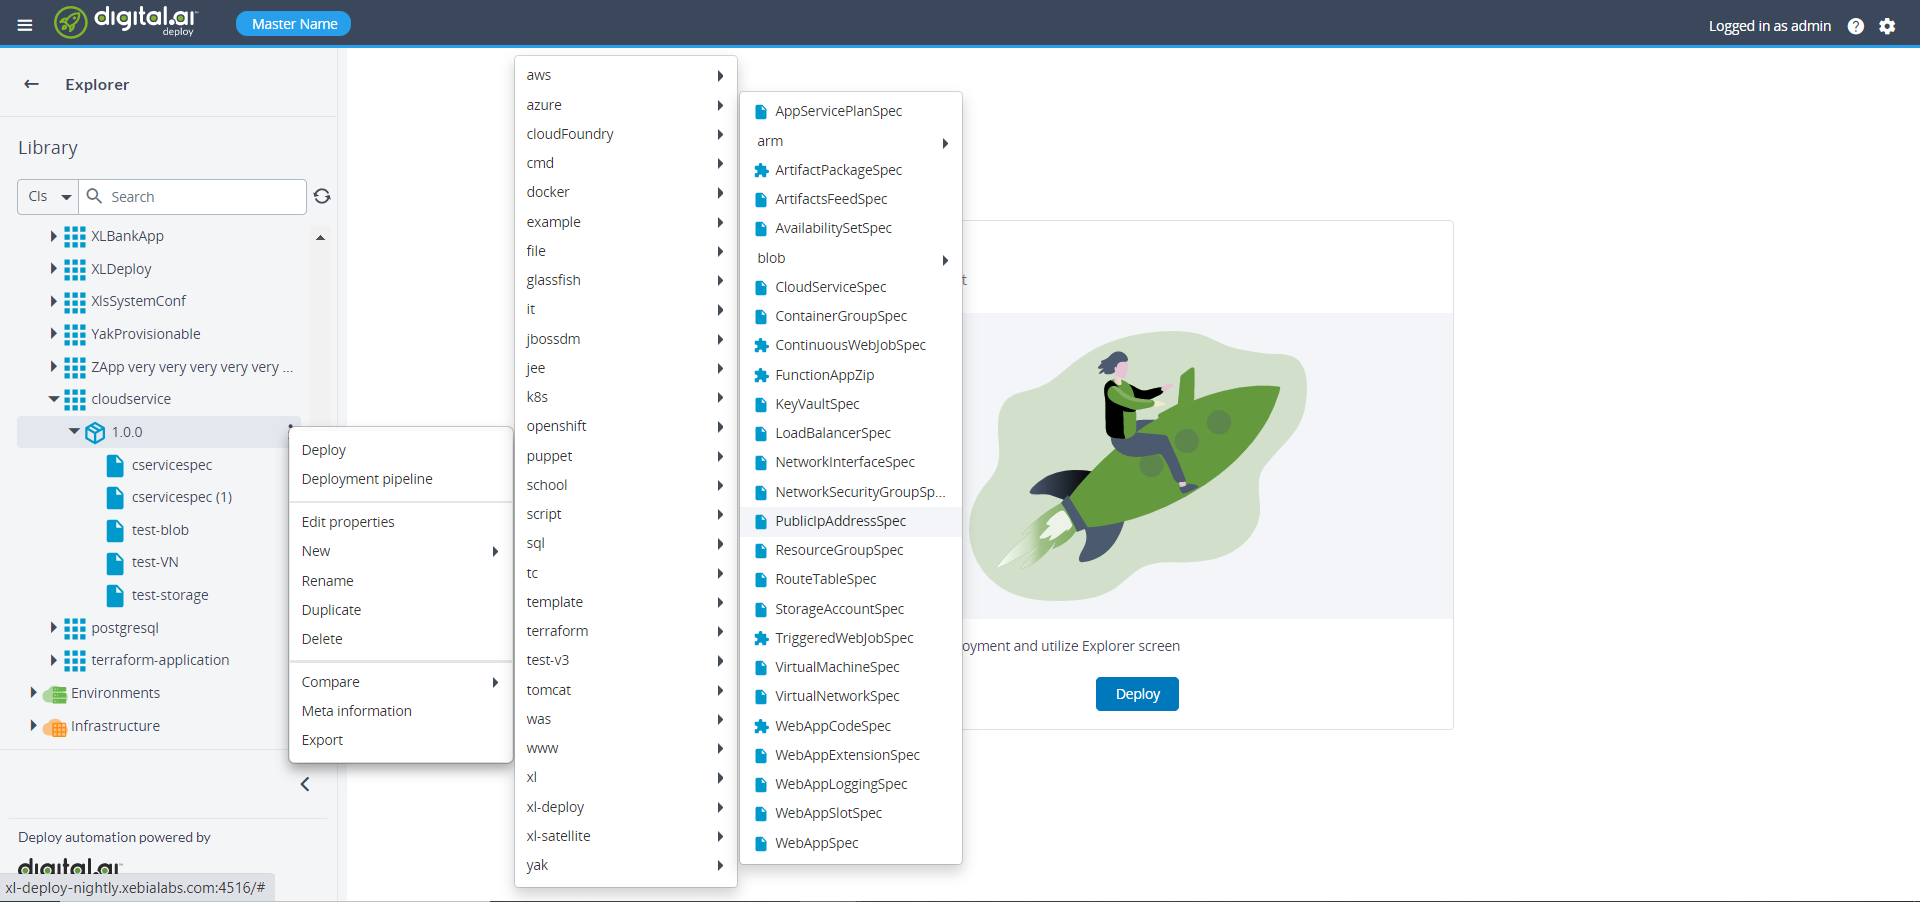
- Specify the required properties under the StorageAccountSpec.

Create Cloud Service Spec
To create cloud service spec, do the following steps:
- In the side navigation bar, click Explorer.
- Under the Application, expand the newly created application.
- On the newly created package, click
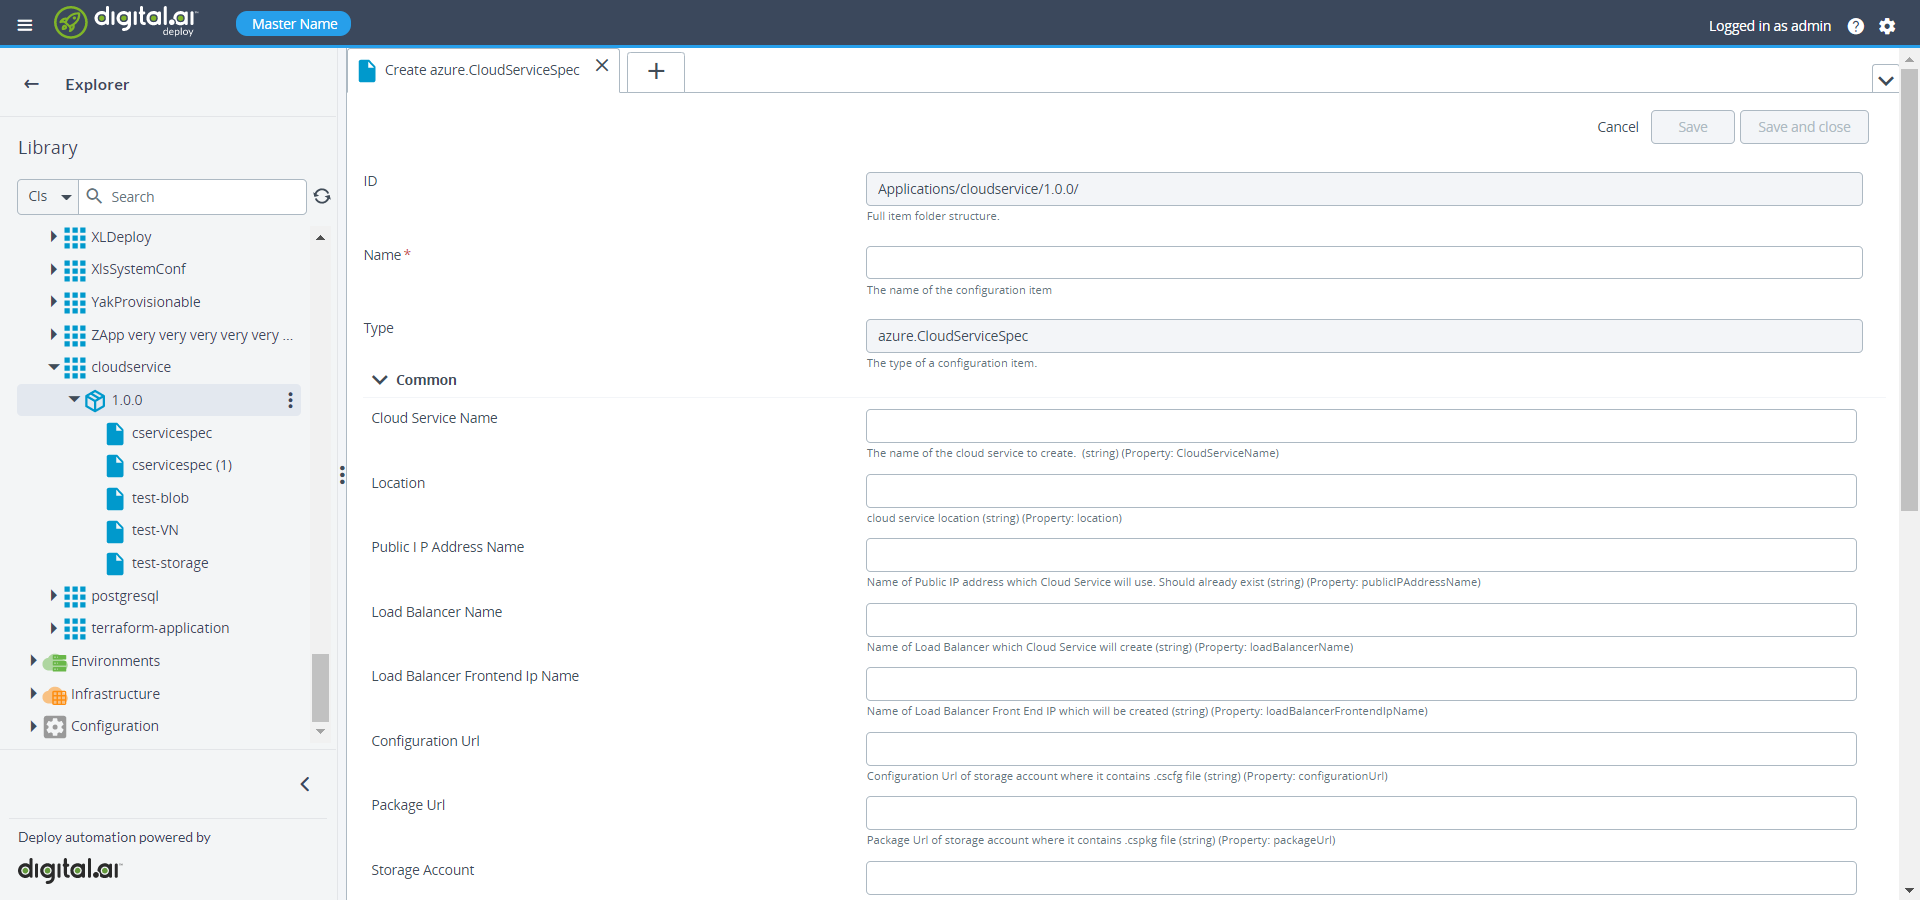
then select New > azure > CloudServiceSpec. A new tab displays.
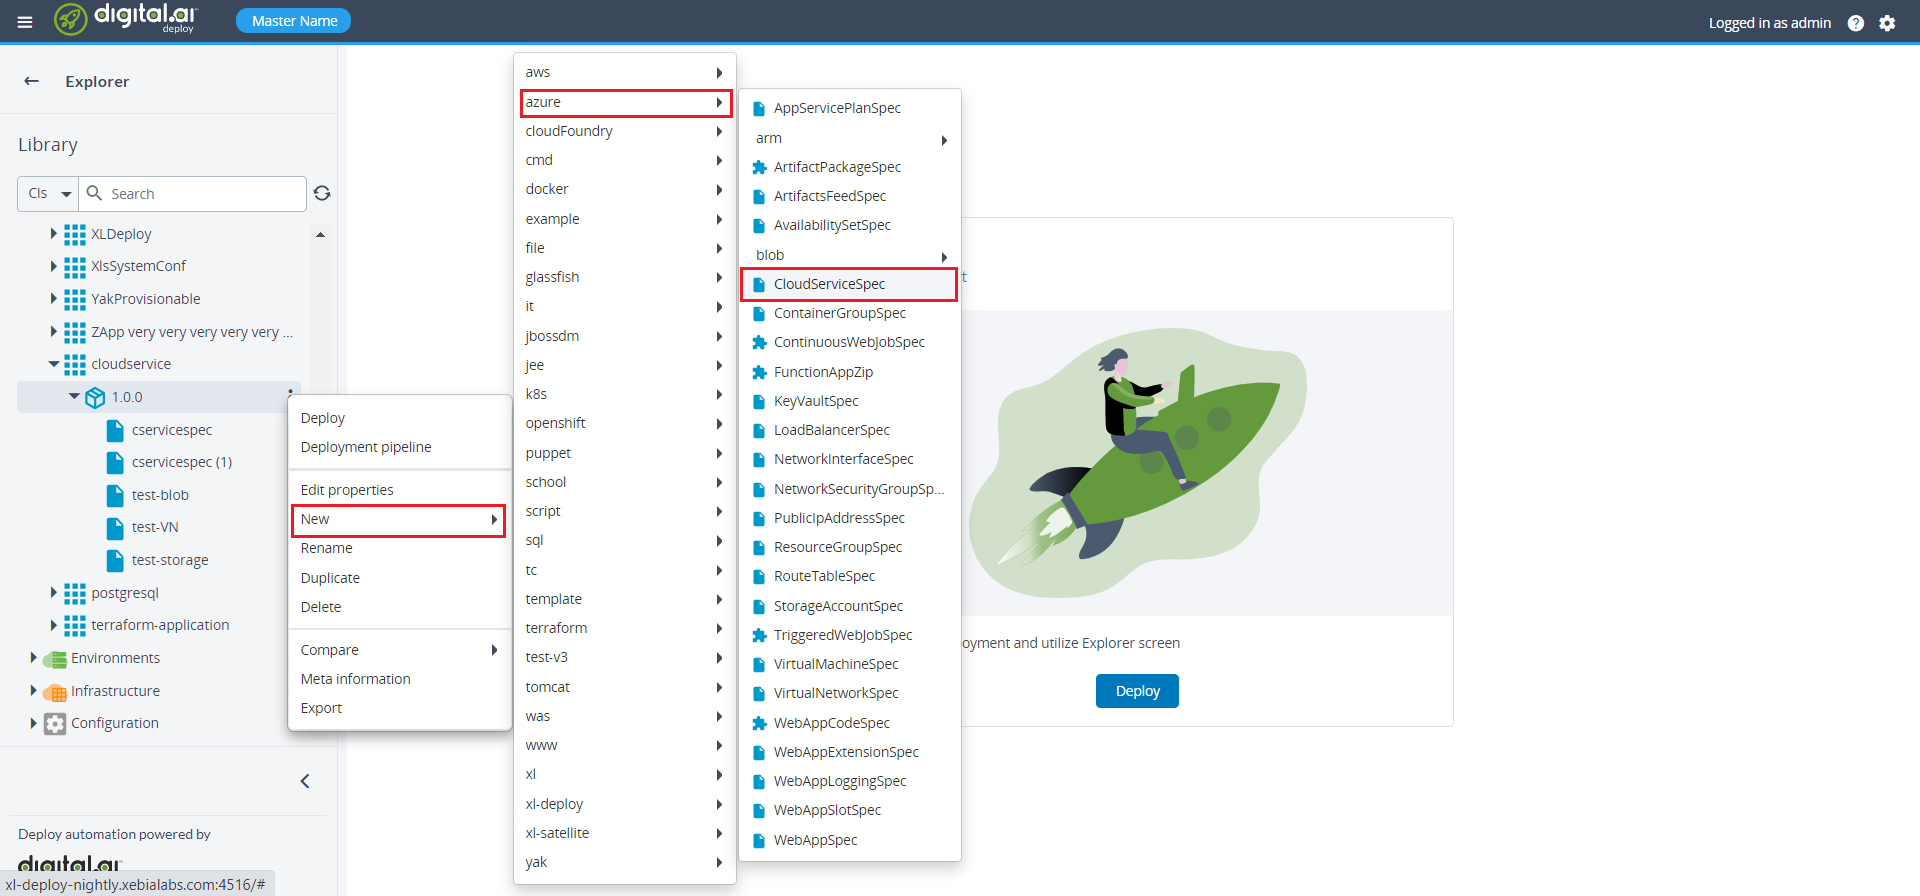
- Specify the required properties including virtual network, storage account, and public ip address under the CloudServiceSpec.
Deploy the Cloud Service Spec
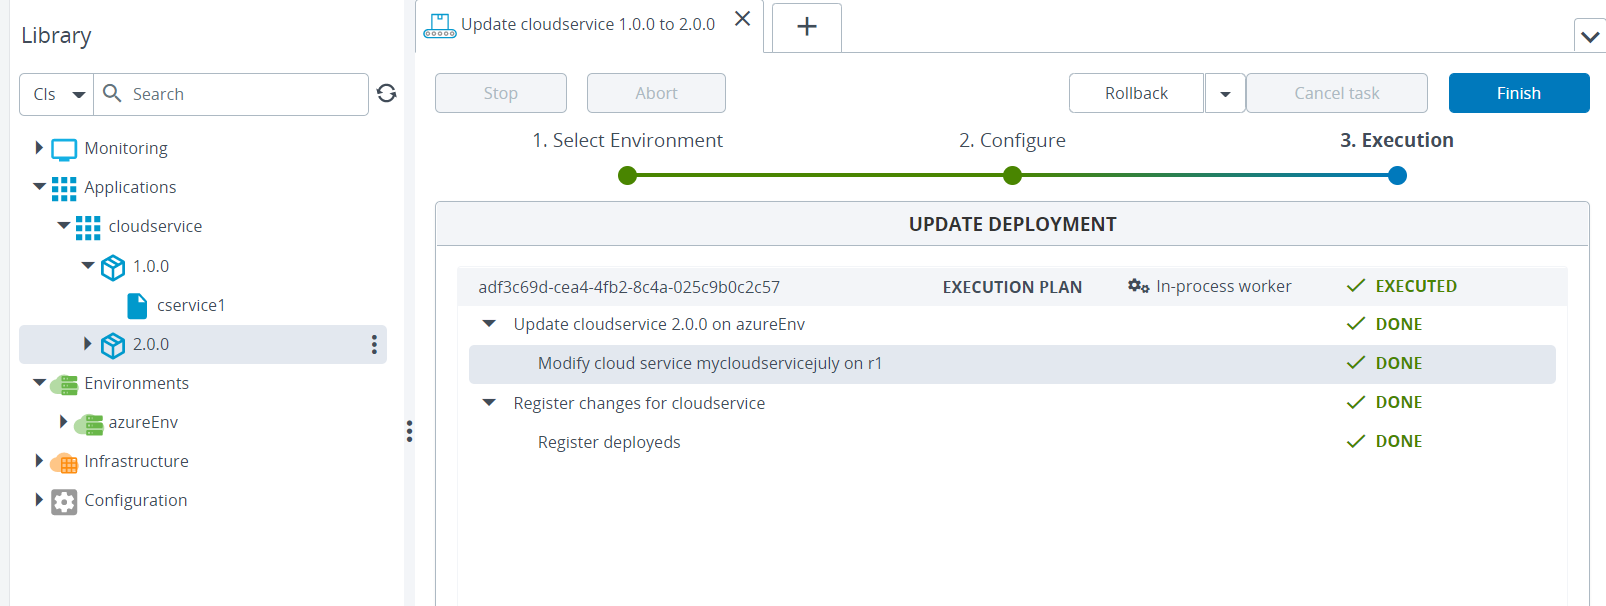
Deploy the CloudServiceSpec file from the Applications. After successful deployment of CloudServiceSpec on Digital.ai Deploy, verify the same on Azure portal.

Azure Blueprints
The Azure blueprints allow you to define deployments and releases in YAML templates, simplifying the process of provisioning resources with the Azure plugin. Azure Resource Manager (ARM) templates can also be used to easily define the Azure resource deployments. For more information, see Deploy to Azure with using the ARM template blueprint
The available Azure blueprints are:
- Basic AKS Cluster
- Azure App Service
- Microservice application on Azure Kubernetes service
- Basic ARM Template
For more information on the blueprints, see Deploy/Release Blueprints. This tutorial will help you to for deploy resources to Azure using ARM templates: Deploy to Azure with using the ARM template blueprint.
Azure WebApp
The Deploy Azure WebApp provides a host service to create and deploy web apps. To create WebApp on your Azure environment, you can configure the Azure WebApp Tags.
You can also configure the following using Deploy:
Azure WebApp Tags
This section describes how to configure Azure WebApp tags using Deploy.
Before you create Azure WebApp tags, you must have the following:
- Azure Cloud Infrastructure configured with a valid resource group
- Environment CI that points to the Azure resource group configured
- Webapptag and app service plan packages created or imported into the Deploy server
- WebApp configured with the required apps service plan in your resource group
Step 1 – Create the ASP service app on Azure portal
Configure the asp service plan on your Azure environment.
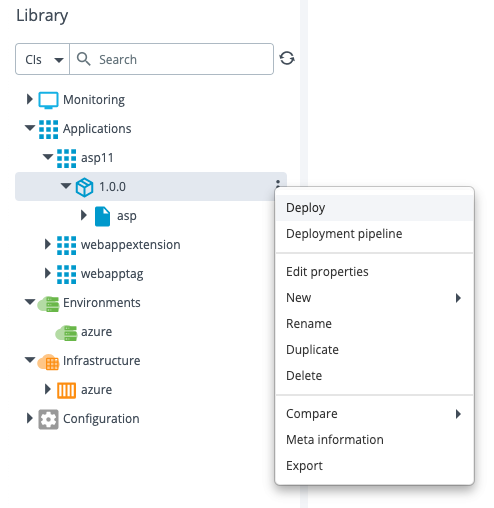
After the deployment is successful, the serviceapp is displayed in the Azure portal.
Step 2 – Create the webapptag on Azure portal
Configure the webapptag 1.0.0 package on your Azure environment.
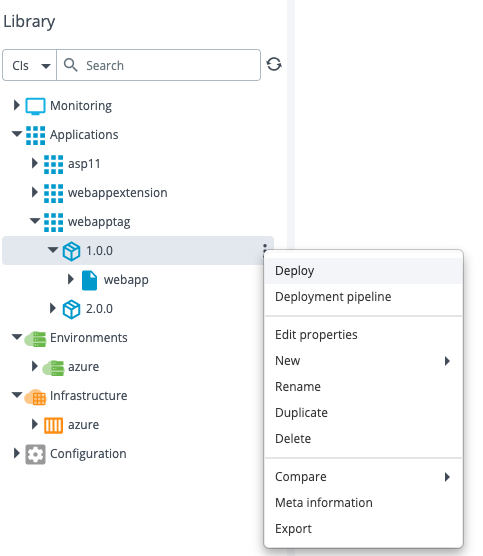
After the deployment is successful, the webapp tags are displayed in the Azure portal.
Step 3 – Update the webapptag Deployment
Update the webatpptag deployment to version 2.0.0.
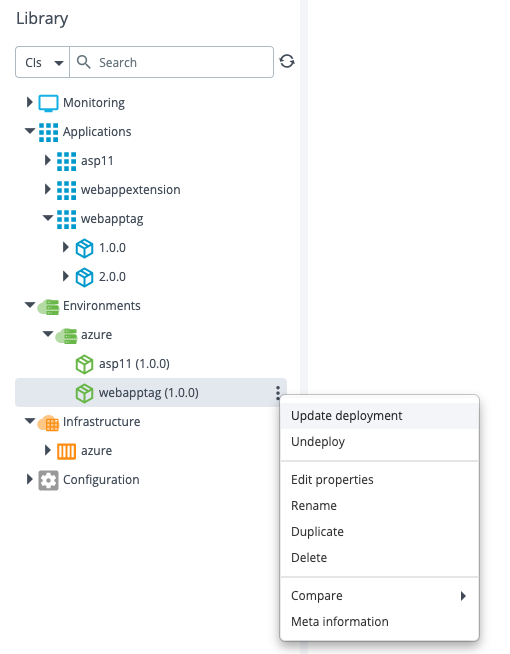
After the update is successful, the new tags are displayed in the Azure portal.
To undeploy the webapp tag, do the following:
- From Environments, click azure > webapptag 2.0.0 and perform a rollback to the earlier deployment version. After the rollback is successful, the original tags from webapptag 1.0.0 are displayed in the Azure portal.
- Right-click webapptag 2.0.0 and click Undeploy to remove webapp from Azure portal.
Azure WebApp Slots
This section describes how to configure Azure WebApp slots using Deploy.
Step 1 – Perform the deployment of web app slot on Azure portal
Deploy the webappslot app on your Azure environment.
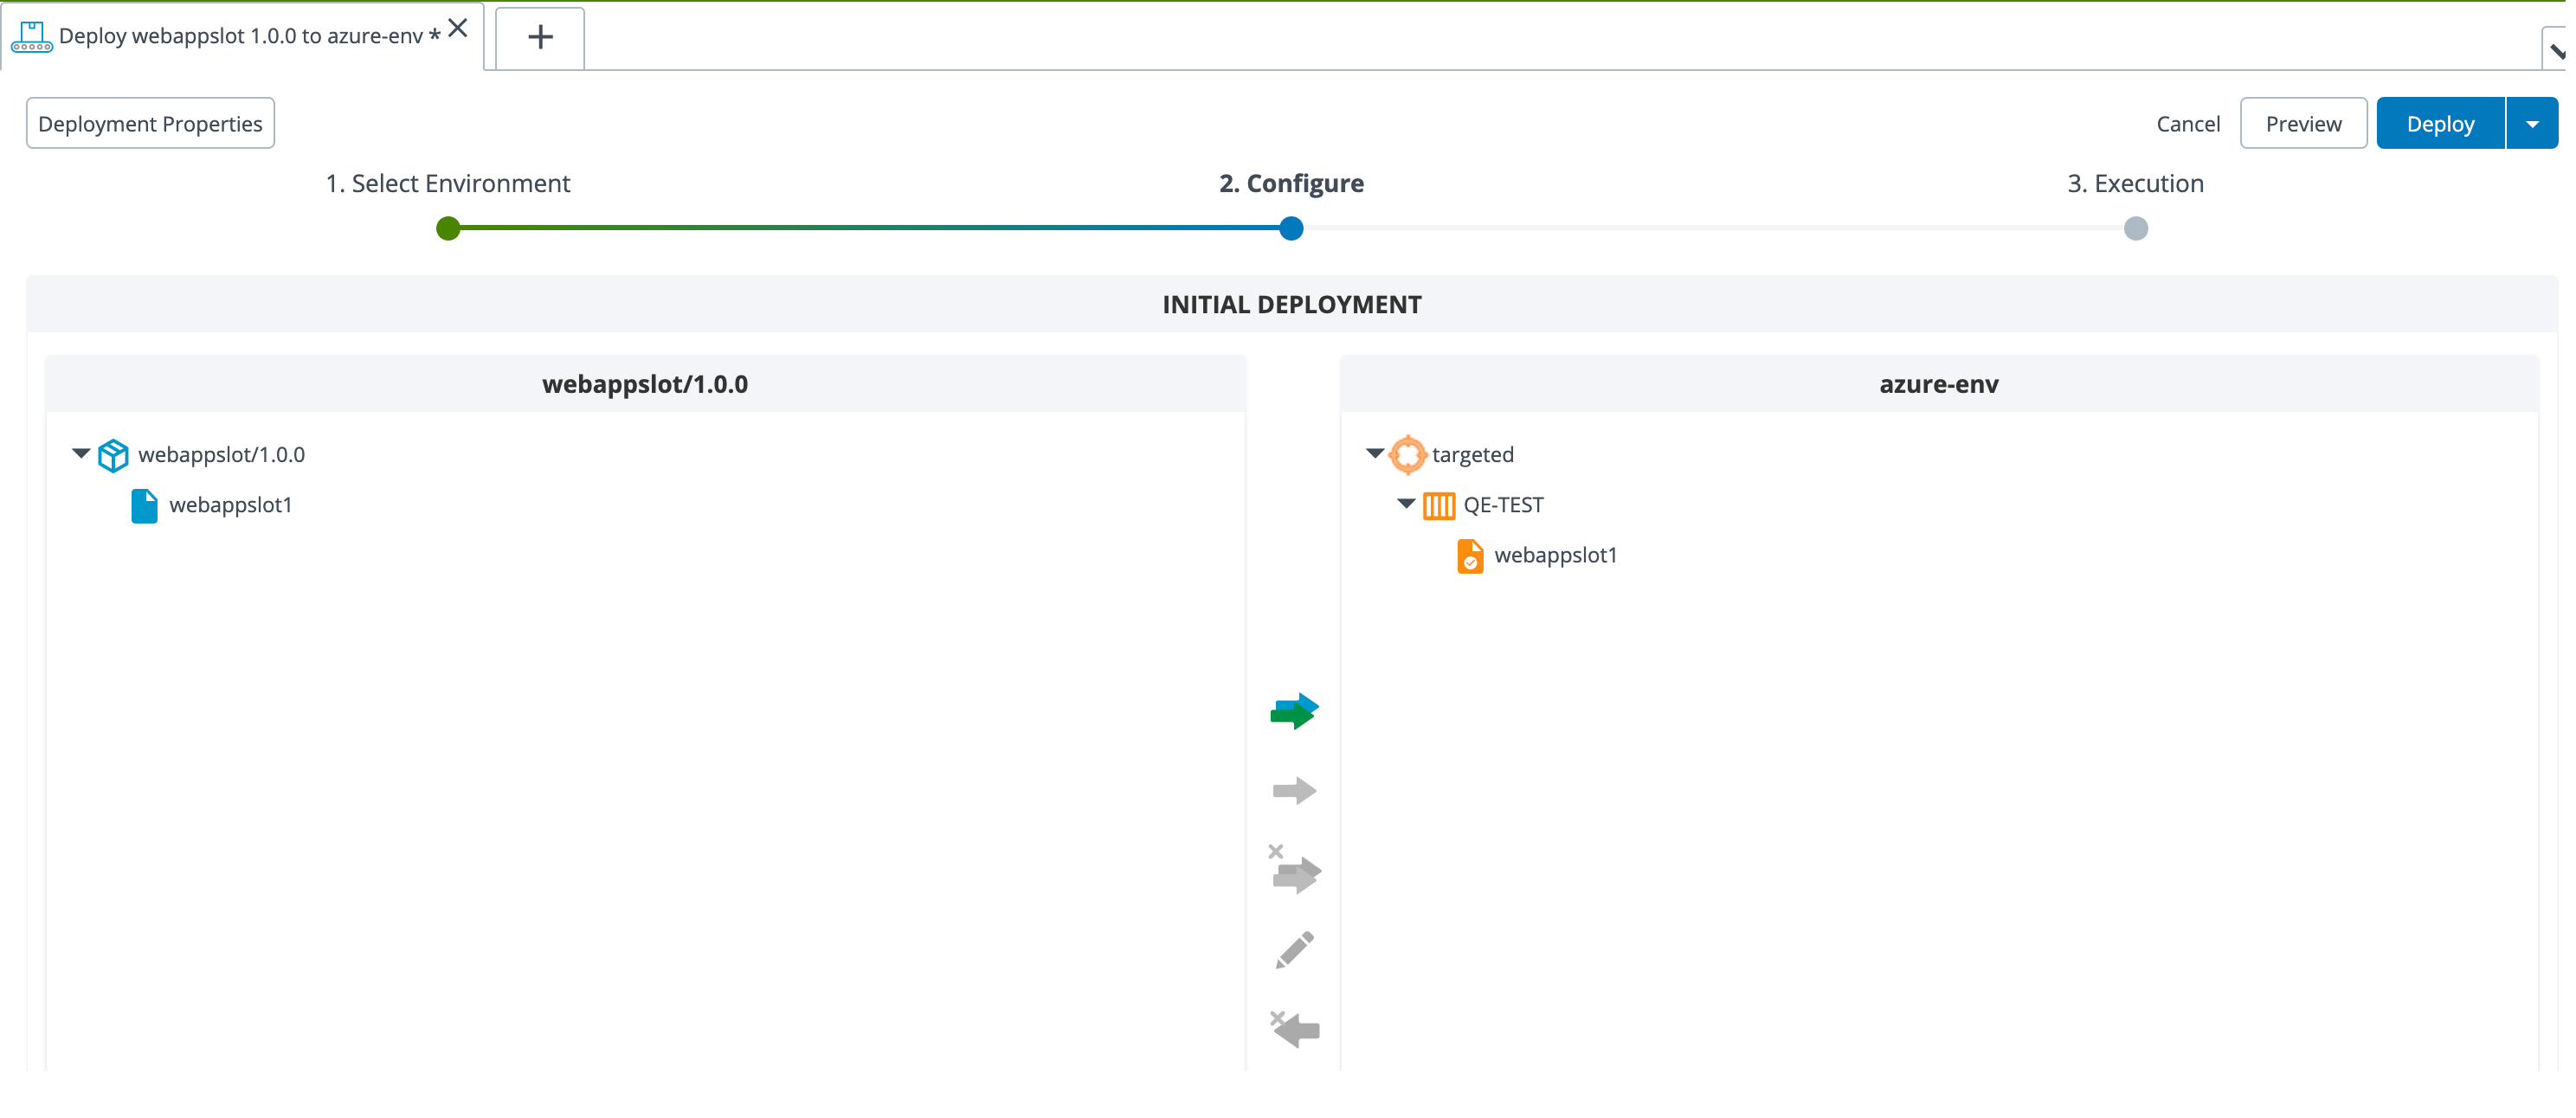
After the deployment is successful, verify the new deployment slot in the Azure portal.
Azure WebApp Logging
This section describes how to configure Azure logging using Deploy.
Step 1 – Ensure the serviceapp and webapptag are deployed successfully
See Azure WebApp Tags steps 1 and 2.
Step 2 – Perform the deployment of webapplogging on Azure portal
Configure the webapplogging 1.0.0 package on your Azure environment.
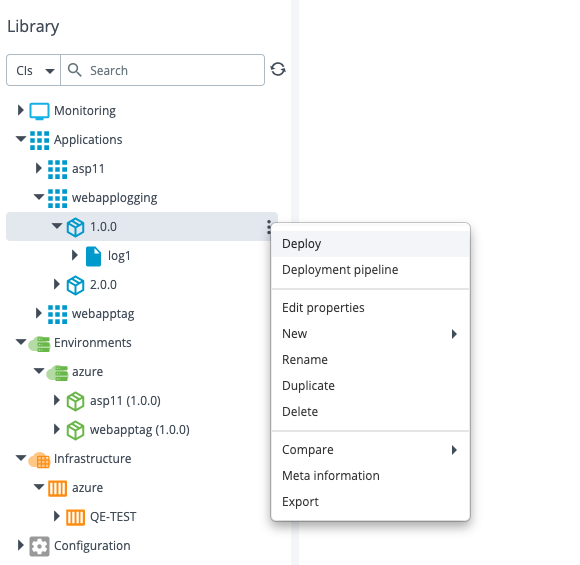
After the deployment is successful, the App Service Logs settings are updated in the Azure portal.
Step 3 – Update the webapplogging Deployment
Update the webapplogging deployment to version 2.0.0.
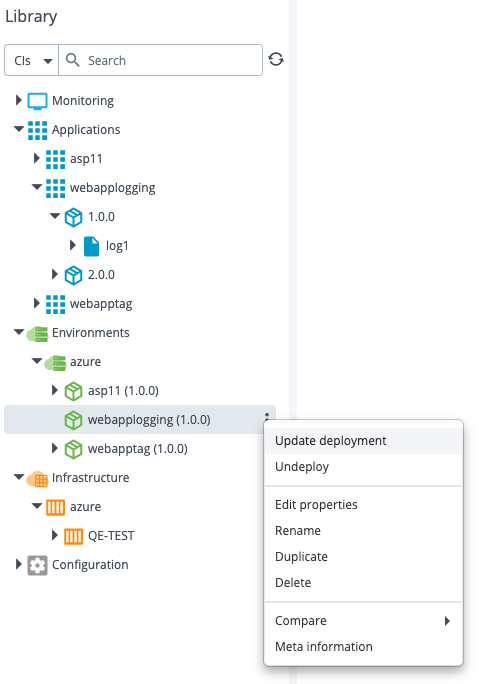
After the update is successful, the App Service Logs settings are updated in the Azure portal.
Azure WebApp Extensions
This section describes how to configure WebApp Extensions using Deploy.
Step 1 – Ensure the serviceapp and webapptag are deployed successfully
See Azure WebApp Tags steps 1 and 2.
Step 2 – Perform the deployment of webappextension on Azure portal
Configure the webappextension 1.0.0 package on your Azure environment.
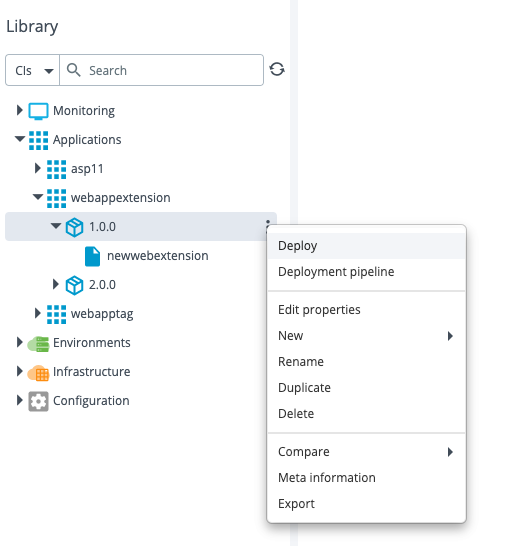
After the deployment is successful, the .NET Raygun APM extension for the web app is displayed in the Azure portal.
Step 3 – Update the webappextension Deployment
Update the webappextension deployment to version 2.0.0.
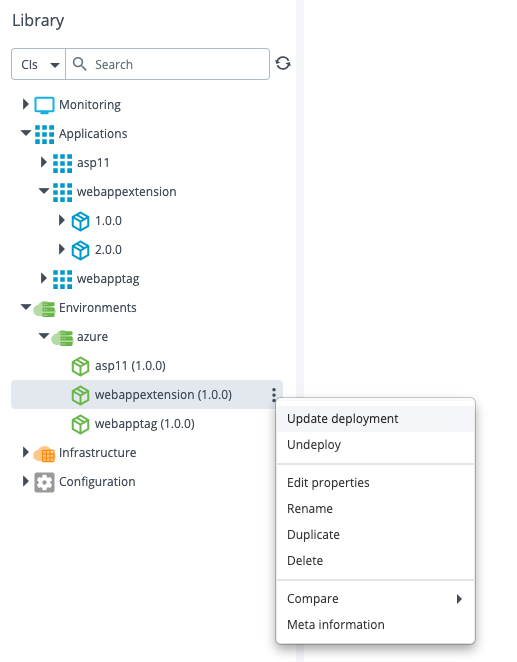
After the update is successful, the extensions for the web app are removed from the Azure portal.
Azure WebAppCodeSpec Deployment
This section describes how to configure Azure WebAppCodeSpec deployment using Deploy.
- Go to Application, click
, and select New > azure > WebAppCodeSpec.
- In the Name field, enter the name of the configuration item.
- Select the code package to be deployed.
- Specify the name of the Webapp to which the code has to be deployed.
- Specify the other optional parameters such as the artifact type and target path.
You can now specify the deployment slots for deploying the webapp code.
- Click Save or Save and close.
Use the configured WebAppCodeSpec configuration item in your deployment process to deploy the code to the Azure Web App.
Azure FunctionApp
The Deploy Azure FunctionApp provides functionality in Digital.ai Deploy to create and deploy FunctionApp in specified Resource Group.
Before you create Azure FunctionApp, you must have the following:
- Azure Cloud Infrastructure configured with a valid resource group
- Environment CI that points to the Azure resource group configured
Azure FunctionApp Using an Image
This section describes how to configure Azure FunctionApp using image stored in a repository.
Step 1 – Configure the required Prerequisites.
Step 2 – Fill the required fields in the azure.FunctionAppImage configuration item.
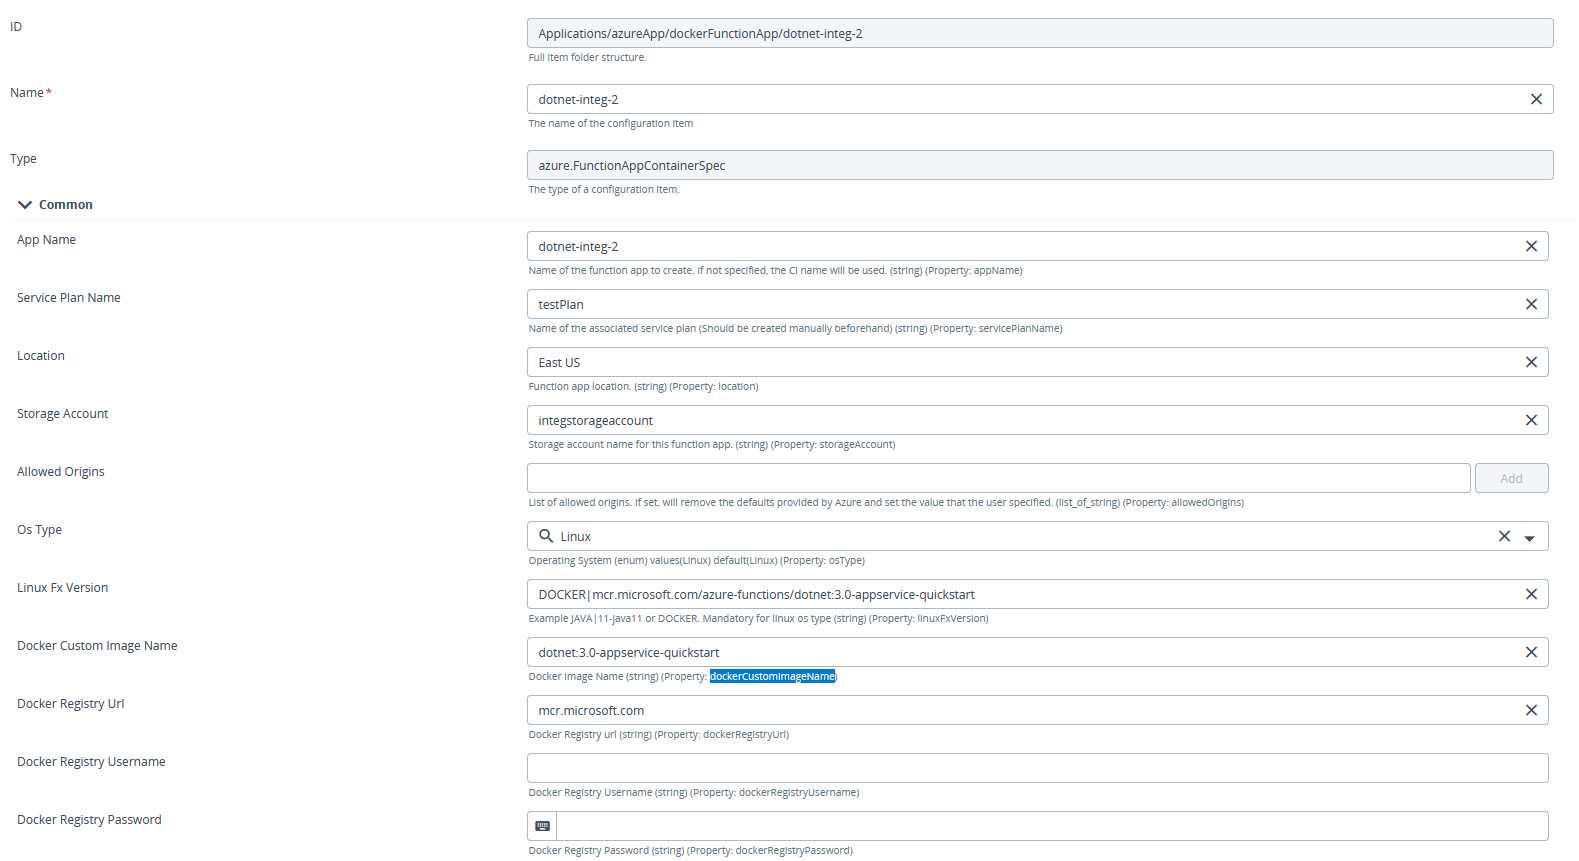
Step 3 – Deploy the Configuration Item to the Deployable.
Deploy the FunctionApp on your Azure environment.
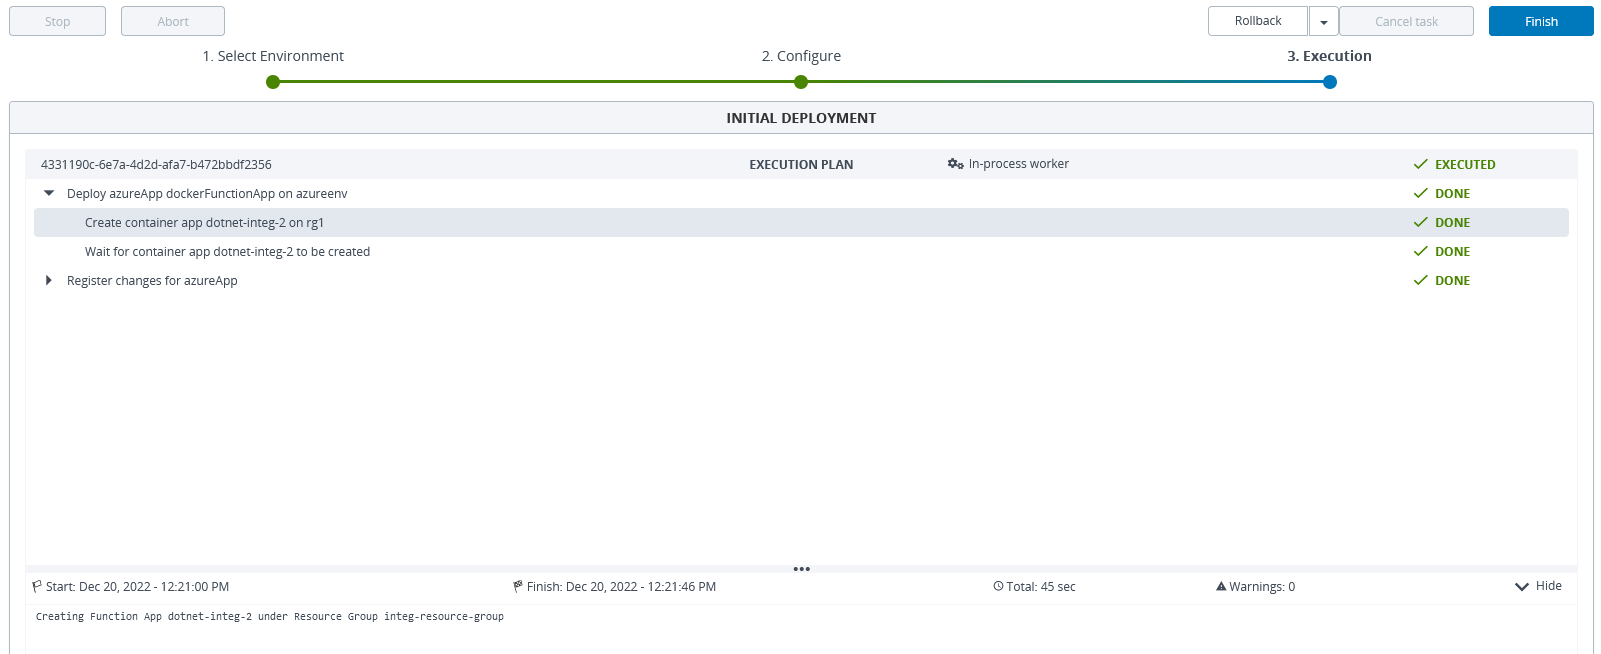
Azure FunctionApp Using a Zip file
This section describes how to configure Azure FunctionApp using zip file as artifact.
Step 1 – Configure the required Prerequisites.
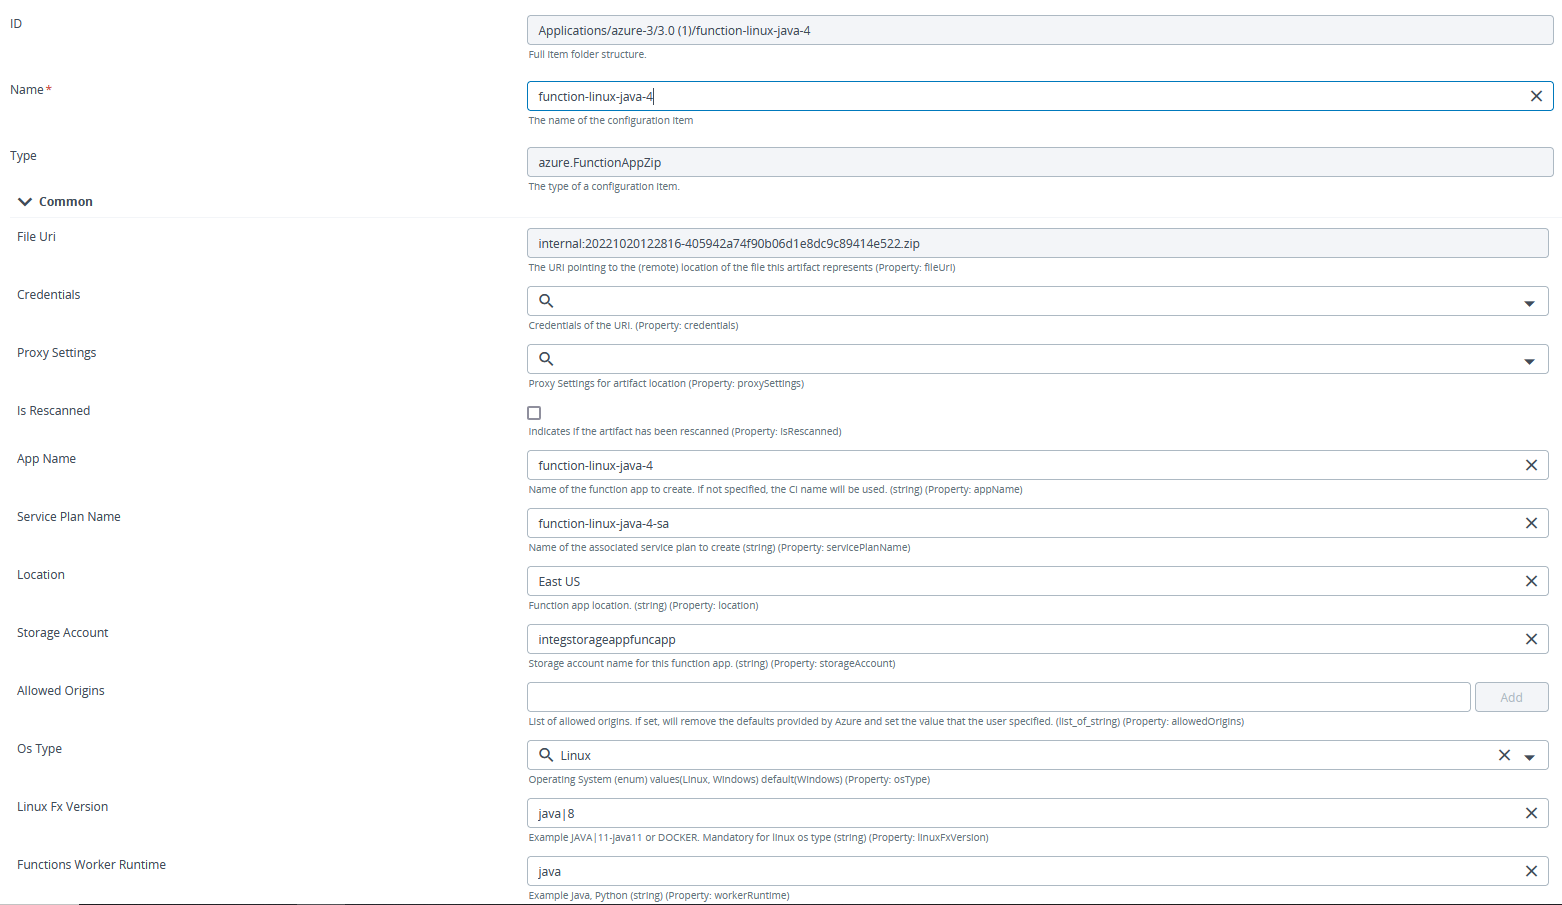
Step 2 – Fill the required fields in the azure.FunctionAppZip configuration item.
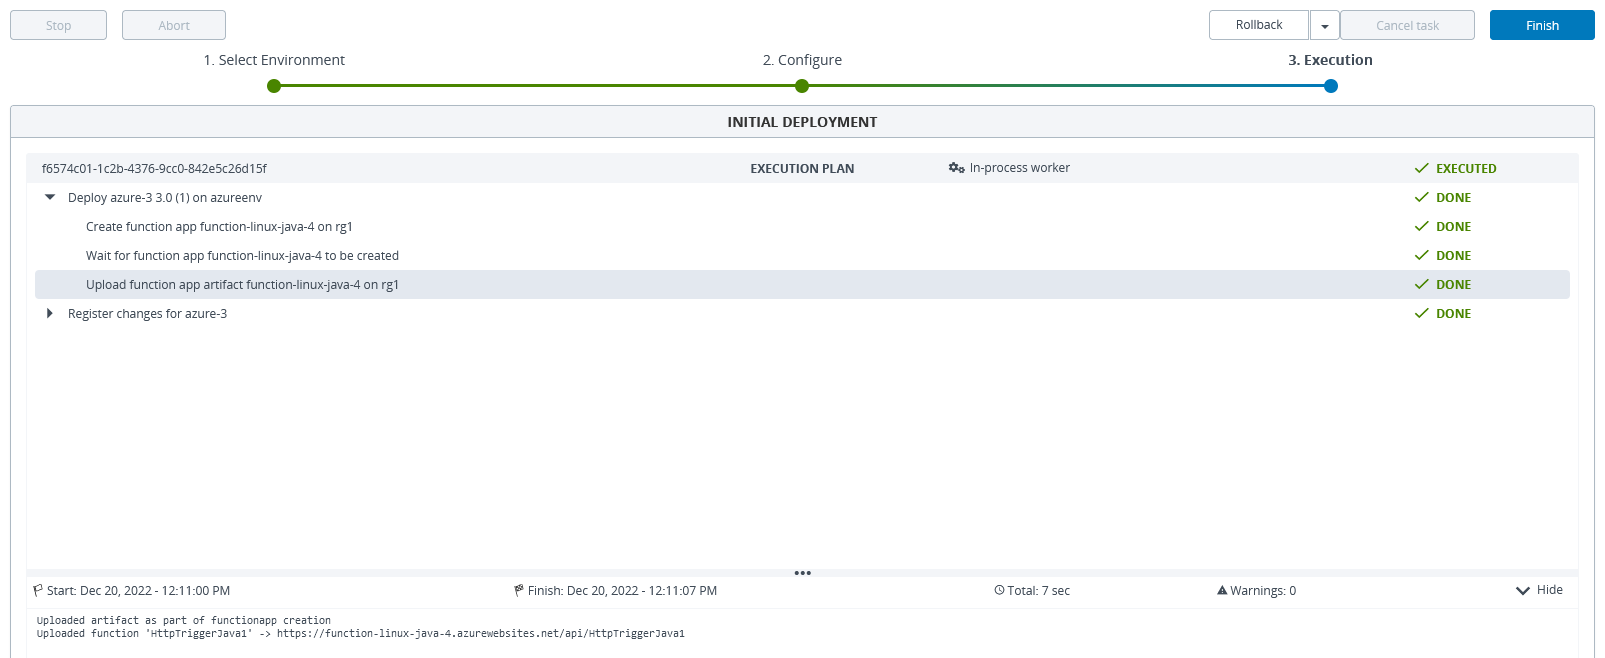
Step 3 – Deploy the Configuration Item to the Deployable.
Deploy the FunctionApp on your Azure environment.
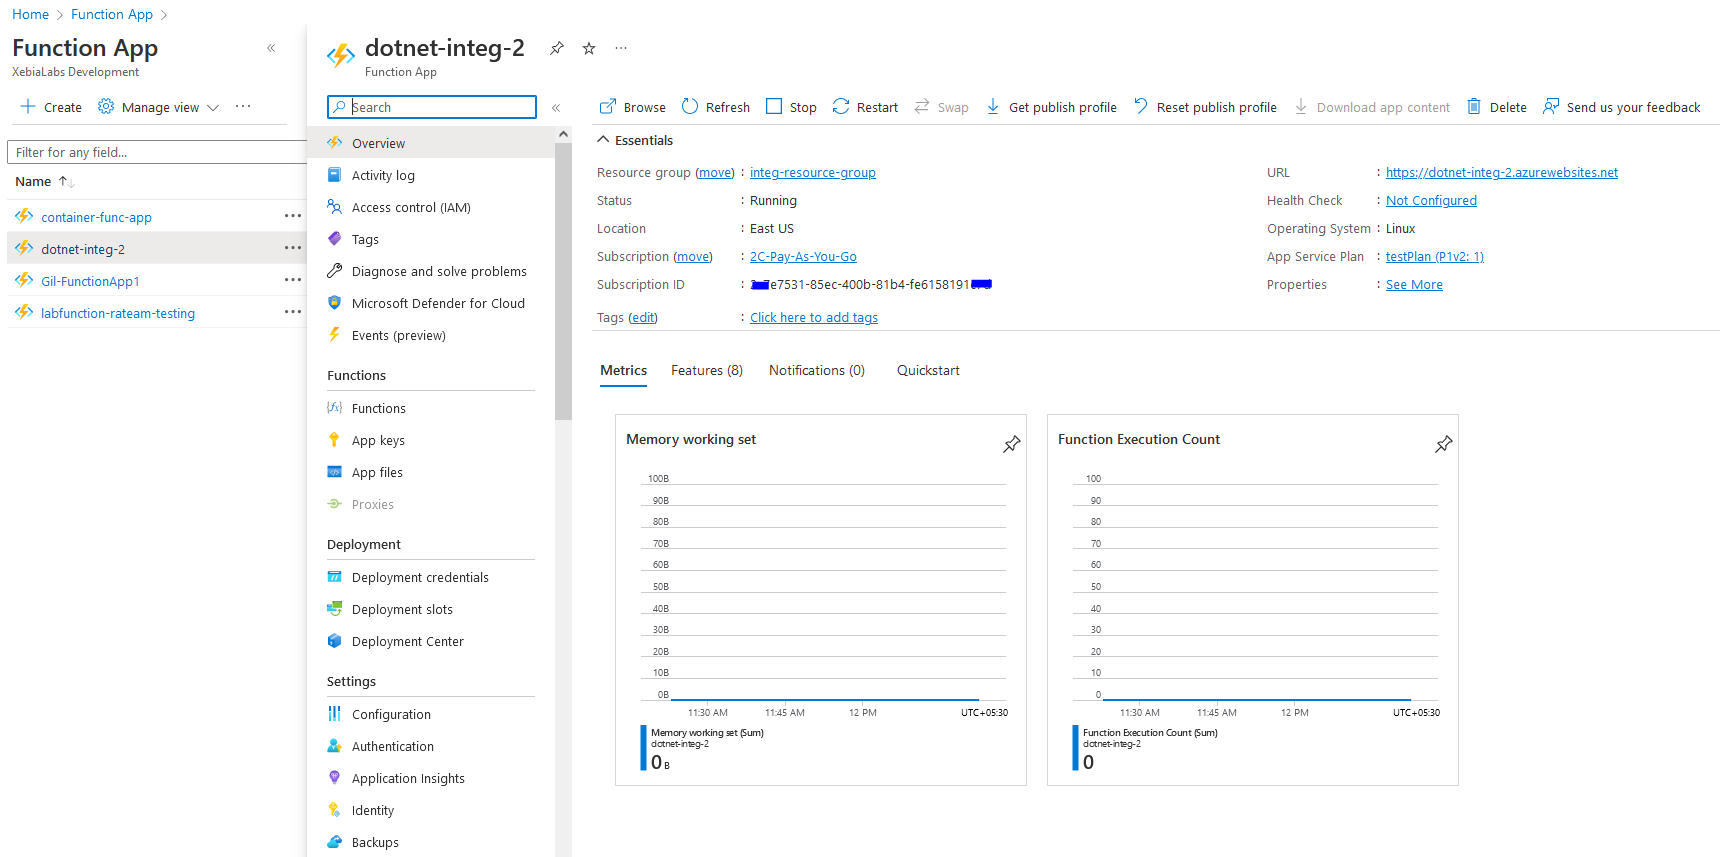
Verify the created Azure FunctionApp in Azure portal
After the deployment is successful, verify the newly created FunctionApp in the Azure portal.
Azure FunctionAppCodeSpec Deployment
- Go to Application, click
, and select New > azure > FunctionAppCodeSpec.
- In the Name field, enter the name of the configuration item.
- Speficy the URL and credentials of the repository to pull the Webapp content from.
- Provide other configuration item as needed.
For the field Service Plan Name, Location, and Hosting Plan, check Azure App Service plan.
- Click Save or Save and close.
Use the configured FunctionAppCodeSpec configuration item in your deployment process to deploy the code to the Azure Web App.
Azure StaticWebAppSpec deployment
- Go to Application, click
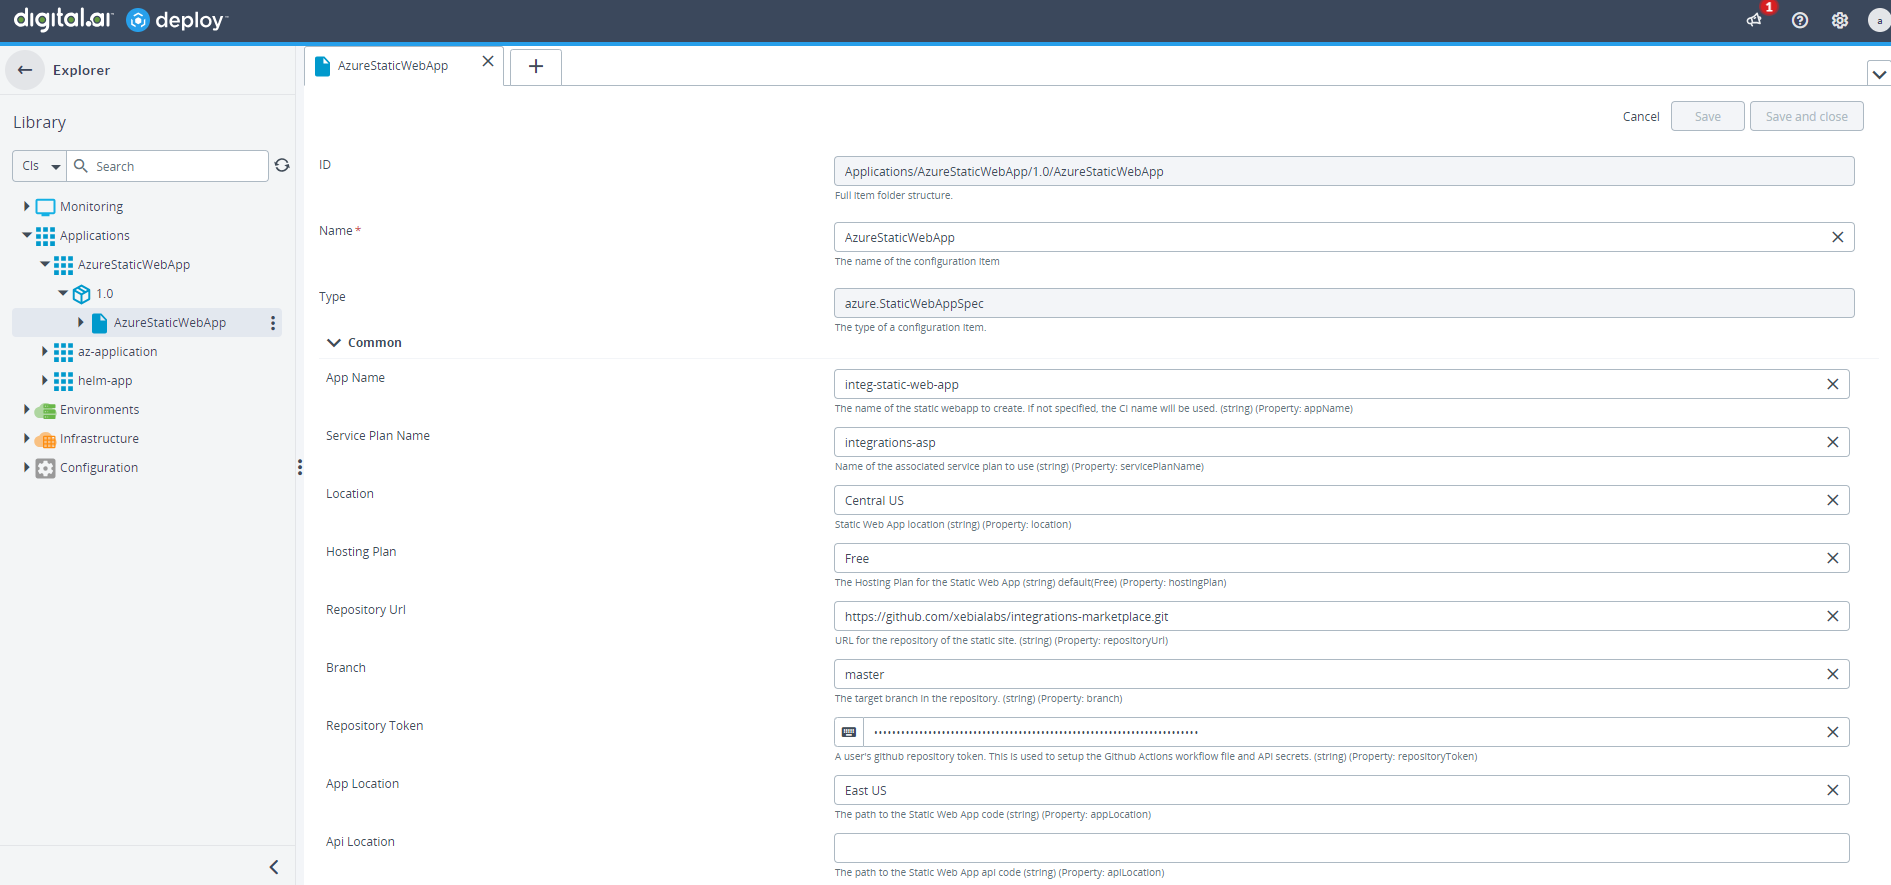
, and select New > azure > StaticWebAppSpec.
- In the Name field, enter the name of the configuration item.
- Provide other configuration item as needed.
For the field Service Plan Name, Location, and Hosting Plan, check Azure App Service Plan.
- Click Save or Save and close.
Use the configured StaticWebAppSpec configuration item in your deployment process to deploy the code to the Azure Web App.
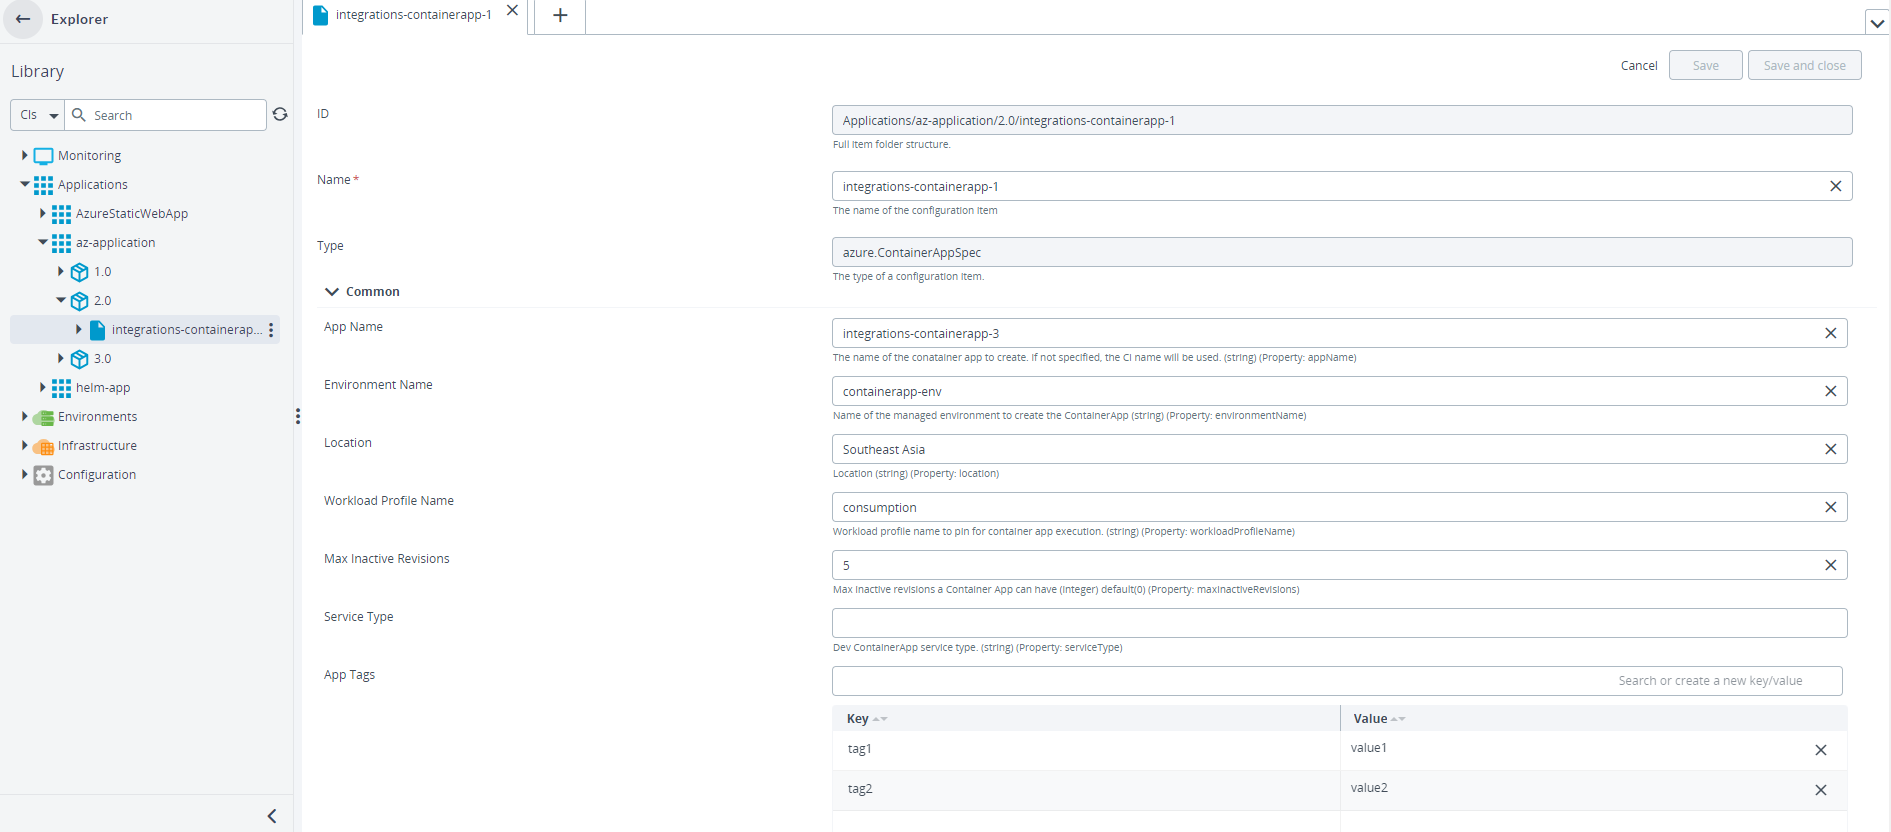
Integration with ContainerAppSpec
- Go to Application, click
, and select New > azure > ContainerAppSpec.
- In the Name filed, enter the name of the container application.
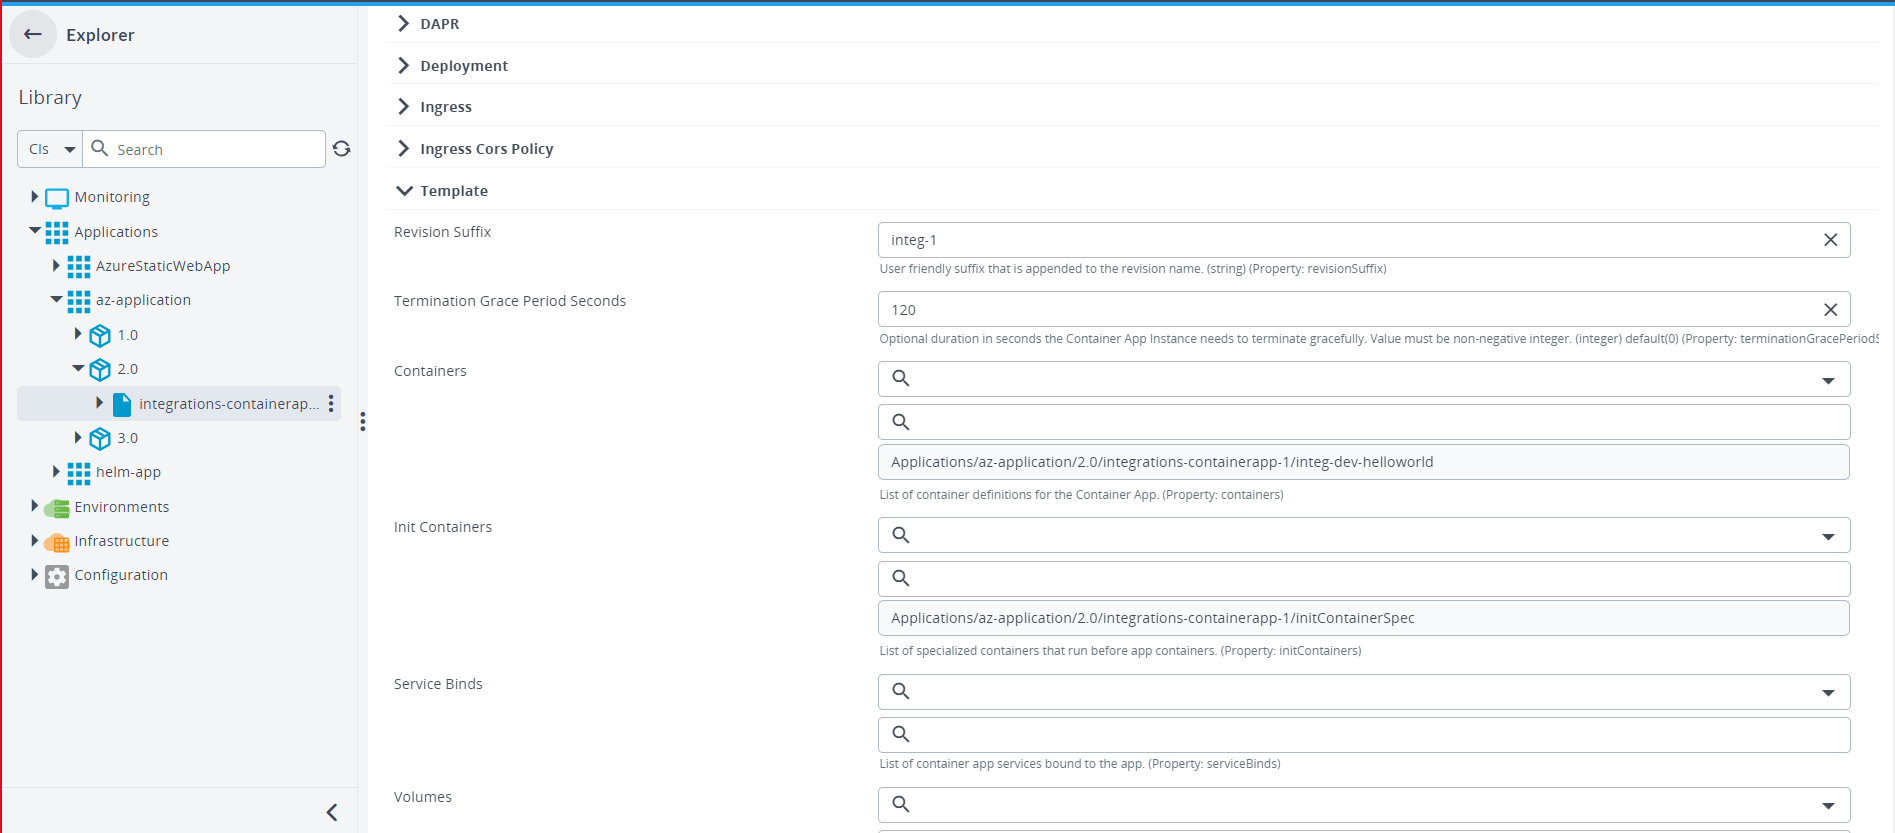
- Specify configurations for DAPR, Ingress, and CORS and Template Revision as needed.
For more information, refer to Container Apps - Create Or Update
- Click Save or Save and Close.
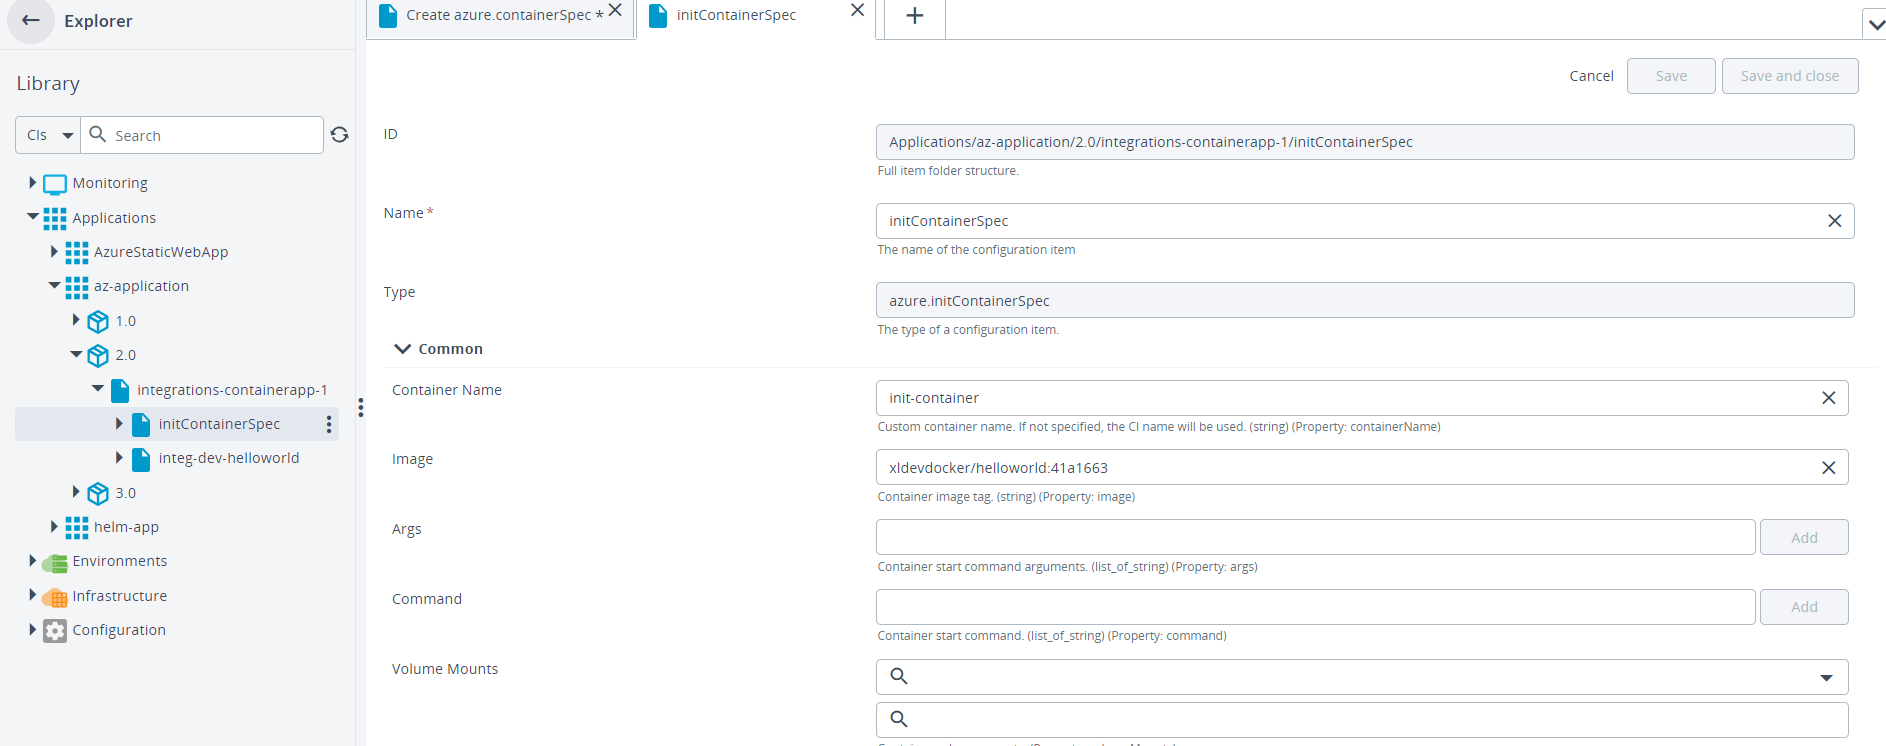
- From the containerapp created, select New > azure and select from the list to add Containers, Init Containers, Volumes, and Service binds as needed.
Managed Identity Support
You can configure managed identities for Azure Container Apps through the ContainerAppSpec. Managed identities provide a secure way for your container apps to authenticate with Azure services without storing credentials in code or configuration.
Properties
-
addSystemAssignedIdentityEnable or disable a system-assigned managed identity for the container app.- Type: Boolean
- Default: false
-
userAssignedIdentitiesSpecify one or more user-assigned managed identities to associate with the container app.- Type: List
- Each entry must be the name of the user-assigned identity.
Example:
"userAssignedIdentities": [
"myIdentity1",
"myIdentity2"
]
Usage Notes
- You can configure system-assigned, user-assigned, or both identity types.
- User assigned managed identities must exist in Azure before being referenced in the deployment specification.
- You can associate more than one user-assigned identity with a single container app.
If userAssignedIdentities contains an invalid or non-existent resource ID, deployment will fail.
Integration with WebAppContainer
Prerequisites: You must create a App service plan in Azure.
- Go to Application, click
, and select New > azure > WebAppContainerSpec.
- In the Name filed, enter the name of the WebAppContainer.
- Specify the image and registry details.

- Provide other additional configuration item as needed.
- Click Save or Save and Close.
Use the configured ContainerWebApp configuration item in your deployment process to deploy the web app.
Azure Create Container Group in Azure Resource Group with Instance Spec
The Deploy Azure ContainerGroupSpec and ContainerInstanceSpec provides functionality in Digital.ai Deploy to create and deploy Container with an image in Azure Container Instances under a resource group.
Before you create Azure Container, you must have the following:
- Azure Cloud Infrastructure configured with a valid resource group
- Environment CI that points to the Azure resource group configured
Azure ContainerGroupSpec to create Container Group
This section describes how to configure Azure ContainerGroupSpec.
Step 1 – Configure the required Prerequisites.
Step 2 – Fill the required fields in the azure.ContainerGroupSpec configuration item.
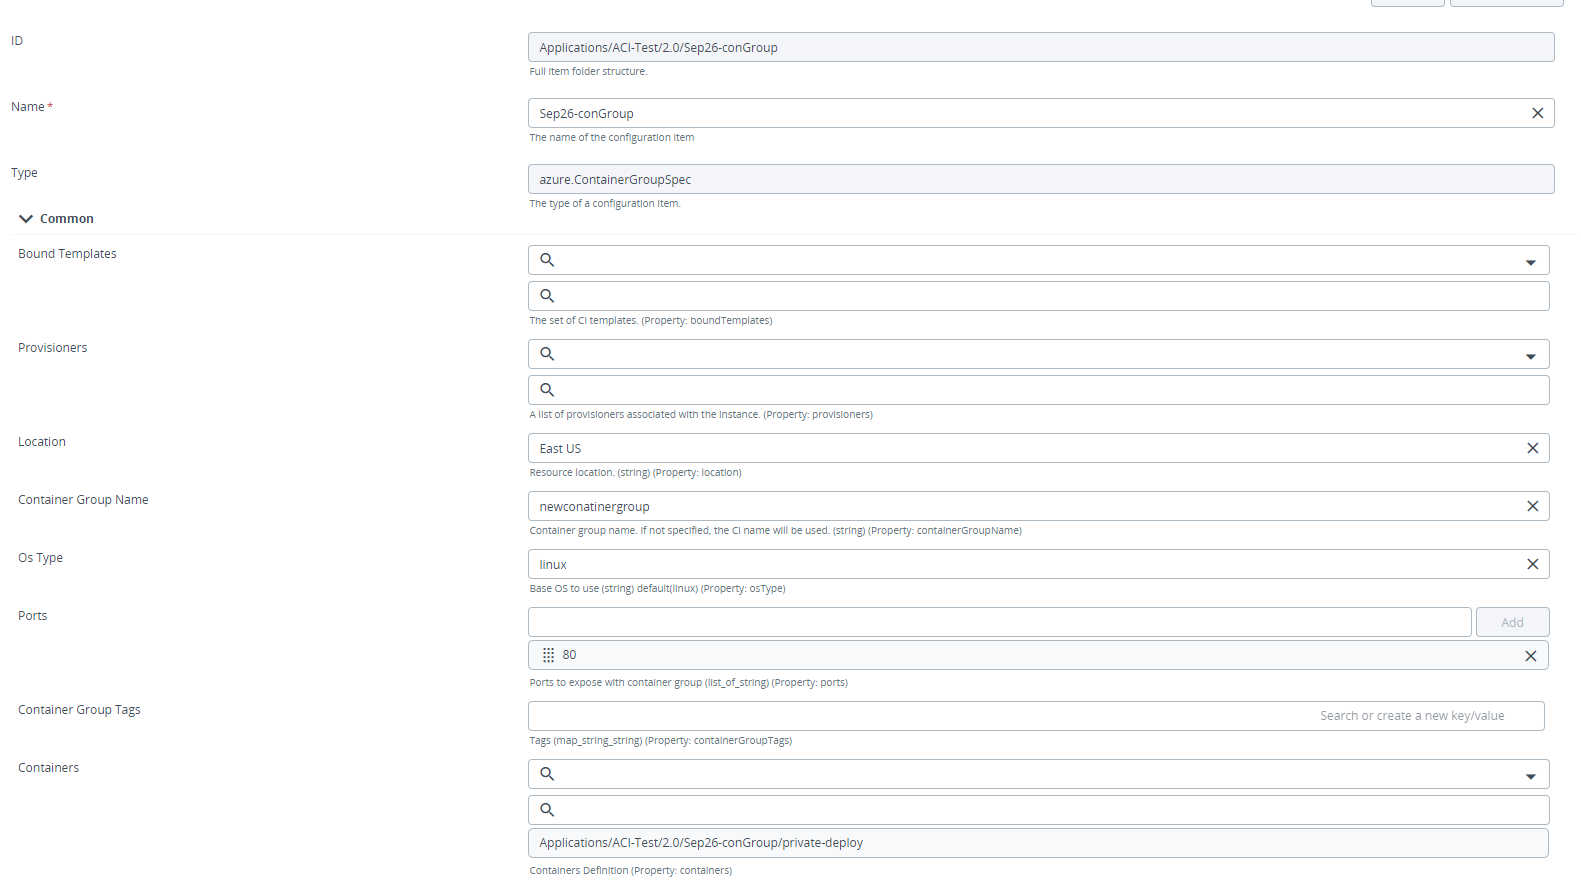
Step 3 – Hover over created azure.ContainerGroupSpec configuration item, click  , and select New > Azure > ContainerInstanceSpec.
Step 4 – Fill the required fields in the azure.ContainerInstanceSpec configuration item.
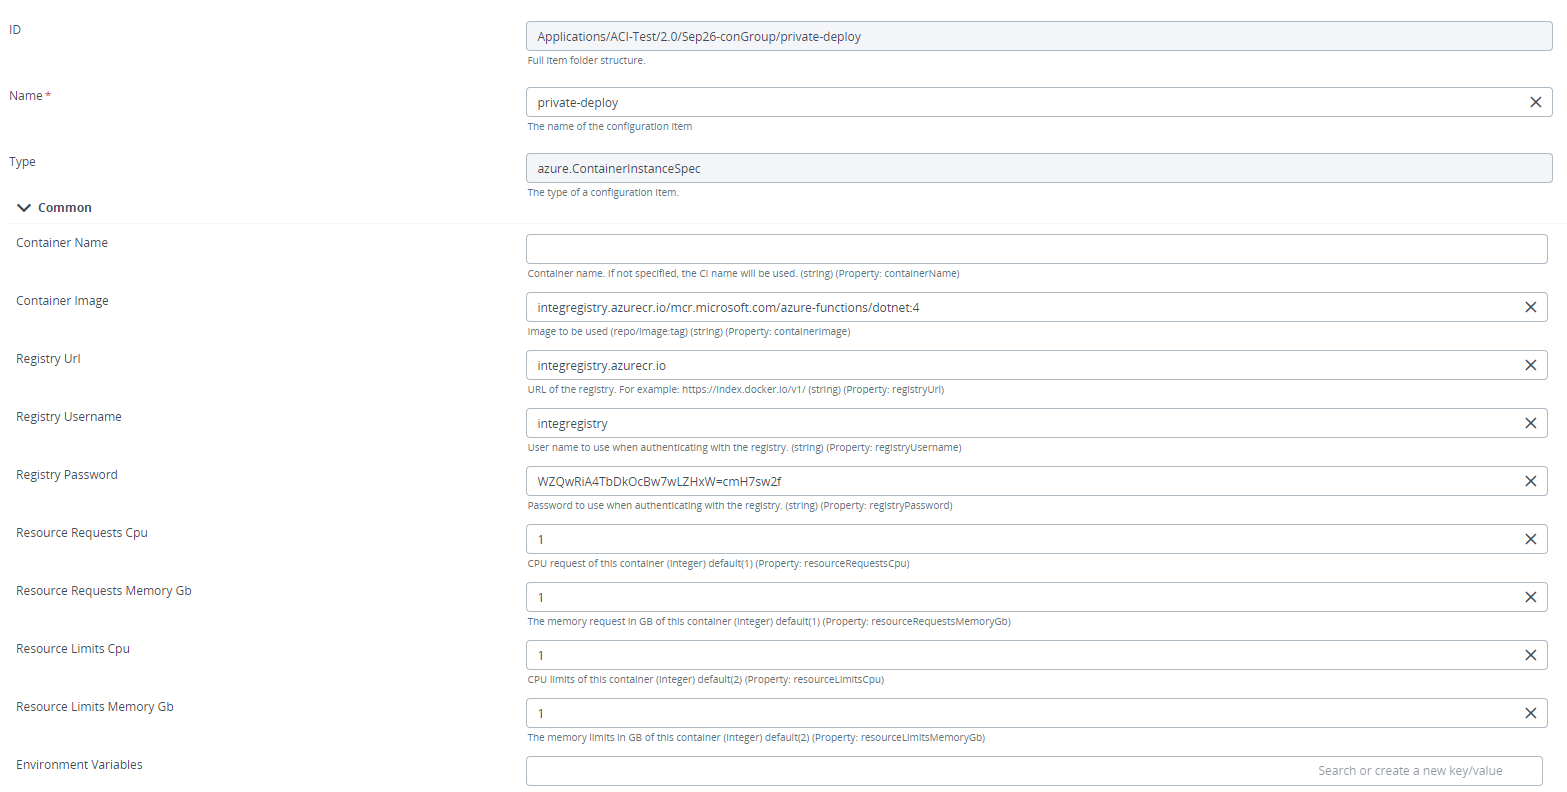
Step 5 – Deploy the Configuration Item to the Deployable.
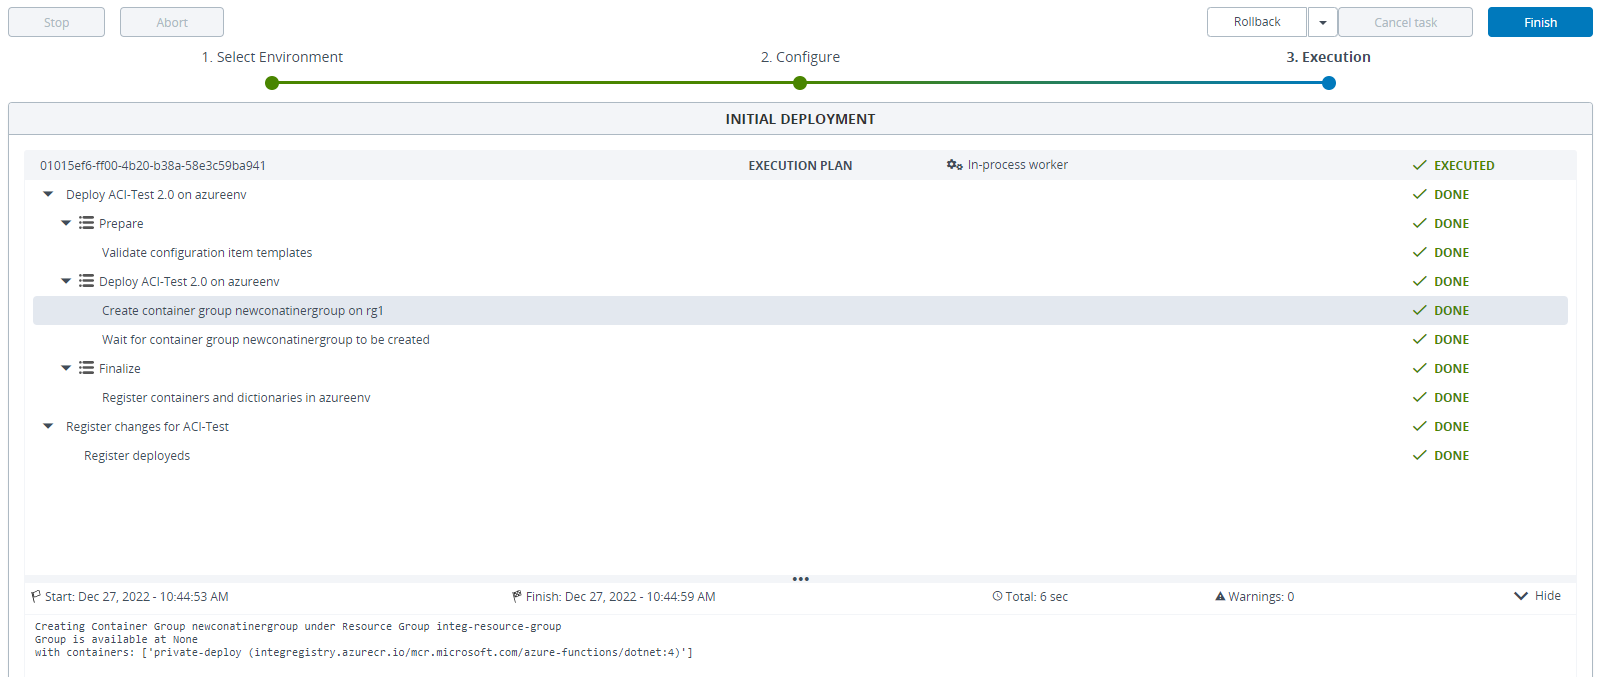
Step 6 – Verify the Newly Created Container Group in Azure Portal.
Step 7 – Update the webapptag Deployment.
Azure Create Resources in Azure Resource Group Using Bicep Template
The Deploy Azure Bicep deployment provides functionality in Digital.ai Deploy to deploy Bicep template resources under a resource group.
Before you create Azure Container, you must have the following:
- Azure Cloud Infrastructure configured.
- Environment CI that points to the Azure Cloud configured.
Azure ContainerGroupSpec to Create Container Group
This section describes how to configure Azure Bicep template configuration Item.
Step 1 – Configure the required Prerequisites.
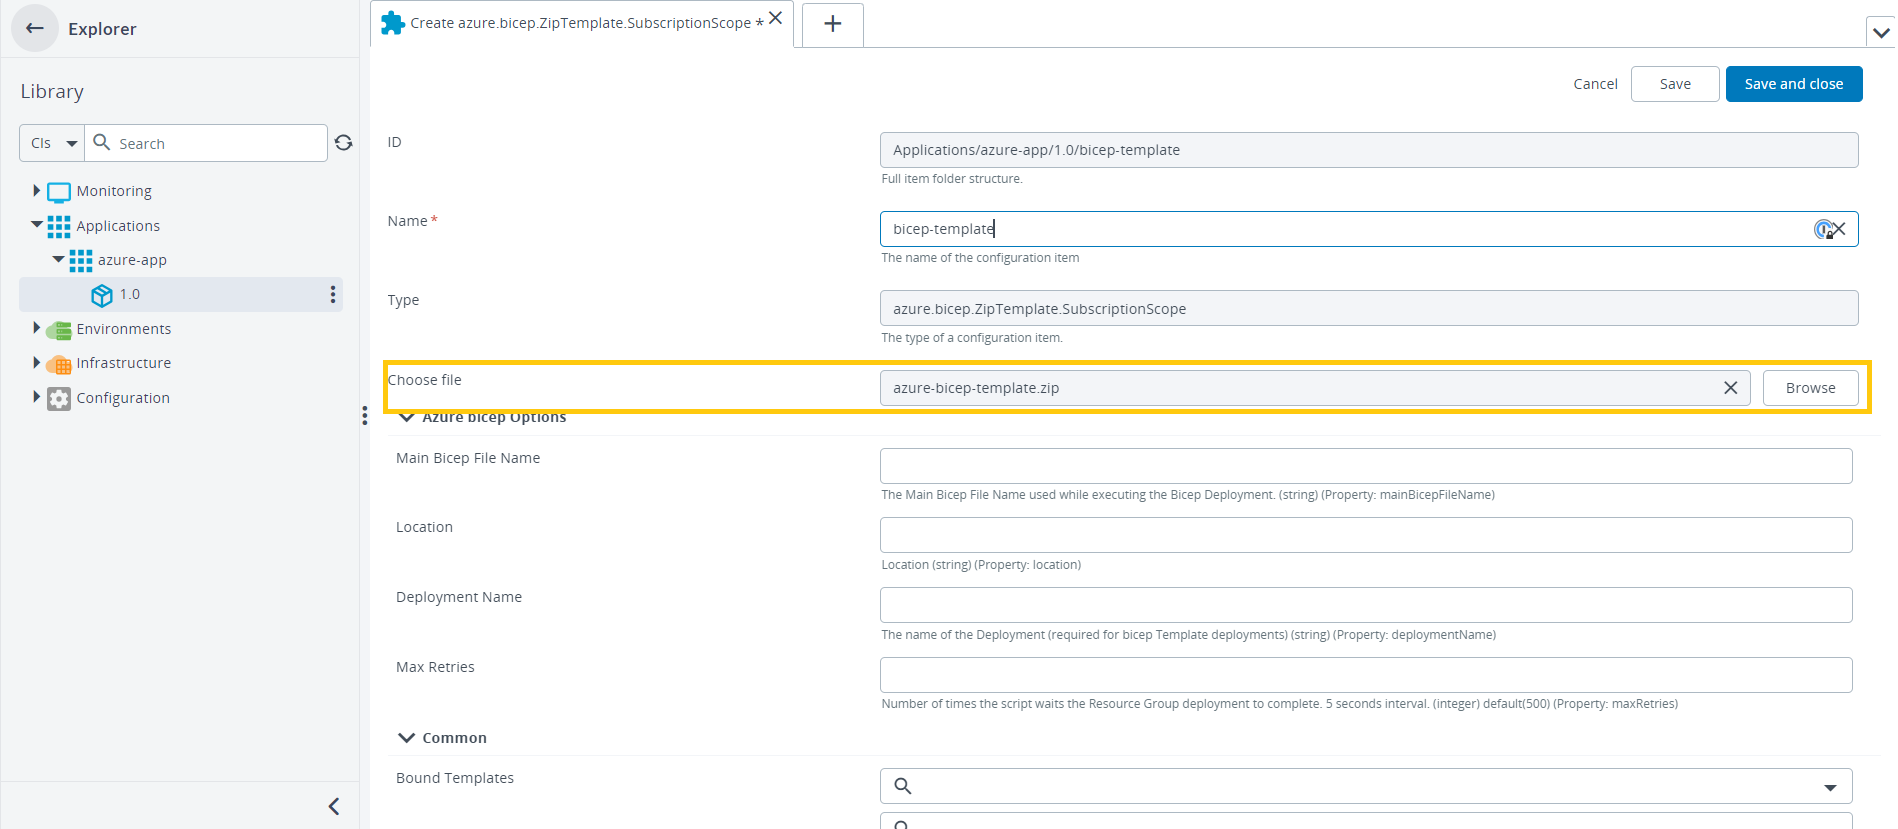
Step 2 – Fill the required fields in the azure.bicep.Template configuration item.
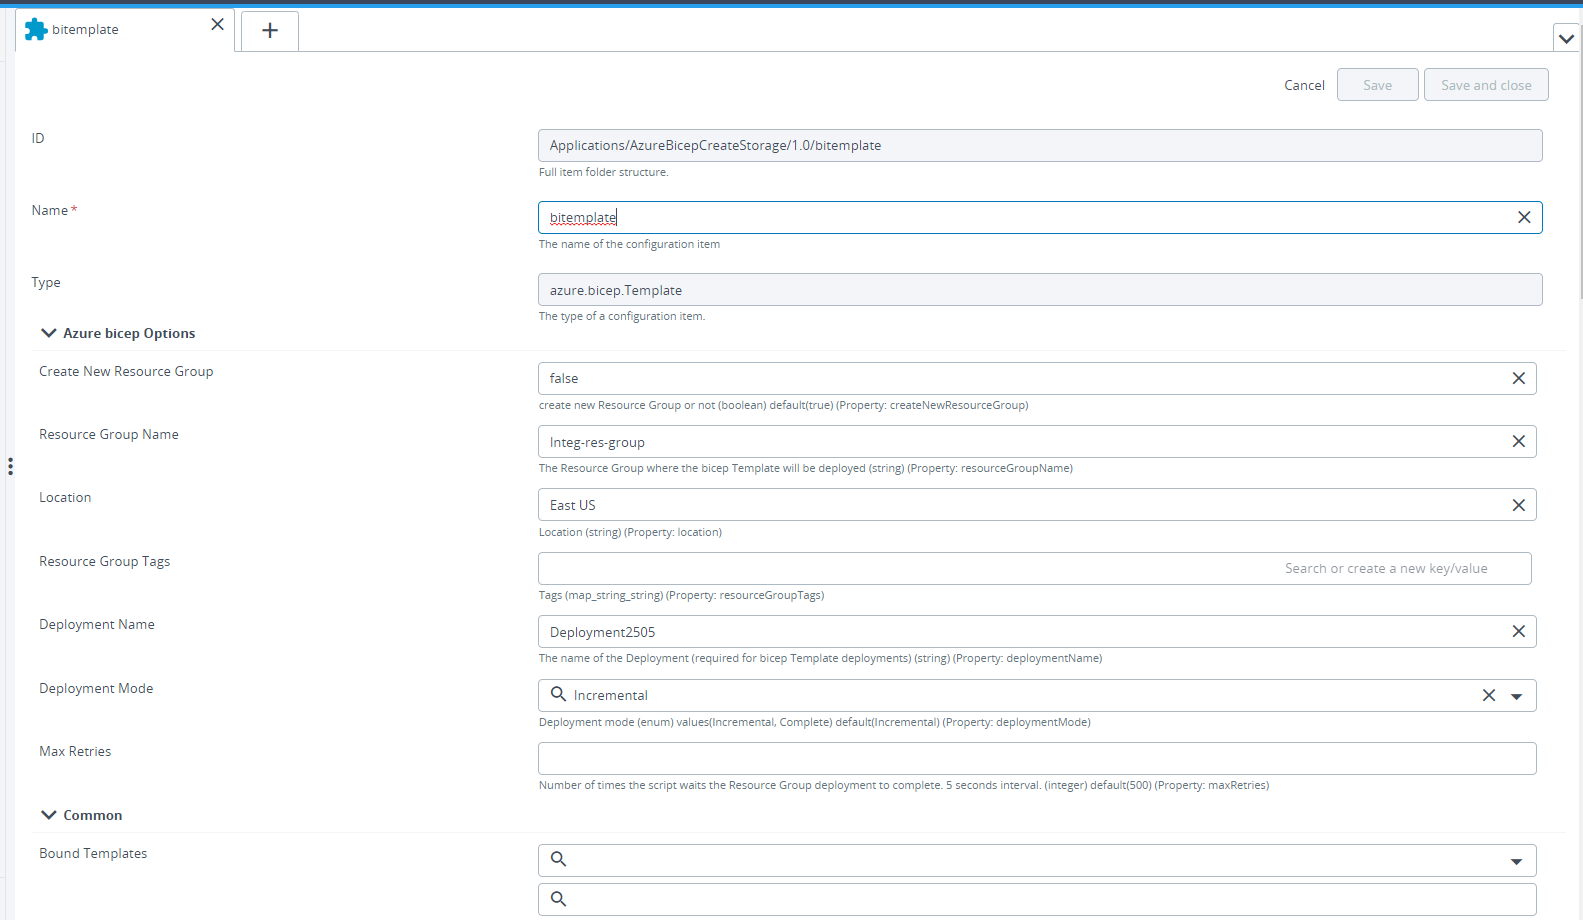
-
You can create bicep templates that can be scoped against a ResoucreGroup or a Subscription.
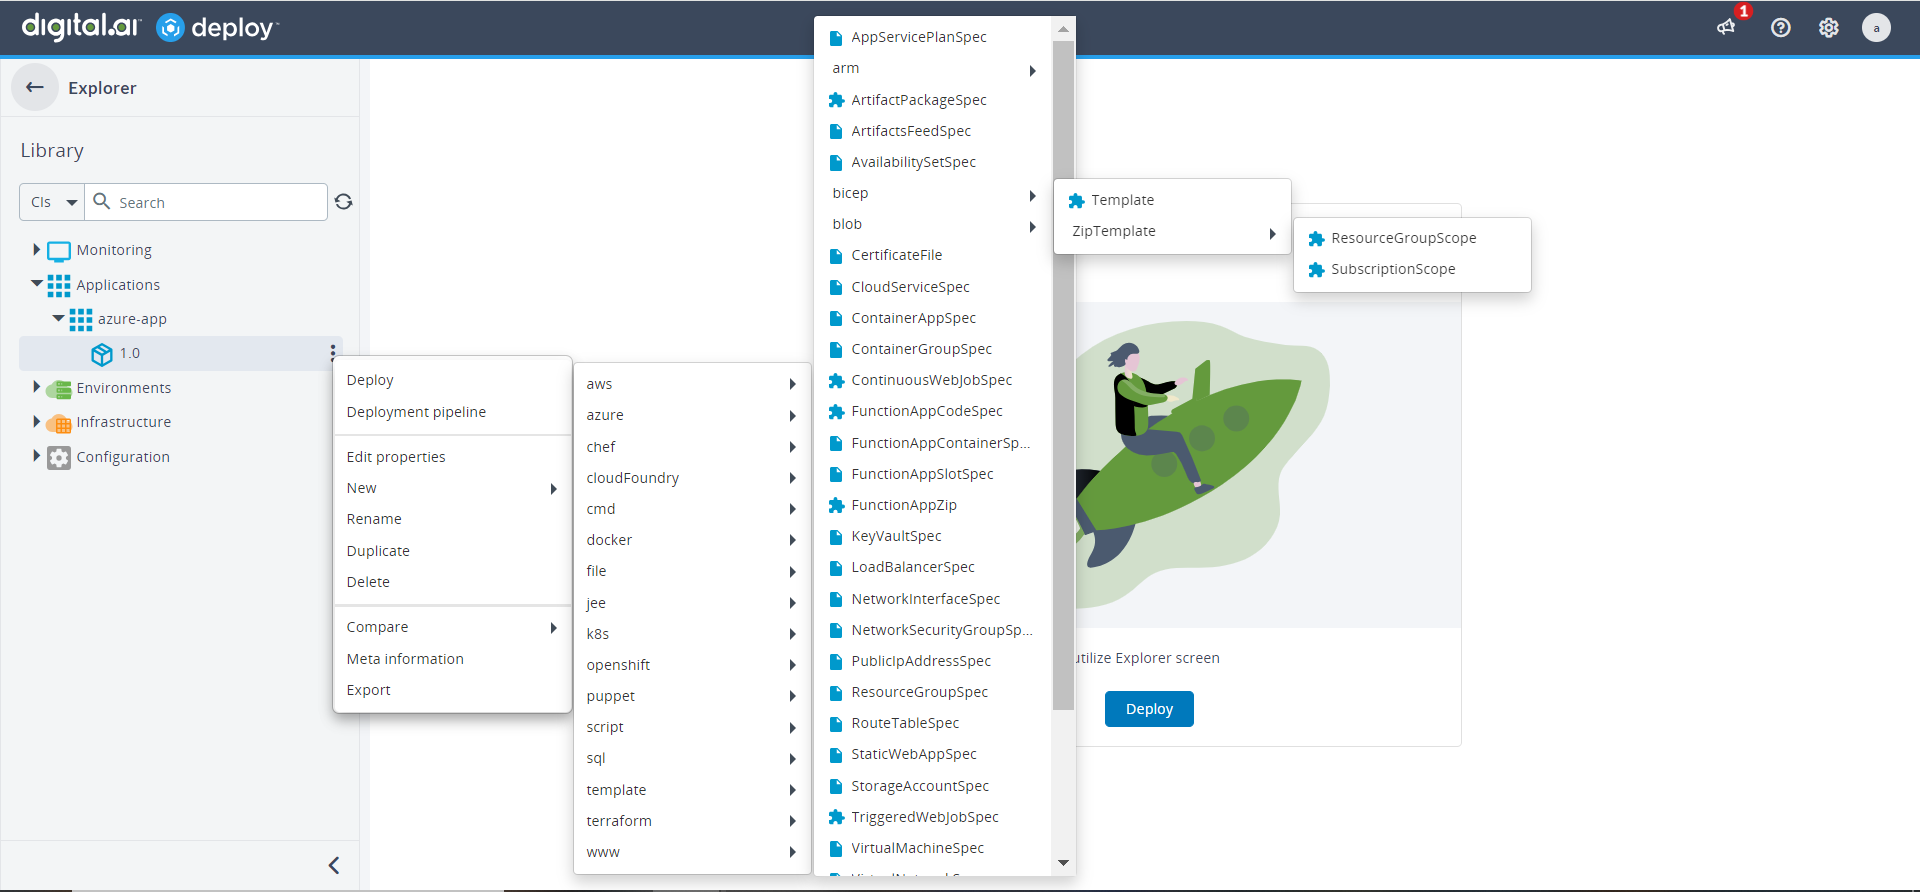
-
You can upload zip folders that consists of collection of templates.
-
Input Variables can be added in the Input Variables field. For Object Type send a Dict String
{'tag1': 'value1'}
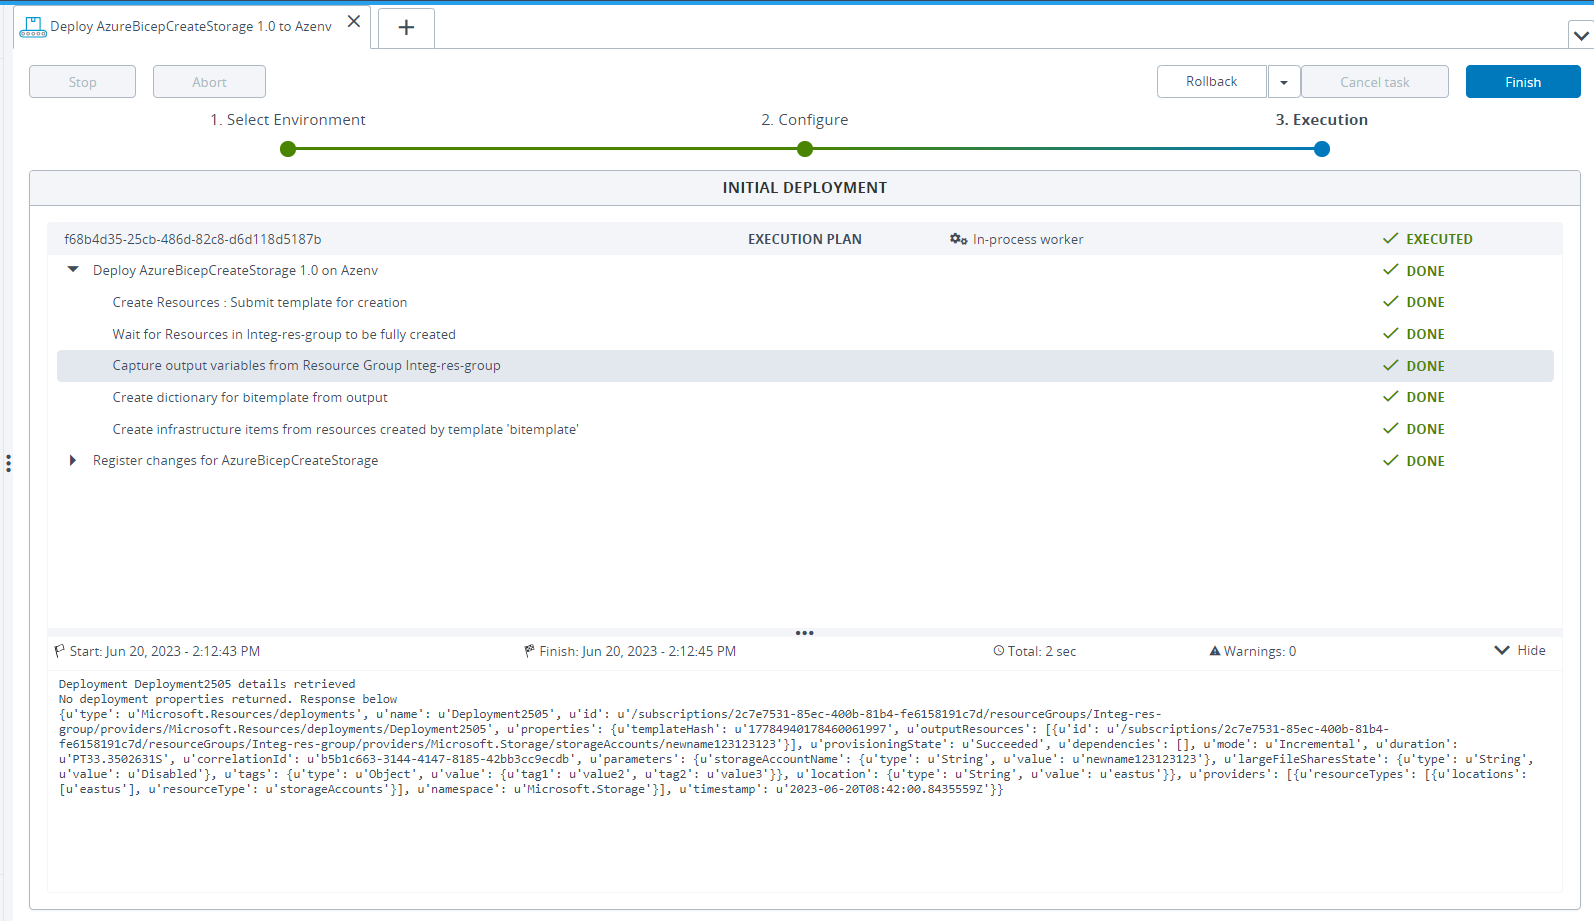
Step 3 – Deploy the Configuration Item to the Deployable.
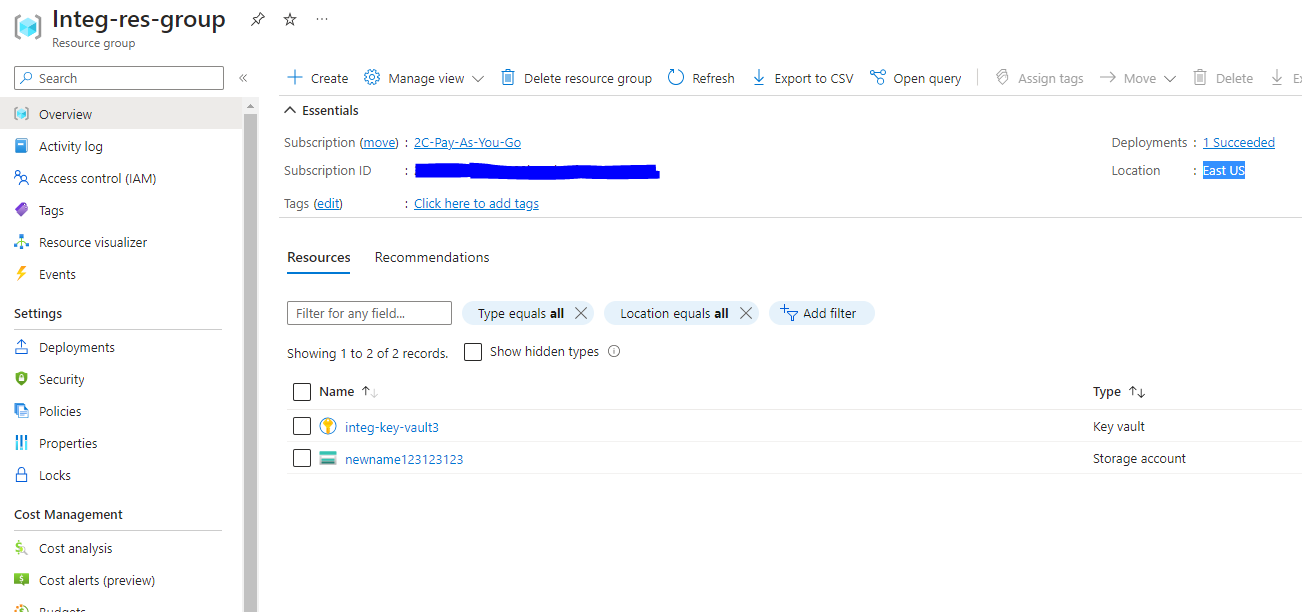
Step 4 – Verify the newly created resources in Azure Portal.
Azure API Management
Azure API Management is a platform for managing, securing, and publishing APIs to consumers. It acts as a gateway that routes requests to your existing services, enforces policies like rate limiting or authentication, and monitors usage without changing your backend code.
The Import API functionality lets you quickly bring existing APIs into the platform by importing definitions like OpenAPI (Swagger), WSDL, or WADL.
Create API Management Configuration Item
To import APIs into Azure API Management using Deploy, do the following:
- In the sidebar, click Explorer.
- Expand Applications, then expand your versioned package.
- Click
, and select New > azure > api.
- Select one of the following options:
- ImportApiFileSpec: To upload a local API specification file (OpenAPI YAML/JSON, WSDL, etc.).
- ImportApiLinkSpec: To use a public URL that links to the specification file.
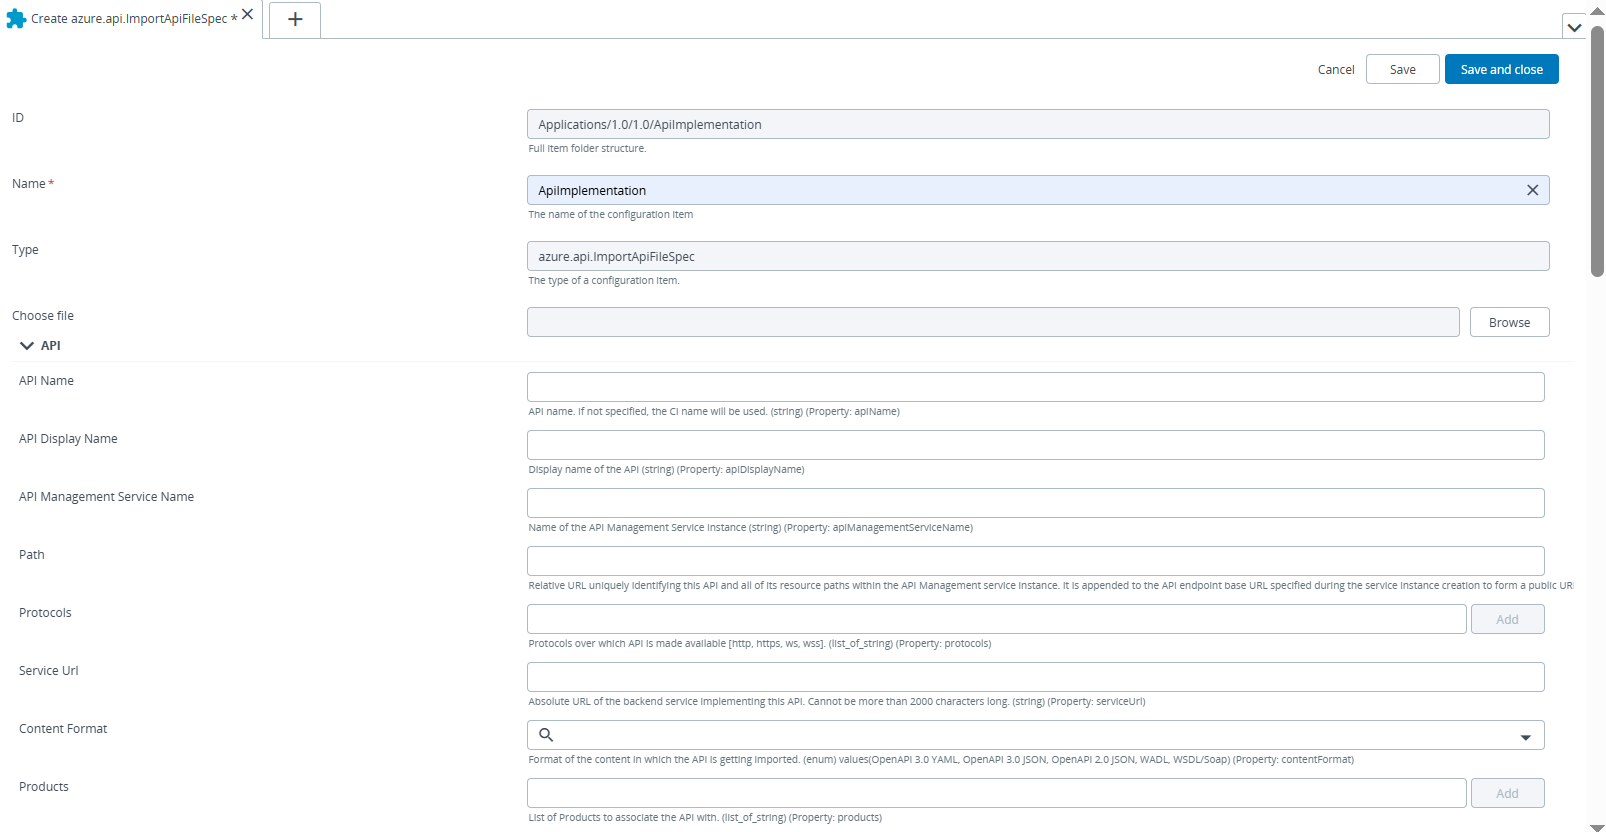
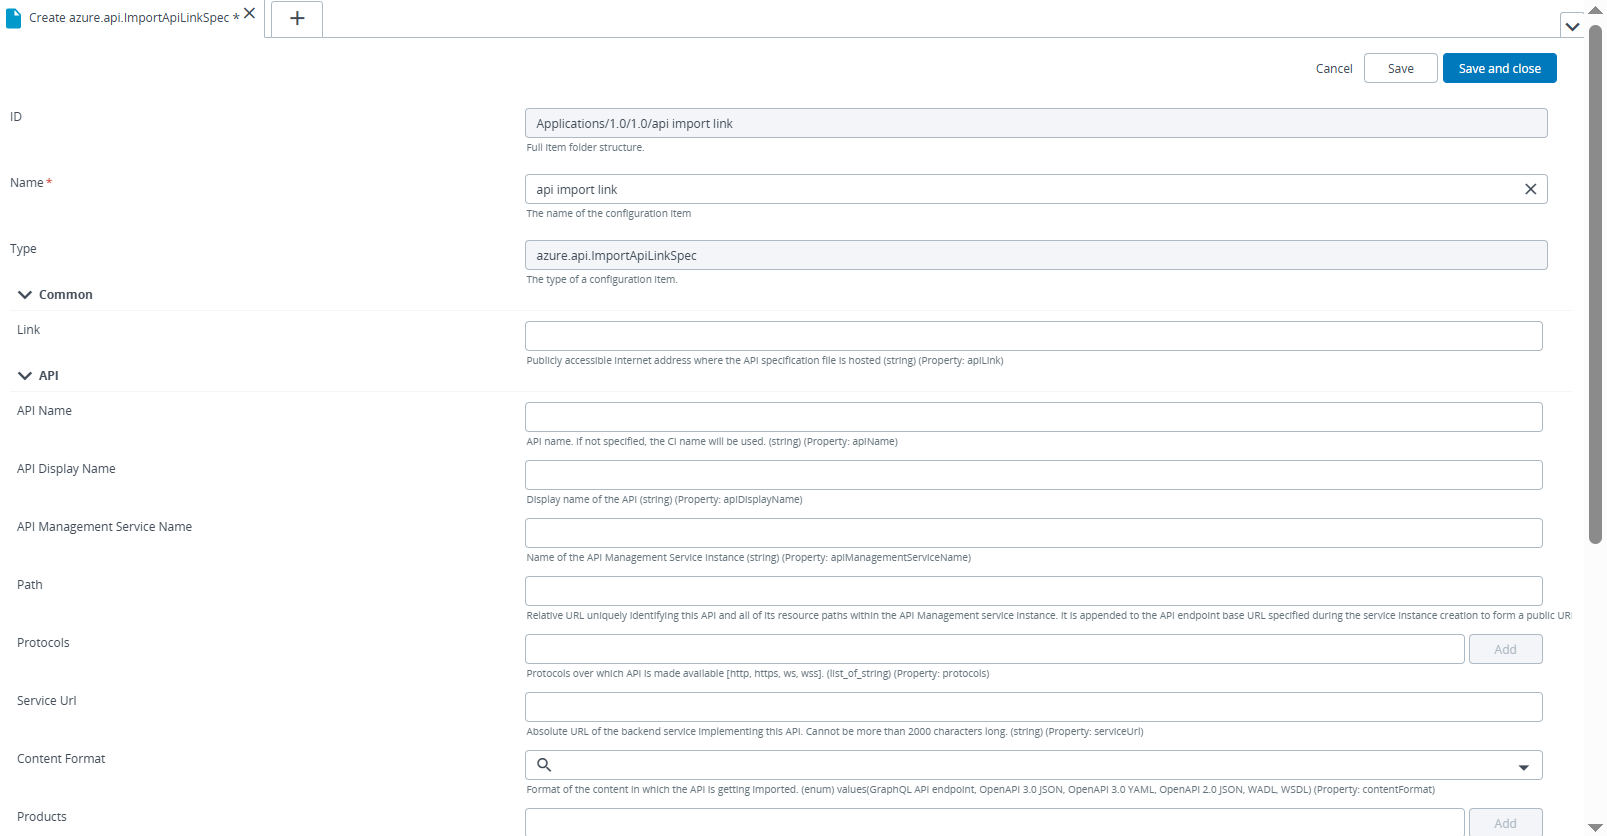
- Enter the required properties for the selected configuration item:
- Name: Name for the configuration item within Deploy.
- Link (applicable for ImportApiLinkSpec): Publicly accessible URL pointing to the API spec file.
- API Display Name: The name that appears in the Azure API Management portal.
- API Management Service Name: The name of the Azure API Management (APIM) instance where the API should be registered.
- Path: The relative URL path where the API will be exposed within the APIM gateway.
- Protocols: The protocols over which the API can be accessed. Multiple values can be added.
- Service URL: The backend URL of the actual API implementation that APIM will route traffic to.
- Content Format: The format in which the API specification is provided (e.g.,
OpenAPI 3.0 YAML,OpenAPI 3.0 JSON,WSDL). - Products: A list of APIM products with which the API should be associated.
- Gateways: The name(s) of the API gateways where the API should be deployed (e.g.,
defaultfor the default gateway).
- Click Save or Save and close.
Once deployed, the API configuration will be reflected in your Azure API Management portal.
API Versioning and Revisions
Azure API Management supports API versioning and Revisions, enabling you to manage the lifecycle of your APIs. This capability helps you evolve APIs safely while ensuring backward compatibility and minimizing risk to those already using earlier versions.
By leveraging versioning, you can expose multiple versions of an API simultaneously. Revisions, on the other hand, let you make non-breaking changes to an existing version useful for iterative updates or staged deployments.
Step 1 – Create an API Version Set
Before managing API versions, create an API version set. This acts as a logical container for related API versions.
Required fields when creating a version set:
-
API Version Set Name: A unique identifier for the version set.
-
Versioning Scheme: Specifies how clients indicate the version they want to use. Choose one of the following:
-
Segment – The API version appears as part of the URL path.
Example:https://api.example.com/v1/orders- Use this when you want the version to be visible directly in the endpoint route.
-
Header – The version is passed in a custom HTTP header.
Example:api-version: 1.0- Specify the header name in the Version Header Name field.
- This is useful when you want a clean URL and prefer to manage versioning via request metadata.
-
Query – The version is passed as a query parameter.
Example:https://api.example.com/orders?api-version=1.0- Specify the query parameter name in the Version Query Name field.
- This method works well when clients can easily append parameters to requests.
-
-
Header Name or Query Parameter Name: Required if you choose the Header or Query scheme.
Once created, this version set can be used to group and manage multiple versions of an API.
Step 2 – Create Versioned APIs
To add a new version to an API:
- Create a new API and associate it with the existing API Version Set.
- Assign a unique API Name for the version (e.g.,
orders-v1,orders-v2). - Provide a Version Identifier (e.g.,
v1,v2,beta). - Add a Version Description to document the version purpose or changes.
You can define different routes, backend URLs, and policies for each version. All versions in a version set can be managed independently but grouped logically.
Step 3 – Add Revisions
Revisions allow you to apply non-breaking changes to a specific API version without creating a new version.
- Each revision includes:
- A Revision ID
- A Revision Description
- Only one revision is marked as active at any given time.
- Revisions allow staging, testing, and rollback workflows within the same version.
This is ideal for progressive rollout, hotfixes, or internal testing before promoting a change to production.
Step 4 – Deploy and Validate
After creating version sets and revisions:
- Deploy the updated API configuration using Digital.ai Deploy.
- Open the Azure API Management portal to validate:
- Version set creation
- API versions listed under the version set
- Revisions available under each API version
With versioning and revisions, you gain complete control over how APIs evolve and how changes are introduced to your consumers.