Helm plugin
This topic describes the Deploy Helm plugin, which supports deploying and managing Helm charts on a Kubernetes host.
The Deploy Helm plugin supports:
- Deploying and upgrading Helm charts (v2 and v3)
- Traditional Helm repositories (HTTP/HTTPS)
- OCI-based Helm registries (
oci://) with Helm v3.8+ - Private and authenticated chart repositories
Using the Deploy Helm Plugin
To use the plugin:
- Download the Deploy Helm plugin ZIP from the distribution site.
- Unpack the plugin inside the
XL_DEPLOY_SERVER_HOME/plugins/directory. - Restart Deploy.
With this plugin, Helm client host types and tasks specific to installing and deleting Helm charts are available to use in Deploy.
Prerequisites
Before you configure the Helm plugin, verify that the following prerequisites are met on the host that executes Helm commands for helm.Client. This can be the local Deploy host or a remote Overthere host.
Helm CLI Installation
The Helm command-line tool must be installed separately on the host that executes Helm commands for helm.Client. The plugin executes Helm commands in the background and doesn't include the Helm binary.
- Download Helm: https://helm.sh/docs/intro/install/
- Supported versions: Helm v2 and v3. OCI registries (
oci://) require Helm v3.8+. - Installation path: Note the installation directory (for example,
/usr/local/binon Linux/macOS orC:\helmon Windows)
File System Permissions
The user account that runs Helm commands on the helm.Client host requires write access to directories where Helm stores cache and configuration. For LocalHost, this is typically the Deploy service account.
Default locations (if not overridden):
- Linux/macOS:
~/.cache/helm,~/.config/helm - Windows:
%TEMP%\helmorC:\Users\<username>\AppData\Local\Temp\helm
For restricted environments (such as Windows service accounts or locked-down remote users), set the following environment variables to redirect Helm to accessible directories:
# Linux/macOS
export HELM_CACHE_HOME=/path/to/writable/cache
export HELM_CONFIG_HOME=/path/to/writable/config
REM Windows
set HELM_CACHE_HOME=D:\helm\cache
set HELM_CONFIG_HOME=D:\helm\config
Helm writes repository index files and downloaded charts to these locations. Without write permissions, helm repo add and helm repo update commands fail.
Kubernetes Access and Testing
Before you configure the plugin in Deploy, verify that Helm can connect to your Kubernetes cluster from the command line on the helm.Client host:
# Test Kubernetes connectivity
kubectl cluster-info
kubectl get nodes

# Test Helm functionality
helm version
helm list --all-namespaces

# Test chart installation (optional)
helm repo add bitnami https://charts.bitnami.com/bitnami
helm repo update
helm search repo bitnami/nginx
Verify that:
kubectlis installed and configured with access to your cluster- The kubeconfig file (typically
~/.kube/config) contains valid credentials and is accessible to the user running Helm commands - The Helm CLI can list releases and access the cluster
- For private registries, authentication works manually before you configure in Deploy
The Deploy Helm plugin executes the same Helm commands you would run manually on the configured helm.Client host. If helm list or helm install fails there, it also fails in Deploy. Always test your setup manually first.
Set Up the Helm Plugin
-
In the infrastructure, create an Overthere host for the machine where the Helm binary is installed and where Helm uses
kubectland its kubeconfig. This can beLocalHostor a supported remote host, including Windows. -
After a successful connection to the host, hover over Infrastructure and click
 .
. -
Click New and select
helm.Client. -
Create a Helm client with the following required properties:
Home(required): Path to the Helm executable directory (for example,/usr/local/binorC:\helm)Version: Select the Helm version (2 or 3, default: 3)Helm Host: Only for Helm v2 with Tiller. Leave blank for Helm v3.kubeConfig(optional): Absolute path to a custom kubeconfig file on thehelm.Clienthost. Leave blank to use the default~/.kube/config(see Kubernetes configuration)kubeContext(optional): Name of the kubeconfig context to use within the kubeconfig fileEnable Stitch Validation(Advanced): When enabled, validates generated Kubernetes YAML before deployment (see Stitch validation)
-
Configure the following optional advanced settings:
Use Cluster Configuration: Generate a temporary kubeconfig fromk8s.Masteroropenshift.Serverconfiguration (see Kubernetes configuration)Debug: Enable verbose logging for all Helm commands (adds--debugflag)Insecure Chart Connection: Skip TLS certificate verification for chart repositories (adds--insecure-skip-tls-verifyfor traditional repos,--insecurefor OCI registries)Insecure Kube Connection: Skip TLS certificate verification for Kubernetes API server connections (deployment operations only)Force Update: Force update of existing repositories (default: true, adds--force-updatetohelm repo add)CA File: Custom CA certificate file for repository authentication (adds--ca-fileflag)
-
The Helm client also needs a reference in the Kubernetes master (
k8s.Master) to manage Helm chart deployments on the Kubernetes cluster. -
If the Kubernetes master already exists in the Infrastructure list, point the
helmClientproperty ofk8s.Masterto the Helm client created in step 4 above. If the Kubernetes master isn't in the Infrastructure list, create a newk8s.Masteras described in the Kubernetes plugin and set the Helm client property to point at the Helm client.
The Home field must contain the directory path where the helm executable is located, not the full path to the binary itself. For example, use /usr/local/bin (not /usr/local/bin/helm).
Kubernetes Configuration
The Helm plugin needs access to a Kubernetes cluster to deploy charts. You can configure Kubernetes authentication in three ways.
Option 1: Default Kubeconfig (Recommended)
This is the default behavior when both kubeConfig and Use Cluster Configuration aren't set:
- Helm uses the default kubeconfig file on the
helm.Clienthost (typically~/.kube/configfor the user running Helm commands) - This is the same configuration used when running
kubectlorhelmcommands manually - No additional configuration is needed in Deploy if your kubeconfig is already working
When to use: When the helm.Client host already has a valid kubeconfig file with credentials for your cluster.
Option 2: Custom Kubeconfig Path
Override the default kubeconfig location by setting the kubeConfig property:
- In the
helm.Clientconfiguration, setkubeConfigto the absolute path of your kubeconfig file.- Example (Linux/macOS):
/home/deploy/.kube/prod-cluster-config - Example (Windows):
C:\deploy\kube\config
- Example (Linux/macOS):
- Optionally, set
kubeContextto use a specific context from the kubeconfig file. - The kubeconfig file must be accessible by the user account that runs Helm commands on the
helm.Clienthost.
When to use:
- Multiple clusters with separate kubeconfig files
- Non-standard kubeconfig location
- Switching between different Kubernetes contexts
Example configuration:
kubeConfig: /opt/deploy/kube/prod-config
kubeContext: prod-us-east-1  # Optional: use specific context
Option 3: Use Cluster Configuration (Dynamic Generation)
Generate a temporary kubeconfig from the k8s.Master or openshift.Server configuration:
- In the
helm.Clientconfiguration, select Use Cluster Configuration (Advanced section). - Verify that the
helm.Clientis linked to ak8s.Masteroropenshift.Serverin Infrastructure. - Deploy generates a temporary kubeconfig file with credentials from the cluster CI.
- The temporary kubeconfig is created at deployment time and includes:
- API server URL from
k8s.Masteroropenshift.Server - Authentication tokens or certificates from the cluster CI
- TLS settings (CA certificates, skip TLS flags)
- API server URL from
When to use:
- Dynamic environments where kubeconfig files aren't pre-configured
- Multiple clusters managed through Deploy's
k8s.MasterCIs - Centralized credential management within Deploy
- When cluster credentials change frequently
Example scenario: You have multiple k8s.Master CIs in Deploy for dev, staging, and production. Each helm.Client can use the cluster configuration directly without maintaining separate kubeconfig files.
Configuration priority:
- Use Cluster Configuration = true: Deploy generates a temporary kubeconfig from the cluster CI (highest priority)
- kubeConfig property set: Uses the specified kubeconfig file path
- Neither set: Uses the default kubeconfig (
~/.kube/config)
You can use the kubeContext property with options 1 and 2 to select a specific context within the kubeconfig.
Setting Use Cluster Configuration to true without properly configuring k8s.Master or openshift.Server causes authentication failures. Verify that the cluster CI has valid credentials (token, certificates, or username and password).
Stitch Validation
Stitch validation is an optional feature that validates generated Kubernetes YAML manifests before deploying to the cluster. When enabled in helm.Client:
- The plugin runs
helm templateto generate Kubernetes YAML from the chart - The Stitch validation engine analyzes the YAML for errors, misconfigurations, or security issues
- If validation passes, the deployment proceeds; if it fails, the deployment is blocked with a detailed error report
Automatic repository authentication:
When Enable Stitch Validation is selected, the plugin automatically authenticates to the chart repository before running helm template, even if the Add Repository checkbox is cleared in the chart configuration. This ensures that:
- Private charts can be validated without explicit Add Repository configuration
- Authentication happens at validation time, preventing "chart not found" errors
- Both traditional (
https://) and OCI (oci://) registries are supported
Stitch validation behavior:
- Enabled: Repository authentication occurs automatically during the planning phase, then
helm templategenerates YAML, Stitch validates it, and the deployment proceeds. - Disabled: No pre-deployment validation. The deployment proceeds directly with
helm upgrade --install.
This feature is useful for:
- Catching configuration errors before deployment
- Enforcing organizational policies on Kubernetes resources
- Validating private charts without modifying chart-level Add Repository settings
Create the Helm Client Infrastructure
To set up the Kubernetes master in infrastructure, see the Kubernetes plugin.
Create an Overthere Host
To create the Overthere host for the Helm client:
-
In the side navigation bar, click Explorer.
-
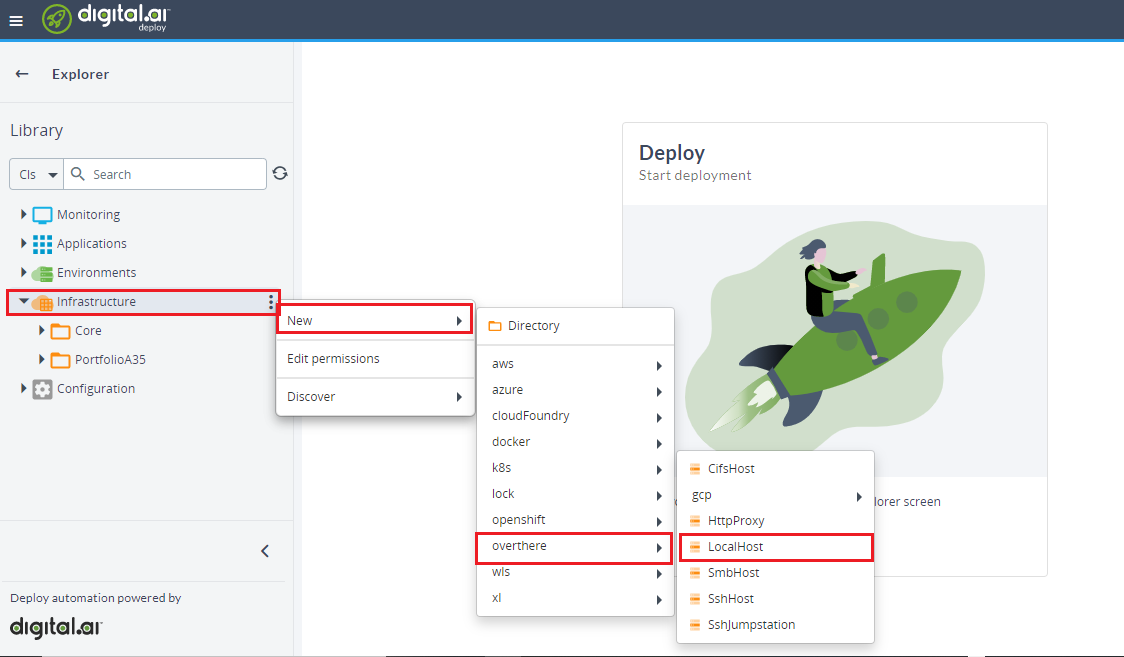
Expand the Infrastructure list.
-
Hover over the host, click
, and select New > Overthere > LocalHost.
-
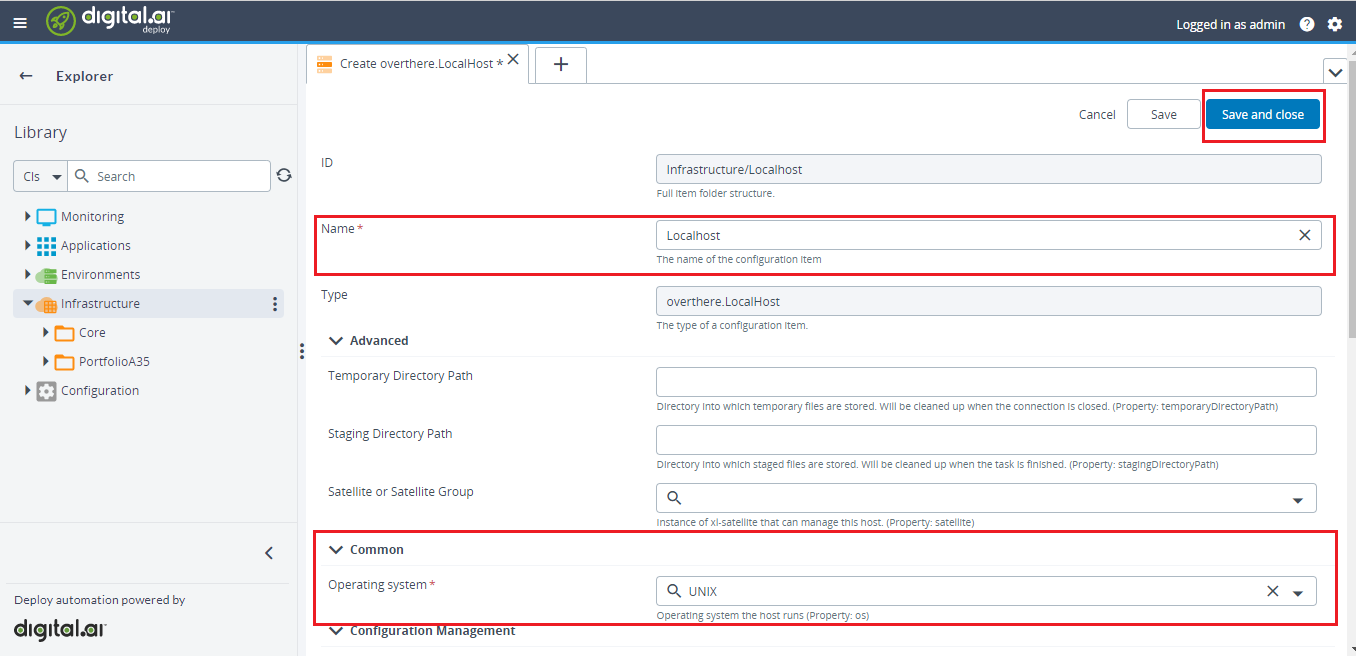
In the Name field, enter a descriptive name such as
LocalHost. -
In the Operating system field, select the operating system of the machine where Helm runs. For example, use UNIX for a local Linux or macOS host, or Windows for a remote Windows host.
noteIf required, you can provide a username and password in the Authentication section.
-
Click Save or Save and close.
Create the helm.Client
- In the side navigation bar, click Explorer.
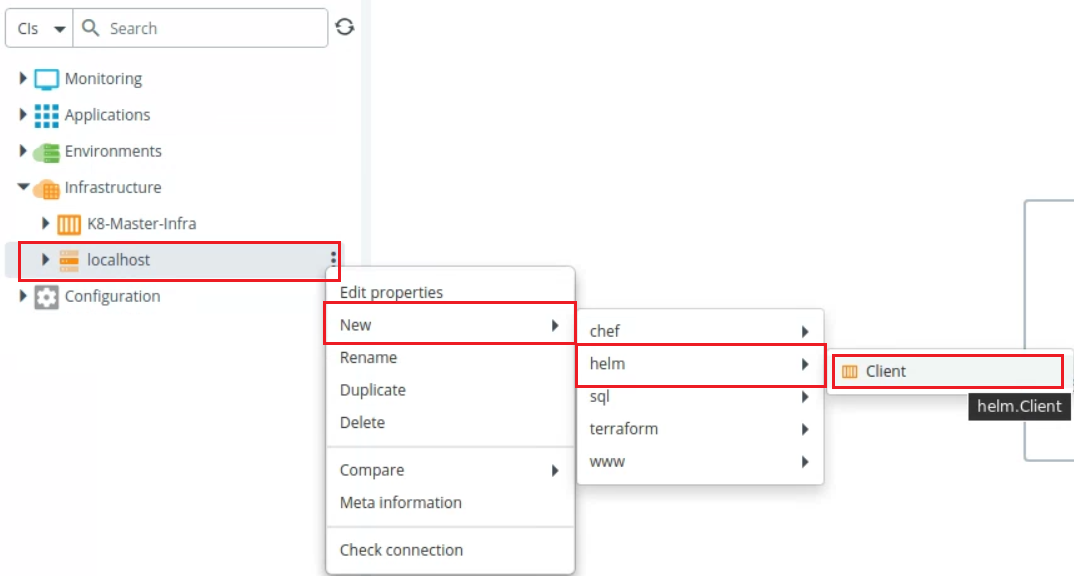
- Expand Infrastructure, hover over the newly created host, and click . Select New > helm > client.
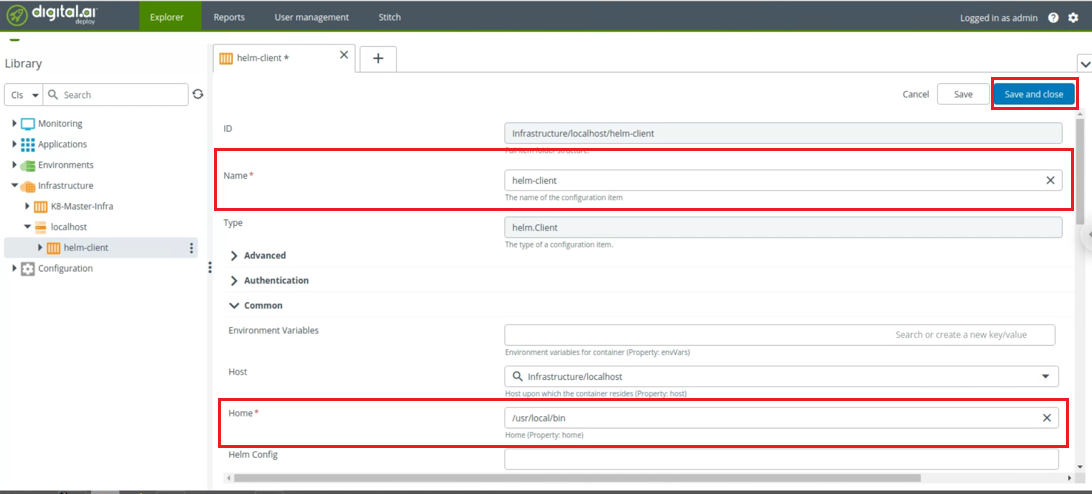
- In the Name field, enter the name of the configuration item.
- In the Home field, enter the path where the Helm client is installed.
- Under the Advanced section, select the version from the dropdown list in the Version field.
Verify the Helm Client Connectivity
-
Expand the Infrastructure list.
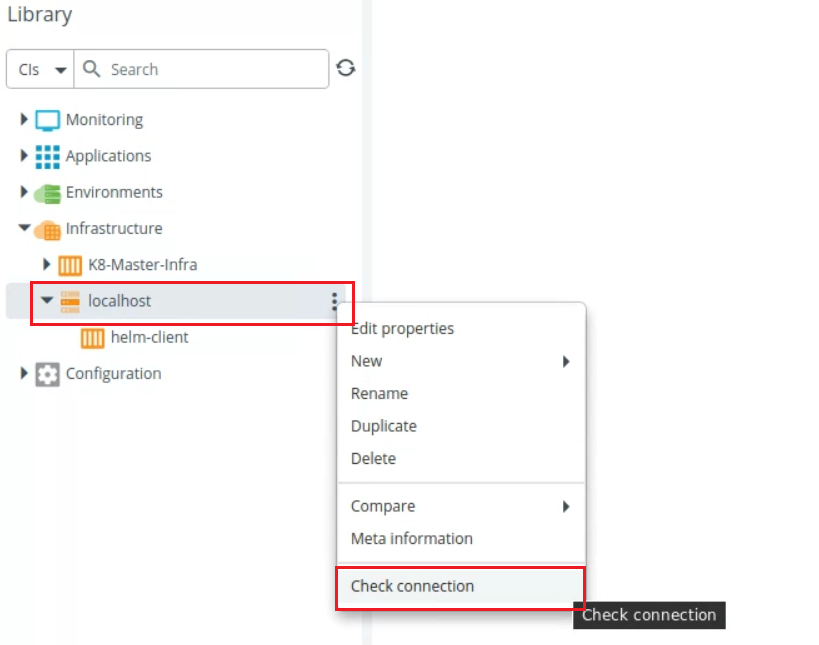
-
Hover over the newly created infrastructure and click
. Select Check Connection.
 note
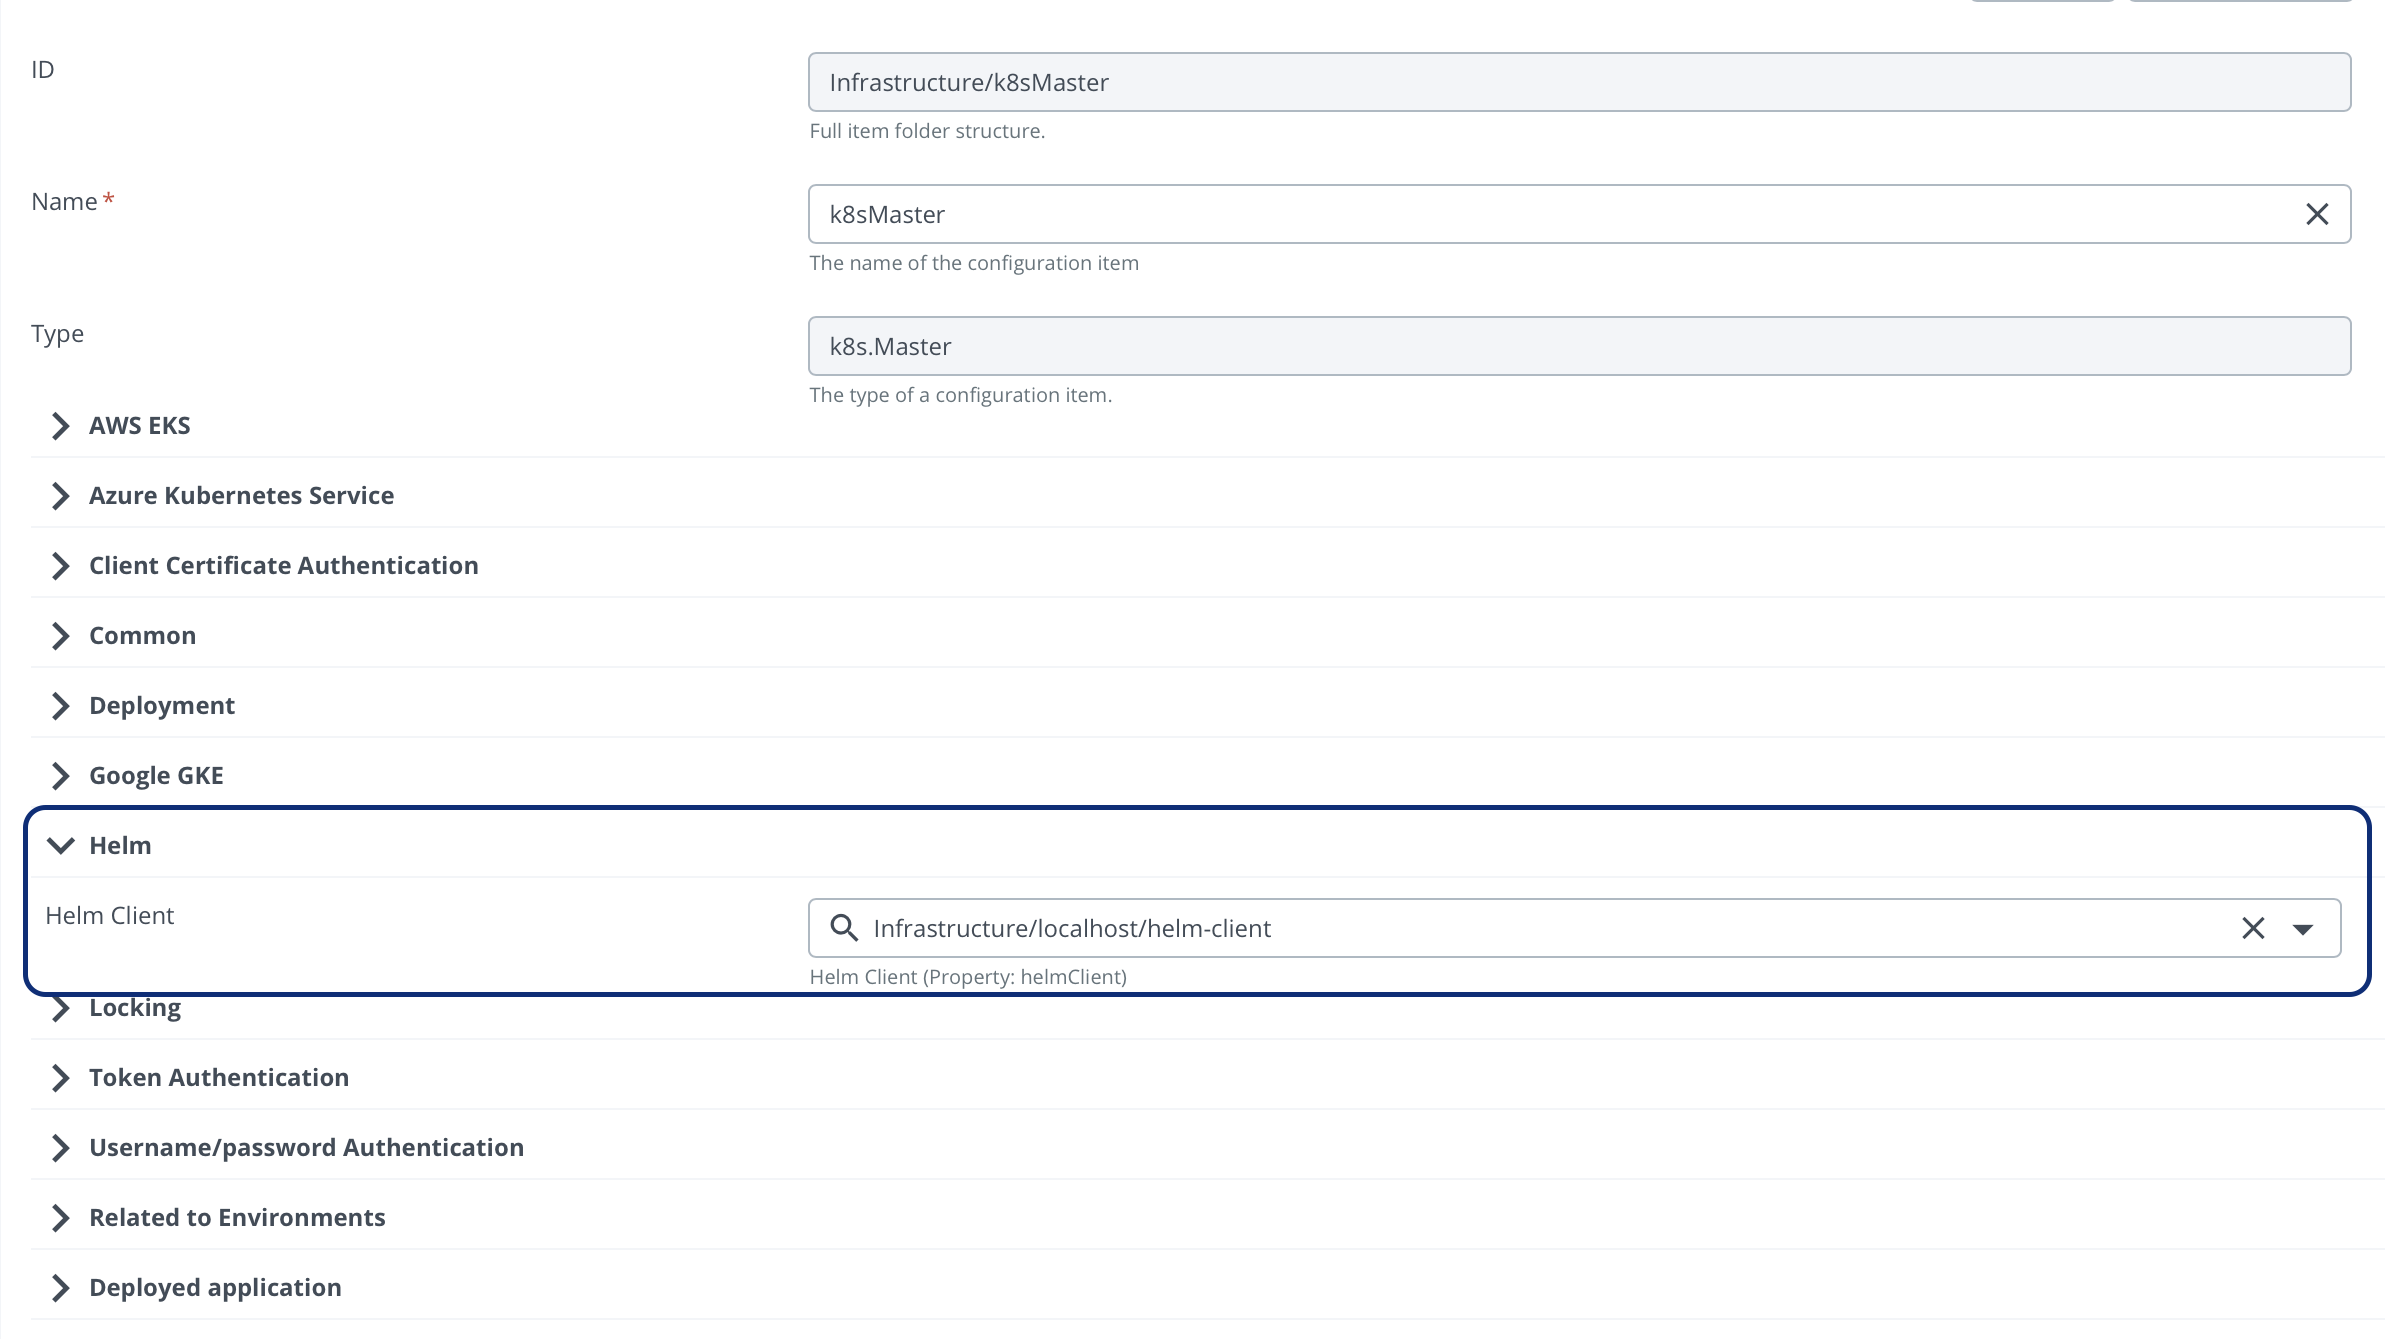
noteAfter the connection is successful, provide the path for the Helm client in the configuration of the created Kubernetes master infrastructure. You can find it in the Helm section of the configuration.
-
Click Save and close.
Set Up the Environment
To create an environment:
-
In the side navigation bar, click Explorer.
-
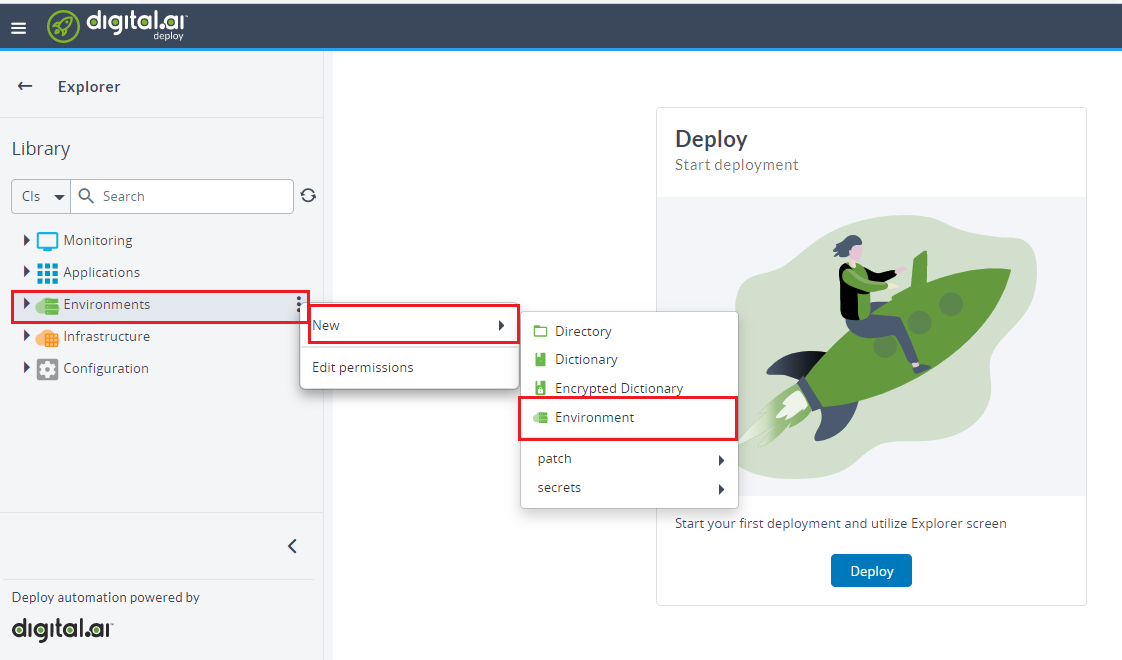
Hover over Environments, click
, and select New > Environment.
-
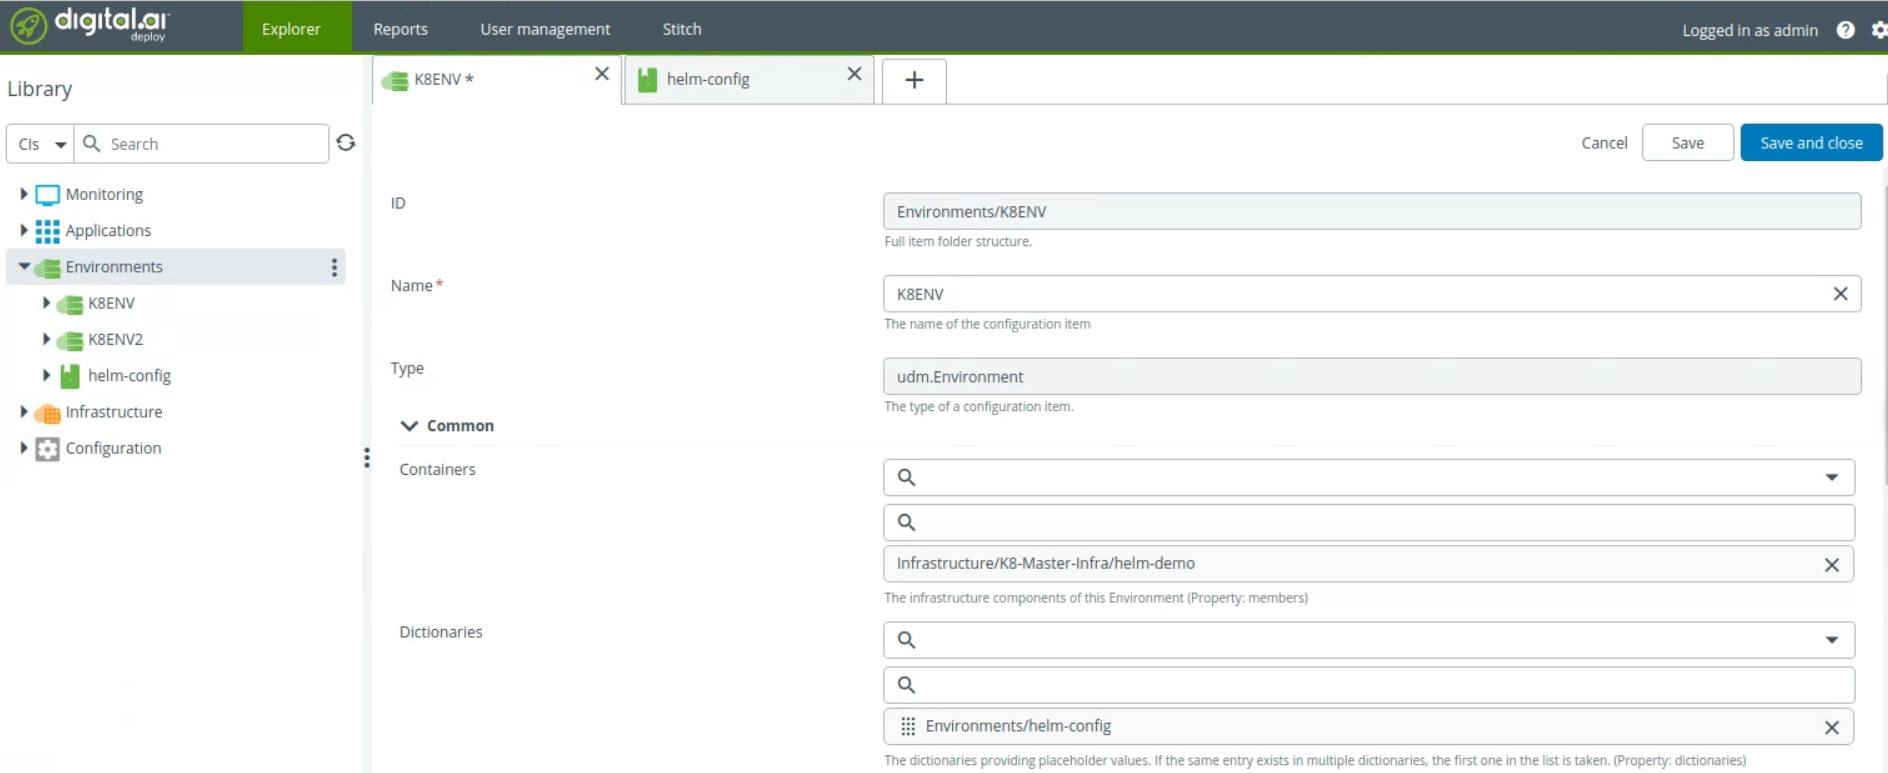
In the Name field, enter the name of the configuration item.
-
Under the Common section, select the Containers field from the dropdown list. The selected container path should be the Kubernetes namespace where you're deploying.
noteYou can install Helm charts with an auto-created namespace.
-
You can also select a dictionary from the dropdown list. Before you select a dictionary, you must first create one in Environments.
Create a Dictionary
To create a dictionary:
- In the side navigation bar, click Explorer.
- Hover over Environments, click , and select New > dictionary.
Repository Authentication and Credentials
The Helm plugin supports multiple authentication mechanisms for accessing private chart repositories. You can specify credentials at three levels, with the following priority (most specific wins):
Chart Level (Most Specific)
Authentication specified in the helm.Chart CI applies only to that specific chart deployment.
Location: Application > Deployment Package > helm.Chart > Repository section
Configuration:
Repository URL: Chart repository URL (for example,https://charts.example.com/repooroci://registry.example.com/charts)Username: Repository authentication usernamePassword: Repository authentication passwordAdd Repository: Whether to add the repository (default: true)
Repository Configuration (Reusable)
Create a reusable helm.Repository CI for repositories shared across multiple charts.
Location: Configuration > New > helm.Repository
Configuration:
Repository URL: Chart repository URL (required)Username: Repository authentication usernamePassword: Repository authentication password
Usage: Reference the repository in helm.Client using the Helm Repo field.
Helm Client Level (Default/Fallback)
Default repository credentials are applied to all charts unless overridden.
Location: Infrastructure > helm.Client > Repository section
Configuration:
Helm Repo: Reference to ahelm.RepositoryCI (optional)Repository URL: Default repository URL for all chartsUsername: Default repository usernamePassword: Default repository password
Setup Private Registry
Traditional Helm Repository (HTTP/HTTPS)
For private Helm repositories (such as Artifactory, Nexus, or Harbor):
- Specify credentials at the chart, repository, or client level.
- Enable Add Repository: Verify that Add Repository is selected in the chart configuration.
- The plugin executes:
helm repo add <repo-name> <repo-url> --username <user> --password <pass>helm repo update
Example URLs:
- JFrog Artifactory:
https://artifactory.company.com/artifactory/api/helm/helm-local - Harbor:
https://harbor.company.com/chartrepo/myproject - Nexus:
https://nexus.company.com/repository/helm-hosted/
OCI Registry (oci://)
For OCI-based Helm registries (Helm 3.8+):
- Use the
oci://prefix in Repository URL:oci://registry.example.com/charts - Specify credentials at the chart, repository, or client level.
- The plugin executes:
helm registry login registry.example.com --username <user> --password <pass>helm install <release> oci://registry.example.com/charts/<chart> --version <version>
Example OCI URLs:
- AWS ECR:
oci://123456789.dkr.ecr.us-east-1.amazonaws.com/helm-charts - Azure ACR:
oci://myregistry.azurecr.io/helm - Docker Hub:
oci://registry-1.docker.io/myuser - GitHub Container Registry:
oci://ghcr.io/myorg/charts
OCI vs. traditional:
- OCI registries (
oci://) usehelm registry loginfor authentication - Traditional repositories (
https://) usehelm repo addwith credentials - The plugin automatically detects the type based on the URL prefix
For private registries, you must provide credentials. Anonymous access isn't supported for private repositories.
Advanced Authentication Configuration
Custom CA Certificates
If your private registry uses a custom or self-signed CA certificate, configure the CA File property in helm.Client:
- Upload the CA certificate file to the
helm.Clienthost. - In Infrastructure > helm.Client > Repository section, set CA File to the absolute path of the certificate.
- The plugin automatically adds
--ca-fileto authentication commands:helm repo add --ca-file /path/to/ca.crt(traditional repositories)helm registry login --ca-file /path/to/ca.crt(OCI registries)
You can skip TLS verification by using Insecure Chart Connection, but this approach isn't recommended for production environments.
Debug Mode
Enable Debug in helm.Client (Advanced section) to see verbose output from all Helm commands, including authentication:
# With debug enabled:
helm repo add bitnami https://charts.bitnami.com/bitnami --username user --password *** --debug
helm registry login registry.example.com --username user --password *** --debug
This output is useful when troubleshooting authentication failures or repository connection issues.
Insecure Connections
Two separate flags control TLS verification:
| Flag | Applies to | Helm commands affected | Use case |
|---|---|---|---|
| Insecure Chart Connection | Repository authentication | helm repo add, helm registry login, helm install --repo | Self-signed certs on chart repositories |
| Insecure Kube Connection | Kubernetes API | helm upgrade, helm delete, helm test, helm status | Self-signed certs on Kubernetes API server |
Disabling TLS verification (insecure mode) exposes you to man-in-the-middle attacks. Use CA File configuration instead for production environments.
Create a Helm Application
Create a Chart and Repository Deployment
-
Hover over Applications, click
, and select New > Application. -
Enter the name for the application.
-
Expand the Application list.
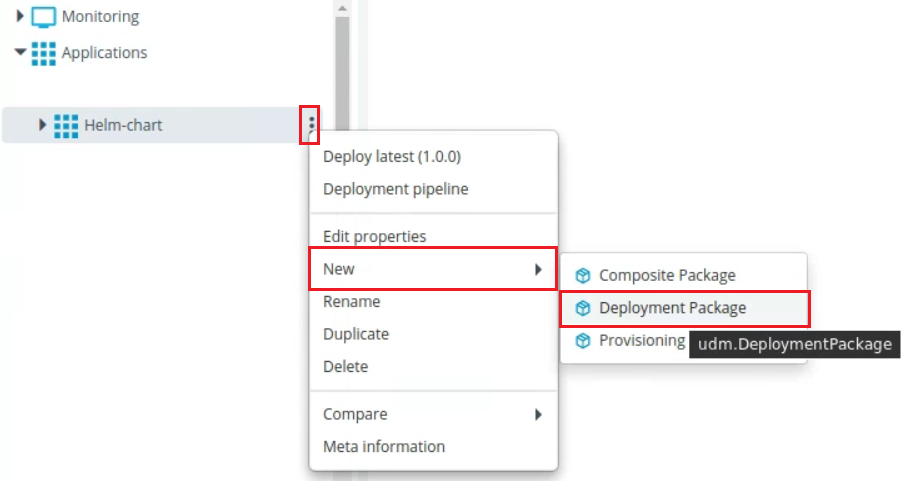
-
Hover over the newly created application, click
, and select New > Deployment Package. -
Enter the name for the deployment package.
-
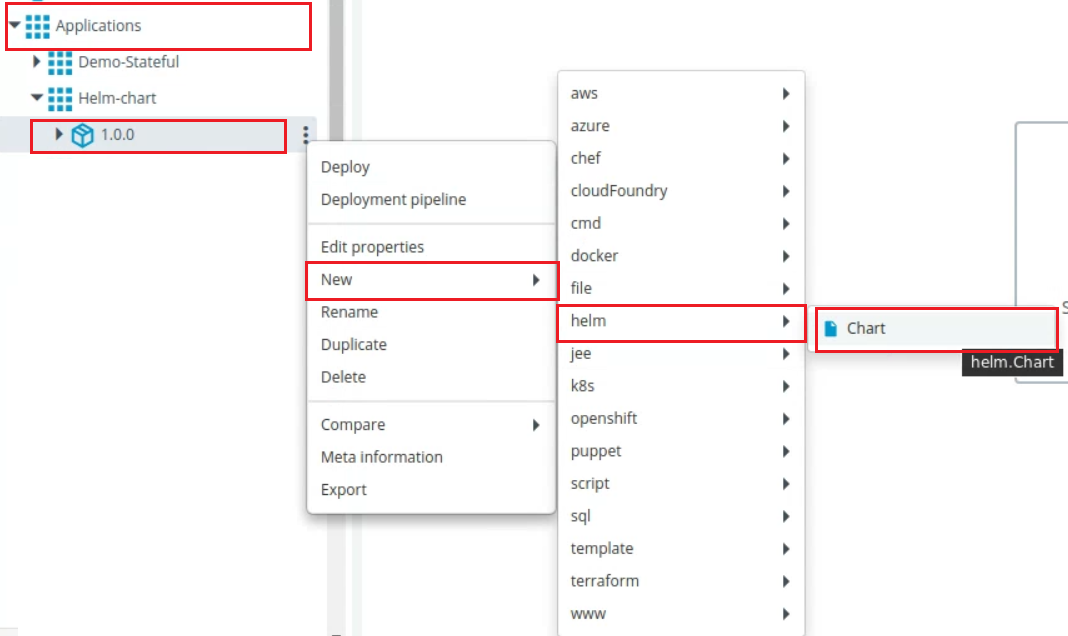
Hover over the newly created package, click
, and select New > Helm > Chart.
-
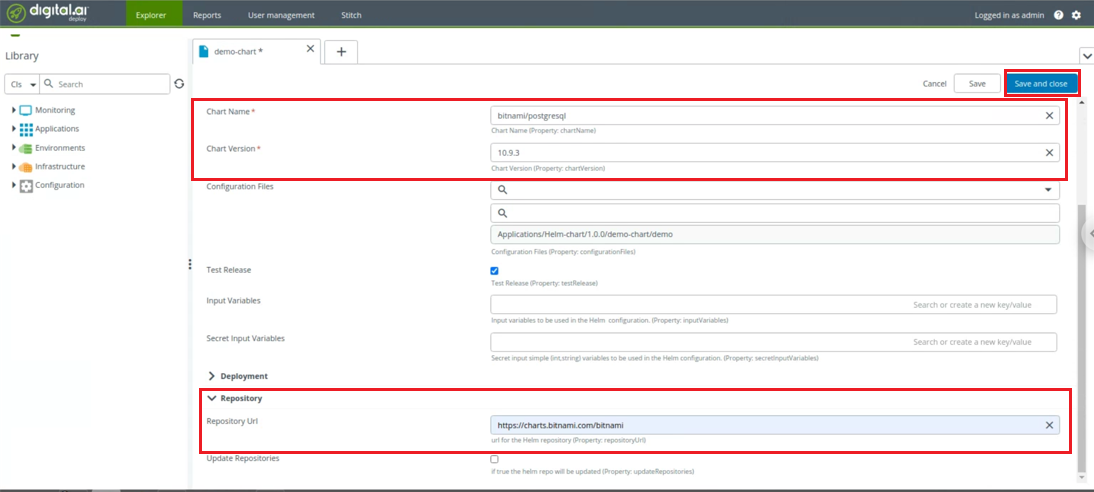
In the Name field, enter the name of the configuration item.
-
Under the Common section:
- In the Chart Name field, enter the chart name:
- For traditional repos with Add Repository enabled, use the format
repo-name/chart-name(for example,bitnami/nginx) - For traditional repos with Add Repository disabled, use just the chart name (for example,
nginx) - For OCI registries, use just the chart name (for example,
nginx)
- For traditional repos with Add Repository enabled, use the format
- In the Chart Version field, enter the chart version (for example,
1.2.3).
- In the Chart Name field, enter the chart name:
-
Under the Repository section:
- Repository URL: Enter the chart repository URL
- Traditional:
https://charts.bitnami.com/bitnami - OCI:
oci://registry-1.docker.io/bitnamicharts
- Traditional:
- Username and Password: Required for private repositories
- Add Repository:
- Checked (default): Repository is added to local cache before installation
- Unchecked: Chart is pulled directly using the
--repoflag (no local cache)
tip- For private repositories, always provide a username and password.
- If you're using default credentials from
helm.Clientorhelm.Repository, you can leave these fields empty. - Repository URL is required unless credentials are configured at the
helm.Clientlevel.
noteIf Enable Stitch Validation is enabled in
helm.Client, repository authentication occurs automatically during the planning phase, regardless of the Add Repository checkbox state. This ensures private charts can be validated without explicitly adding them to the local cache. - Repository URL: Enter the chart repository URL
-
(Optional) Under the Advanced section, use the Install/Upgrade Flags field to pass additional Helm command-line flags to the deployment. See Pass Additional Helm Flags.
-
Click Save and close.
Chart Name Format Examples
| Scenario | Add Repository | Chart Name | Repository URL |
|---|---|---|---|
| Public repo, cached | Selected | bitnami/nginx | https://charts.bitnami.com/bitnami |
| Public repo, direct pull | Cleared | nginx | https://charts.bitnami.com/bitnami |
| Private Artifactory | Selected | my-repo/app | https://artifactory.company.com/artifactory/api/helm/helm-local |
| OCI registry | N/A (automatic) | nginx | oci://registry.example.com/charts |
Pass Additional Helm Flags
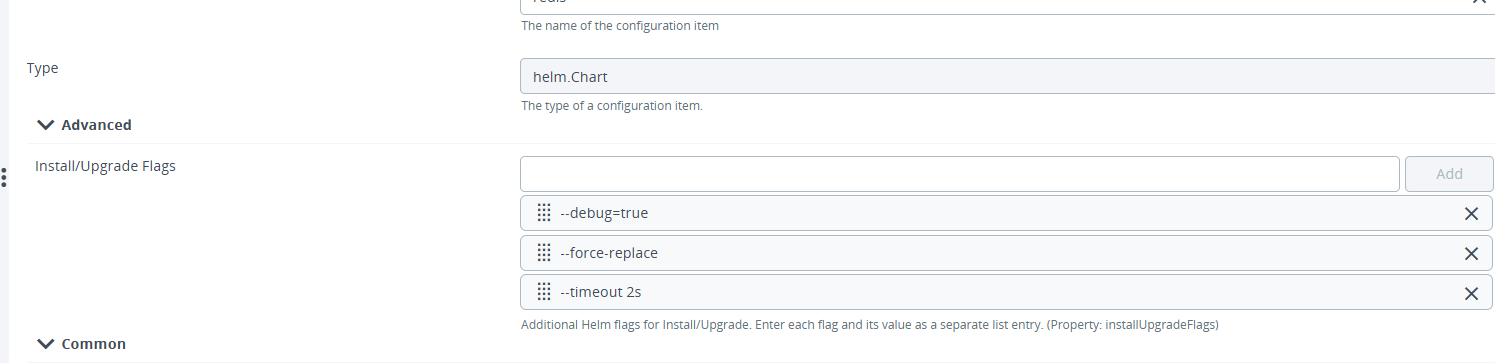
From 26.3, the helm.Chart configuration item supports an Install/Upgrade Flags field under the Advanced section. Use this field to pass additional Helm command-line flags that are appended to the helm upgrade --install command at deployment time. This lets you control install and upgrade behavior on a per-chart basis without modifying the plugin.
To add Install/Upgrade flags:
-
Open the
helm.Chartconfiguration item and expand the Advanced section. -
In the Install/Upgrade Flags field, enter one flag (and its value, if applicable) per list entry, then click Add. For example:
--debug=true--force-replace--timeout 2s
-
Click Save and close.
During deployment, the configured flags are appended to the generated Helm command. For example:
helm upgrade --install redis test/redis --namespace default --version 18.6.1 --debug=true --force-replace --timeout 2s
You can view the flags applied to the executed command in the deployment step log.
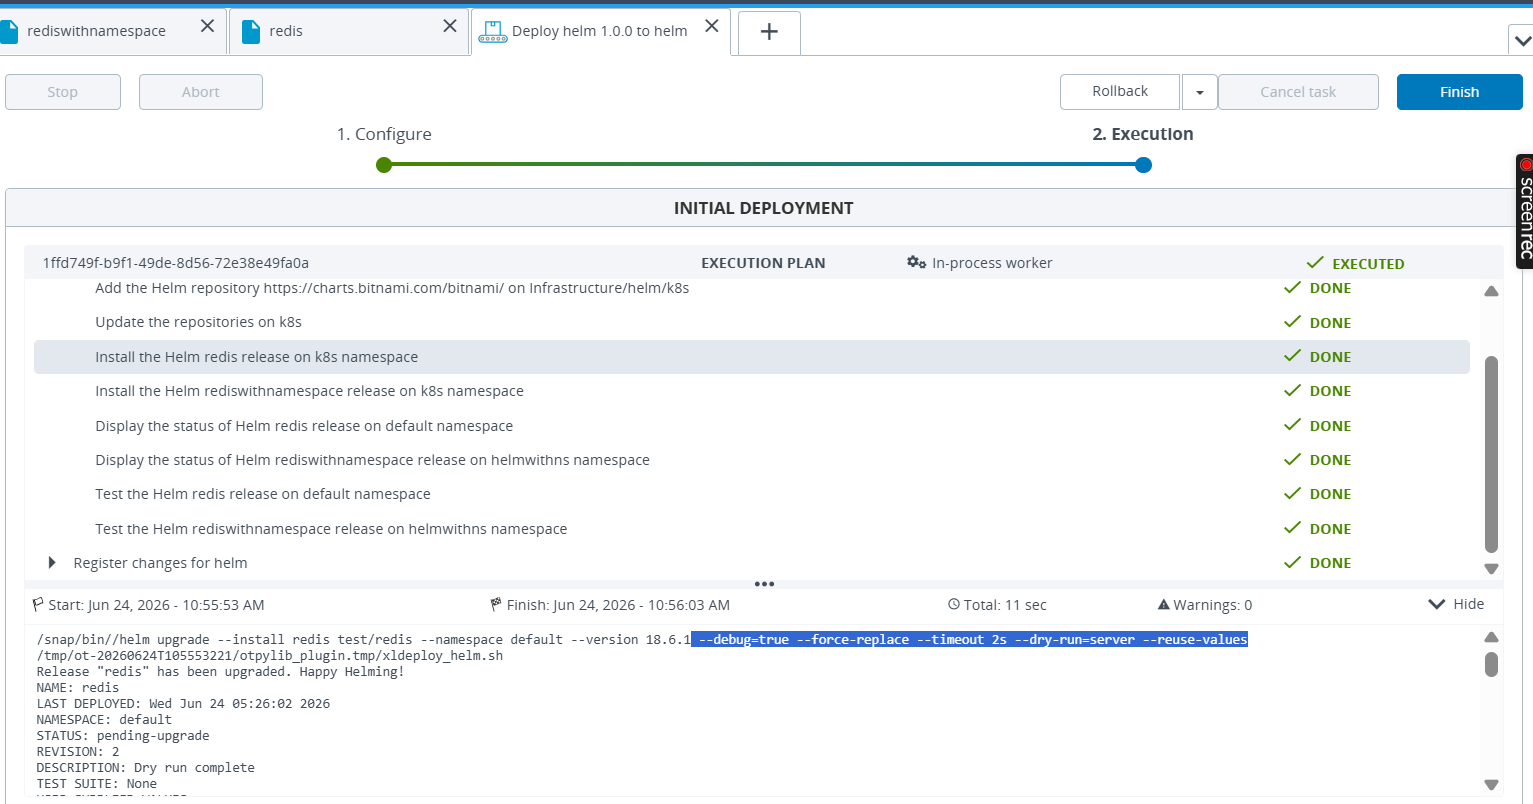
For a complete list of Helm flags and their descriptions, refer to the Helm documentation.
Update values.yaml by Using a ConfigFile
The helm.ConfigFile type supports a YAML file that overrides the values.yaml of a Helm chart.
To create a helm.ConfigFile under helm.Chart:
- Hover over the newly created chart application, click , and select helm > ConfigFile.
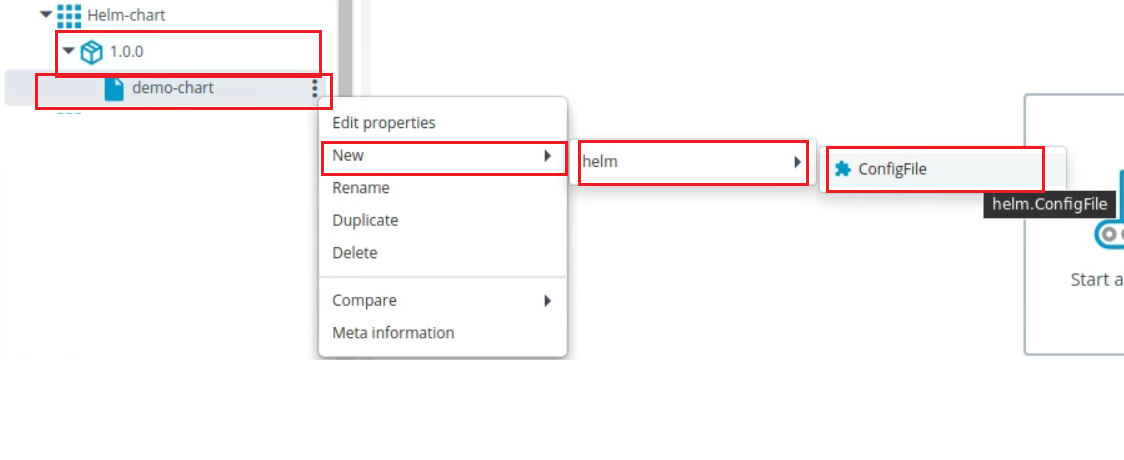
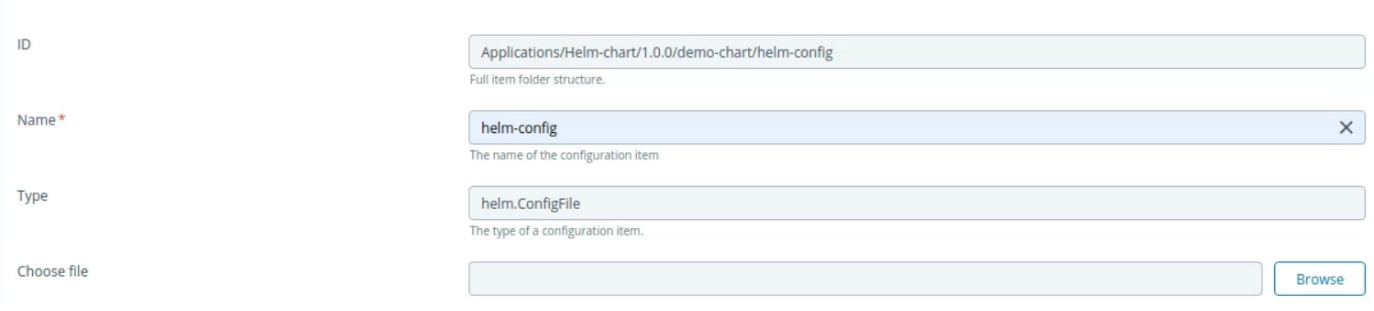
- In the Name field, enter the name of the configuration item.
- In the Choose file field, select the
.ymlfile from the browser. - Click Save and close.
You can also specify custom values for values.yaml in Input Variables and Secret Input Variables.
Deploy the Package
To deploy the package:
- Select the environment where you want to deploy.
- Click Continue and then Deploy.
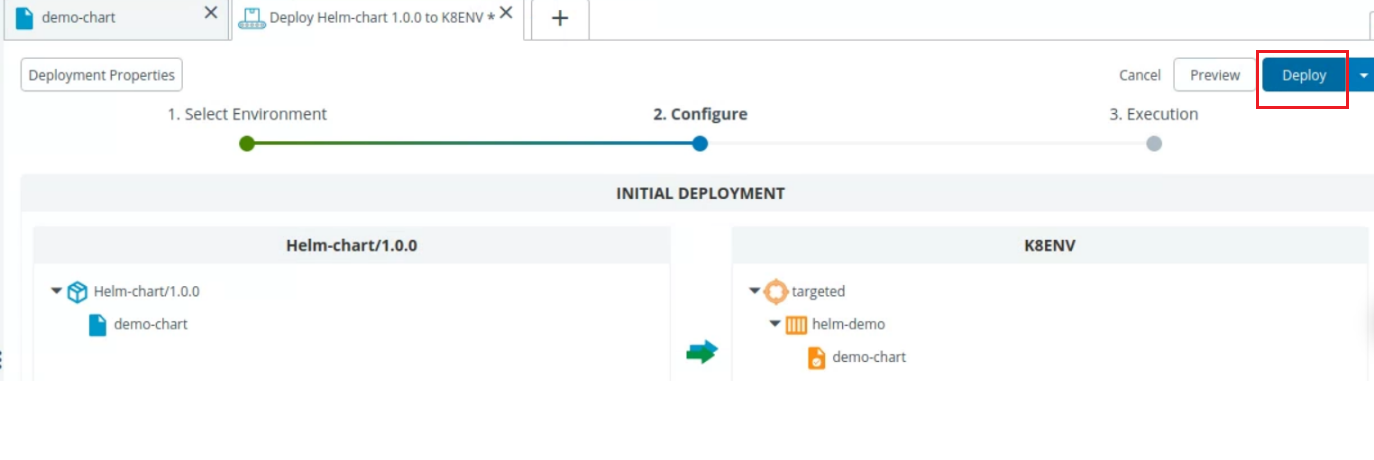
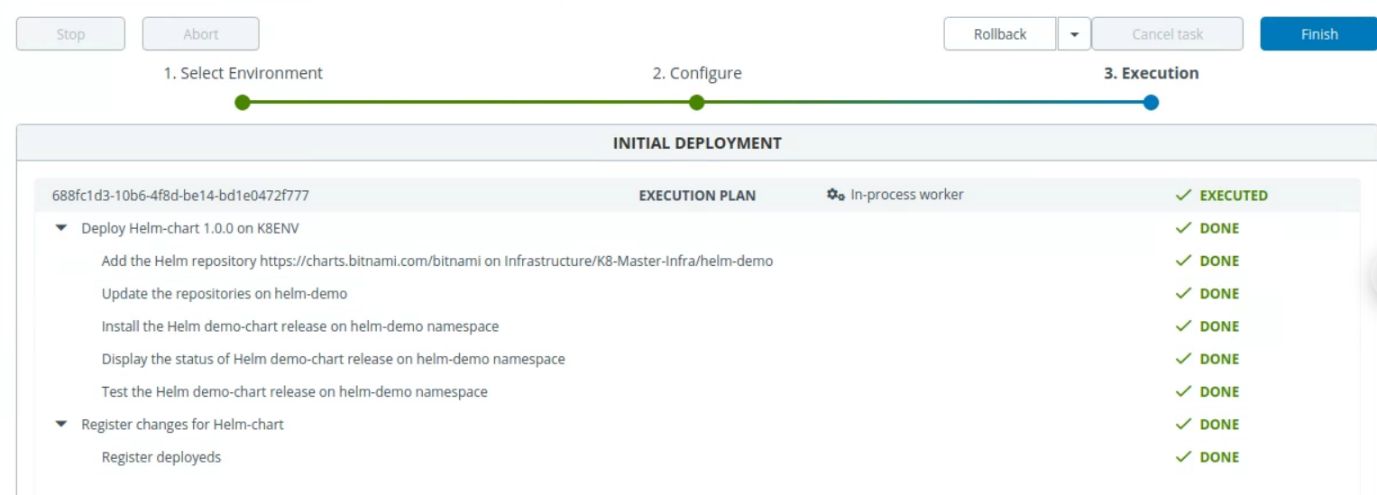
To verify the deployment, run the helm ls -n helm-demo command on the terminal, where helm-demo is the name of the namespace where you're deploying.

Deploy Two Helm Charts in Parallel
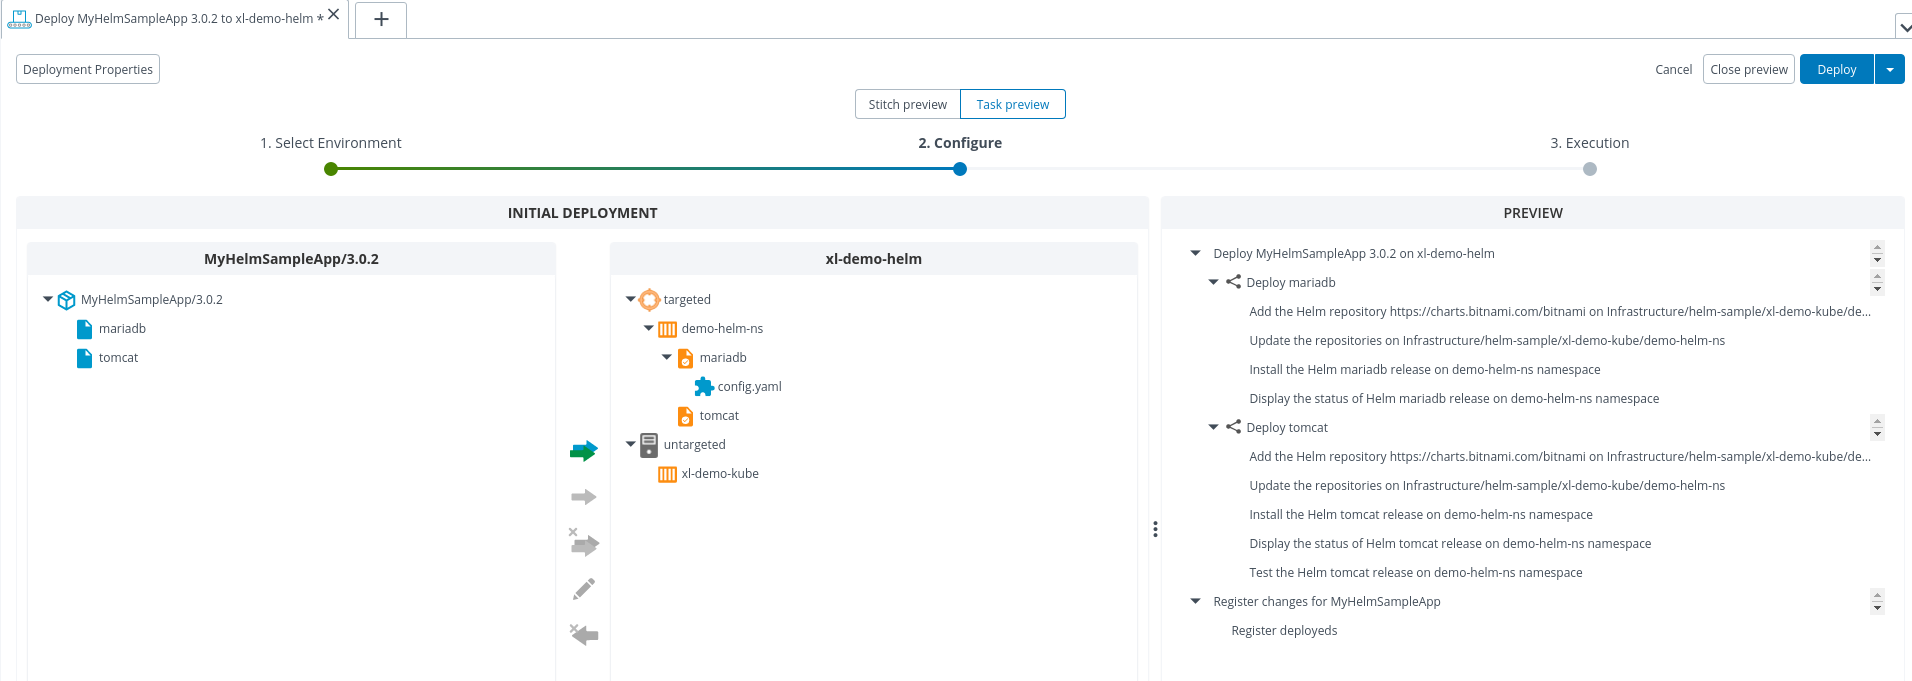
You can deploy Helm charts in parallel with Deploy. The Deploy Helm plugin supports all the core deployment features provided by Deploy.
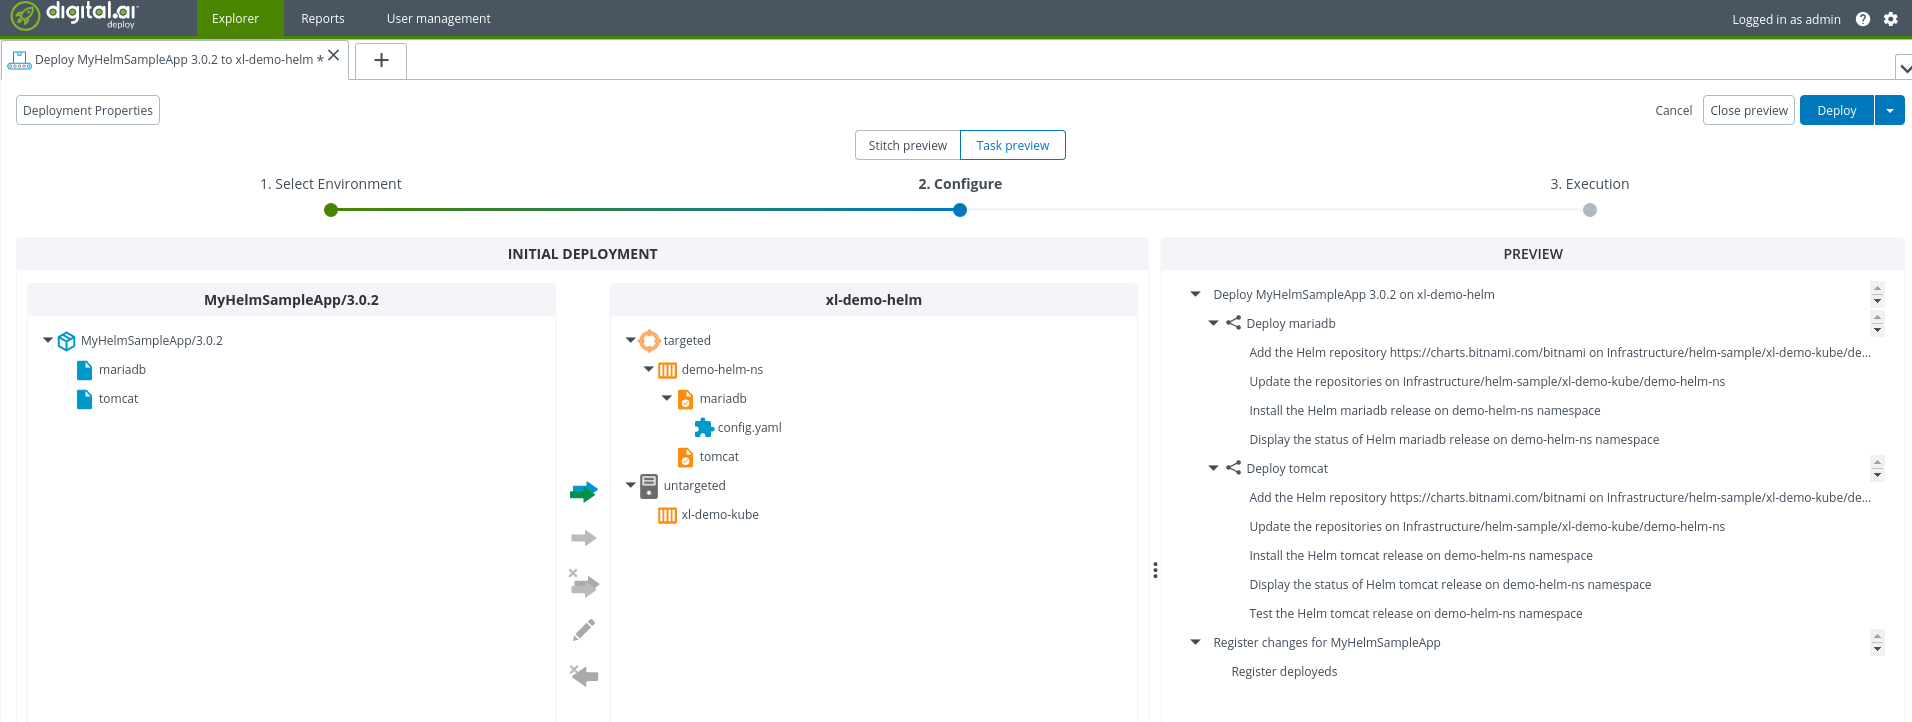
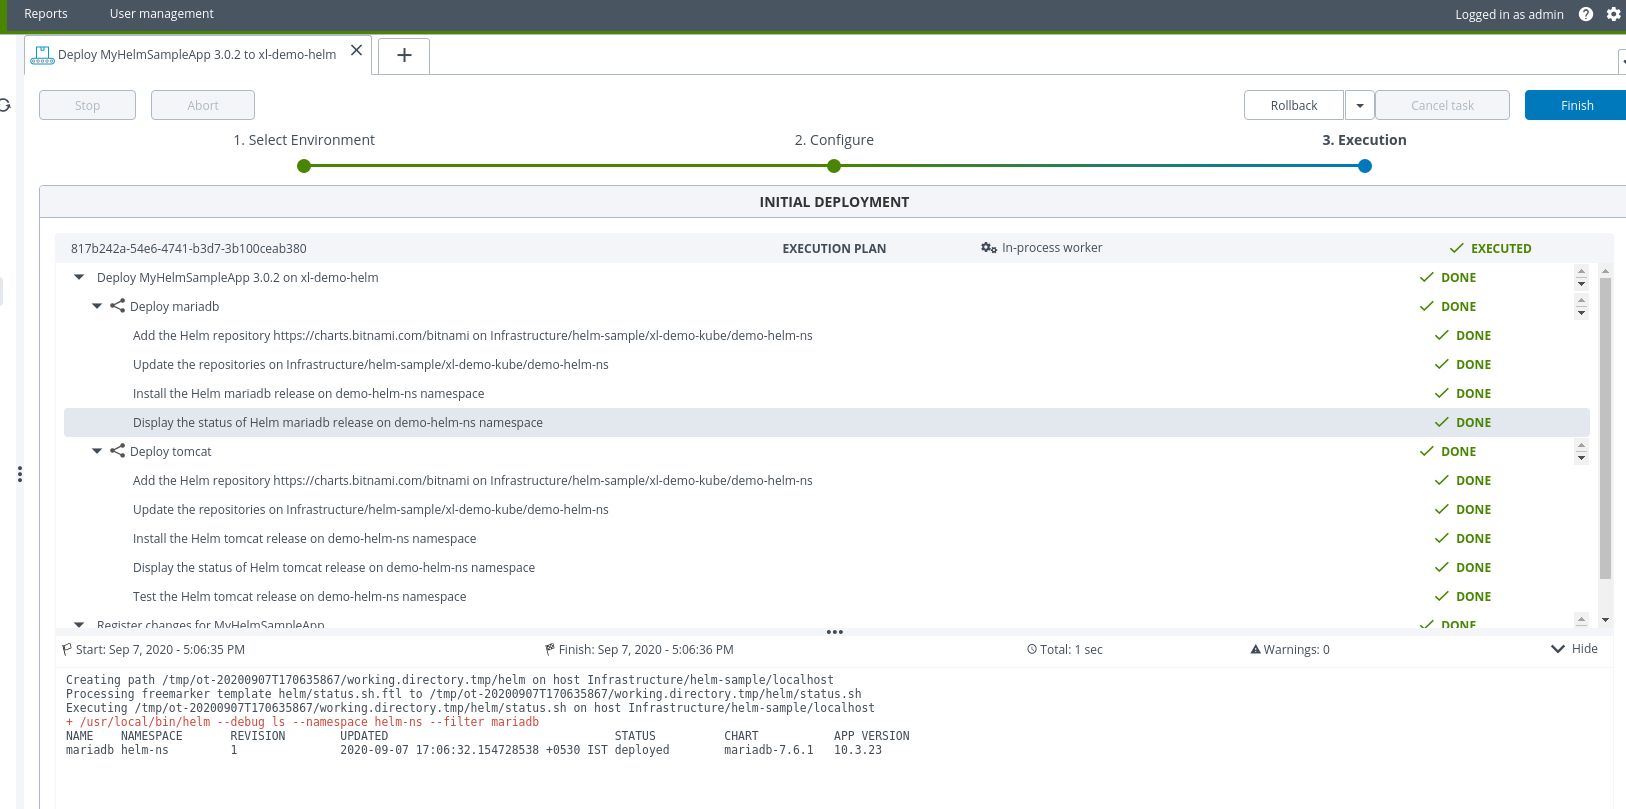
Troubleshooting
"Failed to execute the Helm command, The system cannot find the path specified"
Cause: The Home field in helm.Client isn't configured or points to an invalid path.
Solution:
- Verify the Helm binary is installed on the configured
helm.Clienthost. - In Infrastructure > helm.Client, set the Home field to the directory containing the
helmexecutable:- Linux/macOS:
/usr/local/bin - Windows:
C:\helmorD:\tools\helm
- Linux/macOS:
- Test by running
helm versionfrom the specified directory.
"no cached repo found (try 'helm repo update')"
Cause: The user account running Helm commands on the helm.Client host can't write to Helm's cache directories.
Solution:
-
Grant write permissions to the user account running Helm commands for Helm cache locations.
-
Or redirect the Helm cache to an accessible directory by using environment variables:
# Linux/macOS (.bashrc or /etc/environment)export HELM_CACHE_HOME=/var/deploy/helm/cacheexport HELM_CONFIG_HOME=/var/deploy/helm/configREM Windows (System Environment Variables or service configuration)set HELM_CACHE_HOME=D:\deploy\helm\cacheset HELM_CONFIG_HOME=D:\deploy\helm\config -
Verify the host user or service account has full control (read/write) to these directories.
-
Restart the Deploy service or remote agent after setting environment variables if required by your host configuration.
"Chart version not found" or "failed to download chart"
Cause: Authentication timing issue (in older plugin versions) or missing credentials.
Common scenario: In plugin versions before 25.1.x, when Enable Stitch Validation was enabled, the plugin attempted to run helm template before authenticating to private repositories, which caused chart download failures.
Solution:
- Upgrade to the latest plugin version (25.1.x or later) with authentication fixes.
- Versions 25.1.x and later automatically authenticate before
helm templatewhen stitch validation is enabled. - No configuration changes are required. The fix is automatic.
- Versions 25.1.x and later automatically authenticate before
- Verify that credentials are configured:
- Check Username and Password in helm.Chart > Repository section.
- Or configure default credentials in helm.Client > Repository section.
- Or create a
helm.RepositoryCI with credentials and reference it inhelm.Client.
- For private registries with stitch validation:
- Credentials are used automatically during validation, even if Add Repository is cleared.
- Both traditional (
https://) and OCI (oci://) repositories are supported.
- Test authentication manually from the
helm.Clienthost:# Traditional repohelm repo add test-repo <repo-url> --username <user> --password <pass>helm search repo test-repo# OCI registryhelm registry login <registry-domain> --username <user> --password <pass>helm pull oci://<registry-domain>/<chart> --version <version>
If you're using stitch validation with private charts on plugin versions 25.1.x or later, the authentication timing issue is resolved. The plugin ensures repository authentication completes before chart template generation.
"secrets is forbidden: User 'system:anonymous' cannot list resource 'secrets'"
Cause: Invalid or missing Kubernetes service account credentials in the kubeconfig file.
Solution:
- Verify the
kubeConfigfield inhelm.Clientpoints to a valid kubeconfig file. - Verify the kubeconfig contains a valid token for the service account:
# Test kubeconfig authenticationkubectl --kubeconfig /path/to/kubeconfig auth can-i list secrets -n <namespace>
- For OpenShift, generate a service account token:
oc sa get-token <service-account-name> -n <namespace>
- Embed the token in the kubeconfig file under the appropriate user entry.
- Verify the service account has RBAC permissions:
# Grant edit role (includes secret access)kubectl create rolebinding <binding-name> \--clusterrole=edit \--serviceaccount=<namespace>:<service-account> \--namespace=<namespace>
"Unable to connect to the server" or "connection refused"
Cause: The Kubernetes cluster is unreachable or the kubeconfig isn't properly configured.
Solution:
1. Test from the command line first:
# Test kubectl connectivity
kubectl cluster-info
kubectl get nodes

# Test with specific kubeconfig
kubectl --kubeconfig /path/to/config cluster-info

# Test Helm connectivity
helm list --all-namespaces
2. Verify kubeconfig configuration in Deploy:
- Option A - Default kubeconfig: Verify that
~/.kube/configexists for the user account running Helm commands on thehelm.Clienthost and contains valid credentials. - Option B - Custom kubeconfig: Set the
kubeConfigproperty to the absolute path of a valid kubeconfig file. - Option C - Use Cluster Configuration:
- Select Use Cluster Configuration in
helm.Client(Advanced). - Verify that
helm.Clientis linked to a properly configuredk8s.Masteroropenshift.Server. - Verify the cluster CI has a valid API server URL and credentials.
- Select Use Cluster Configuration in
3. Check configuration priority:
If you have both Use Cluster Configuration = true and kubeConfig set, Deploy generates a temporary kubeconfig (Use Cluster Configuration takes priority). To use your custom kubeconfig, clear Use Cluster Configuration.
4. For Use Cluster Configuration issues:
- Verify that
k8s.Masterhas:- API Server URL correctly set
- Valid Token or TLS Cert/Key configured
- CA Cert if using custom certificates
- Test the cluster configuration:
# For token-based authkubectl --server=https://api.cluster.com --token=<token> get nodes# For certificate-based authkubectl --server=https://api.cluster.com \--client-certificate=<cert> --client-key=<key> \--certificate-authority=<ca> get nodes
5. Network connectivity:
- Verify the
helm.Clienthost can reach the Kubernetes API server (check firewall rules). - For private clusters, verify VPN or bastion host connectivity.
- Test with
curl:curl -k https://api.cluster.com:6443/version
The Deploy Helm plugin uses the same kubeconfig and network access as manual helm and kubectl commands. If those commands work from the command line, they should also work in Deploy. Always test manually first.
"Conversion = 'F'" or encoding issues
Cause: Character encoding mismatch between Deploy and chart files.
Solution:
- In helm.Chart > Encoding section, set Chart Encoding Type to match your chart's encoding (for example,
UTF-8orISO-8859-1). - For config files, set File Encoding Type in
helm.ConfigFileproperties. - Verify that YAML files use consistent line endings (LF for Linux/macOS, CRLF for Windows).
Repository Authentication Not Working With helm.Repository CI
Cause: The helm.Repository reference isn't properly linked or credentials aren't cascading.
Solution:
- Verify that the
helm.RepositoryCI exists under Configuration (not Infrastructure). - In Infrastructure > helm.Client > Repository section, select the
helm.Repositoryfrom the Helm Repo dropdown. - Verify that
helm.Repositoryhas:- Repository URL set (required)
- Username and Password configured
- Restart Deploy after creating or modifying
helm.RepositoryCIs.
Best Practices
- Test Helm commands manually on the
helm.Clienthost before configuring in Deploy. Ifhelm listorhelm installworks from the command line there, it works in Deploy. - Use the default kubeconfig when possible (option 1). This is the simplest and most reliable approach if your kubeconfig is already configured.
- Use
helm.RepositoryCIs for shared private registries accessed by multiple charts. - Enable debug mode in
helm.Client(Advanced > Debug) for verbose logging during troubleshooting. - Use environment-specific credentials through Deploy dictionaries for sensitive information.
- Keep Helm up to date. Use Helm v3.8+ for full OCI registry support.
- Document custom configurations. If you're using
HELM_CACHE_HOMEorHELM_CONFIG_HOME, document the paths for operations teams.
Get Support
If issues persist:
- Enable Debug mode in
helm.Clientconfiguration. - Collect Deploy logs from
XL_DEPLOY_SERVER_HOME/log/deployit.log. - Run equivalent Helm commands manually and compare output.
- Contact Digital.ai Support with the following information:
- Deploy and plugin versions
- Helm version (
helm version) - Error messages from
deployit.log - Kubernetes or OpenShift version
- Whether you're using traditional or OCI registries