Preparing your App and Test Bundles
Creating App and Test Bundles
It is the developer's responsibility to create paired bundles, one being the app bundle and the other being the XCUITest bundle. These will, later on, be uploaded to cloud to make for a single execution plan. To do so, in Xcode, the developer must first build the and create the bundles out of the targets of both app and XCUITest. On the right-hand, you can see the targets section in Xcode where the targets are located and where the build process is triggered to create the bundles.
Target Screen Containing Both App and Test

Building the App and Test Bundles
Before you can build the two bundles, you have to make sure that you have properly configured your signing identity. Otherwise, the build will fail. Also, you can run the test locally to see that it passes and the test process will create the bundles. This is recommended when first creating the bundles, you can later on just build the bundles without running the tests.
You can choose one of two ways, through Xcode's GUI or through CLI.
Testing and Building with Xcode GUI
When you have your app and test ready to go, choose a device (simulator or physical device) to run the test on: Product → Test. This will build the app, deploy it on a device and run the test.
Testing and Building with CLI
If you are more CLI inclined, you can build the targets from the terminal. In the terminal, navigate to the folder where the .xcodproj project is located. Then run the following command:
xcodebuild test -project MyAppProject.xcodeproj -scheme MyApp -destination 'platform=<PLATFORM>,name=<DEVICE_NAME>,OS=<OS>'


Some examples:
> xcodebuild test -project MyAppProject.xcodeproj -scheme MyApp
-destination 'platform=OS X,arch=x86_64'
-destination 'platform=iOS,name=Development iPod touch'
-destination 'platform=Simulator,name=iPhone,OS=9.0
For more information, visit's Apple's support page on the subject.
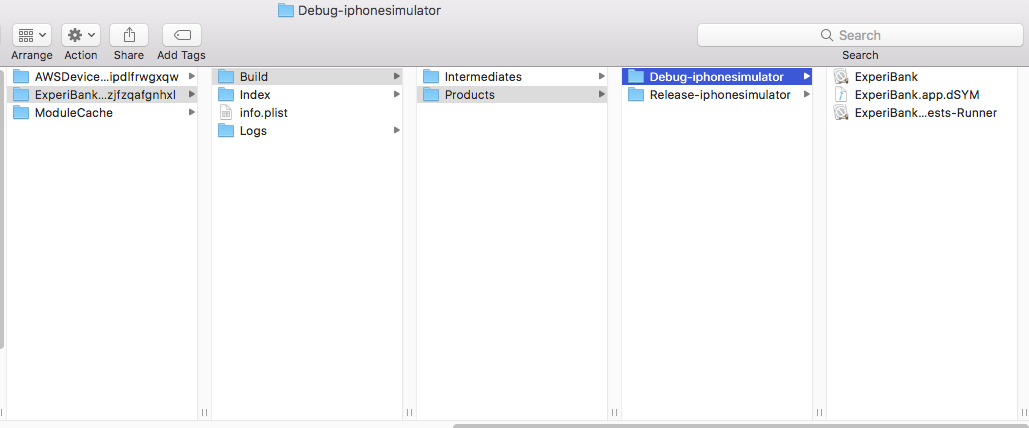
At the end of the test run, two bundles will be created in the DerivedData folder (see the screenshost in the section below for more information). To find the two bundles in the DerivedData folder: DerivedData/<your_app>/Build/Products/Debug-<device_test_ran_on>
Building Only with Xcode GUI
In Xcode, click on Product → Build For → Testing.
To find the two bundles in the DerivedData folder: DerivedData/<your_app>/Build/Products/Debug-<device_test_ran_on>
Building Only with CLI
To build using CLI, navigate to the folder where the project is located and run the following:
xcodebuild -scheme <scheme> build-for-testing
If you do not specify the build directory, the bundles will be created in the folder DerivedData/<your_app>/Build/Products/Debug-iphoneos
If you do not want to sign the app, or you don't have a signing identity, run the same command with these additional flags:
xcodebuild -target <app_target_name> -target <test_target_name> build CODE_SIGN_IDNETITY="" CODE_SIGNING_REQUIRED=NO CONFIGURATION_BUILD_DIR="dir/for/build"
Choose Device to Run the Test on

Derived Data Folder Containing Both Bundles


Creating an App .ipa file and Zipping the Test Bundle
Once the app and test bundles have been built using Xcode, look for them in the folder Derived Data or in the folder where you set them to be created. To find the location of the Derived Data, click on Xcode → Preferences → Locations. Under Derived Data, find the location of the bundles that you built and navigate to it. Both bundles will be there under DerivedData/<your_app>/Build/Products/Debug-<device_test_run_on> with the extension .app, although they will later on be treated differently.
Now that you have both the app and test bundles, create a .ipa file from the one and zip the other. These files will be uploaded to the cloud when creating an execution plan.
Create an App .ipa file
After you ran the test and built the app and test bundles:
- Go to the target screen.
- Click on Product→ Archive.
- Click on Window → Organizer.
- In the organizer, select the app.
- Click "Export" → Save for Ad Hoc Deployment.
- Once the export process is complete, look for the .ipa file under the folder you chose at the end of the export process.
Alternatively, you can navigate to the folder where the app bundle is located. Add there a .sh (shell script file) with the following script:
#!/bin/bash
if [ -d "Payload" ]; then
	rm -fr Payload/*
else
	mkdir Payload fi # if you'd rather copy the .app file, then replace the next line with:
# cp -r $1 Payload
mv $1 Payload
zip -r $2.ipa Payload
rm -fr Payload
Run the shell script with the parameters .app file, name of the output .ipa:
script.sh your_app.app the_app_name #(there is no need to add .ipa in the second parameter)
Zipping the Test Bundle
In folder where the test bundle is located look for the test bundle (will usually end with -Runner). Right-click on it and choose "compress".
You now have both the .ipa and the zipped test bundle and you are ready to execute tests.
Archive View - Export App to .ipa
