Edit Tracker Artifacts
Support for @mentions
Artifact Comments and Description fields support @mentions and users called out via @mentions are added to the monitoring list. Usernames with the @ prefix (for example, @mphippard) are automatically added to the monitoring list. However, users called out via @mentions must have Artifact View permission to be added to the monitoring list.
Support for Markdown
The Description and Comments field supports Markdown. With the Markdown editor, you can change the format your text for better readability, preview your changes, undo and redo the changes especially while drafting the description or comments. Formatting options include: mark your text with bold and italics font styles, add a codeblock, include headers, add bulletted and numbered lists, indent a paragraph, add horizontal rule and images.
TeamForge uses Showdown—a bidirectional Markdown to HTML to Markdown converter written in Javascript. For more information, see the official Showdown Documentation. Here's an abridged version of the Markdown syntax documentation.
Edit a Tracker Artifact
When work has been done on a tracker item, or more information is needed, the project member to whom the item is assigned should update the item's status accordingly. Comments from other project members help the artifact's owner decide how to handle the work.
For example, when the work defined in the tracker item is completed, change its status from Open to Fixed.
Your tracker administrator may have set up work flow rules that constrain your ability to do certain kinds of updates. For example, an administrator may have specified that only users with the "QA Engineer" role can change an artifact's status from Open to Closed.
A project manager might also change an artifact's priority, return it to the submitter for additional clarification, or assign it to a project member for resolution or action.
Generally, the project member to whom the tracker artifact is assigned will update the status. Any project member with the appropriate permissions can add comments.
Each comment in an artifact or task has a unique ID with its own URL. To link directly to a particular comment, copy that comment's URL and paste it into an email, a project page, or another comment. For example, to point to the third comment in artifact 12345, write artf12345#3 in your comment. (If the artifact or task you are linking to is on a different site, give the complete URL, like this: http://mysite.com/sf/go/task1234#3).
-
Click Trackers from the Project Home menu.
-
On the list of project trackers, click the tracker you want to update.
-
On the List Artifacts page, select the tracker artifact you want to update.
-
On the View Artifact page, click Edit.
-
On the Edit Artifact page, make your changes.
- Select a tracker type from the Tracker drop-down list to change the artifact's tracker type.
- Edit the artifact's title and description.
- Click Save.
-
On the View Artifact page, change any other fields if required, and click Update.
Project members with CREATE/EDIT permissions can create new tags or use existing tags, if required, from the Edit Artifact page.
Create tags on the go from the Edit Artifact page. However, you cannot rename or delete a tag from the Edit Artifact page.
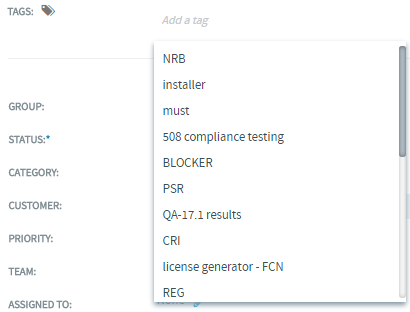
Click Add Tag next to the Tags field to get the list of tags mapped to your project. You can add up to a maximum of 10 tags to any artifact and a message is displayed if you try to add more than 10 tags. Type a tag name and if the tag name is not exitsting already, a contextual Create a new tag link shows up for you to create a new tag.
 note
noteWherever the tag widget is not applicable, the associated tags are displayed as read only tags. For example in View Artifact page.
noteFrom 17.8 release, TeamForge is configured to send HTML emails to users assigned to and users monitoring the artifact you create or update. For more details, see HTML EMails.
A new check box, Show Pending/Obsolete releases added in TeamForge 19.2, if selected, lets you select one of the pending and obsolete file releases for the Reported in Release and Fixed in Release fields.

Selecting this check box, lists the pending and obsolete file releases in the Reported in Release and Fixed in Release fields. The pending and obsolete file releases are greyed out to distinguish them from active file releases.
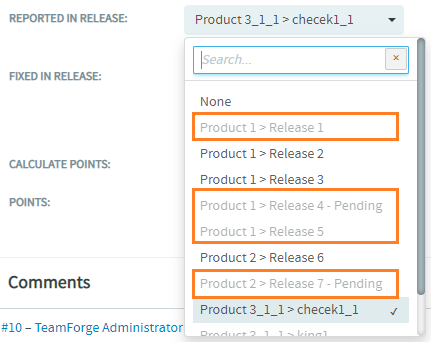
The check box becomes disabled, once you’ve selected a pending or an obsolete file release. To enable it, select an active file release or “None”.
When creating or updating an artifact, you can drag and drop any number of files with their overall size not exceeding 25 MB in the Attachments field. You can also select multiple files using the Browse button. Make sure that you add only files of restricted file types. For more information on attaching restricted files types, see PROHIBITED FILE TYPES.
All updates to the artifact are recorded in the Comments section of the Status/Comments tab.
View Progress of File Uploads
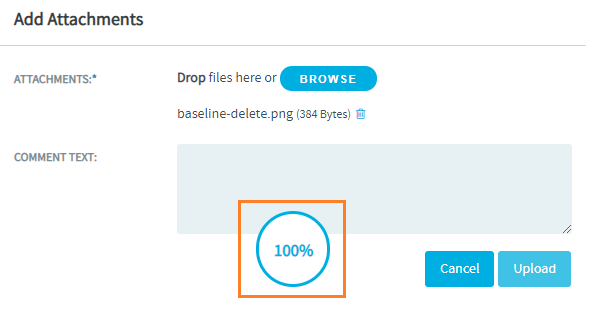
When file attachments are uploaded while updating an artifact, a file upload progress indicator shows up on the View Artifact page, and Add Attachments dialog box (of the Attachments tab on the View Artifact page).

Edit Your Comments
Have you got something wrong like a typo error when you added comments to a tracker artifact? Don't worry !!! You can now edit your comments and make the corrections. You can see an Edit link for every comment that you have added. Click the Edit link.
![]()
Change the comments and press Shift+Enter or click Save to save the changes.

You can edit the same comment any number of times.
All your edited comments have the status Edited to indicate that the comment was edited already. To see the history of the edits, click the Edited link.

The edit history of your comments and the comments added/edited by other users are shown on the Change Log section. The Change Log includes the all the changes with respect to the same comment.

Whenever you edit your comments, email notifications are sent to the users monitoring the artifact.
Attachment Reminder for Tracker Artifacts
Have you ever forgotten to attach files when creating or updating Tracker Artifacts? If yes, the Attach Reminder feature comes in handy to alert you in case you've missed attaching the files while submitting an artifact.
How it works?
If you've included one of the following keywords exactly in the Description field on the Create Artifact page and in the Comment Text field on the View Artifact page, the Attachment Reminder dialog shows up, when you try to save the changes without attaching the files.
| attach | attached are | attached to this artifact | attached is |
| attached file | attached files | attached document | attached documents |
| are attached | find attached | find the attached | find included |
| find the included | 've attached | have attached | is attached |
| I attached | I'm attaching | I am attaching | PFA |
| see attached | see attachment | see attachments | see the attachment |
| see the attached | see included |
Attachment Reminder, if keyword is included in the Description field on the Create Artifact page.
Attachment Reminder, if keyword is included in the Comment Text field of the View Artifact page.
Click Cancel to get back to the artifact for attaching the files. Click OK to submit the artifact without attaching the files.
Handling Simultaneous Updates to the Same Artifact
Previously, when you update a Tracker artifact that has been updated simultaneously by another user, a version mismatch error is thrown directing you to reload the page and your changes were not retained.
To handle this much better, the "Overwrite" feature is implemented in TeamForge 19.3. From now on, if you try to update an artifact that has been simultaneously updated by another user, you will get an alert to let you add your changes over other user's changes or cancel to view the changes done by the other user.
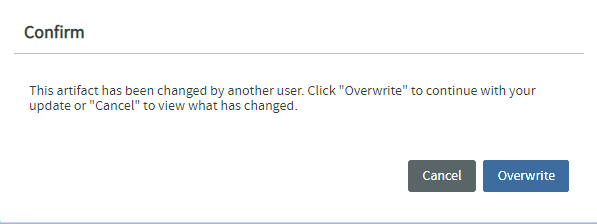
Click Overwrite to update your changes on top of the other user's changes. If you edited the same field that is edited by the other user, your change replaces the other user's changes.
Click Cancel, if you want to view/verify other user's changes before saving your changes. After verifying the other user's changes, you can proceed to save your changes using the Save or Save and Close option or leave the artifact with only the changes of the other user.
Automatically Adjust Remaining and Actual Effort
The Estimated Effort, Remaining Effort and Actual Effort fields are user-editable text fields that accept any positive number. Typically, the effort for an artifact is estimated when you create an artifact. Once estimated, the artifact is updated at regular intervals to keep the remaining and actual effort data up-to-date.
Though you can have the remaining and actual effort updated manually, the Effort Spent text field (along with the Automatically adjust Remaining and Actual Effort check box) comes in handy to have the Remaining Effort and Actual Effort fields adjusted automatically every time you record the effort you have spent on an artifact.
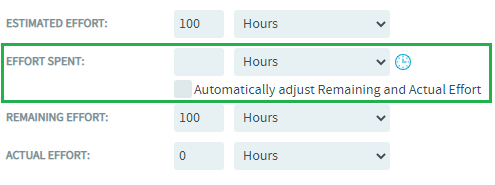
- Effort Spent is a configurable text field available by default to update the effort spent on an artifact (any positive number) at regular intervals, typically on a day-to-day basis.
- Using the Effort Spent field (together with the Automatically adjust Remaining and Actual Effort check box) to automatically adjust the actual and remaining effort is optional. While the Estimated Effort field is always user-editable, the Remaining and Actual effort fields are user-editable if and only if the Automatically adjust Remaining and Actual Effort check box is not selected.
- The effort spent value you record at regular intervals is incremental in nature. Do not construe the effort spent you record as the sum total of all the effort spent to date at any given point in time.
- When an artifact is created, the Remaining Effort and Actual Effort values are equal to the Estimated Effort and zero (0) respectively.
- Later, any value you enter for the Effort Spent field (with the Automatically adjust Remaining and Actual Effort check box selected) is duly deducted from the Remaining Effort and added to the Actual Effort.
- However, the Remaining Effort and Actual Effort fields are reset to their last known (saved) values, if for some reason, you clear the Automatically adjust Remaining and Actual Effort check box before saving the changes to the artifact.
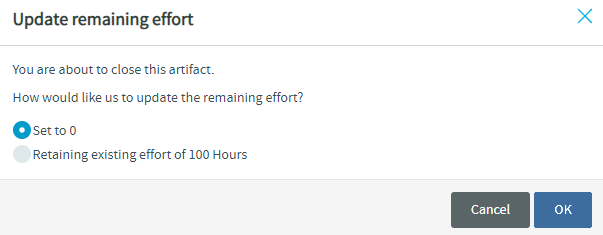
- The following dialog box appears when you try to close an artifact (change the status to meta status
Closed) with an outstanding Remaining Effort that is not equal to zero.- Set to 0 (default)---Select this option to round any outstanding effort off to zero.
- Retain existing effort of x units---Select this option to close the artifact with the outstanding effort value as is.
- Any change (increase or decrease) down the road to the estimated effort is used to derive a new remaining effort---which can either go up or down depending on the increase or decrease respectively. However, the Remaining Effort is rounded off to zero if the derived remaining effort becomes negative.
- Changes to the Effort Spent text field are added to the change log and the Artifact Comments section.
- An E-mail notification is sent to all monitoring users for any changes to the Effort Spent field.
- The Effort Spent field is not shown if you choose to have the effort data summed up from one or more child artifacts (by selecting the Calculate Effort: Sum effort from children check box).
- Like the other effort data, the Effort Spent data is also ported to the datamart for reporting purposes.
View a Baseline from View Artifact Page
A new tab Baselines is added to the View Artifact page to list the baseline(s) with which the artifact in scope is associated. The Baselines tab is visible only to users with baseline license and Tracker view permission. Click the baseline id to view the associated baseline.

Edit a Tracker Artifact by Email
To comment on a tracker artifact when you are not logged into TeamForge, send an email to the tracker, or reply to an automatic update email about the artifact.
You can also add a comment or an attachment to a tracker artifact that you are monitoring by responding to the monitoring email notification.
You can also use email to add an attachment. But to edit any other fields, you must make the changes in TeamForge.
You do not have to be logged into TeamForge to edit a tracker artifact using email, but you must have the tracker edit permission for the tracker contaning the artifact you want to edit.
Send an email message to <artifact id>@<Digital.ai TeamForge server>.
You can find the artifact ID on the Artifact Details page.

TeamForge maps your email to the tracker record like this:
| Email field | Tracker field |
|---|---|
| To | Tracker email address |
| Subject | Artifact title |
| Body | Artifact description |
| Attachments | Attachments |
Edit Multiple Artifacts (Mass Update)
When you have a large number of artifacts to update (for example, all the artifacts in a tracker, or a filtered list of artifacts in a planning folder), you can edit all the artifacts at once.
Exercise caution while mass-updating multi-select fields. Mass-updating multi-select fields (such as Tags and multi-select lists) overrides any existing values with the new values you select.
When you update two or more artifacts at a time, each user who is monitoring any of the changed artifacts gets a single email describing all the updates.
- Click Trackers from the Project Home menu.
- Go to the tracker or planning folder that contains the tracker artifacts you want to edit.
In a tracker, you can use the filter to help you find the desired artifacts.
You can select the Planning Folder tab and select the planning folder that contains the artifacts (cross-tracker artifacts) you want to edit.
You can only see common fields when you select artifacts from more than one tracker for mass update.
- Select the artifacts you want to edit, and click Mass Update.
- For artifacts in a tracker, choose which ones you want to update.
- Selected: Updates only the artifacts that you selected.
- Filtered Set: Updates all artifacts returned by your filter, or all artifacts in the tracker if you did not apply a filter.
tipChoose Filtered Set when the artifacts span multiple pages and you want to select them all.
- Make your changes and click Update.
Some fields in your tracker may have values that depend on values in other fields, or use validation rules to ensure correct content. If your mass update operation breaks any such dependencies, you must fix the errors before running the mass update.
Edit Multiple Artifacts Inline
When you have a list of tracker or planning folder artifacts to update, you can edit all the artifacts inline at once.
- Click Trackers from the Project Home menu.
- Select the Trackers, Planning Folders or Teams tab, select the tracker, planning folder or team that contains the artifacts you want to edit inline.
- In the List Artifacts page, click Edit Inline. To help you identify editable columns, all non-editable columns are disabled. You can see a hand symbol when you hover the mouse pointer over the editable columns.
- Click a field in a column and edit the selected artifact. For example;
- Clicking a field in the Assigned To column lets you edit the person assigned to the specific artifact.
- Clicking a field in the Planned For column displays the Planning Folder dialog box to let you change the planning folder for the specific artifact.
- When you are done, click Save.