Work with the Internal Code Browser
-
Click SOURCE CODE from the Project Home menu.
-
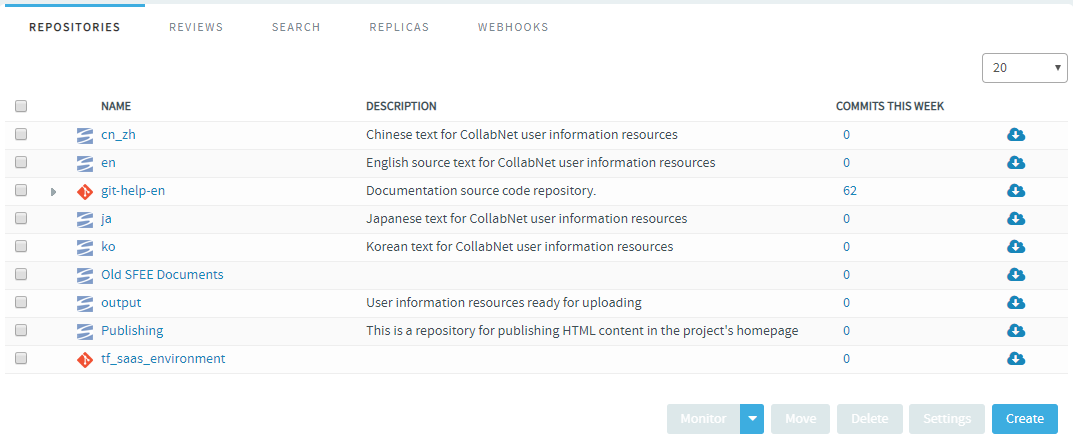
Select the Repositories tab.
-
From the list of project repositories, select the repository you want to look at.
Click the name of a Subversion or a Git repository in which you want to view code. On the top right of code browser, you can select the branch/tag (for Git) or specify the revision (for SVN) you want to browse.
To clone the repository, click the clone button ( ) available against each repository in the list.
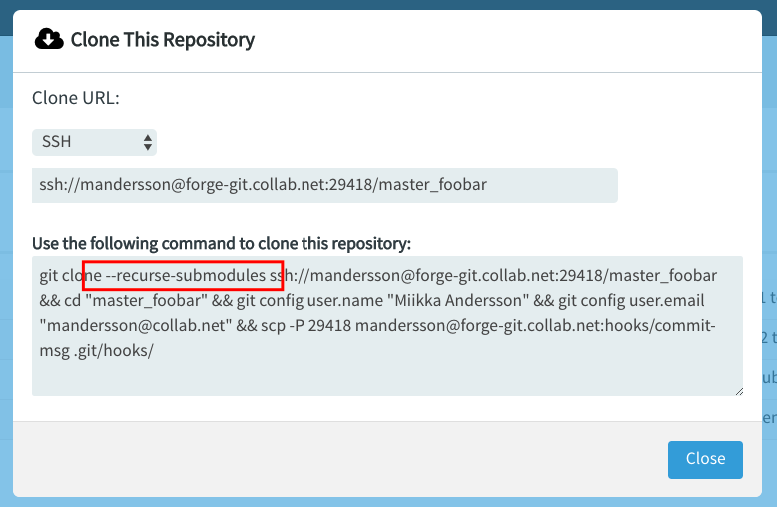
From TeamForge 18.2, recursive cloning of submodules is enabled in the Code Browser.
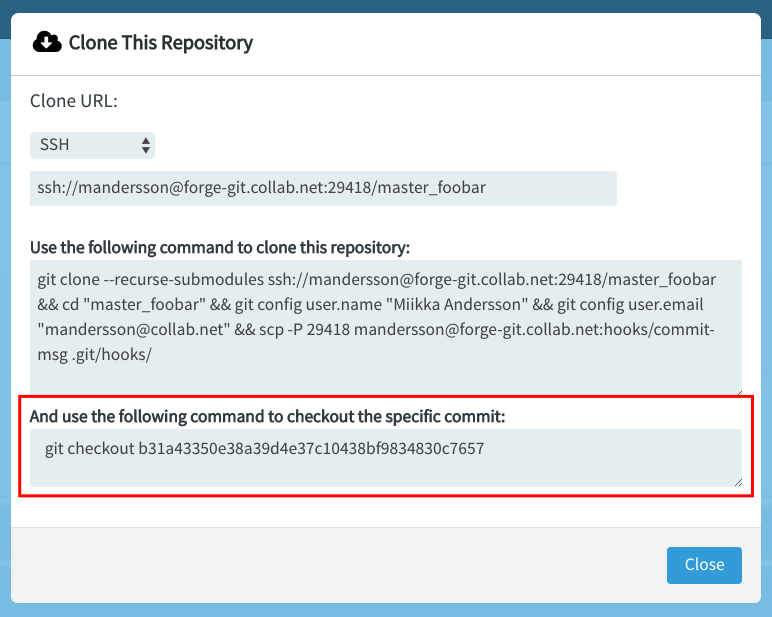
From TeamForge 18.2, context-specific cloning can be done with which the user can checkout exactly the same revision/branch/tag that is being viewed on Code Browser, when cloning a repository.
From TeamForge 18.3, various Git LFS backends are supported in Code Browser. Prior to TeamForge 18.3, only FS backend was supported.
The Replicas Tab
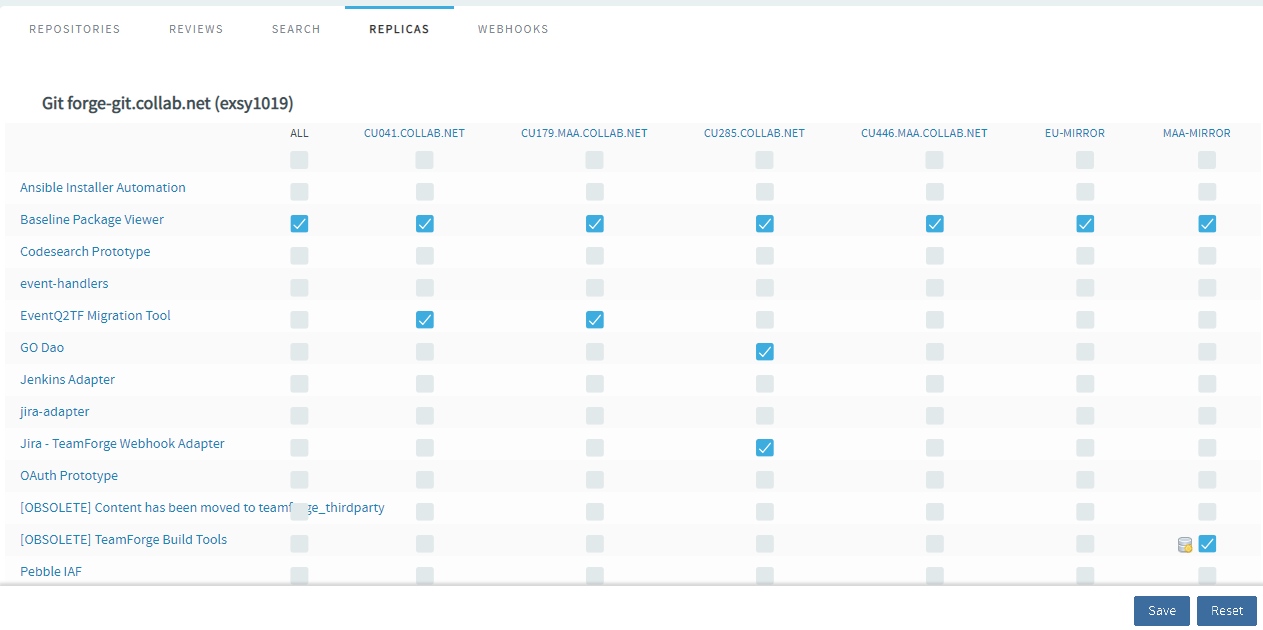
Use the Replicas tab to replicate multiple repositories with ease. Setting up replication one-by-one for a large number of repositories can be time consuming. You now have an exclusive REPLICAS tab from where you can set up replication for multiple repositories in one go.
The REPLICAS tab lists all the avialble repositories and replica servers in a tabular format. Simply select or clear the check boxes to enable or disable repository replication on the available replica servers.
The View Tab
This tab allows you to do the following:
- Browse through the folder hierarchy of the repository and view the content of specific files. For any folder or file you are viewing within a branch (Git) or revision (SVN), you can obtain the commit information pertaining to its last update.
- While viewing a single specific commit or a file, you can see the paths that were modified in that commit, the associations including JIRA such as builds, code reviews and so on for the specific commit and the difference between files in that commit.
-
While viewing a folder, if there is a file named
readme,readme.txtorreadme.md, that file will automatically be rendered beneath the list of files in the folder. If the file contains markdown formatting, it will be rendered as rich text. -
With the linking capability, you can refer to a line of code or a range of lines in any revision of the file.


-
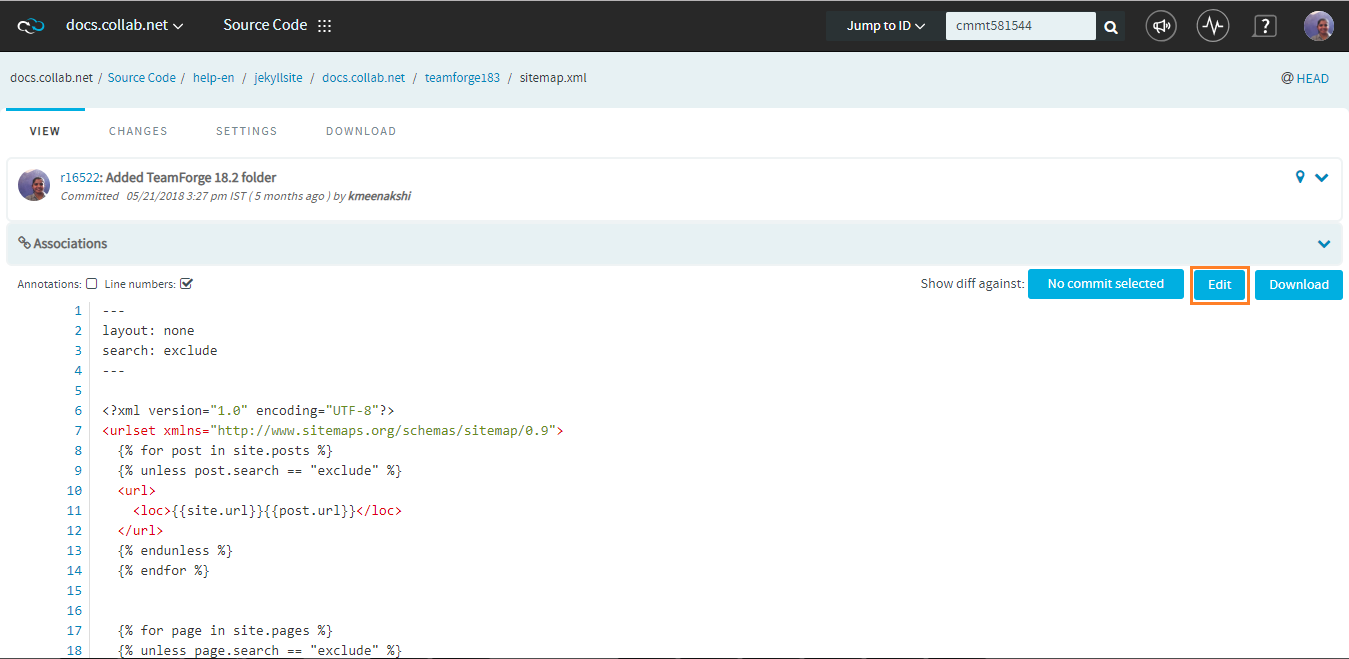
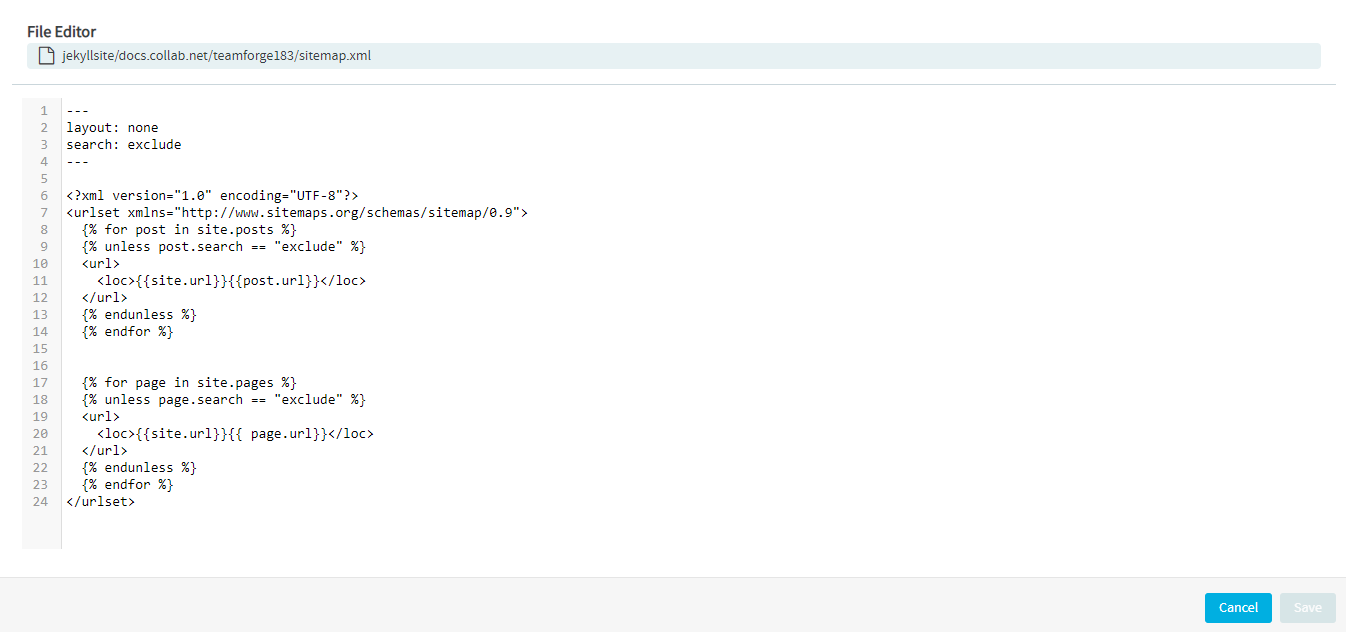
Inline-edit files in a Subversion Repository. Just browse and open the file (on a Subversion repository) on the View tab. Click Edit, edit the file in the File Editor and click Save.
-
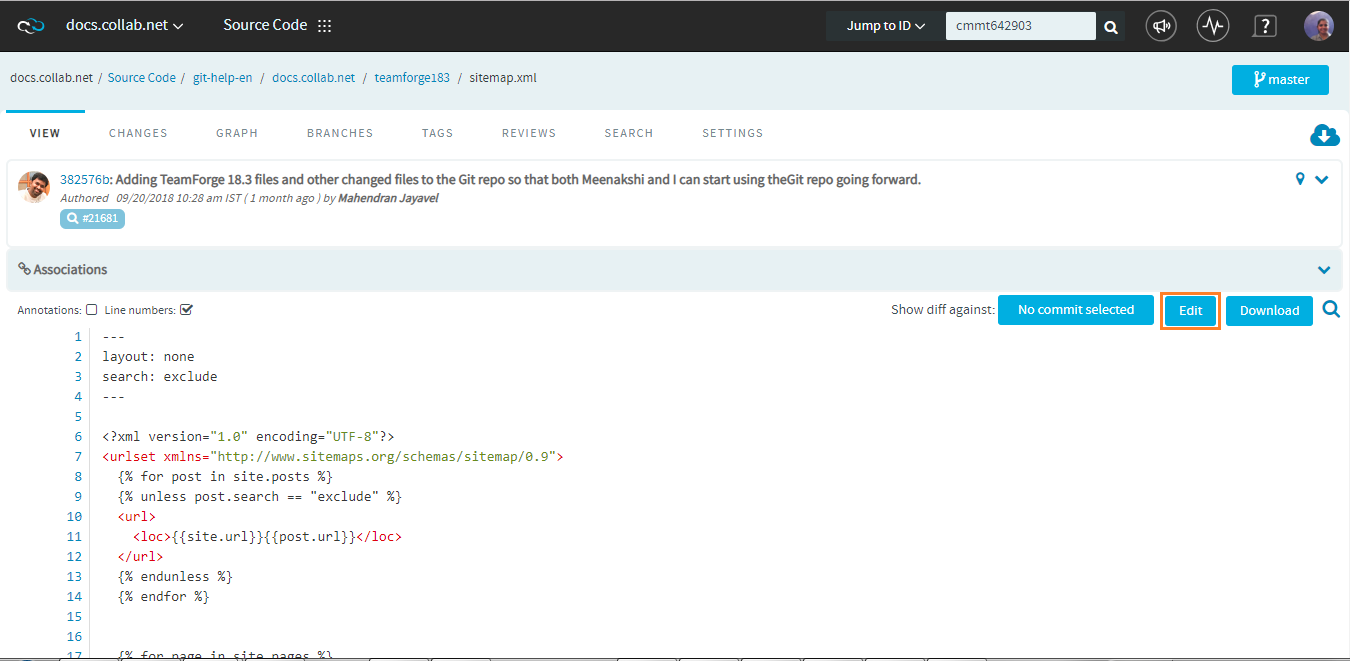
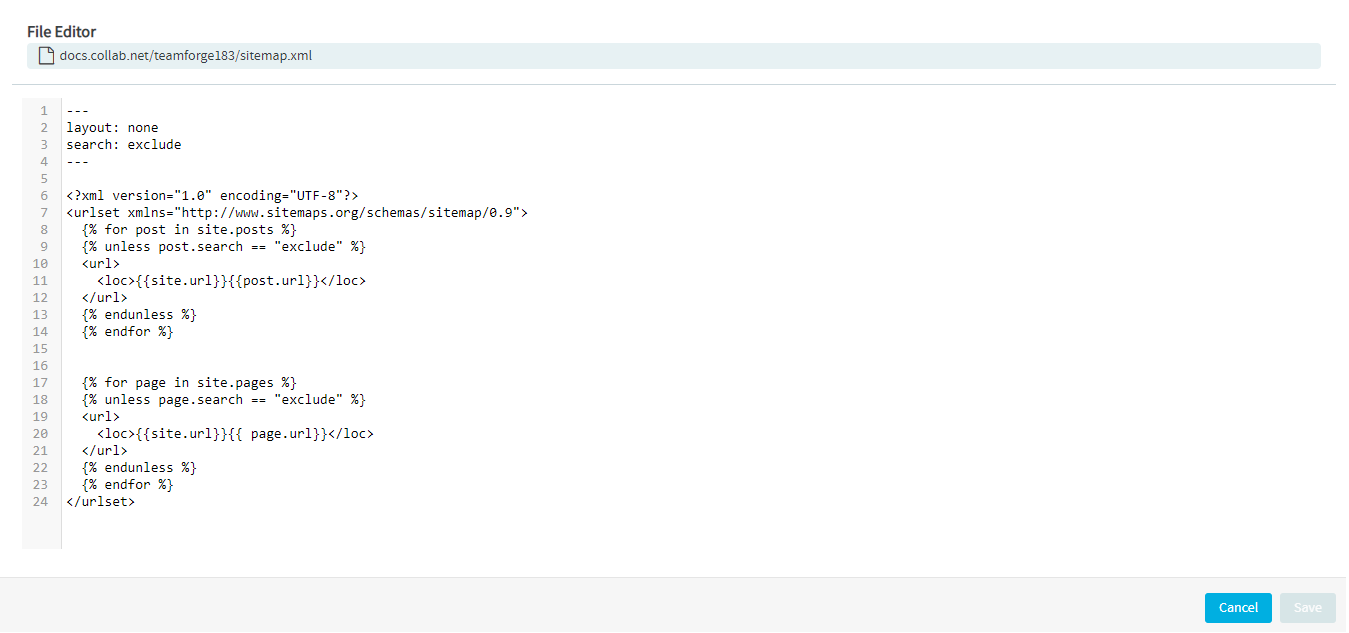
Inline-edit files on Git repositories without Code Review. You can inline-edit the source files on Git repositories for which code review is not enabled. Browse and open the file on the View tab, click Edit, modify the file on the File Editor and click Save.
-
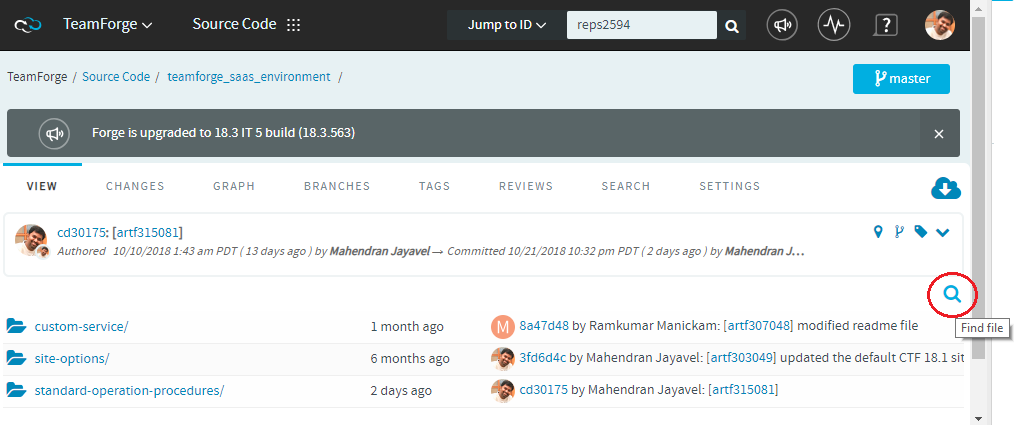
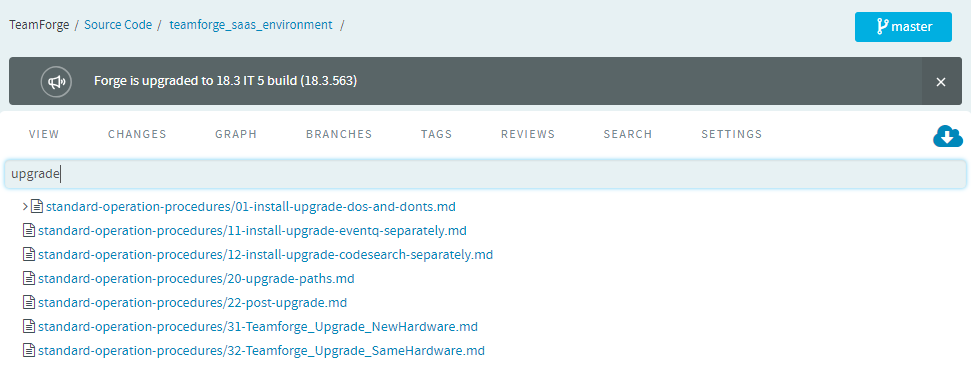
Find files as you type. With the Find File feature, you can just type the keywords and the results are shown as you type. Click the Find File icon and type the keyword to find a file you want.
-
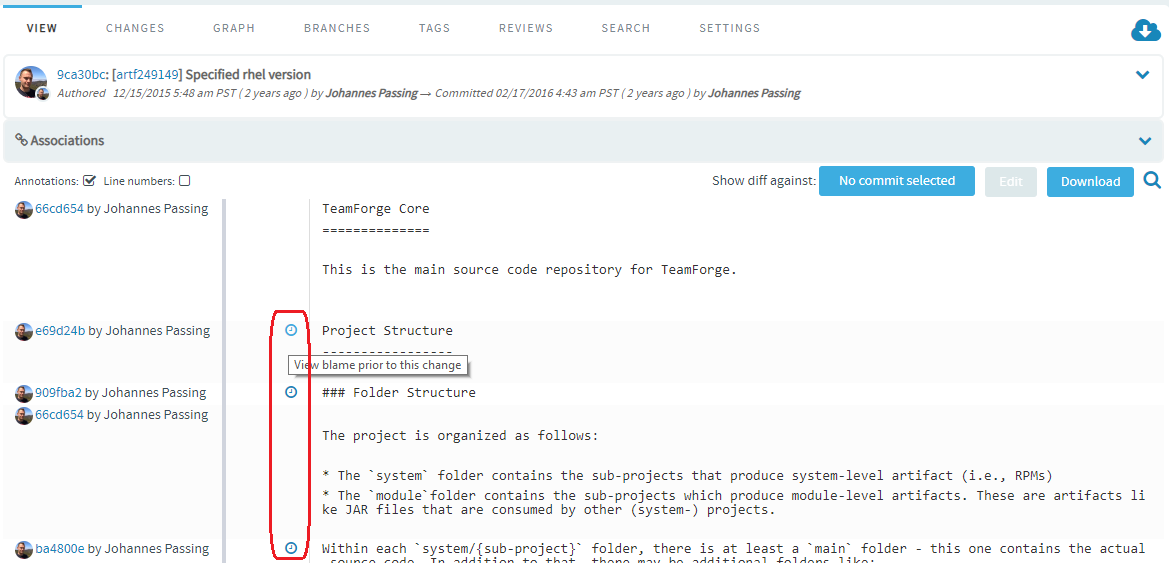
View Git Blame Prior to a Specific Change. You can now view Git blame prior to a particular change. Browse and view a file in a Git repository, select the Annotations check box and click the View Git blame icon.
-
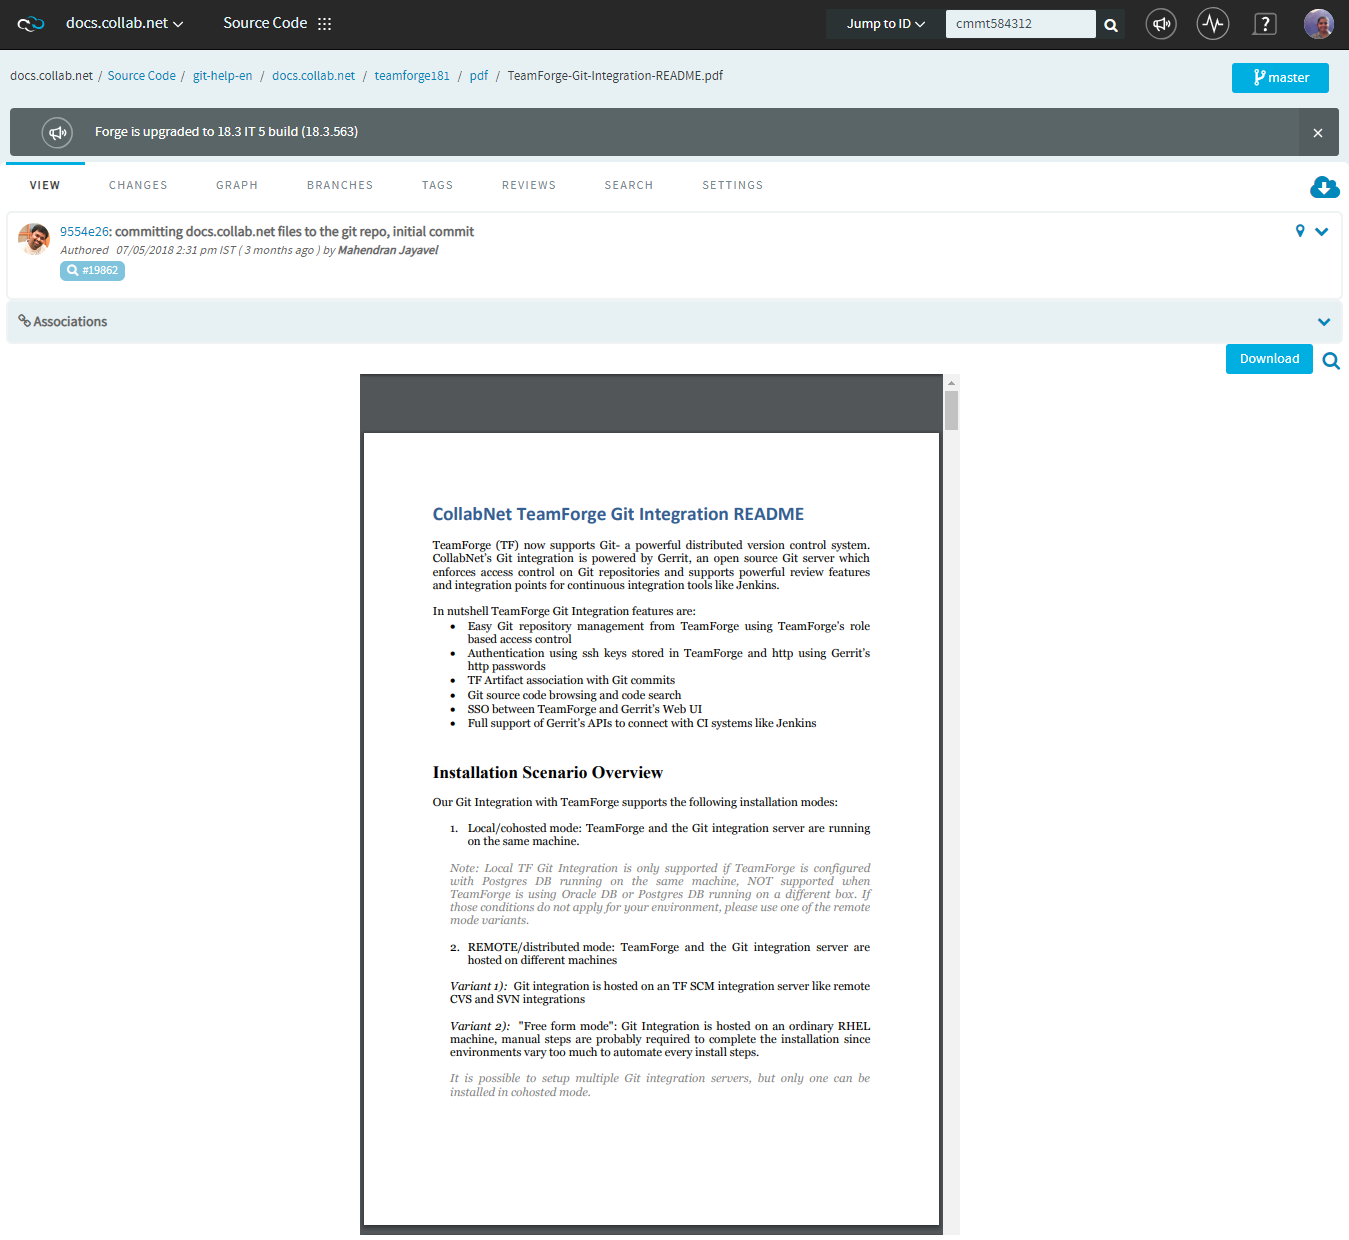
View PDF files. You can view the PDF files in Code Browser.
-
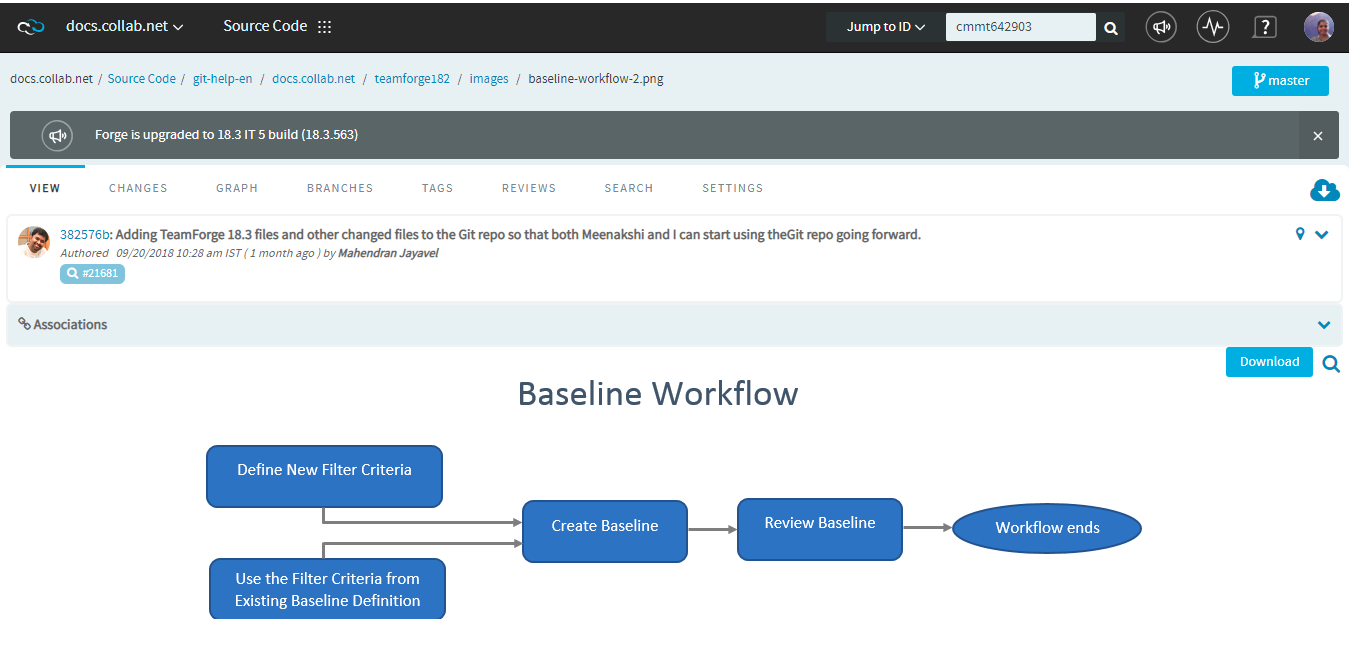
View Images stored in Git LFS. You can view the image files stored in Git LFS. Supported formats: GIF, JPEG, and PNG.
-
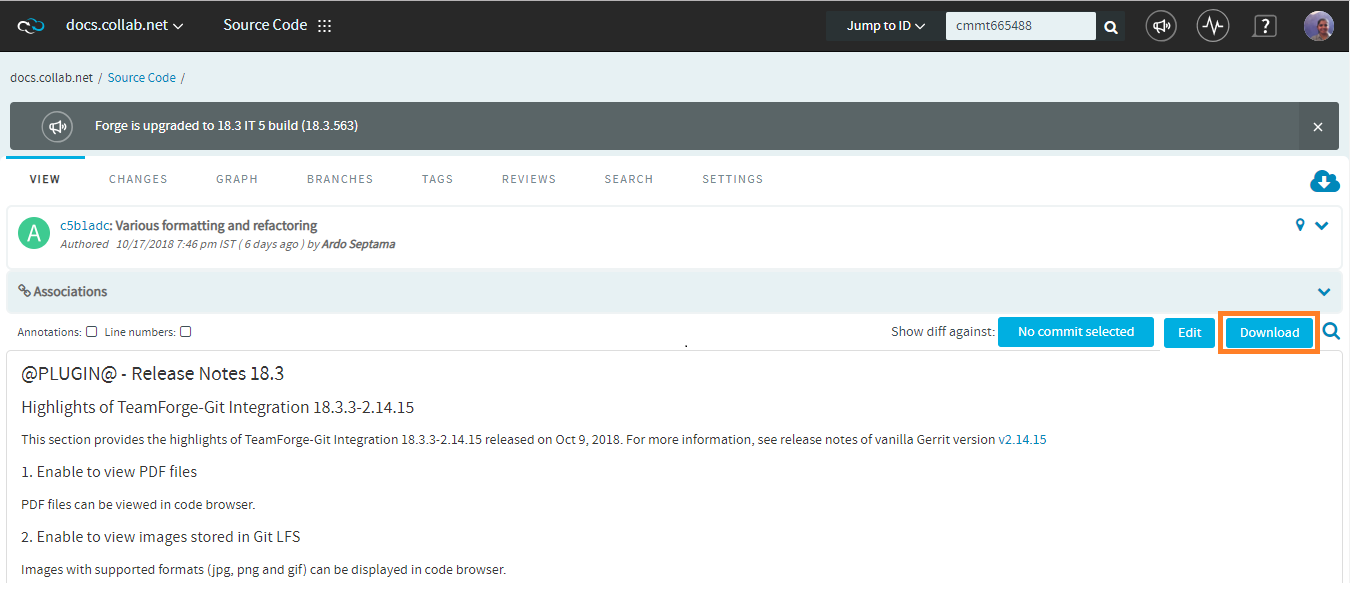
Download files. The existing Download tab is replaced by the Download button, which appears next to the Edit button on the Code Browser. Click this button to download source files.
-
Support for multiple Git LFS backends in Code Browser. Prior to this Gerrit release 18.3.6-2.14.6, the Code Browser was only able to access LFS files that were stored on local file system (FS backend).
-
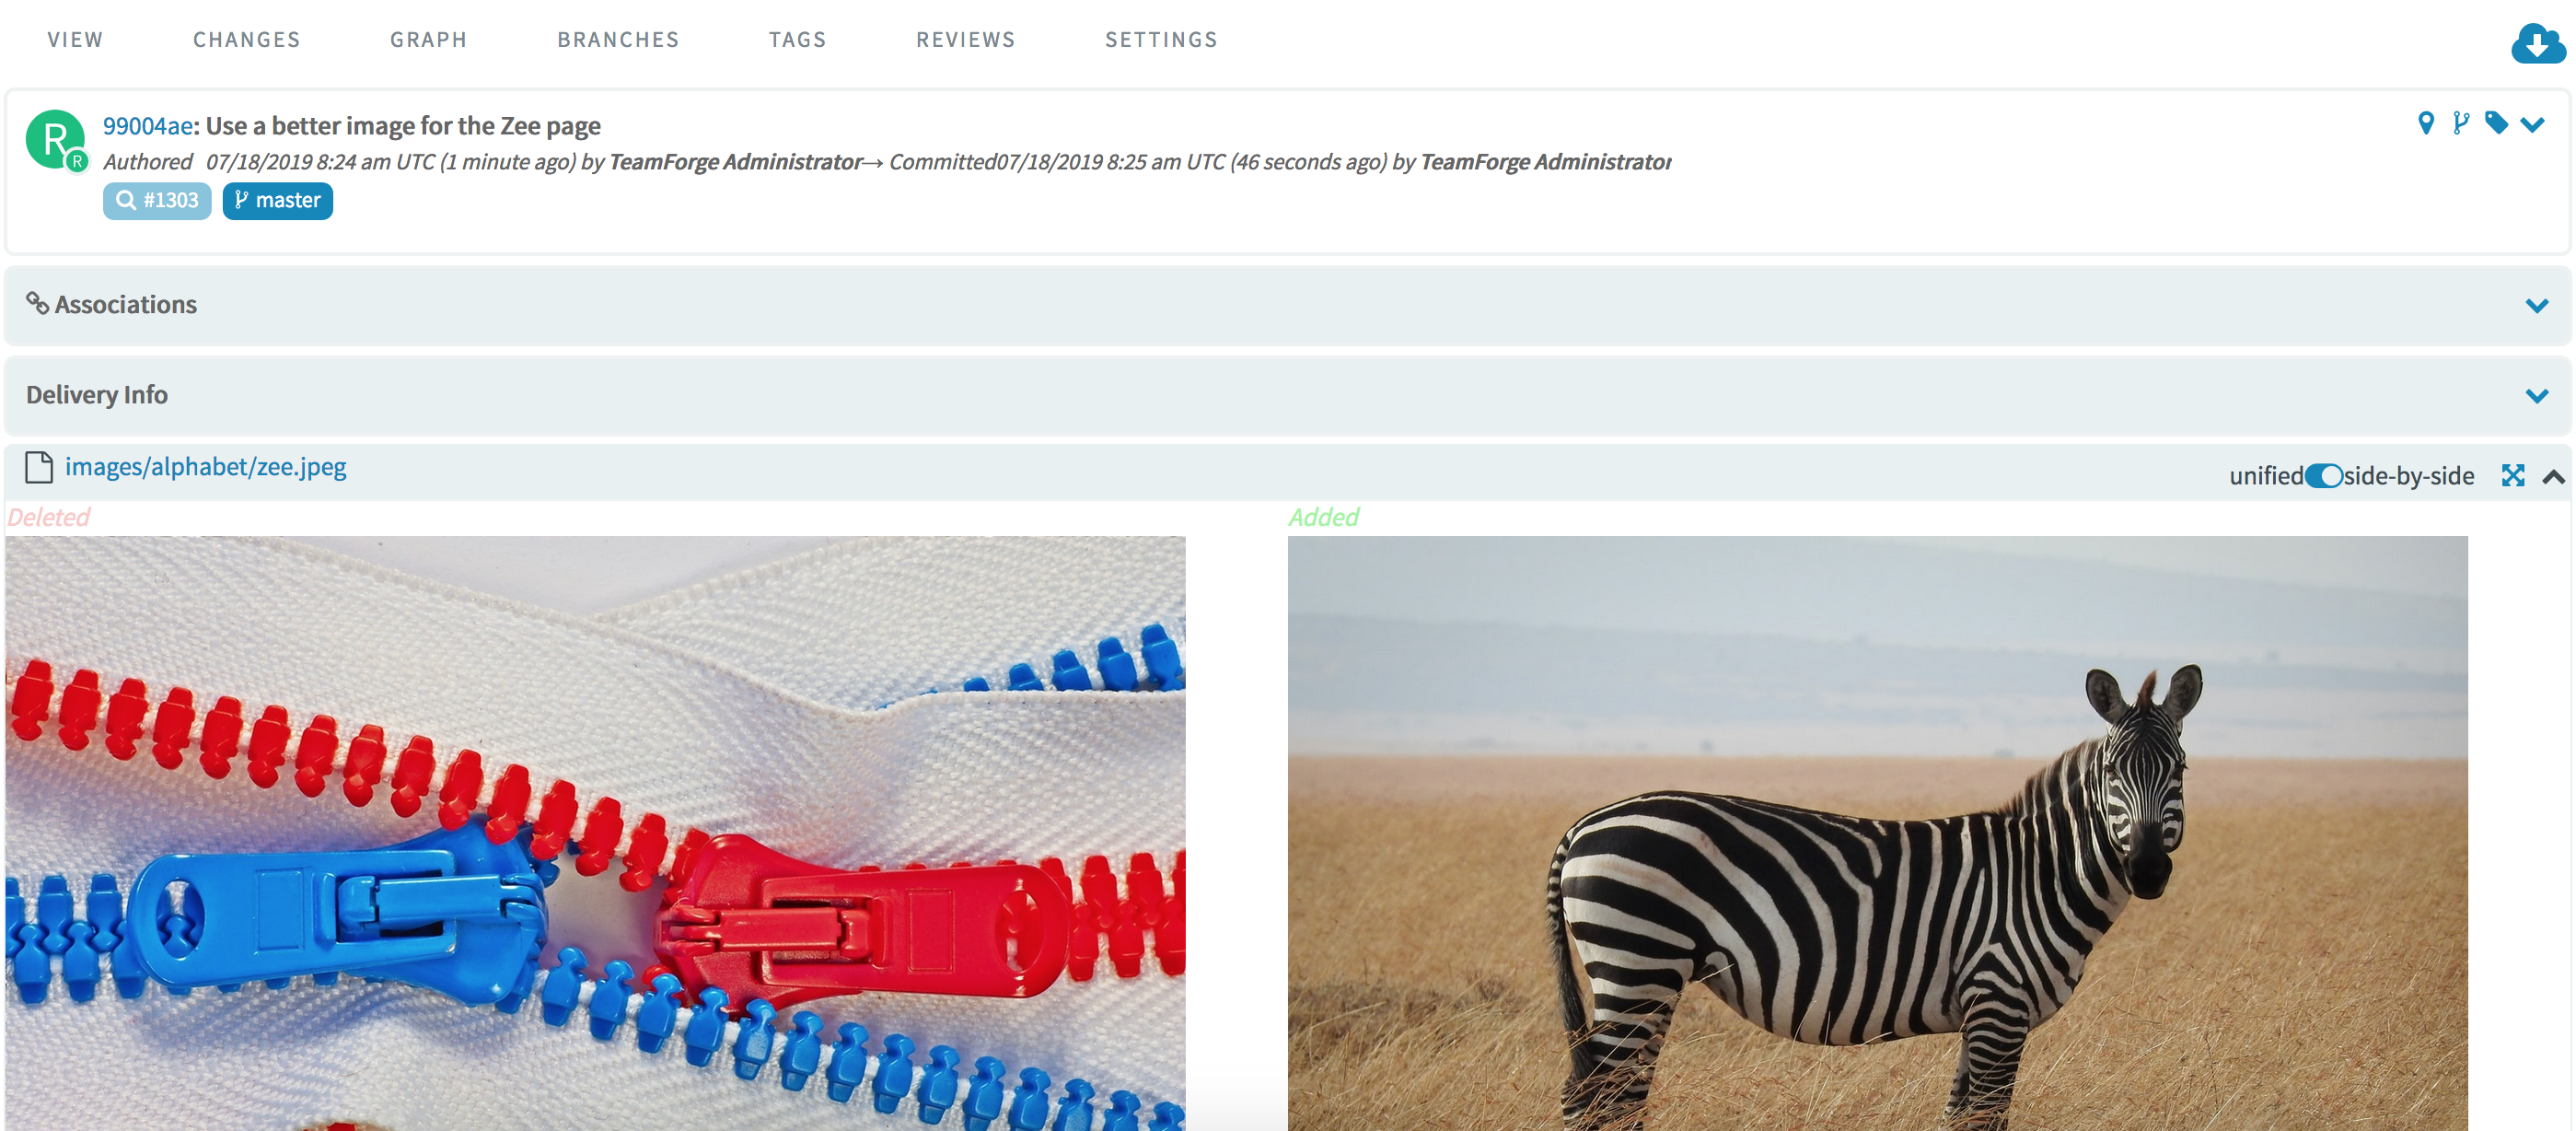
Show old and new images in commit diffs. Old and new images are now shown in commit diffs.
-
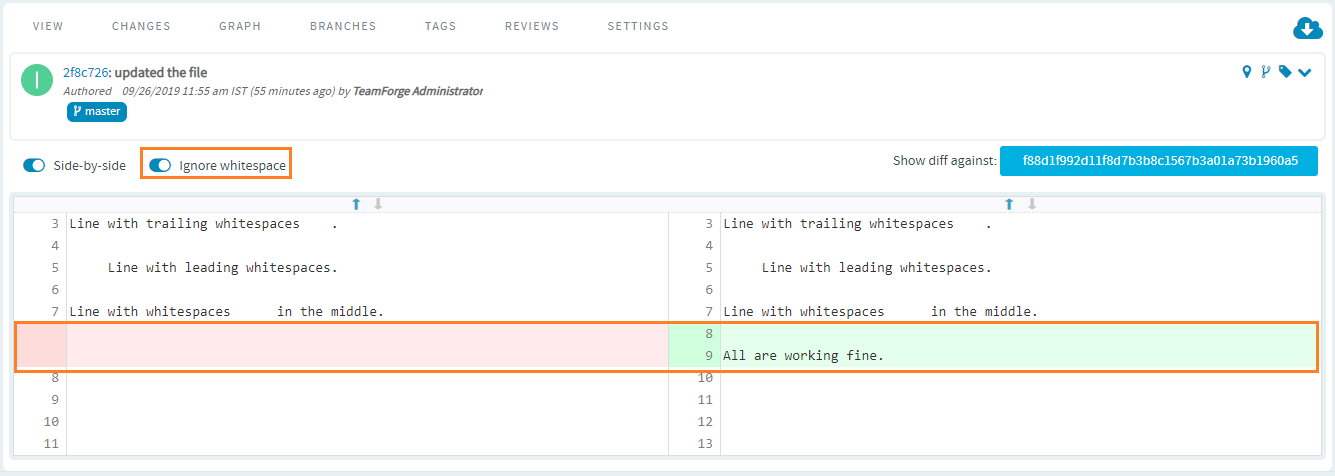
Ignore whitespaces in code diff view. A new Ignore whitespace option has been implemented in TeamForge 19.3 to let you get rid of any leading whitespaces, trailing whitespaces, and whitespaces in the middle of a line in your code, while viewing the differences in the code from the Code Browser.
The Ignore whitespace option is disabled by default. When it is disabled, you can view the code changes along with the whitespaces.
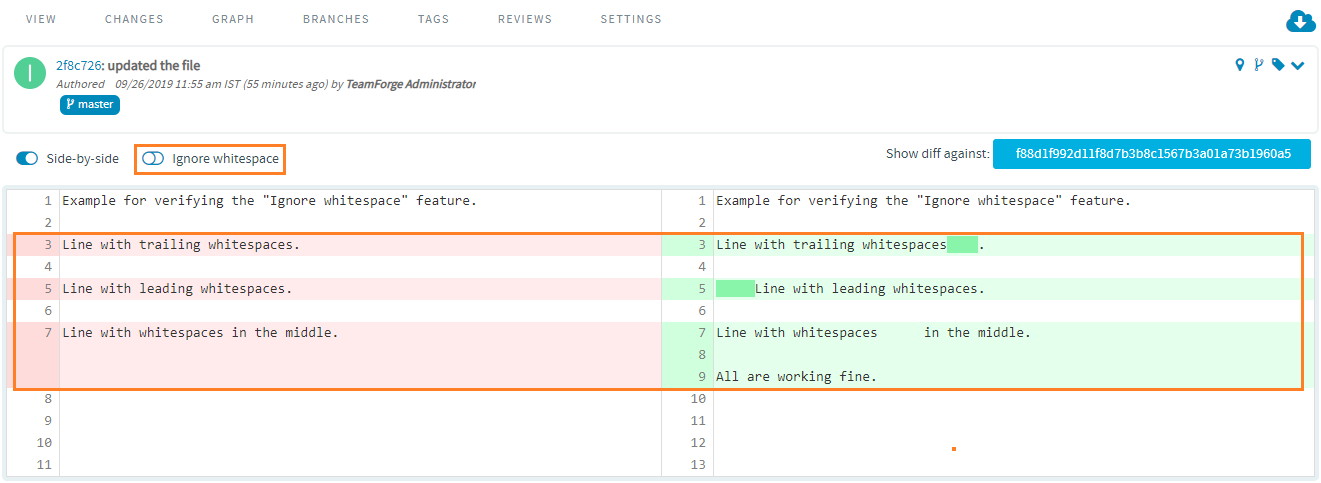
If you enable it, all the whitespaces (leading, trailing and the middle) in your code are excluded in the code diff view. In other words, only the code changes are shown.
Add Files to Git Repository
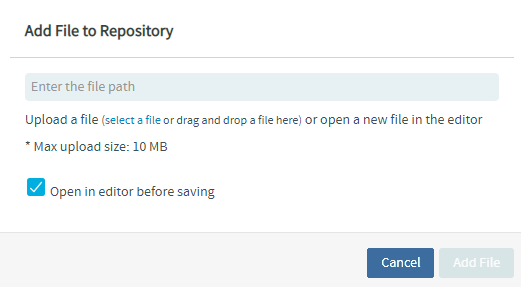
You can now add files to a Git repository from the View tab of the Code Browser. You can add only one file at a time. Click the Add a file to repository ( ) icon on the View tab to add a file to the repository.

You can either upload an existing file or create a new file from the Add File to Repository pane. The uploaded and new files can be added to the repository after a direct commit or after a code review.
To add a new file:
-
Enter a file name in the text field on the Add File to Repository pane.
noteThe Add File button is enabled, after a file name is entered in the text field.
-
Click Add File.
If the Open in editor before saving checkbox (selected by default) remains selected, when you click the Add File button, the file is opened in the File Editor to let you add, review, and modify the content before saving.
-
Click Save.
-
Commit the change directly or create a code review.
The file is added successfully after the commit or after the code review is done and the change is merged.
To upload a file:
-
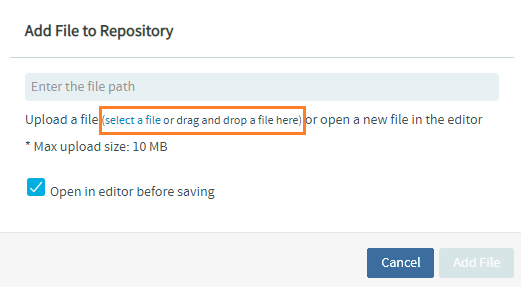
Click the select a file link (to browse and select a file) or just drag-and-drop a file.
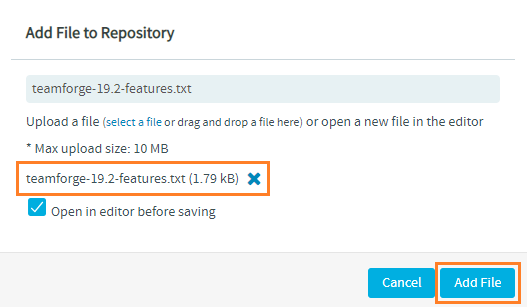
noteThe Add File button is enabled, after a file is added to the Add File to Repository pane.
-
Click Add File.
If the Open in editor before saving checkbox (selected by default) remains selected, when you click the Add File button, the uploaded file is opened in the File Editor to let you review and modify the file content before saving.
-
Click Save.
-
Commit the change directly or create a code review.
The file is added successfully after the commit or after the code review is done and the change is merged.
Download Folders from a Git Repository
From TeamForge 19.3, you can not only download individual files, but also the folders from a Git repository. A new icon Download this folder as a ZIP file ( ) is added to the View tab of the Code Browser for each repository and for every individual folder within the repository.
Select the Git repository and click this icon to download the files and folders residing in the selected repository.

To download an individual folder within a Git repository, select the folder and click this download zip file icon.

The zip folder downloaded directly from a repository has the name of the repository with the keyword "master" appended to it (say "git1master.zip" for the repository "git1"), while the zip folder downloaded from an individual folder within the repository has the name of the folder itself (say, "newtest.zip" for the folder "newtest").
Support for Relative Paths to Files, Folders, and Images in Markdown Files
You can now add relative paths of files, folders, and images either as inline-style links or as reference-style links to the markdown files from within the Code Browser.
-
When you add the relative path of an image in the markdown file as an inline-style link or as a reference-style link as illustrated below, the image file is rendered on saving the markdown file.


-
When you add the relative path of a file in the markdown file as an inline-style link, say
[This is a link to a file](new)or as a reference-style link, a link to the file is added on saving the markdown file.
Click this link to view the file content.

-
When you add the relative path of a folder in the markdown file as an inline-style link, say
[This is a link to a folder](testqa)or as a reference-style link, a link to the folder is added on saving the markdown file.
Click this link to view the folder contents.

Support for Unified Diff View of Images in Code Browser
You can now compare the differences between versions of an image file in unified diff view of code browser.
Two modes of viewing differences between image versions are available:
- Image Opacity
- Highlight Image Differences
To view the differences between two image versions, select the VIEW tab and select a commit id from the Show diff against list.
Image Opacity Mode
-
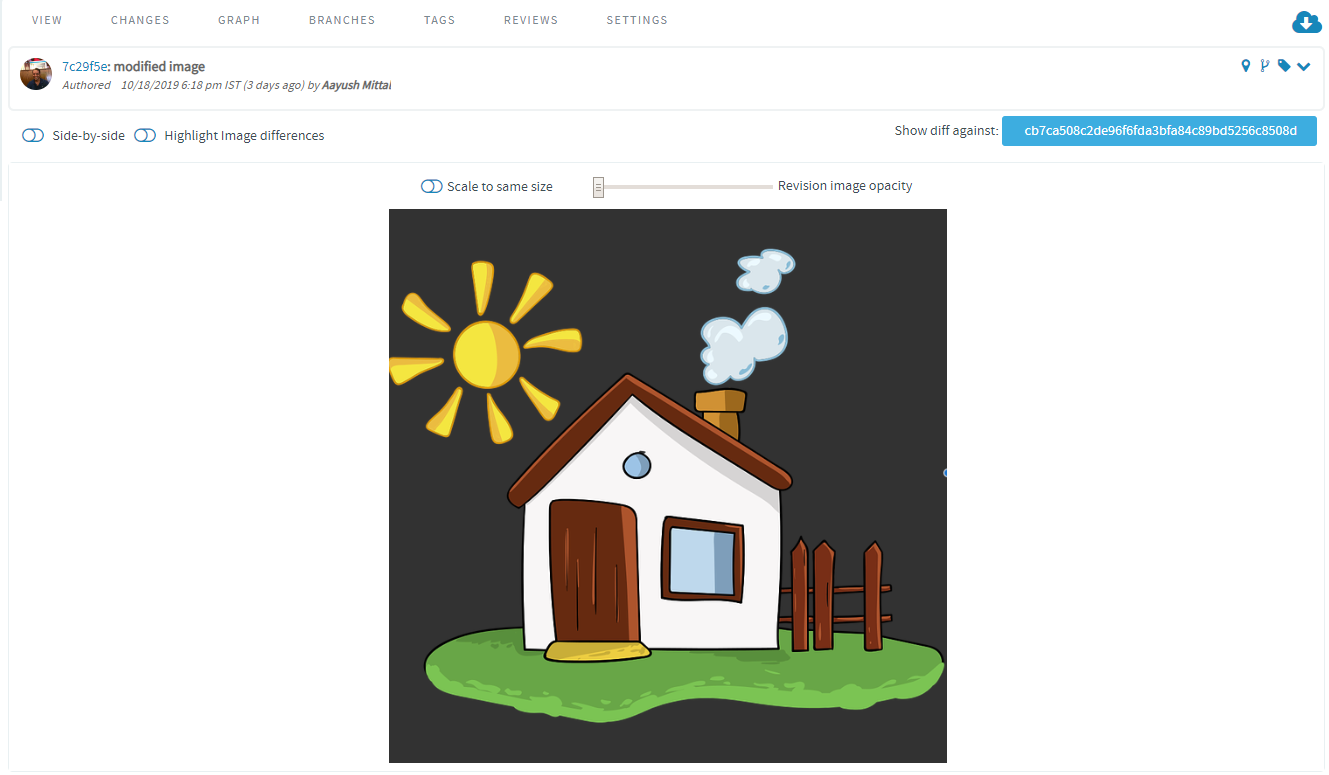
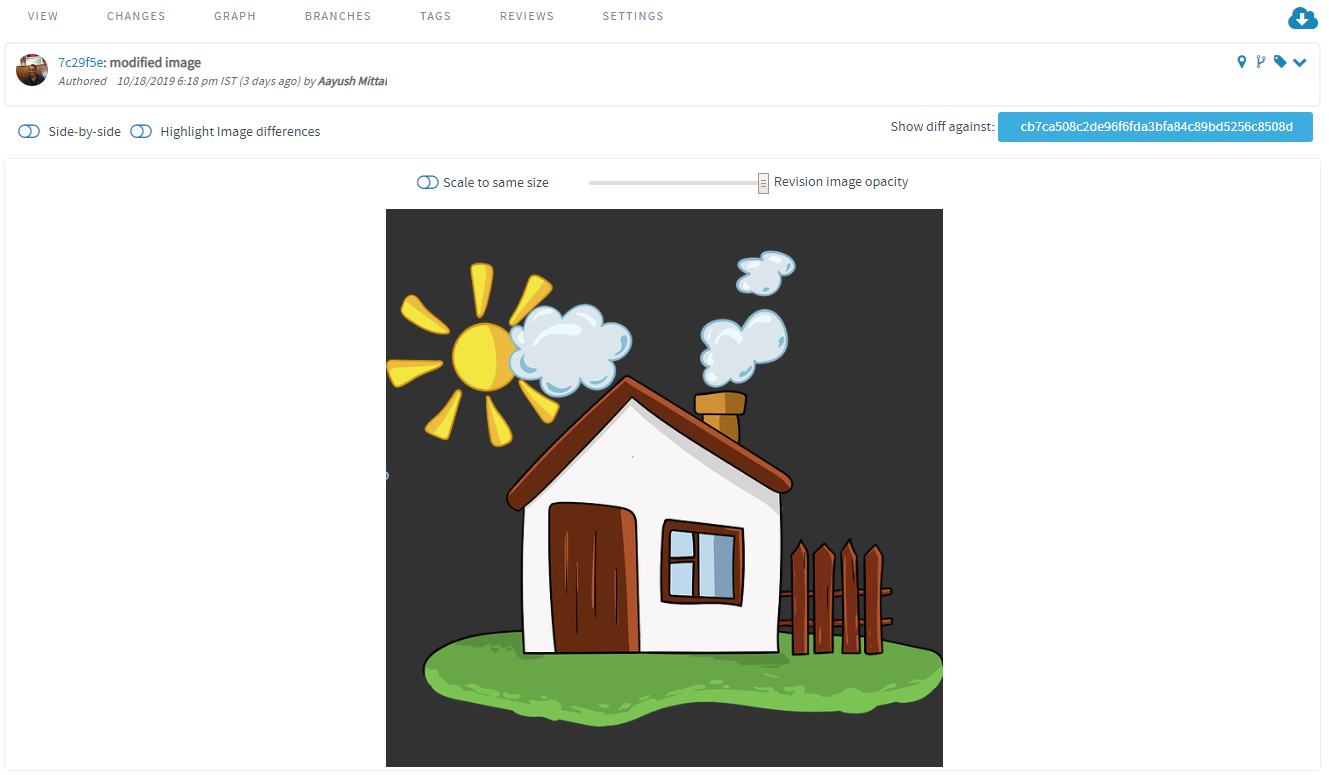
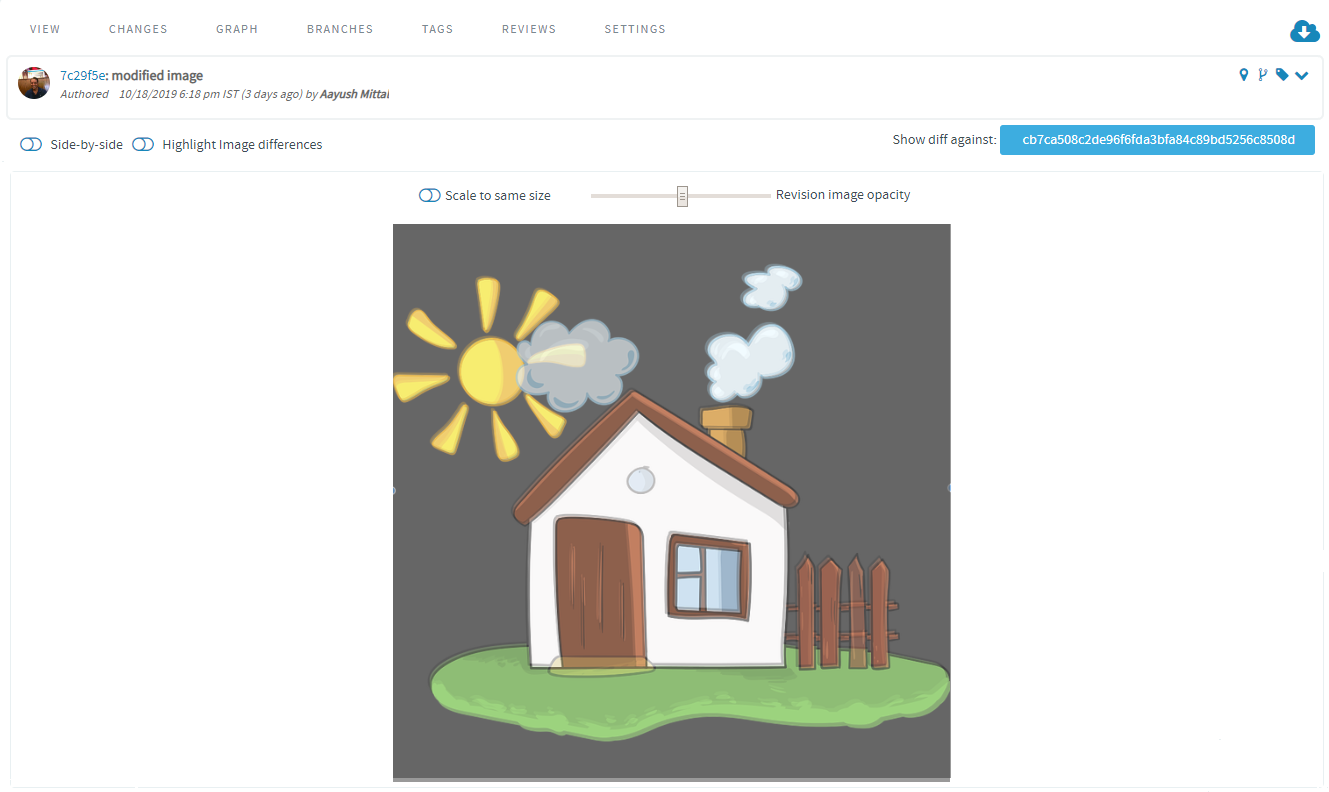
In this mode, which is shown by default, you can use the Revision image opacity slider to increase or decrease the opacity of both the base image and the revised image.
If you pull the slider towards the extreme left, you can view the base image.
Pulling the slider to the right end, shows the revised image.
With the slider in the middle, you can view the base image with revisions prominently shown at a single glance.
-
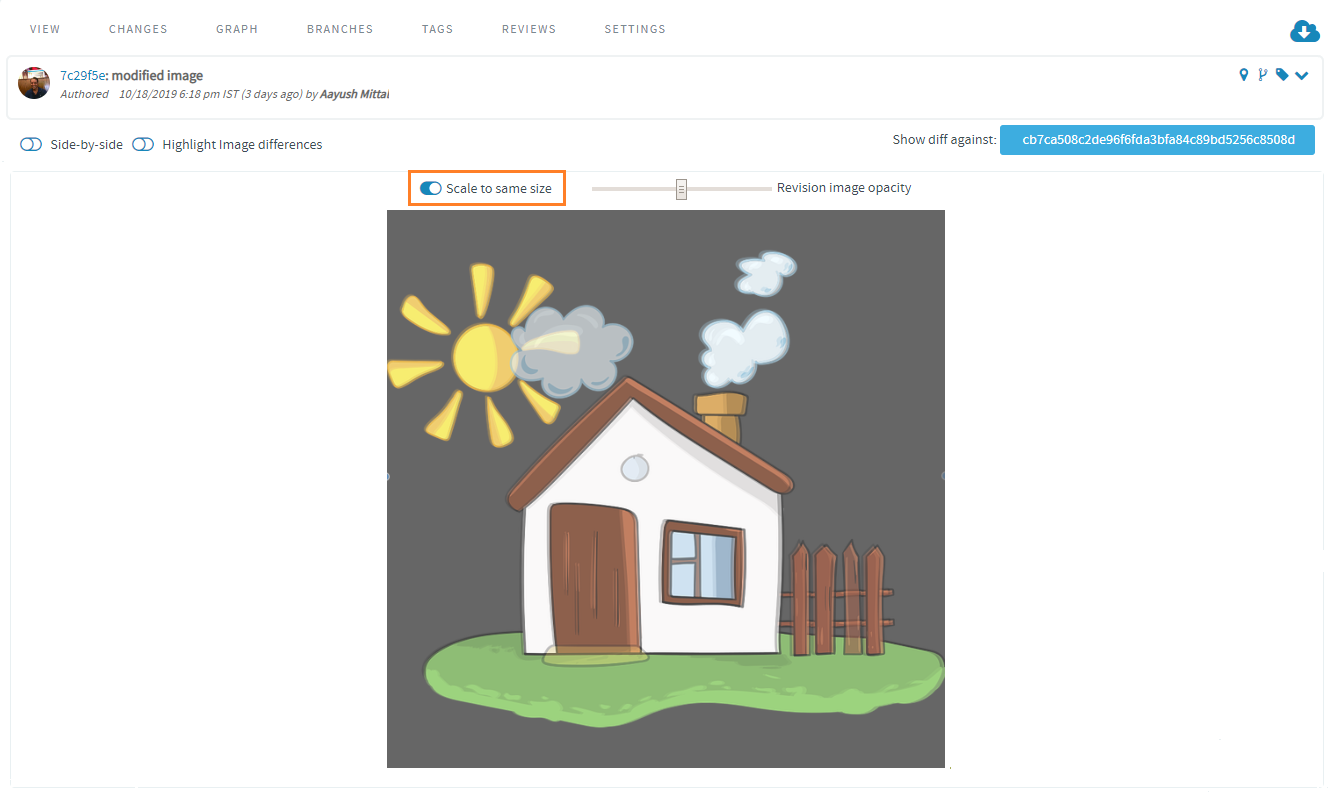
Enable the Scale to same size option, to scale both the versions of the image that differ in size, to fit into the frame.
Highlight Image Differences Mode
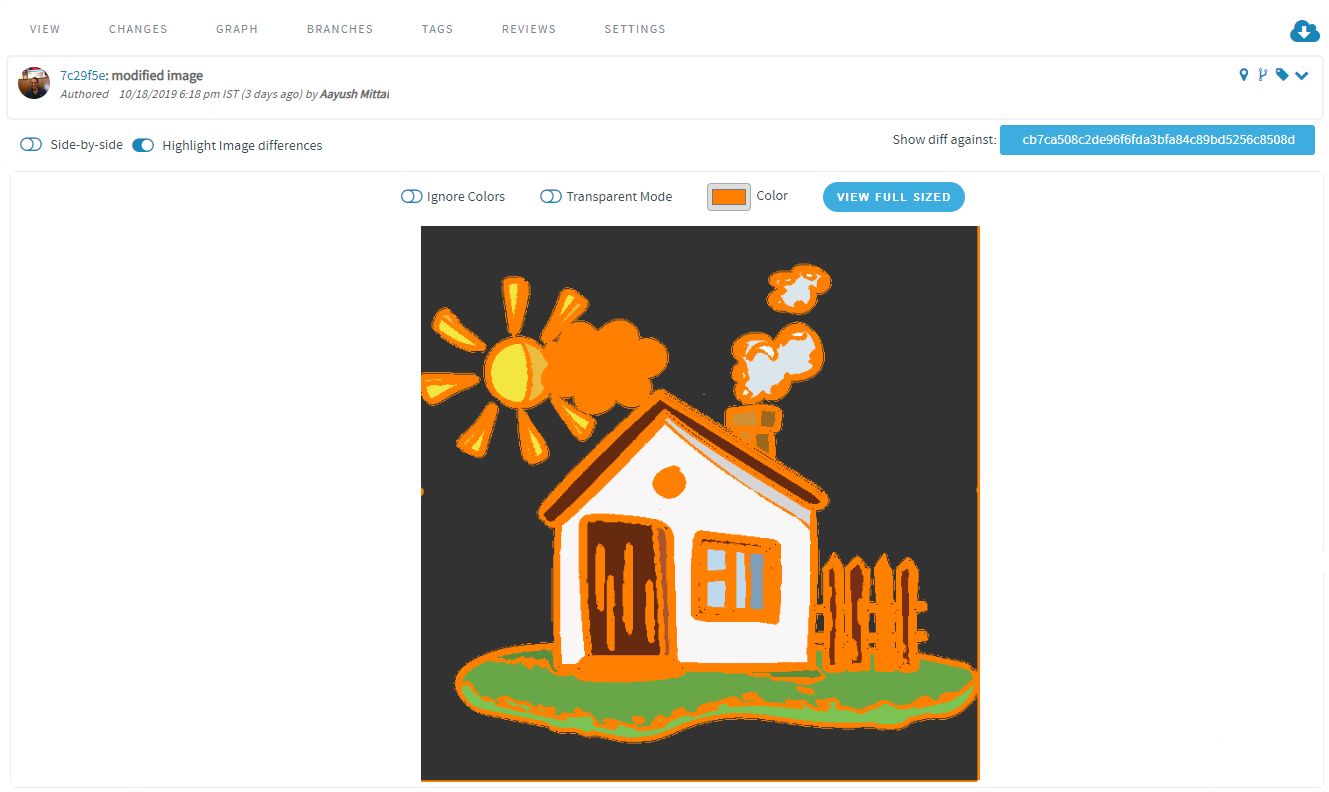
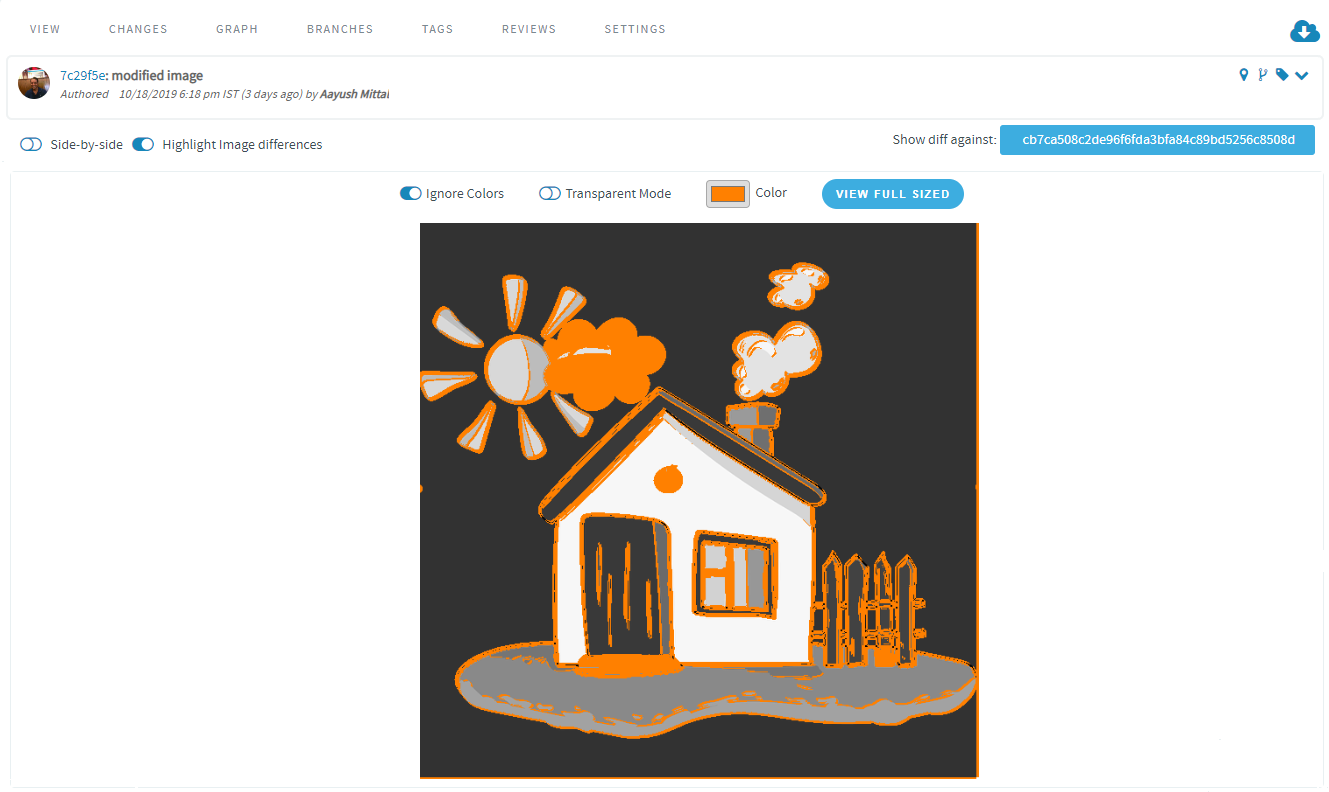
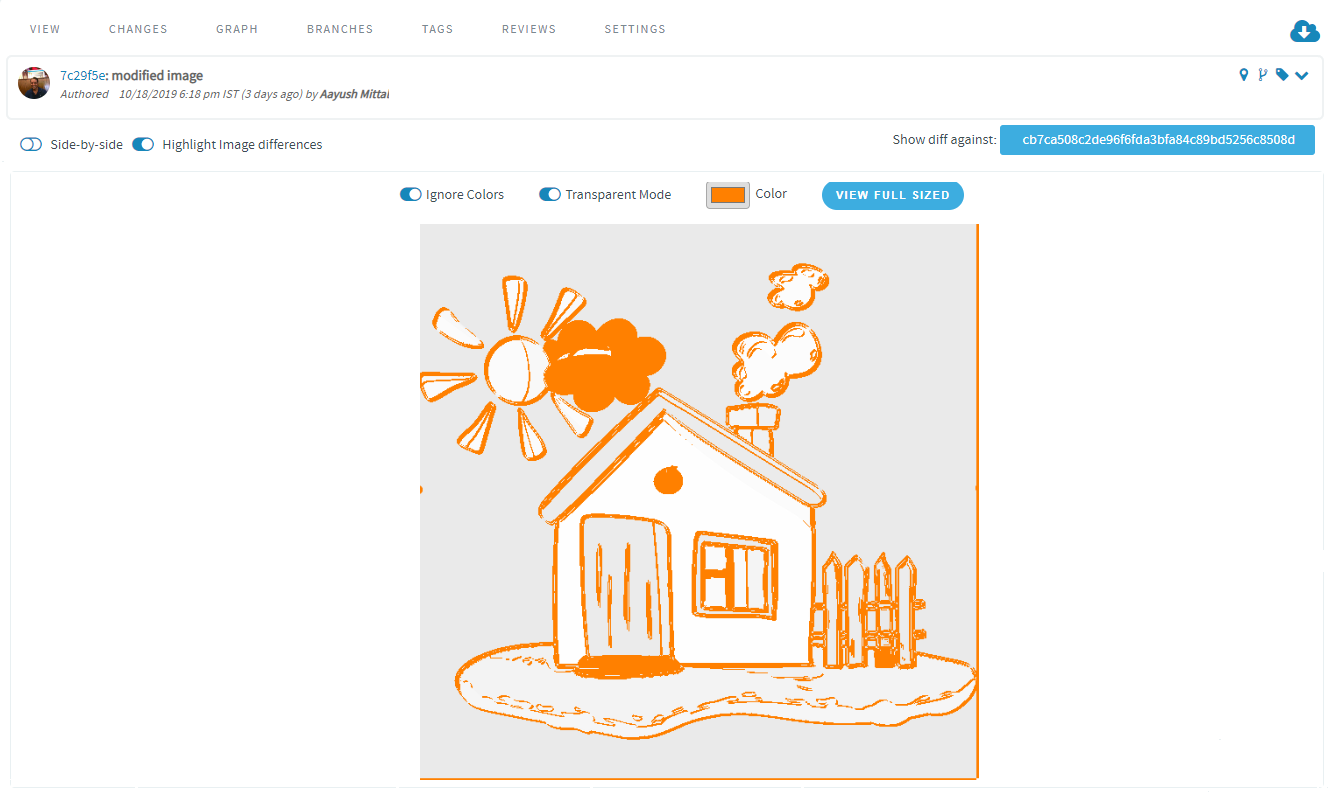
You can switch to the Highlight Image Differences mode, if you want the changes in the revised image to be highlighted using a color. You can also view the changes in a transparent mode.
Enable the Highlight Image Differences option to go to this mode. Two other options, Ignore Colors and Transparent Mode are shown in this mode. By default, these two options are disabled. You can select a color of your choice.
Highlight Image Differences" mode is not supported in Microsoft Internet Explorer.
-
Image with both the Ignore Colors and the Transparent Mode options disabled. Here, the pixel ratio of both the base and the revised images are similar.
-
Image with the Ignore Colors option enabled, and the Transparent Mode option disabled. You can clearly make out the revised parts of the image as they are shaded with the selected color.
-
Image with the Ignore Colors option enabled, and the Transparent Mode option enabled. Here, the unchanged portion of the image are transparent so that the revised portion are highlighted more clearly.
The threshold value for showing the changes is set to size 1200px X 1200px. Hence for images with size larger than 1200px X 1200px, only the changes included within this threshold value (1200px X 1200px) are shown and the changes in the remaining portion of the image are ignored and highlighted with the selected color.
You may want to view the image in its original size because in both the image opacity and the Highlight Image Differences modes, images of any size fit into the frame. To view the image in full size in a new tab, click the VIEW FULL SIZED button.
To view the image diff options for a committed image file on the
- CHANGES tab—Click and expand the change id.
- GRAPH tab—Click on a commit id.
- REVIEWS tab—Click any open or merged reviews that has the image changes and click on the Files tab.
The Changes Tab
This tab lets you view all of the commits that touched a specific path you are browsing within a branch or revision. Click a commit to view its details.
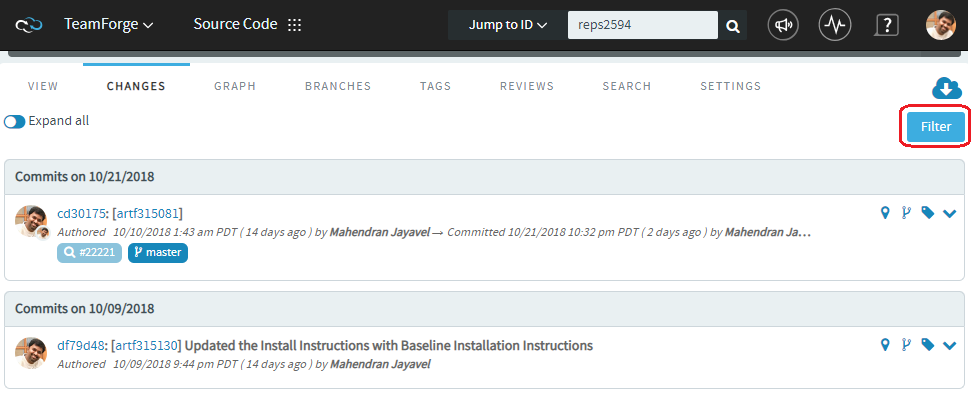
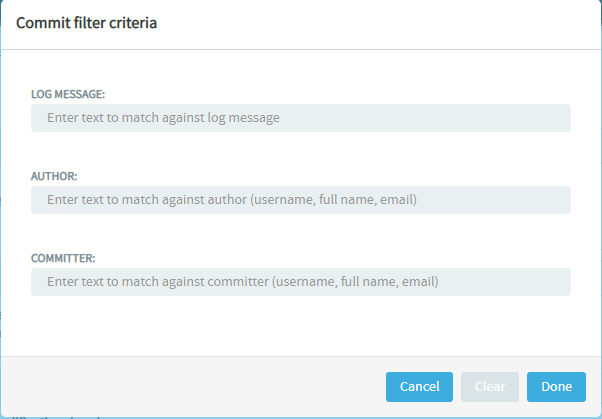
With more and more number of commits, the Changes tab can typically show a long list of changes. However, if you are looking for specific commits on a particular subject or commits made by a specific committer, you can filter commits further either by the log message, author or by the committer.
Just click Filter and type a keyword to search the log message or type the author or committer name and click Done. The list of commits would be filtered by the criteria you entered. You can clear the filter criteria anytime.
The Graph Tab
This tab provides a graphical representation of the changes made including branching and merging of repositories.
The Branches Tab (for Git)
This allows you to see all of the branches in the repository in their relation to the default (master) one. Using Compare Branch, you can see the commits in the branch that do not exist in the default branch.
Support for Protected Branches in Quality Gates
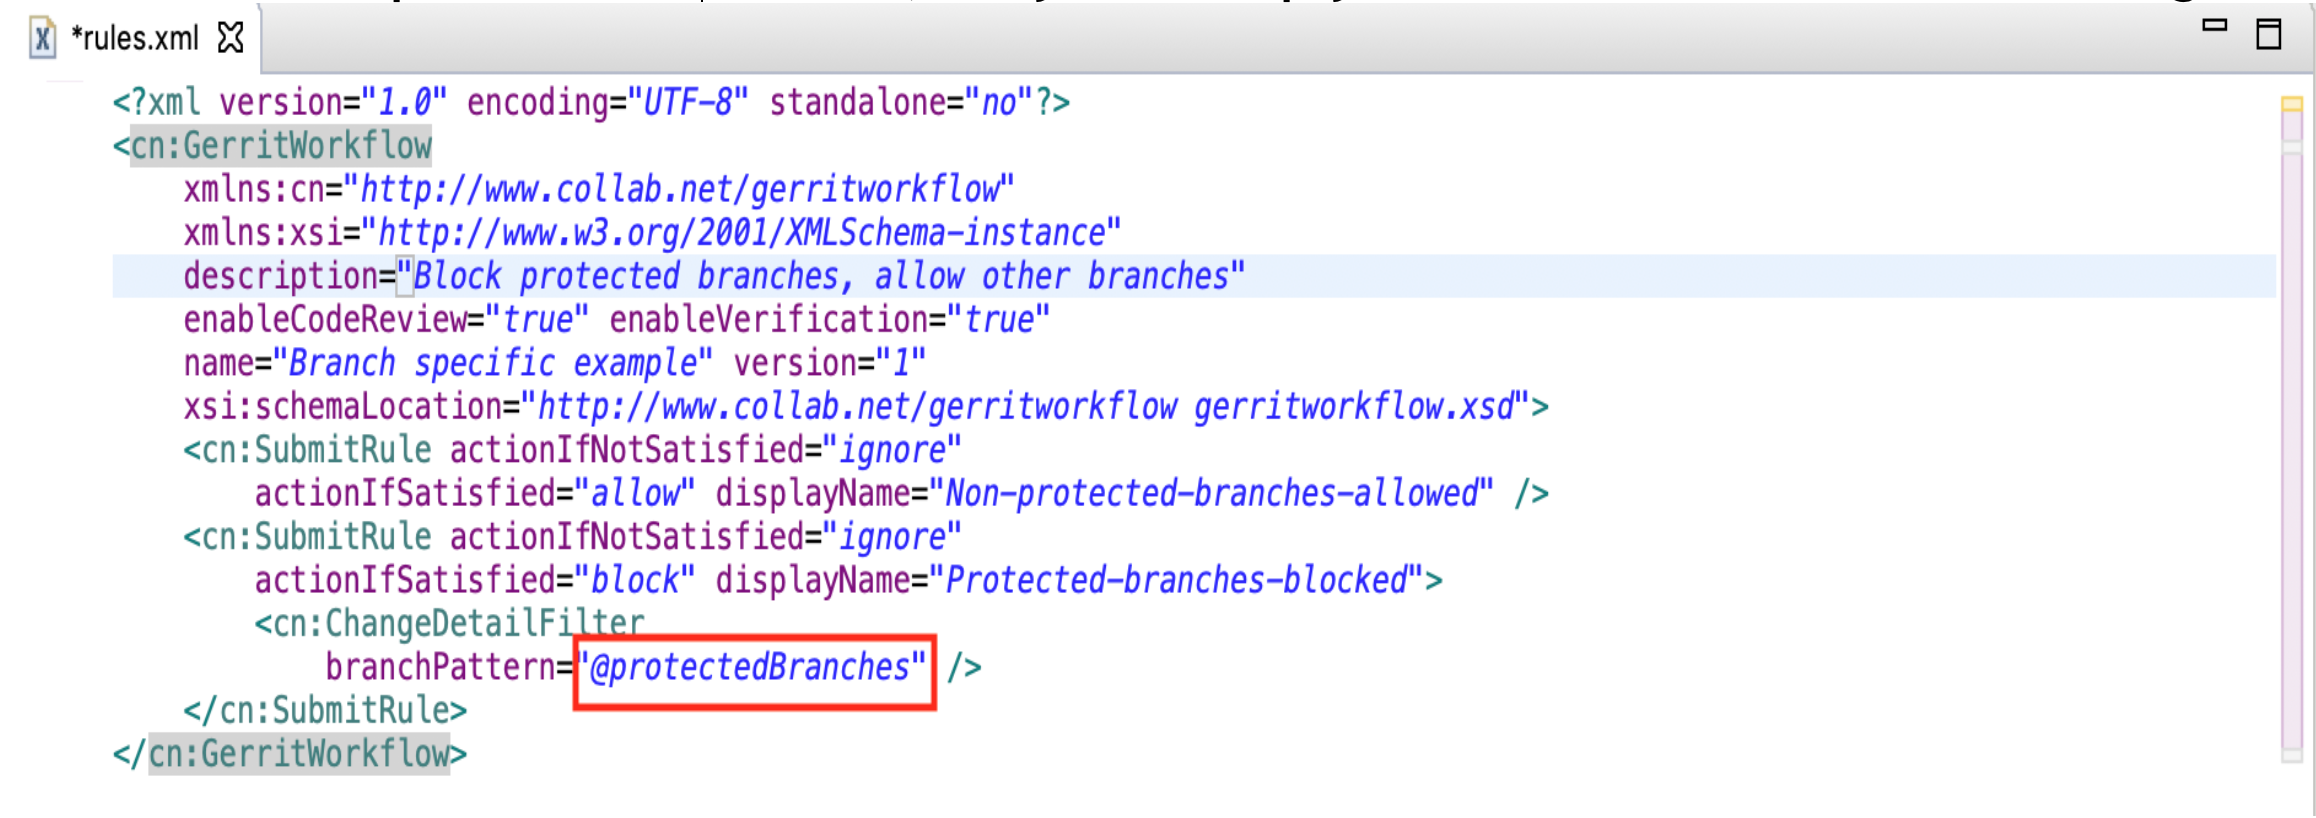
Quality gates can now be enabled for protected branches in a TeamForge project by creating a change detail filter and setting the branch pattern to annotation "@protectedBranches" in rules.pl file. This filter reads all protected branches that are configured in Settings > Policies tab of a TeamForge project and applies the configured submit rule to these branches. For instance, you can simply create the following rule to block any submission to protected branches:
The Tags Tab
This tab lets you create Git tags and tag specific points in history as being important. Typically, you can use this functionality to mark release points (v1.0 and so on) with an option to add Release Notes for the tagged version. Once you create a tag, you can use it to download source code as a zip/tar file and view the tag information in Changes and Graph tabs.
-
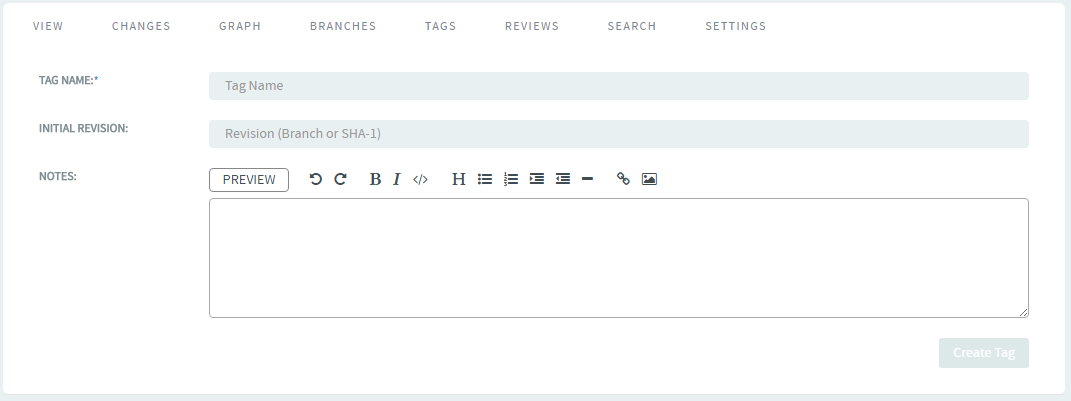
To create Git tags and tag specific points in history as being important (to mark release points, for example, v1.0, and so on), select the TAGS tab and click Create Tag.
-
Type a tag name and revision number and add a Release Notes for the tag. Click Create Tag.

Once you create a tag, you can use it to download source code as a zip/tar file and view the tag information in Changes and Graphs tabs.

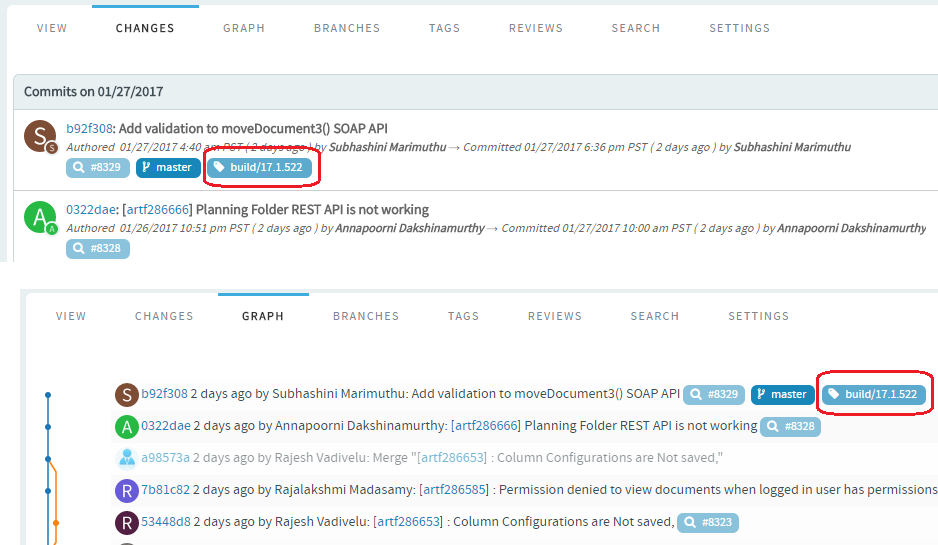
Multiple Tags for a Single Commit**: You can associate multiple tags, each with its own note, pointing to a single commit.
View Tags
You can view the tags of a given Git repository from either the List View or the Tree View subtab. Select the required tag to view its details.
-
List View—Displays the list of tags of a given Git repository.
-
Tree View—Displays the tags of a given Git repository in a tree structure. Select a tag from the new tree view to view its details on the right side of the tree view. In the tree view, the slash-delimited tags such as
build/release/subrelease/1.0.0.1can be viewed by navigating to the foldersubreleaseand selecting the tag1.0.0.1.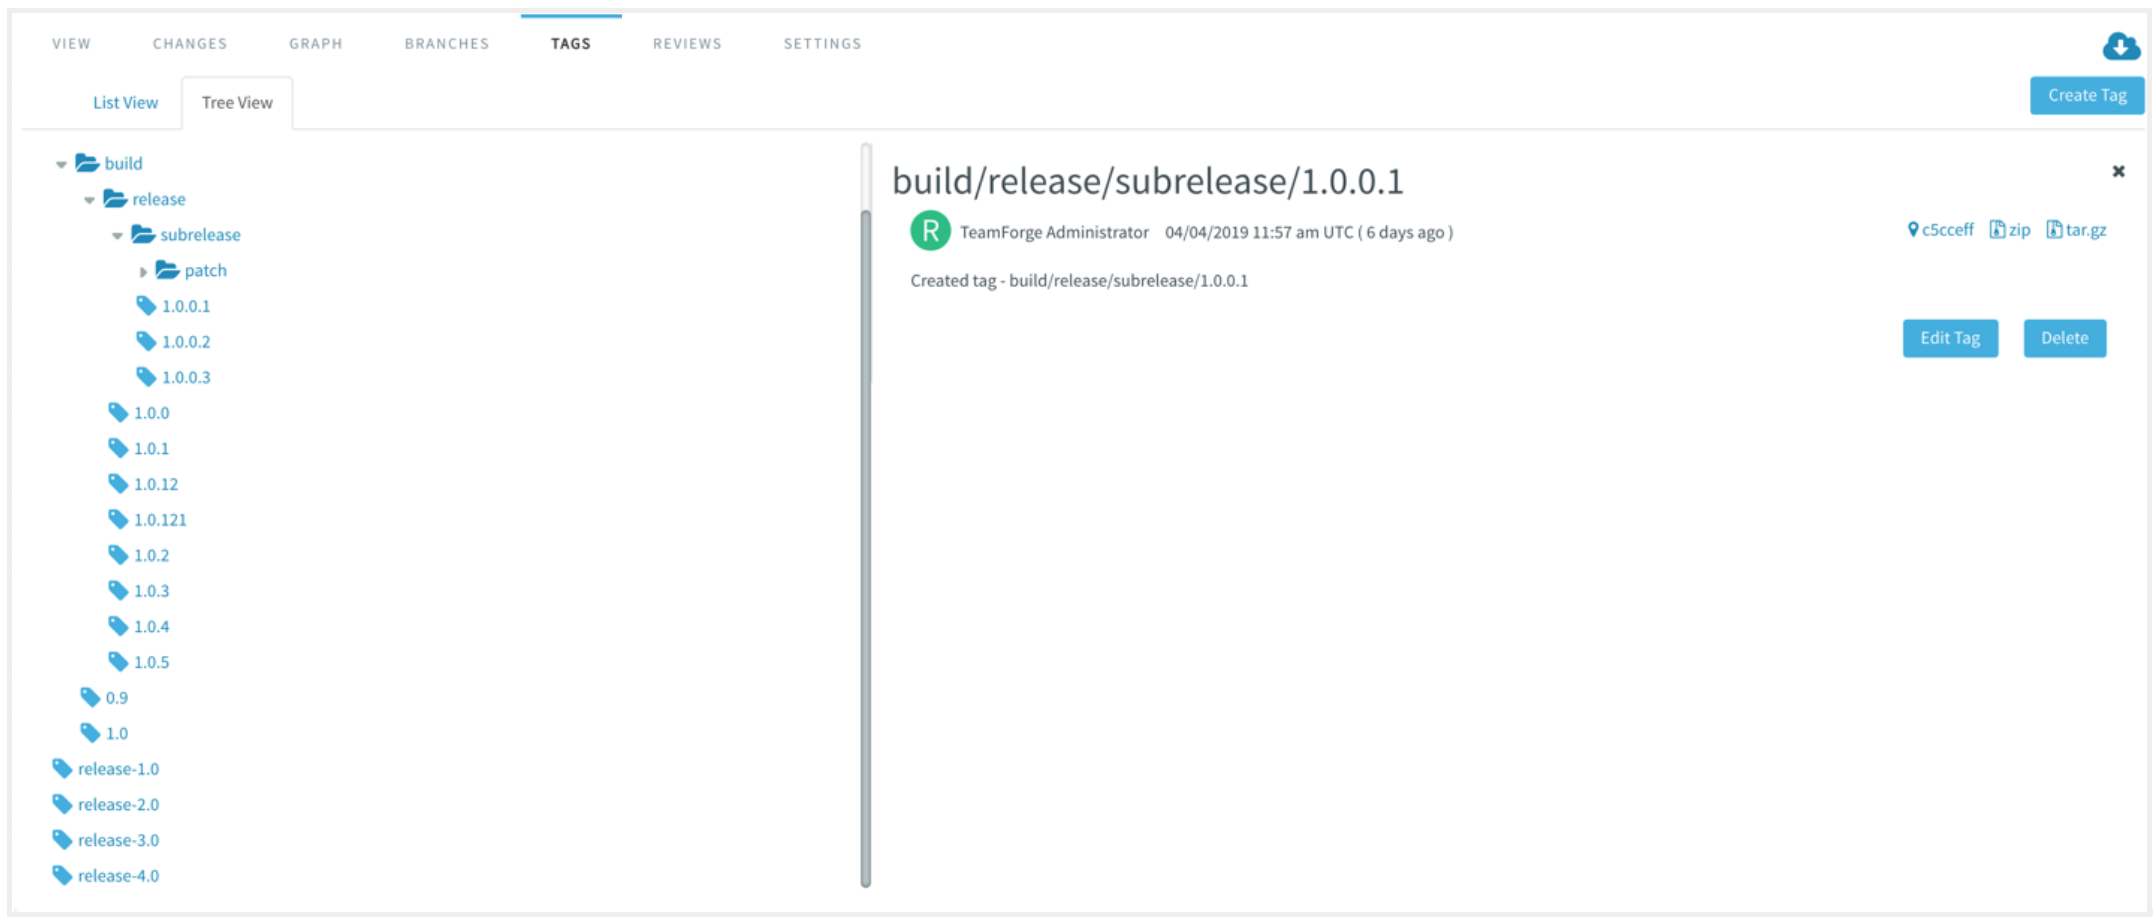
The Reviews Tab
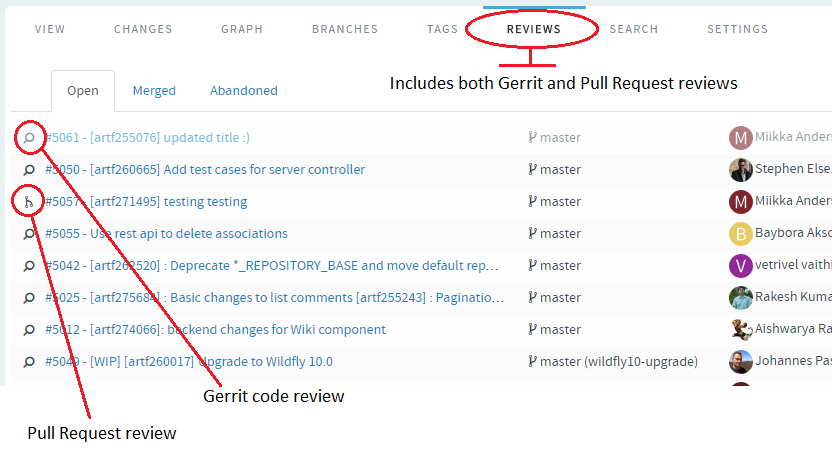
This tab lists all the Open, Merged, and Abandoned reviews, both Pull Requests and Gerrit single-commit reviews. Pull requests allow developers to collaborate with each other on a code change before merging it into another branch on a GIT repository. You can access this tab only when the repository owner has enabled this feature. For more information, see Pull Request: Step by Step.
-
Support for Both Pull Requests and Single-commit Gerrit Reviews: Supports all types of code review policies, which include Pull Requests and single commit Gerrit Reviews.
-
Auto Refresh When a Pull Request Changes: When a pull request changes, the page is automatically refreshed to reflect the changes.
-
Comments to Support @mentions: Inline comments are parsed for @mentions and users called out via @mentions are added as reviewers.
-
Open Your Gerrit Reviews in Gerrit's User Interface: A new button has been added to let you open your Gerrit Reviews in Gerrit's user interface.
-
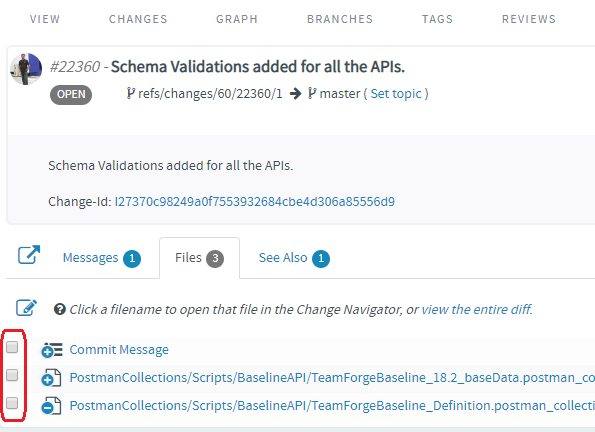
Check Boxes to Mark Files as Reviewed: With open code reviews, a check box is added to all the files listed in the Files tab. This check box is selected to mark files as reviewed when you open a file for review and close the file. You may also manually select or clear the check box to mark a file as reviewed or not respectively.
-
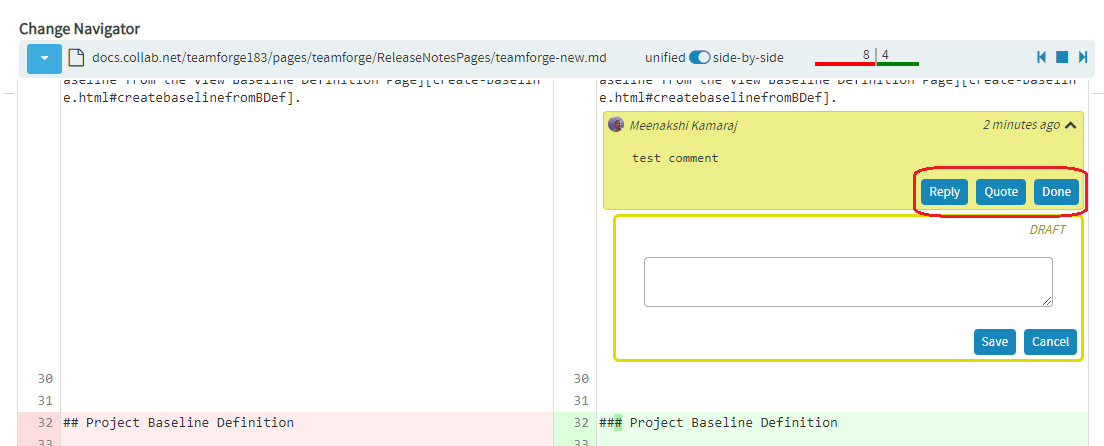
Reply to Comments During Code Reviews: You can now reply to comments added to files during code reviews. In other words, comments can now become a conversation/discussion during code reviews. You can also quote comments while replying to other's comments and mark comments as Done.
-
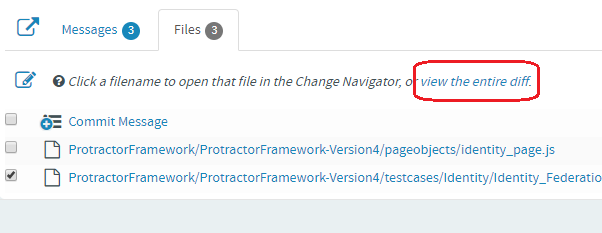
View the Entire Diff: Instead of reviewing files one-by-one, you can click the view the entire diff link on the Files tab and review the entire diff on the same page.
-
Private and WIP Reviews: You can now mark code review as
PrivateorWork In Progress(WIP), which comes in handy when you want to collaborate with others in private on experimental changes. With this enhancement, theDraftoption, which is used to mark code reviews as draft, is no longer available.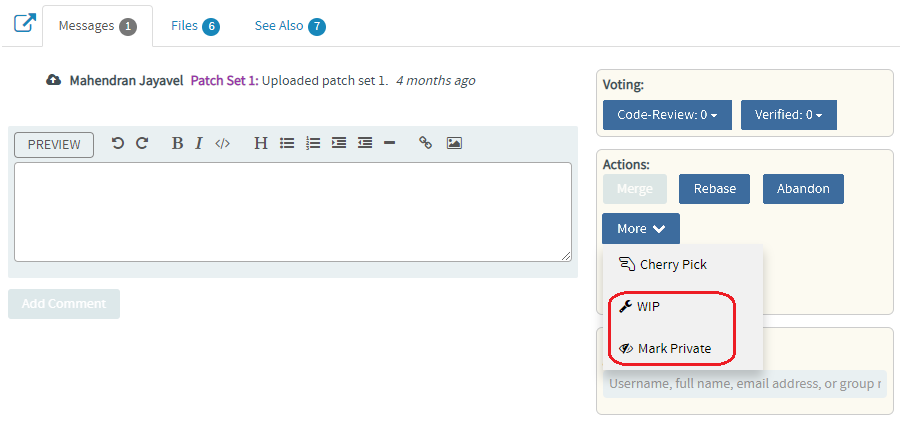
-
Ability to Diff the Change Against the Base or a Previous Patch Set: As part of the Gerrit review workflow, you now have the ability to diff the change against the Base or a previous Patch Set.
-
Markdown Support: Markdown support for all .MD files: Render Markdown files when viewed through Code Browser.
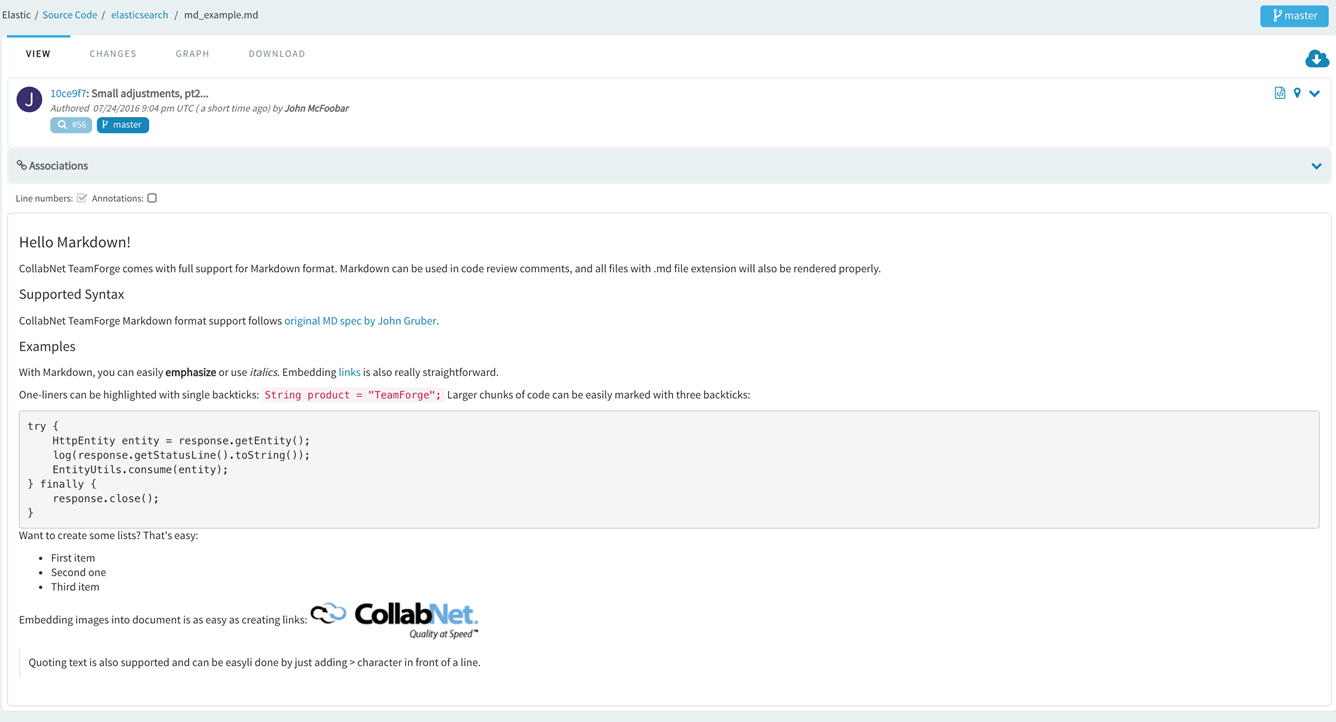
TeamForge uses Showdown—a bidirectional Markdown to HTML to Markdown converter written in Javascript. For more information, see the official Showdown Documentation. Here's an abridged version of the Markdown syntax documentation.
-
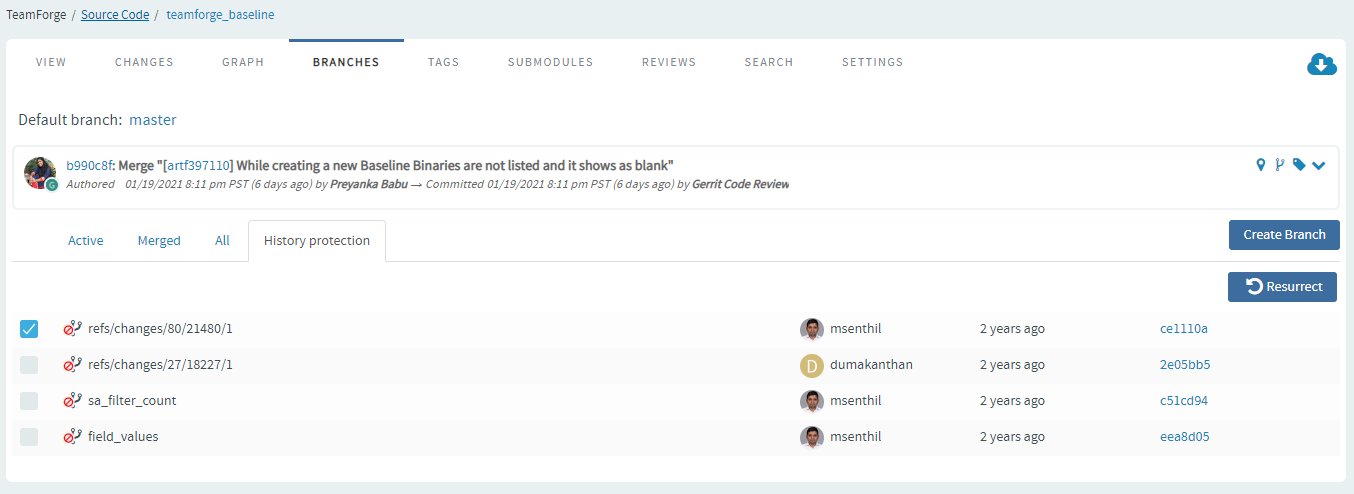
Mass Delete/Resurrect Options: Mass delete/resurrect options in History Protect tab:

-
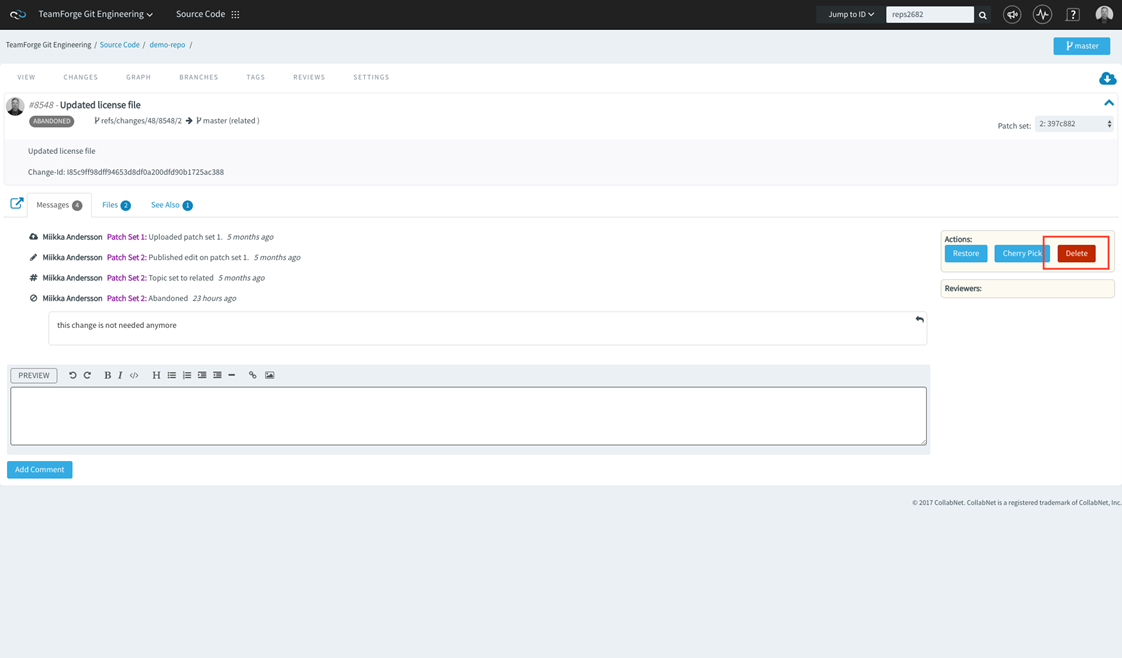
Delete abadoned reviews: To delete an abandoned review, open the review in the code browser and click Delete from Actions.
-
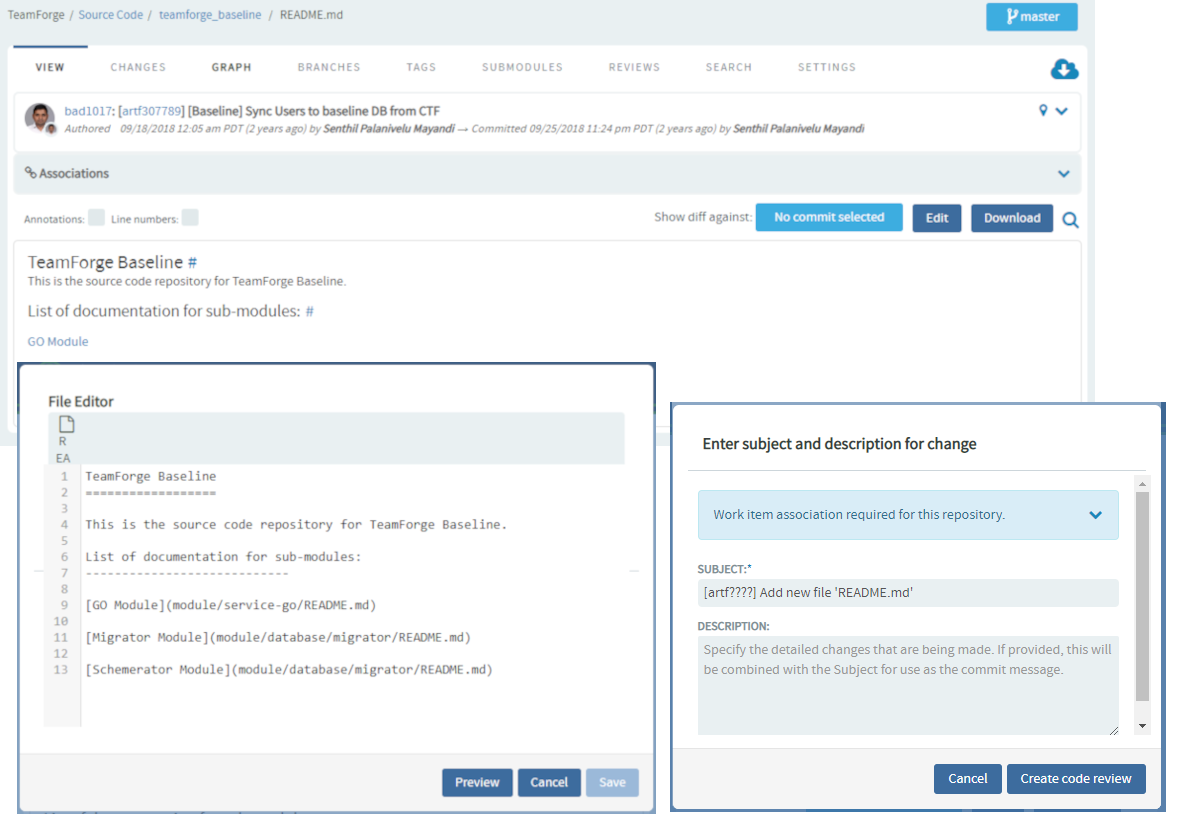
Inline Editing of Files: Quick changes to files, if required only to few files, can be done using the inline edit feature from within the code browser without having to clone an entire repository. Browse the repository, locate and open the file in the View tab, click Edit to open the file in the File Editor, make your changes, Create code review and Publish your changes for review.
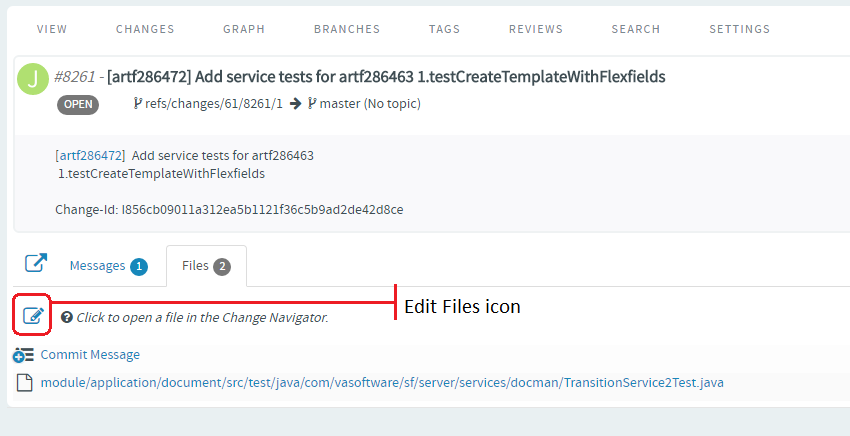
You can add new files to a review and delete files from a review by click the Edit Files icon and then the "+" and "-" icons respectively.
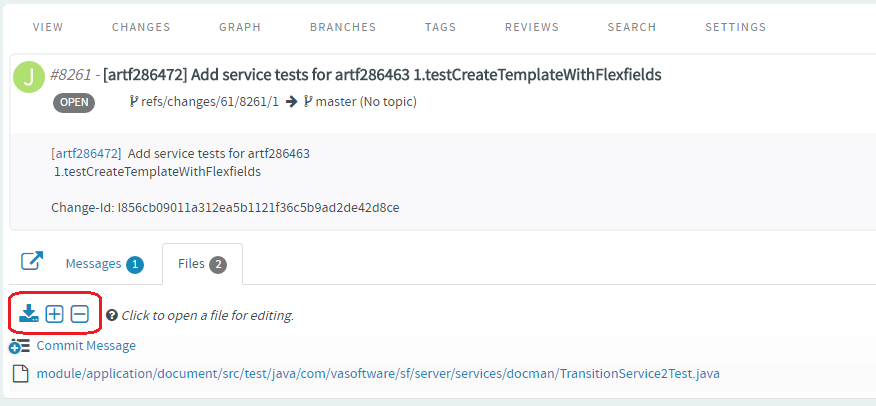
Type the name of the file to see results matching the file name, select a file and click Add File.
Type the name of the file you want to delete to see results matching the file name, select the file and click Delete File.
Click the Complete File Edits icon.

-
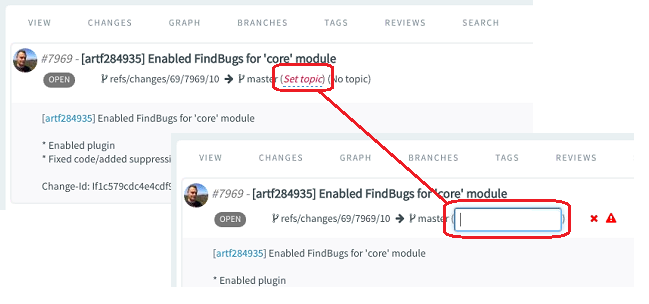
Submit Whole Topic: You can now bundle related changes (code reviews) by topic and submit the whole topic for review instead of just submitting changes one-by-one. Just open a review, click the Set Topic link and enter the topic name.
-
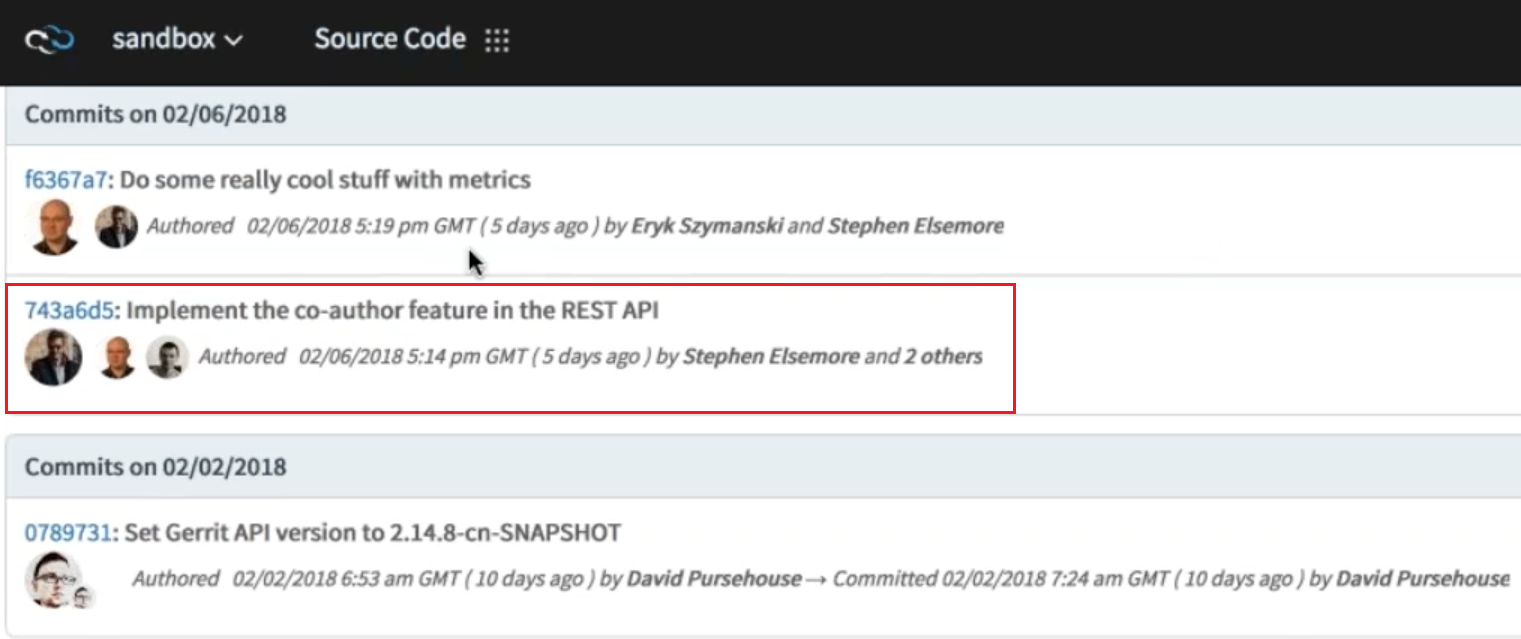
Add Coauthors in Commit Message: The coauthor name is also included as part of the author avatar and Authored by information on the changes list, whenever a change is done to the "Co-authored-by" footer text. More information can be seen in change details view.

-
Option to show only files with review comments—By default, all files with or without the code review comments are shown on the Files tab view. Select the check box Commented files only, if you want to see only the list of files that have review comments.

-
Review comments to unchanged lines of code—Code review comments, added to lines of code that have not been modified as part of the code change, are now visible in the UI.
-
Improved user experience with review rules
-
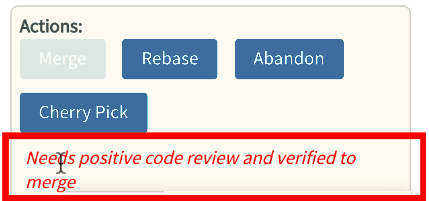
Active review rules are displayed on the Actions panel.
-
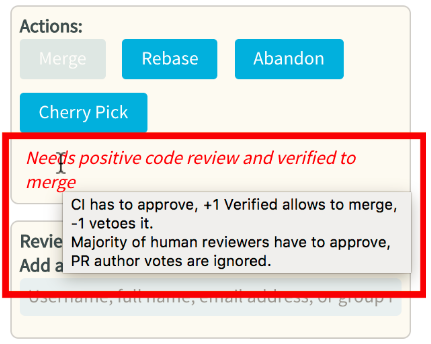
Review rules description is added as a tooltip on the Actions panel. The tooltip describes which rule is violated and what steps need to be performed moving forward.
-
-
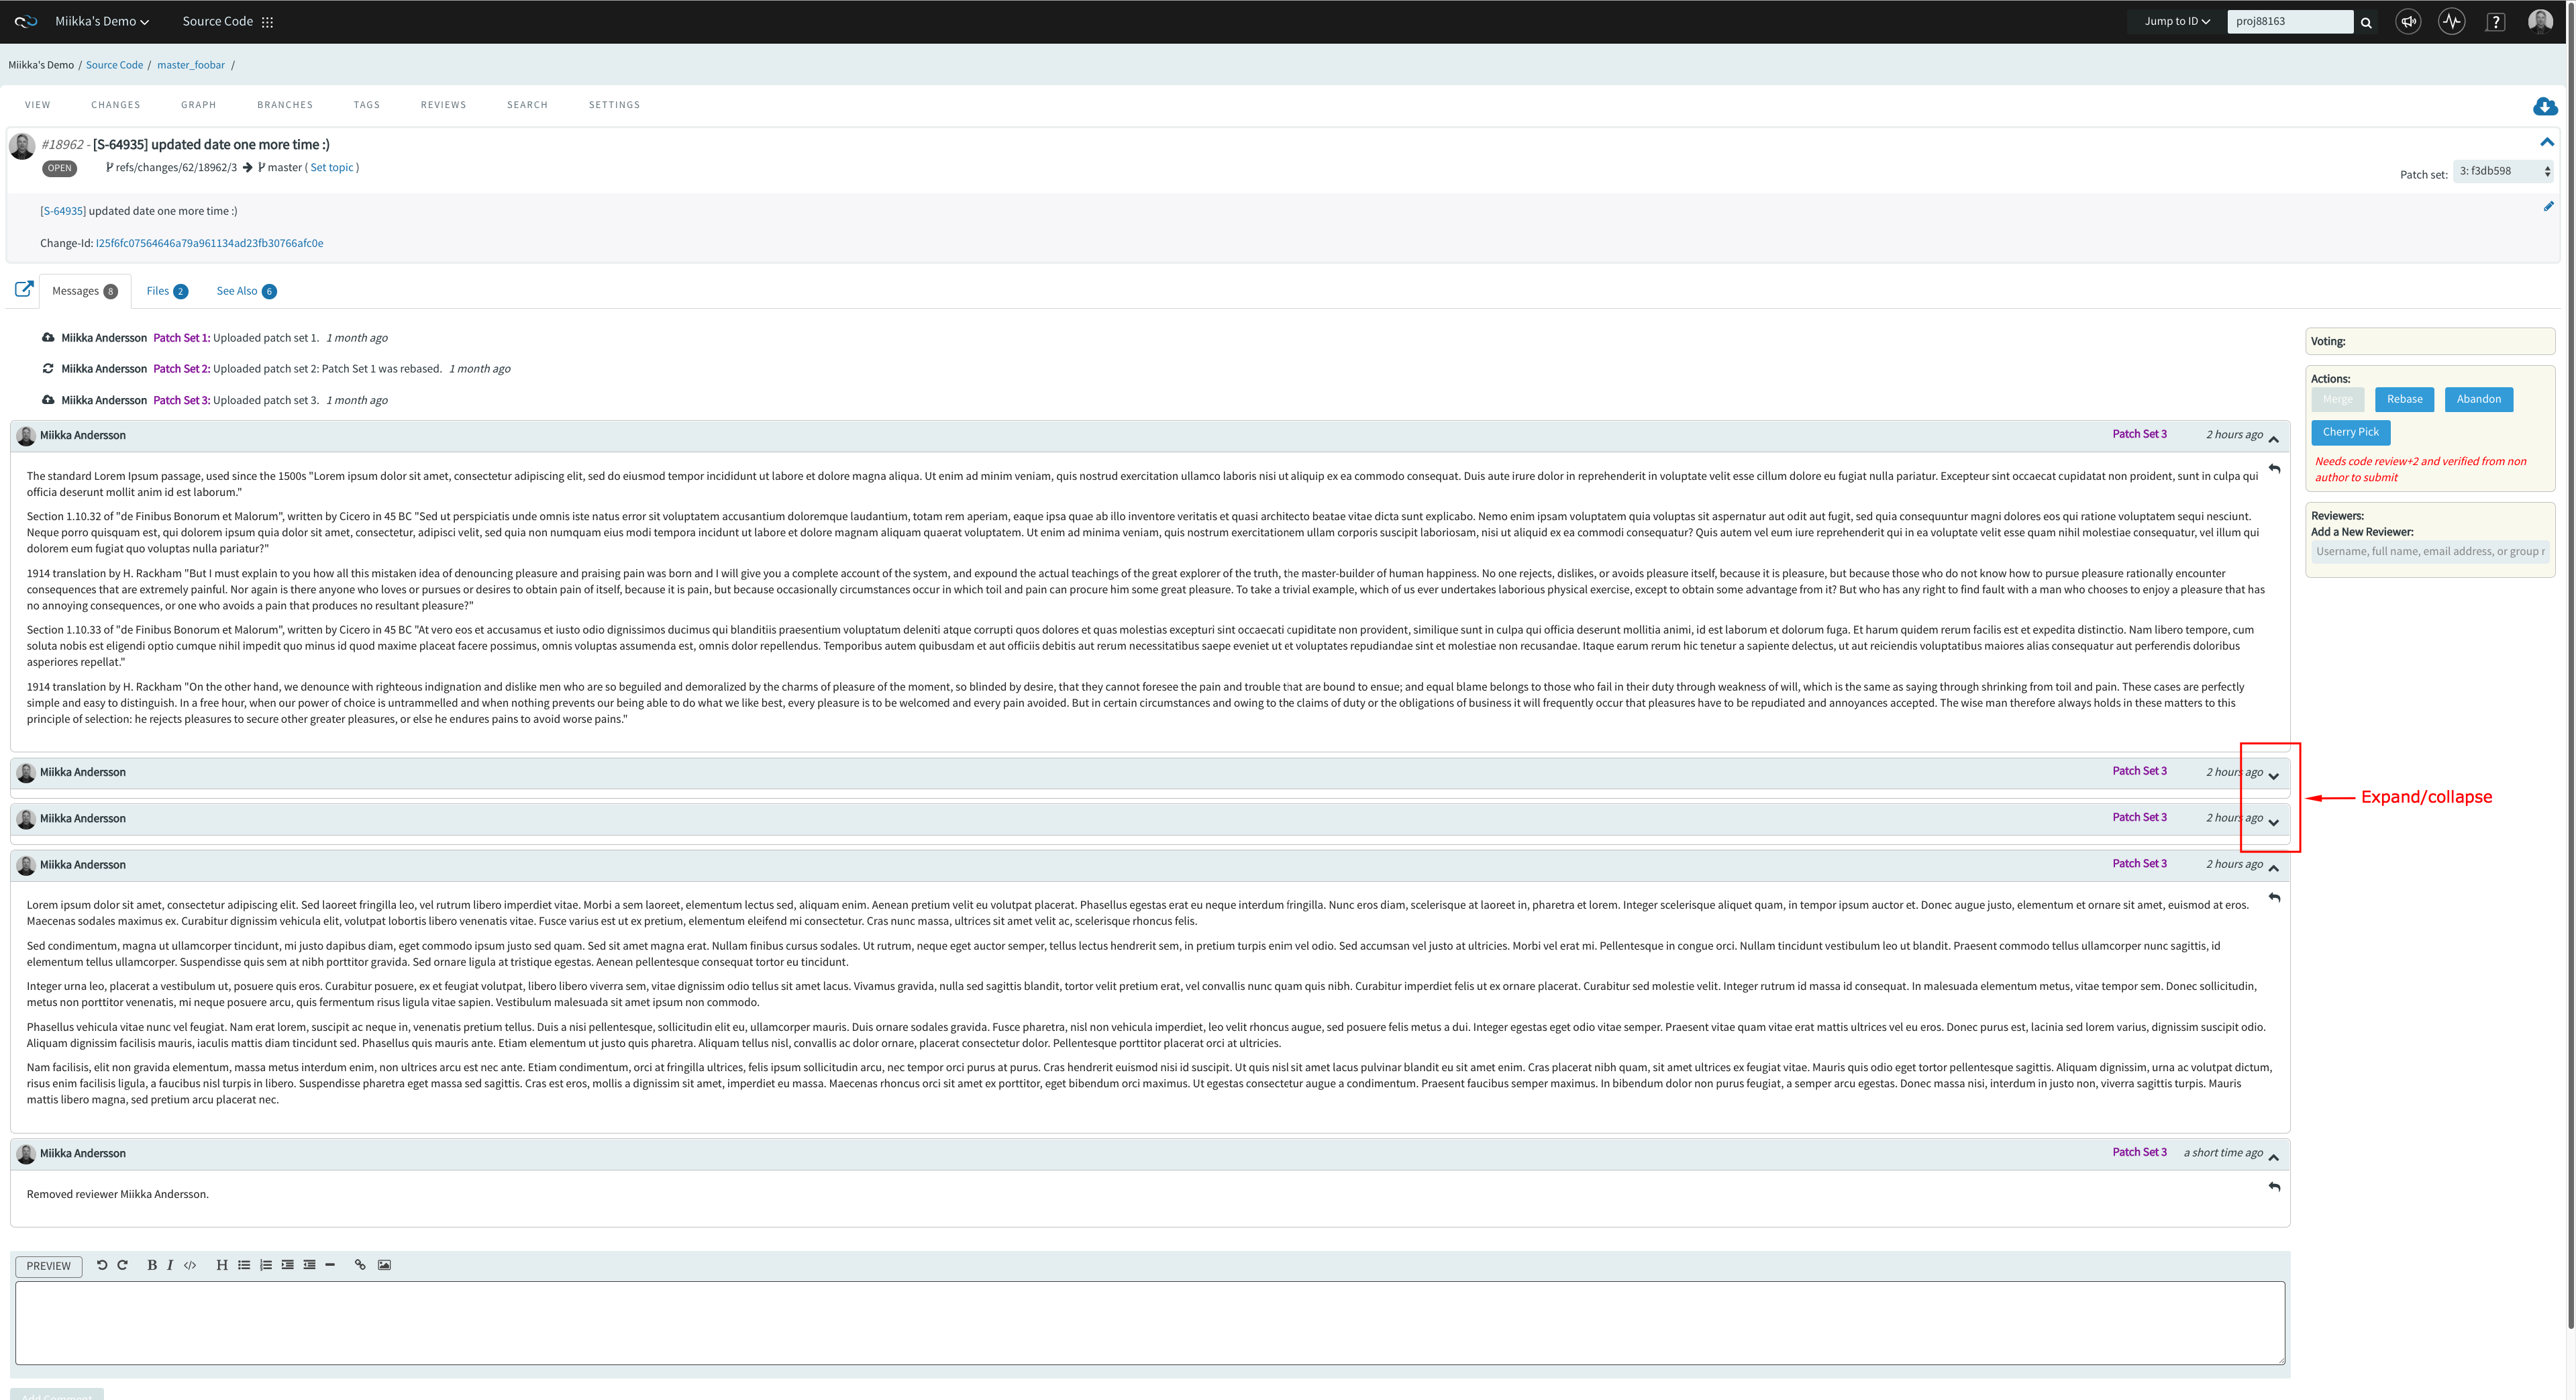
Hide/Show details for code review comments—Allows toggling visibility for long review comments (having lot of log snippets or images) using the Expand/Collapse option.
-
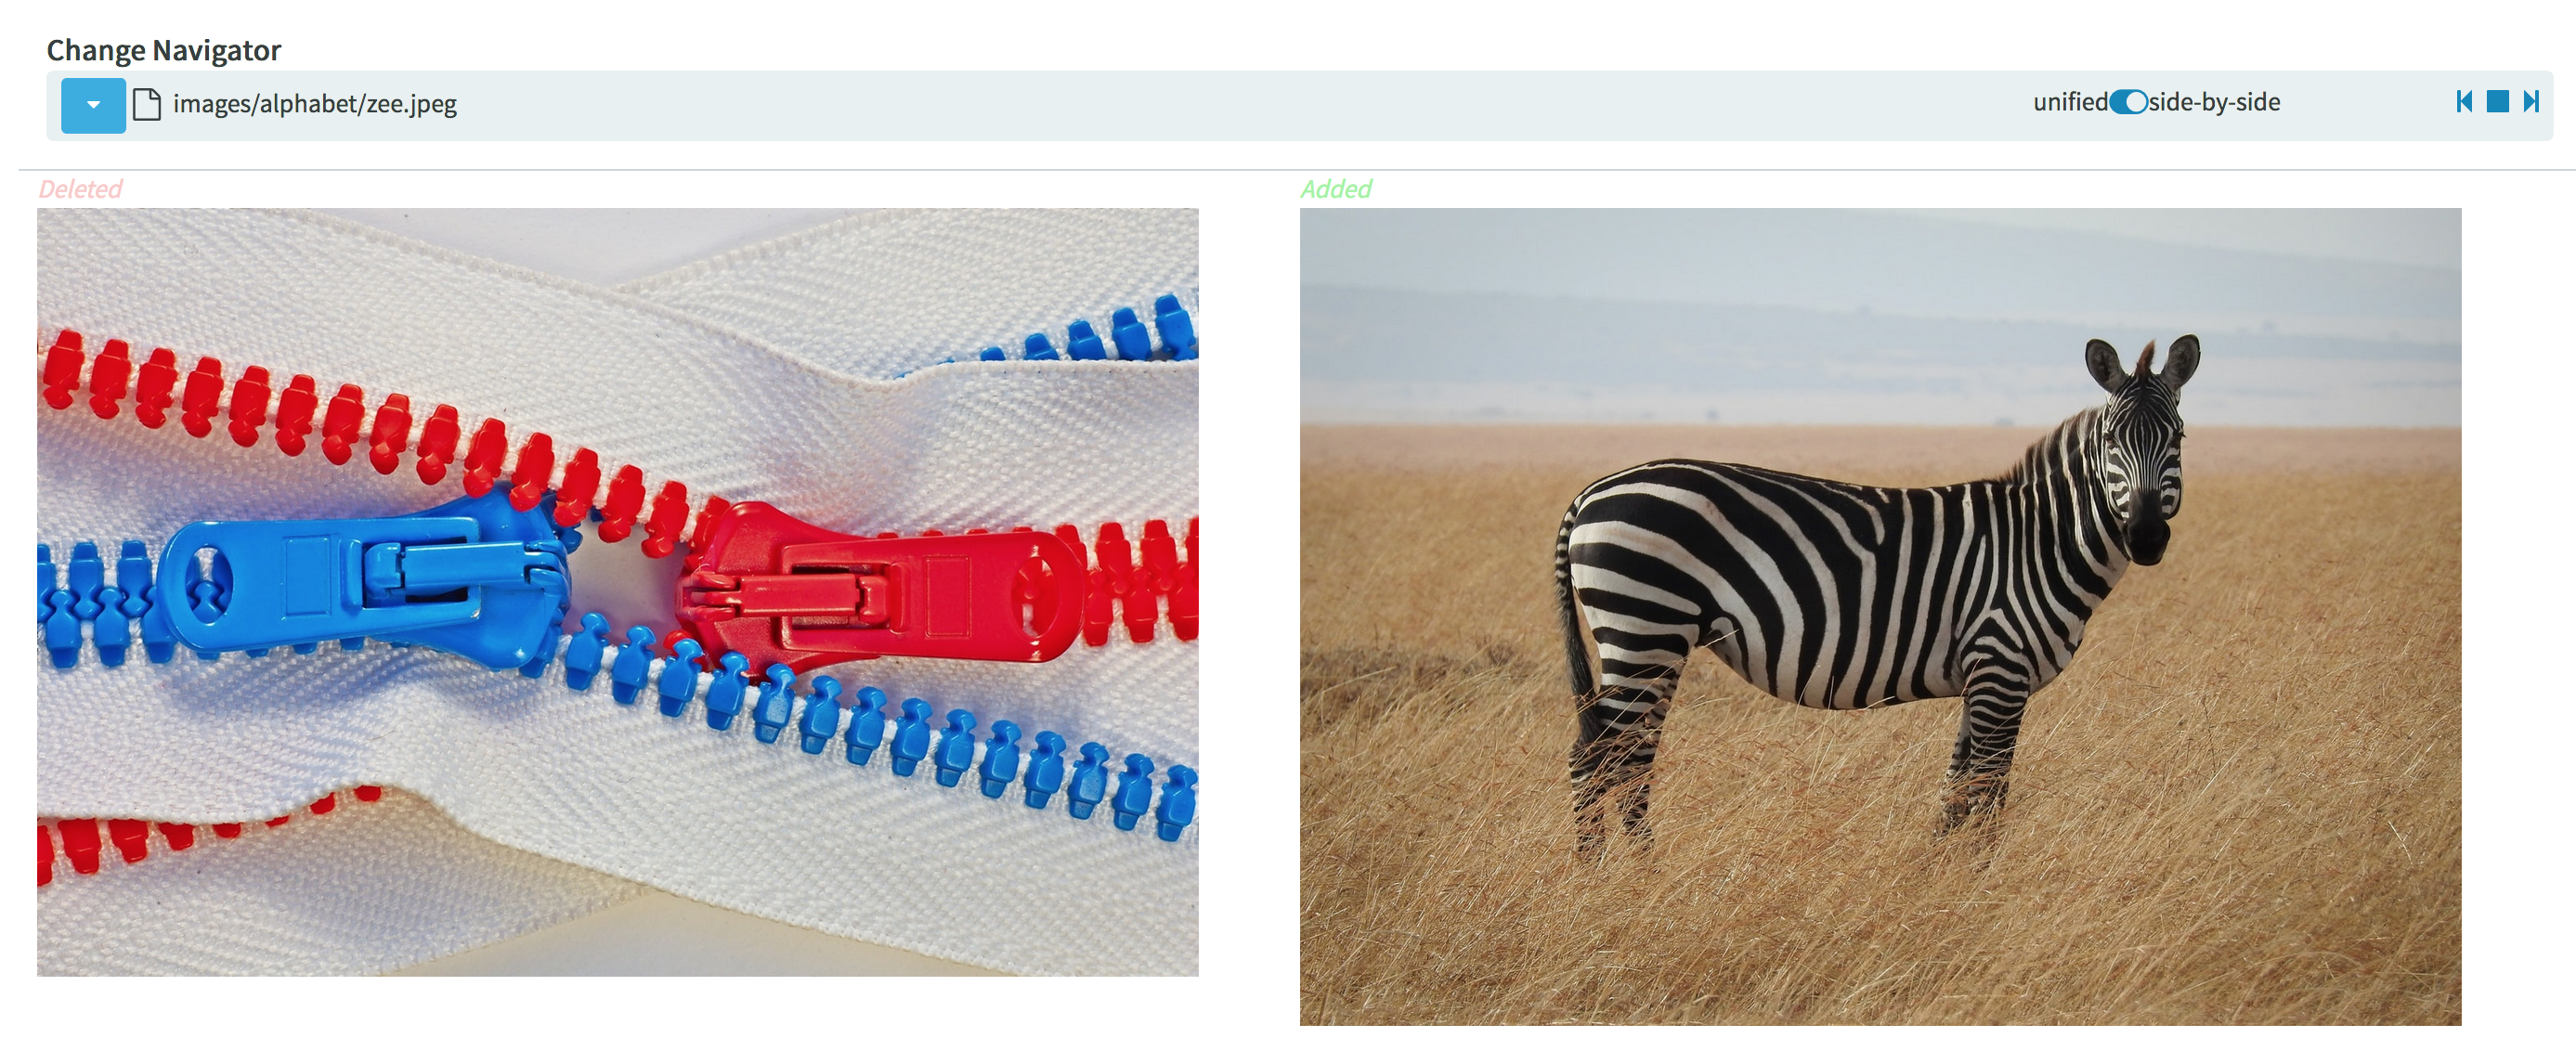
Show old and new images in code review Diffs for merged requests. Old and new images are now shown in code review diffs for merged requests.
The Search Tab
This tab lets you search for code via TeamForge Code Search powered by Elasticsearch. You can search all files in a repository or narrow your scope to specific file types such as C, C++, C# and so on. Type your search keyword, select a file extension (optional) and click Search. For more information, see Search Code.

The Settings tab
This tab lets you configure the repository settings for both Git and SVN as follows:
- General Repository Settings
- Policy Settings
- Replica Settings
General Repository Settings
In the General settings tab, you can configure the repository details such as:
-
Name—Name of the repository.
-
Description—Description about the repository.
-
Server—Server to which the repository is connected. Value includes the repository type (Git/Subversion), hostname, and the system ID.
Example for Git:
<pre>
Git v1git.cloud.maa.collab.net (exsy1002) | | | | | | (repository type) (hostname) (system ID) </pre>
Example for Subversion:
<pre>
SVN (v1svn.cloud.maa.collab.net) (exsy1003) | | | | | | (repository type) (hostname) (system ID)
-
Folder—Project folder that contains the repository.
Policy Settings
You can set up the policies required for both Git and Subversion to work as configured.
The following table provides the policy fields applicable for Git and Subversion.
| Policies | Git | Subversion |
|---|---|---|
| Default Branch | ||
| Protect History | ||
| Repository Category | ||
| Submit Type | ||
| Git LFS Enabled | ||
| Max LFS Object Size | ||
| Association | ||
| Index | ||
| Monitoring | ||
| Webhook URLs | ||
| Custom Object ID Mappings |
Default Branch
The default branch is the base branch in your repository, against which all pull requests and code commits are automatically made.
The default branch of a remote repository is defined by its HEAD. For convenience reasons, when the repository is cloned, Git creates a local branch for this default branch and checks it out.
master acts as the default branch of a Git repository, unless you specify a different branch. A Source Code Administrator can change the default branch on the repository.
Protect History
History protection archives rewritten changes and keeps backups of deleted branches. If history changes occur, an immutable backup ref is created in the remote repository, notification emails are sent to all members of the Gerrit Administrators group, and an event is logged in the audit log.
For more information, see History Protection.
Repository Category
You can control all Gerrit Code Review features directly from TeamForge by specifying a code review policy.
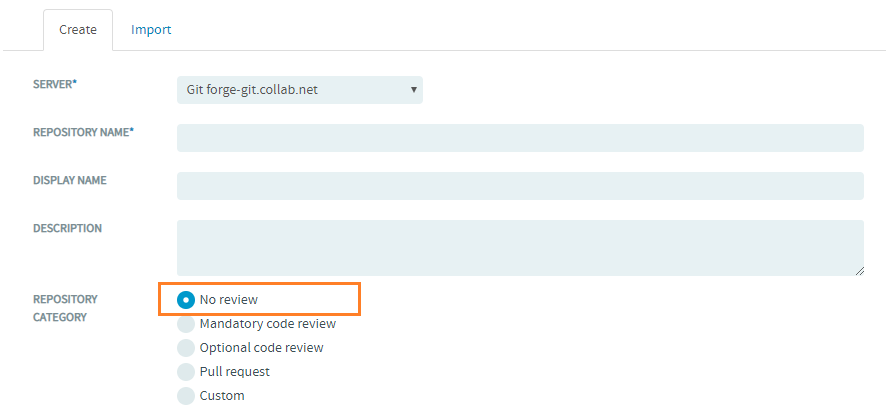
For more information on code review policies, see Control Your Code Review Policy.
Submit Type
Gerrit uses Submit type as the method to submit a change to the project. The submit type defines what Gerrit should do on submit of a change if the destination branch has moved while the change was in review.
For more information on submit type, see Submit Type.
Git LFS Enabled and Max LFS Object Size
Git Large File Storage (LFS) is a Git extension for versioning large files. Git LFS replaces large files such as audio samples, videos, datasets, and graphics with text pointers inside Git, while storing the file contents on a separate server (typically a remote server).
For more information on Git LFS, see Set up LFS.
Association
Create associations between code commits and other Digital.ai TeamForge items, such as tracker artifacts or documents, to help define relationships, track dependencies, and enforce workflow rules.
For more information on associating code commits, see Associate Code Commits.
Index
Select Repository content will be available in search results to index the content of the repository and to make the repository content available in search results.
Monitoring
For security reasons, you may want to restrict email notifications to the essential information. If so, select Hide Details in Monitoring Messages
Webhook URLs
Webhooks can be configured both at a project level or for select repositories. Once set up, SCM events such as commit and merge are published to the Webhooks for other applications to consume.
For more information on setting up webhooks for repositories, see Set up Webhooks for Repositories.
Custom Object ID Mappings
Custom object ID mapping is a process in which you define a combination of regular expression and link URL that is used to dynamically create hyperlinks of custom object IDs used in commit messages. For example, you can define a custom object ID mapping to automatically linkify objects of an external application.
For more information on linkifying custom object ids, see Linkify Custom Object IDs in Code Browser.
Replica Settings
In this section, you can see how to add the Replica Server(s) to a Git repository or a Subversion repository. The Git or SVN repository is then replicated on the Replica Server(s) added to it.
Replicate a Git Repository
Before you replicate can replicate a Git repository, you must add one or more Git Replica Servers (also referred to as slave or mirror servers) with TeamForge. For more information on how to set up Git Replica Servers, see Set up Git Replica Servers.
It is assumed that you already have one or more Teamforge projects that consists of one or more Git repositories that you want to replicate.
-
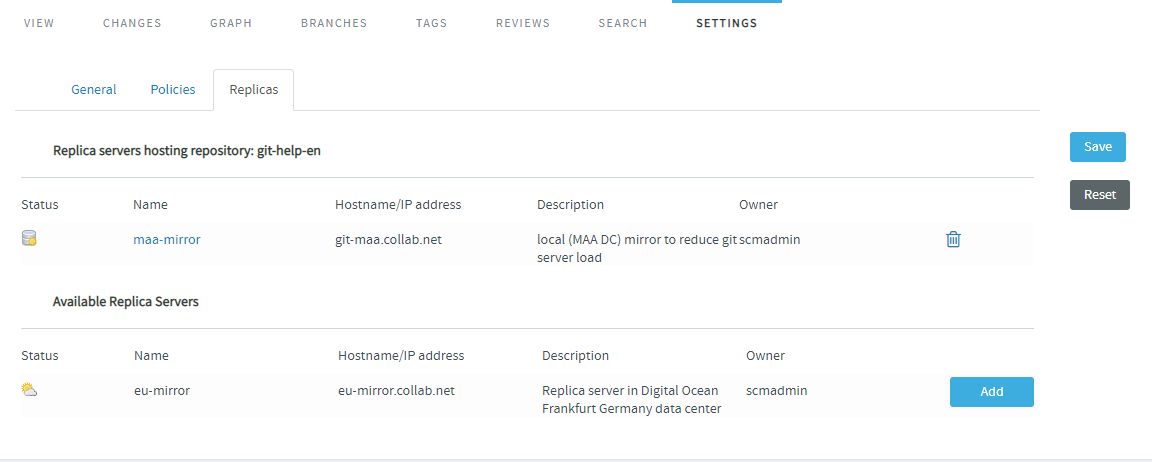
To start replicating a repository--go to the TeamForge project--select the Git repository you want to replicate, select the Settings tab and then select the Replicas tab.

This page lists the available Git Replica Servers.
If you don't see any available replica server listed here, it may be because none were created for this Subversion server, or there are pending replicas which haven't yet been approved by a TeamForge administrator.
-
From the list of Replica Servers, click the Add button of one or more Replica Servers to have the server(s) replicate the selected repository.
-
Click Save.
-
Push a commit and verify if it's replicated on the Replica Servers.
Replicate a Subversion Repository
When a Subversion Edge replica has been successfully registered with a TeamForge SCM integration server, it is available to project administrators in projects using that server to house repositories. To replicate a Subversion repository, you need to add it to one or more Replica Servers.
Before you can replicate a Subversion repository, you must first add one or more Replica Servers. This involves converting a Subversion Edge server, and then approving the replica in TeamForge.
-
Click SOURCE CODE from the Project Home menu.
-
In the list of project repositories, select the one you want to replicate and click Settings.
-
Select the Replicas tab. The available replica servers are listed here.
Here's an example:

If you don't see any available replica server listed here, it may be because none were created for this Subversion server, or there are pending replicas which haven't yet been approved by a TeamForge administrator.
-
From the list of Available Replica Servers, click Add of one or more Replica Servers to have the server(s) replicate the selected repository.
-
Click Save. Now the replica server is the hosting server for the repository.

Push a commit and verify if it's replicated on the Replica Servers.