TeamForge—TestLink Integration Using the TeamForge Webhooks-based Event Broker
TestLink is a web-based Test Management system that supports all the various components and processes involved in a testing process. Using TestLink, you can create test specifications, execute test cases, create custom reports, generate test plan metrics and so on.
Before you begin with the installation and the configuration of the TeamForge—TestLink integration plugin, generate the TeamForge Webhook URL by running the create_webhook_event.py script.
TeamForge—TestLink Integration Overview
The TestLink integration plugin, collabnet-testlink-1.0.5.tar, if installed and configured, can notify the native TeamForge Webhooks-based Event Broker about the test cases and the test execution results.
The TeamForge—TestLink integration plugin, collabnet-testlink-1.0.5.tar, works only with the TestLink versions 1.9.17–1.9.20.
For more information about the installation requirements for TeamForge—TestLink integration, see:
- [TeamForge Installation Requirements][requirements]
- TestLink Installation Requirements
Contact CollabNet for support on TeamForge—Testlink integration. For TestLink support, contact TestLink directly. Click here for more information.
TeamForge 16.7 through TeamForge 19.1 support integration only with TestLink 1.9.15 and 1.9.16 using the
collabnet-testlink-1.0.2.tar plugin.
TeamForge 19.2 supports integration with TestLink versions 1.9.17–1.9.20 using the
collabnet-testlink-1.0.3.tar plugin.
TeamForge 19.3 and later supports integration with TestLink versions 1.9.17–1.9.20 using the
collabnet-testlink-1.0.5.tar plugin.
If you are on earlier versions of TestLink, upgrade to one of the supported TestLink versions and integrate it with TeamForge. This integration does not provide backward compatibility (Data reliability and Migration) to older TeamForge—TestLink 1.9.11 integration that is based on TeamForge's Integrated Application Framework (IAF).
By default, only TeamForge Site Administrators can create test suites. If you want other users to create test suites, you must create a site-wide role in TeamForge, grant "CREATE/VIEW" access to "All Projects" for the role and assign this role to users.
TeamForge 22.1 supports integration with TestLink 1.9.17–1.9.20 to track and synchronize requirement and defect tracker artifacts between these two systems.
The TeamForge—TestLink integration has two primary touch points:
-
Requirements (TeamForge) to Test Suites (TestLink)
-
Test Case Run Failures (TestLink) to Defects (TeamForge)
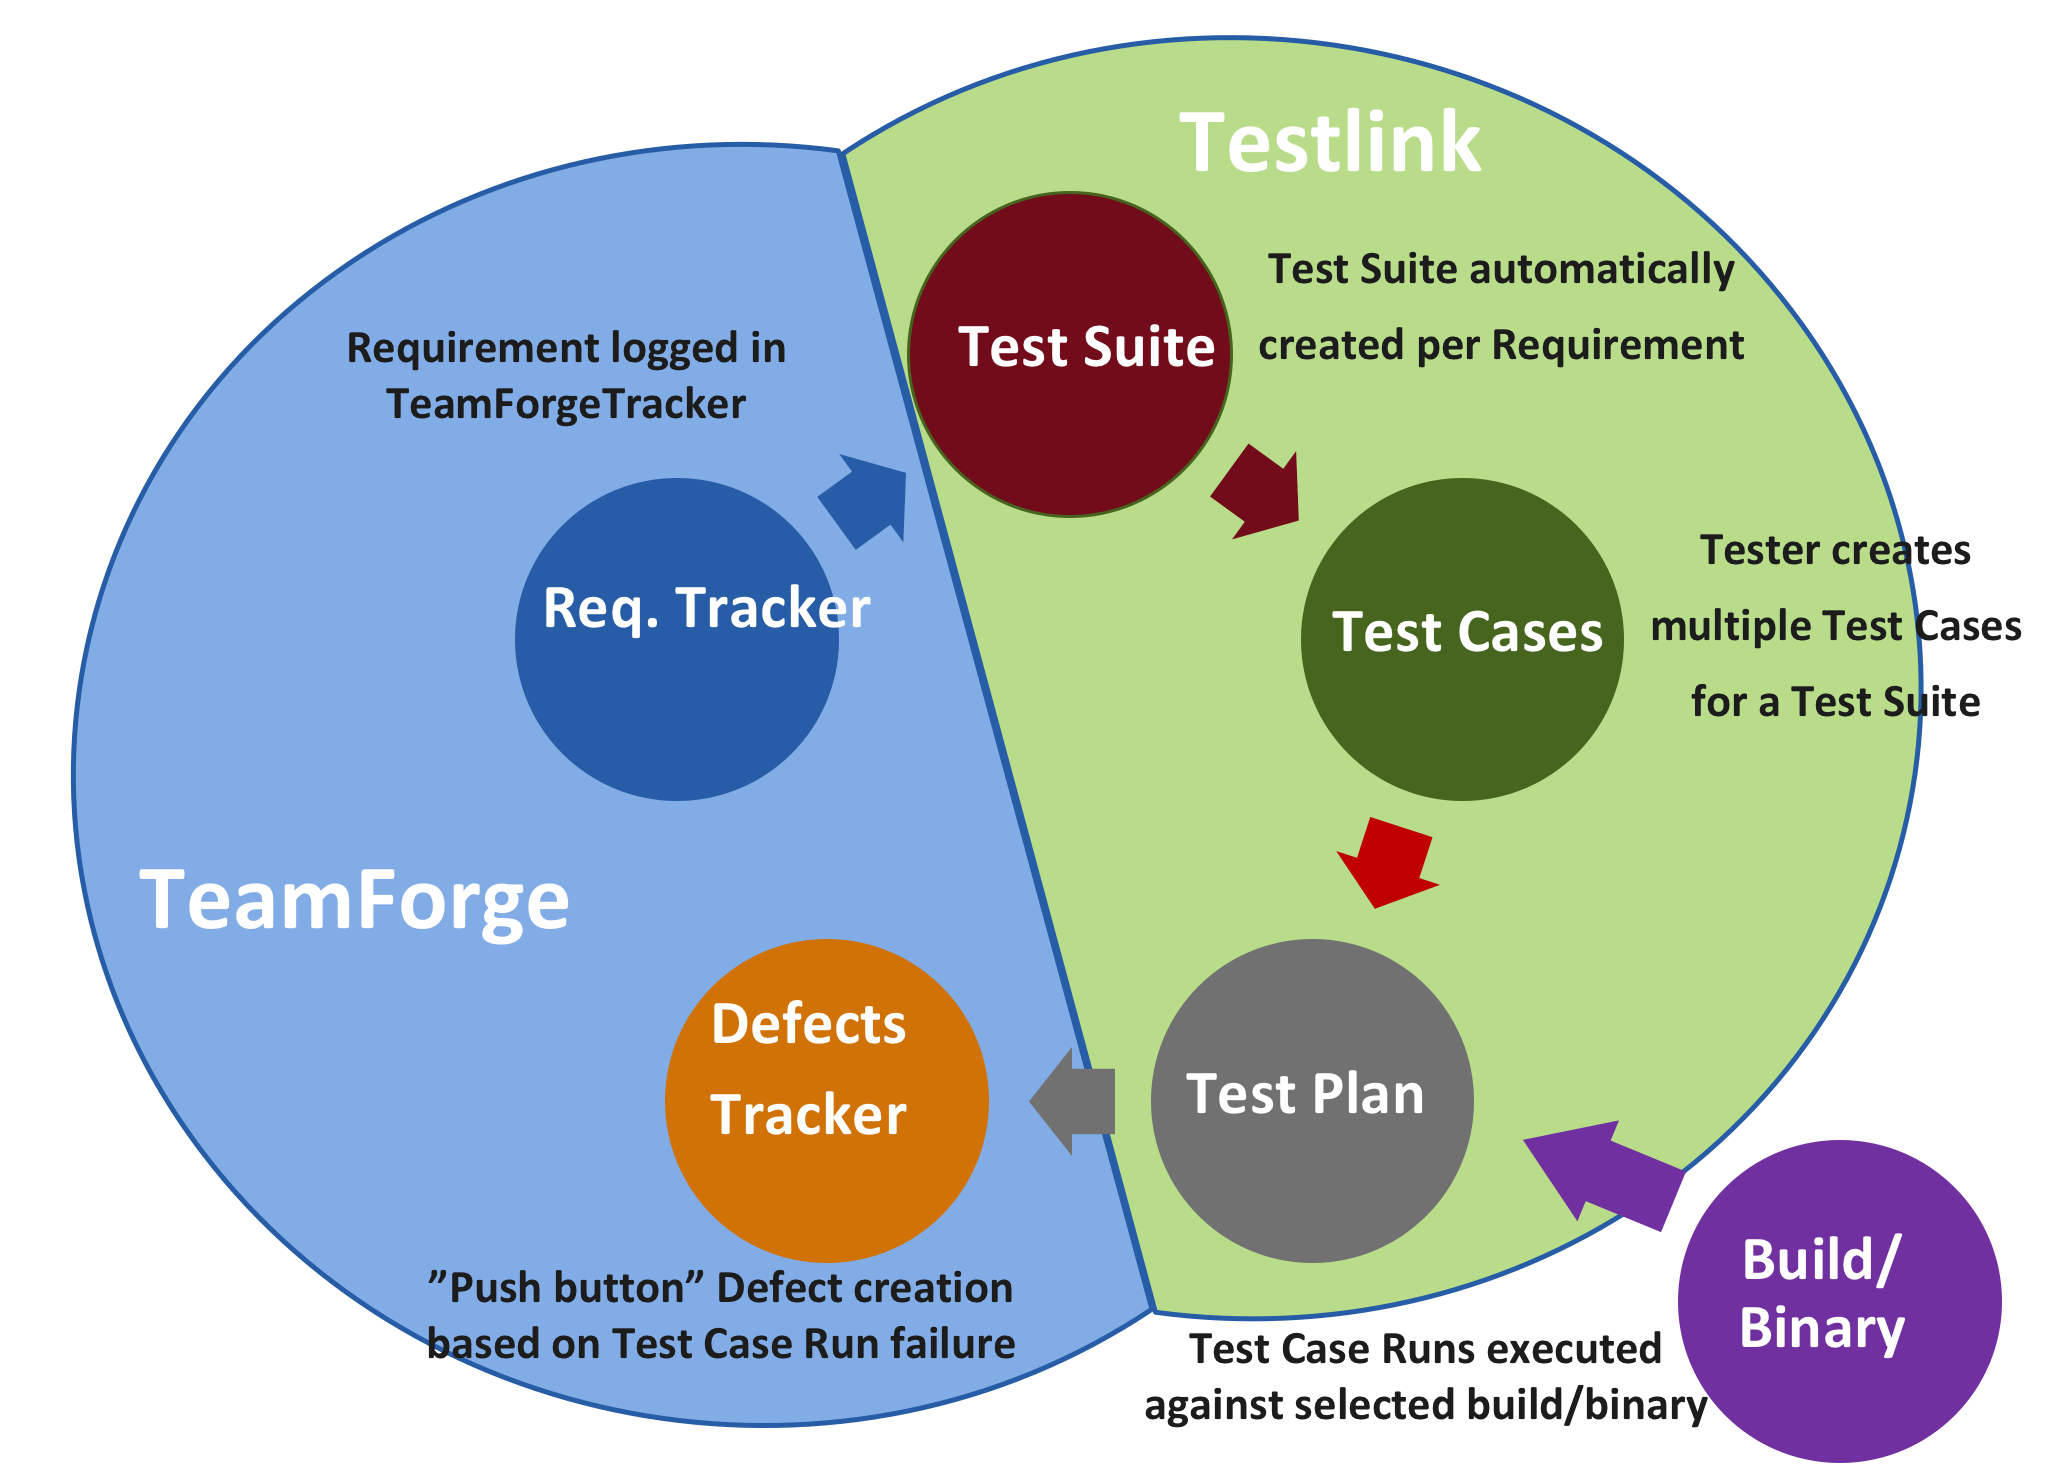
Here is a sample workflow to illustrate these touch points:
-
Map TeamForge and TestLink projects—The first step is to establish a project mapping between the intended TeamForge and TestLink projects. During mapping, in TestLink, you’ll be able to specify the TeamForge “Requirements” and “Defects” trackers for your project. These trackers will be used throughout the workflow.
-
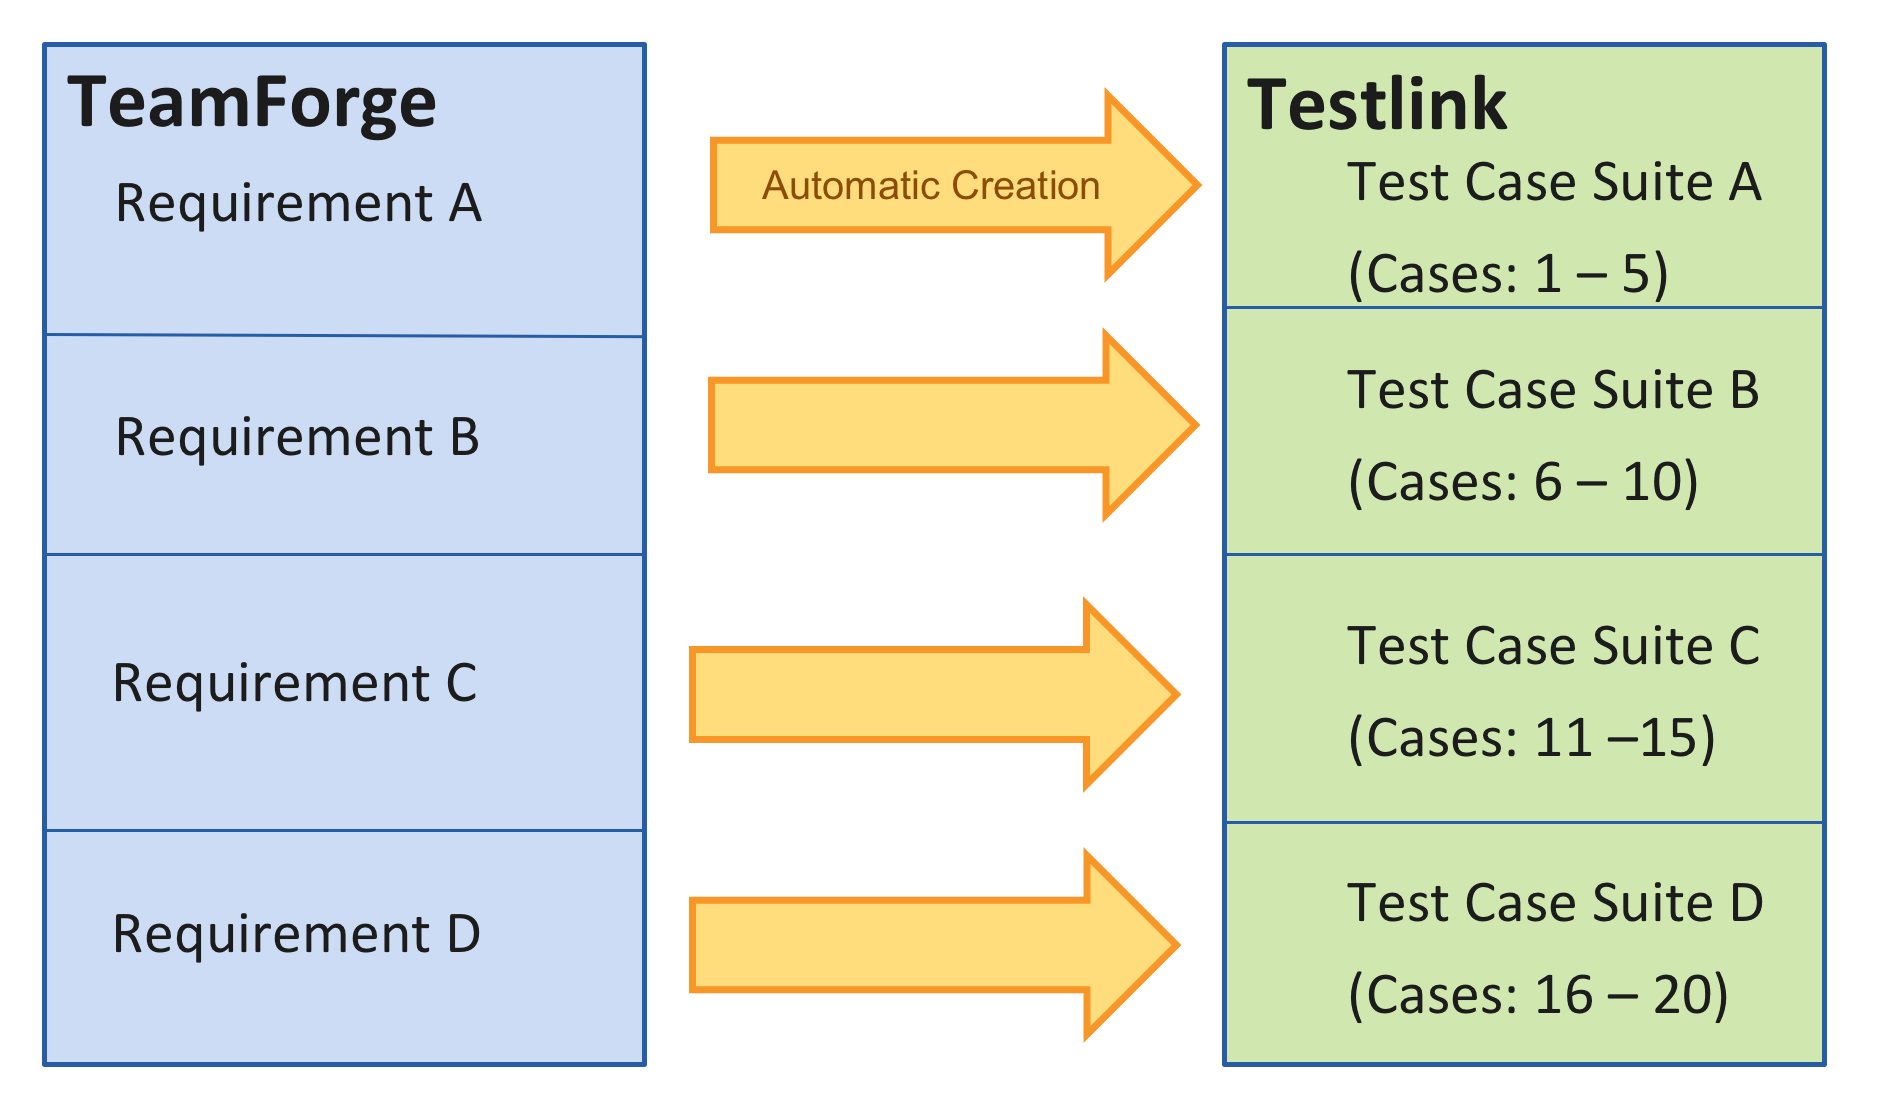
Create Requirements and Test Suites—When a requirements tracker artifact is created in the TeamForge tracker specified in Step 1, you can choose to have a “Test Suite” created in TestLink. The Test Suite, once created, is associated with the requirements tracker artifact in TeamForge.
-
Populate Test Suite with Test Cases—Within TestLink, you can find and populate your Test Suite with Test Cases.
-
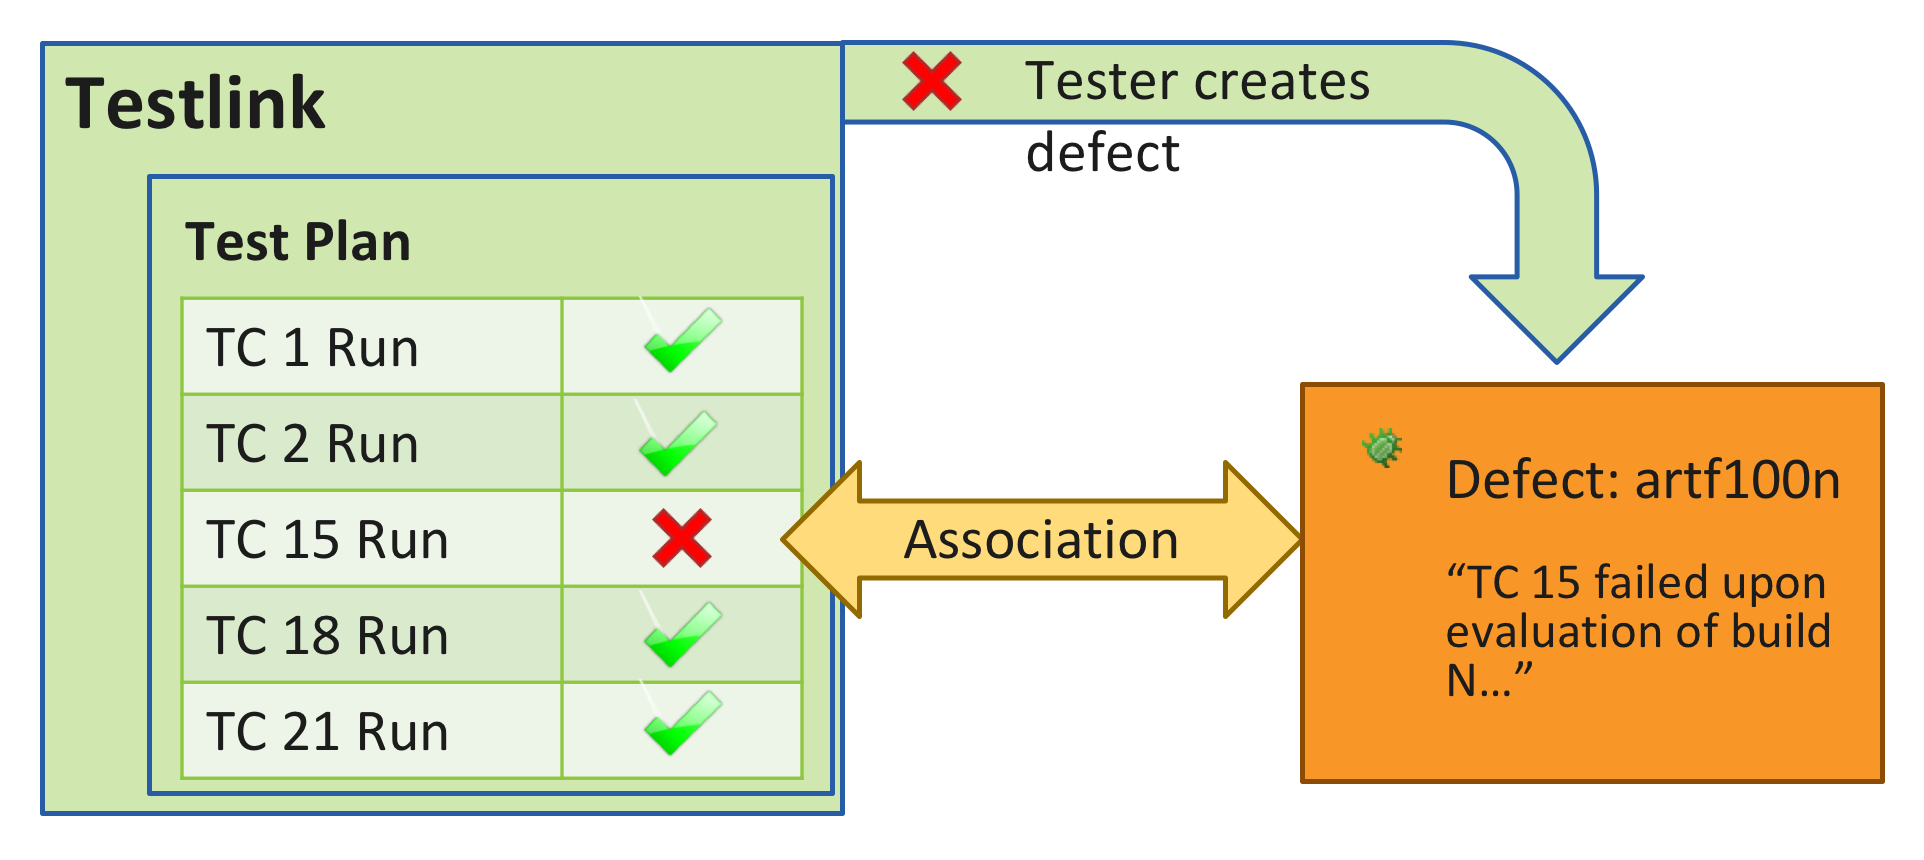
Run Test Cases against Builds—Once the Test Cases have been defined, you can run them against desired builds, tracking results in TestLink. Test Case runs are associated to the build/binary being tested for traceability purposes.
-
Create Defects for failed Test Case runs—If you encounter failing Test Case runs, you can simply click a button inside TestLink to create a defect in TeamForge. This is a “push button” defect that opens a new TeamForge window pre-populated with Test Case run failure data. An association will be created between the failing Test Case run and the new Defect.
-
Visualize Traceability—Once this cycle is complete, you can view the associations chain between the requirements tracker artifact and the Test Suite, Test Case runs and any associated defects, the builds or binaries they exercised, the commits which triggered the build, and ultimately the requirements that started it all.
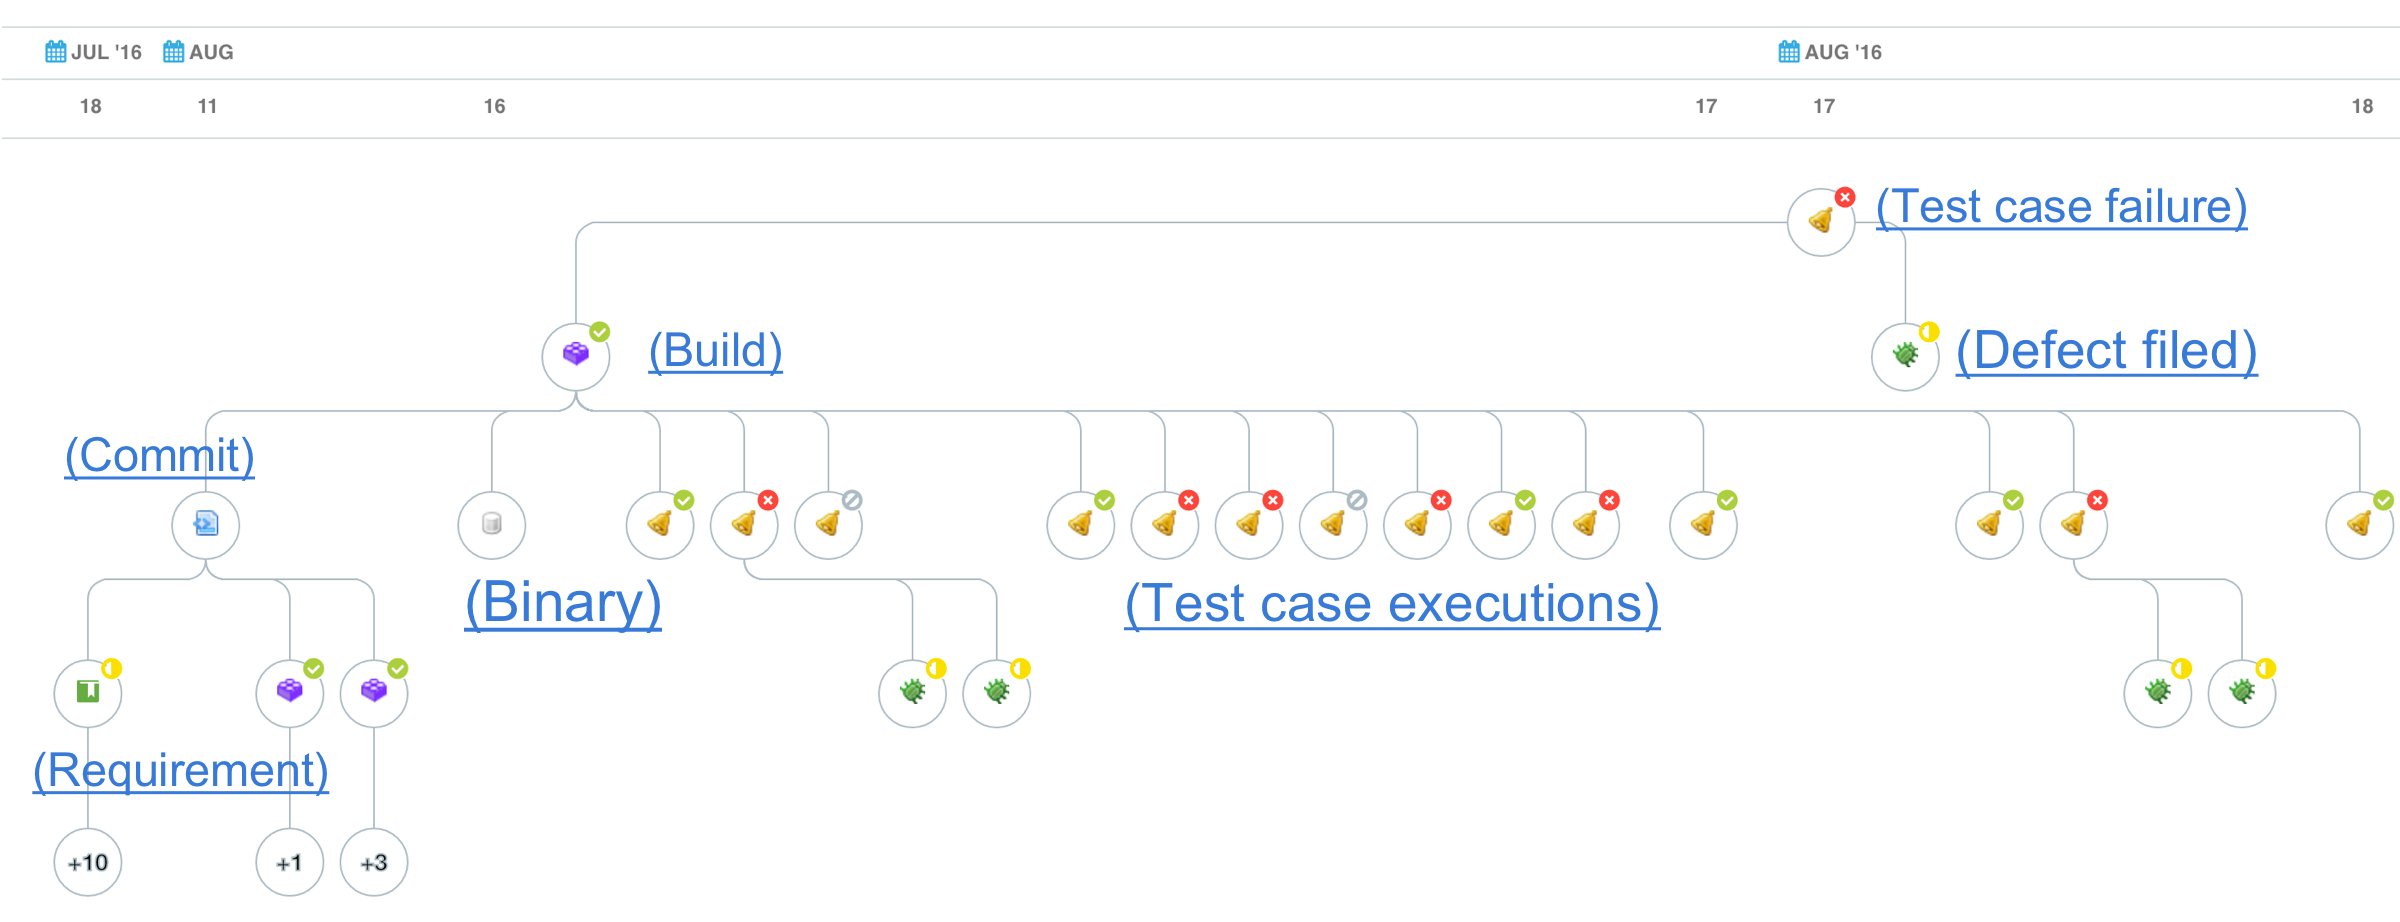
Set up the TeamForge Application Server
Follow these instructions to install the TestLink integration plugin on the TeamForge 22.1 Application Server.
- Log on to the TeamForge Application Server.
- If you have been having TeamForge—TestLink integrated earlier, delete the existing plugin JAR file (for example
collabnet-testlink-1.0.4.jar) post upgrade to TeamForge 22.1.- Go to My Workspace > Admin.
- Select Projects > System Tools > Customizations.
- Select the TestLink plugin JAR file (for example,
collabnet-testlink-1.0.4.jar). - Click Delete. A confirmation message is displayed.
- Click OK.
- Download the
collabnet-testlink-1.0.5.jarfile. - Go to My Workspace > Admin.
- Select Projects > System Tools > Customizations and click Create.
- Click Choose File and select the
collabnet-testlink-1.0.5.jarfile. - Click Add.
Set up the TestLink Server
-
Log on to the TestLink Server.
-
If you've been having TeamForge integrated with TestLink 1.9.16 or earlier:
-
Upgrade your TestLink server to one of the supported TestLink versions 1.9.17–1.9.20. Follow the TestLink's official upgrade procedure.
Make sure that you have the following RPMs available during TestLink installation:
php-xml
php-mbstring
php-bcmath
-
Remove the existing TeamForge—Testlink integration plugin.
-
Uninstall the existing TeamForge—TestLink integration plugin.
-
Delete the TeamForge project mapping.
Before uninstalling the TeamForge—TestLink integration plugin, it is a best practice, but not mandatory, to delete the TeamForge project mapping in TestLink.
importantWhile deleting the project mapping in TestLink, TeamForge custom sources turn inactive. The TestLink tool in TeamForge should be removed manually, if required.
-
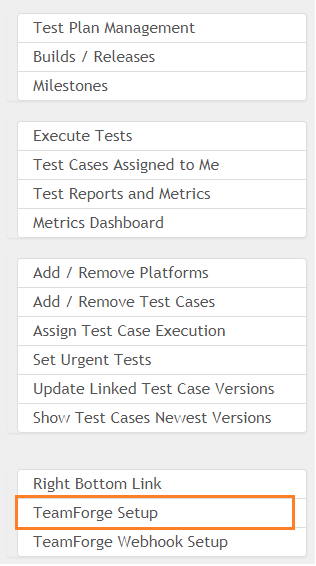
Click TeamForge Setup.
-
Click Delete. A confirmation message is displayed.
-
Click OK. The TeamForge project mapping is deleted.
-
Click the Plugins icon from the toolbar.

-
Identify the TeamForge—TestLink integration plugin from the list of Installed Plugins and click Uninstall.
-
-
-
If you are installing TestLink for the first time, just download and install one of the supported TestLink versions 1.9.17–1.9.20 on the TestLink server.
-
Download the collabnet-testlink-1.0.6.tar plugin file to the
/tmpdirectory and untar the file to<testlink-installation-directory>/pluginsdirectory.cd <testlink-installation-directory>/plugins/
tar -xvf /tmp/collabnet-testlink-1.0.6.tar -
Log on to TestLink.
-
Click the Plugins icon from the toolbar.

-
Identify the TeamForge—TestLink integration plugin from the list of Availabe Plugins and click Install.
The TeamForge—TestLink integration plugin is installed and shows up in the Installed Plugins section.
-
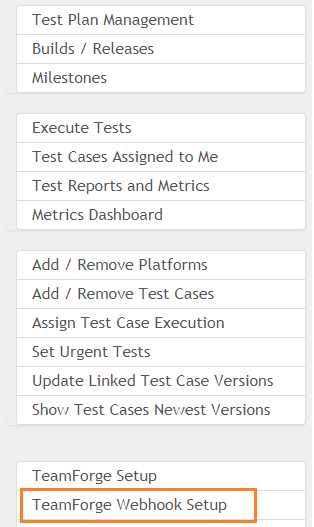
Go to TestLink Home and click the TeamForge Webhook Setup link.
-
Enter the Webhook URL and click Save.
noteYou can generate the TeamForge Webhook URL by running the
create_webhook_event.pyscript.
-
Click the Home icon from the toolbar.
-
Create a TestLink project.
- Click Test Project Management and click Create.
- Define project attributes such as the name, description, project prefix and so on. Click Create.
-
Go to the home page and click the TeamForge Setup link. This is where oyu create the mapping between the TeamForge and TestLink projects.
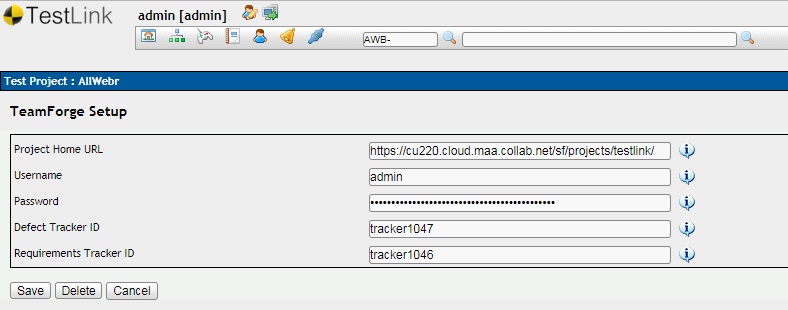
-
Enter the TeamForge Project Home URL, Username, Password, Defect Tracker ID, Requirements Tracker ID and click Save.
importantIt is assumed that you have a TeamForge project, requirements tracker and defect tracker created already. If not, create them first and then perform this step of setting up TeamForge in TestLink. Have the requirements and defect tracker ID handy while setting up TeamForge in TestLink.
For more information on creating a TeamForge project and setting up trackers, see:
Association Between the Requirements Artifact and the Test Suite
Once you create a mapping between the TeamForge and TestLink projects, three new fields show up on the TeamForge's Requirements and Defect trackers.
Select Create from the Test Suite drop-down list and type the TestLink project name to have a test suite created in TestLink whenever you create a new requirements artifact in TeamForge. The Test Suite so created is associated with the requirements tracker artifact as well.
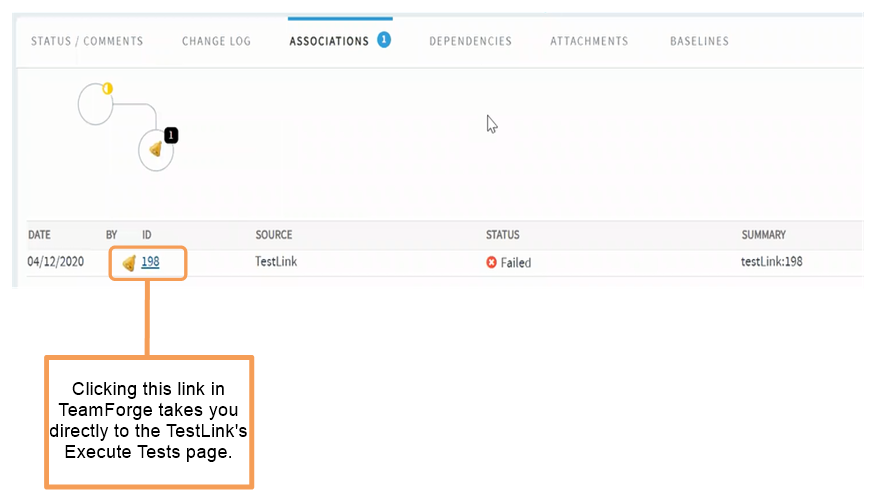
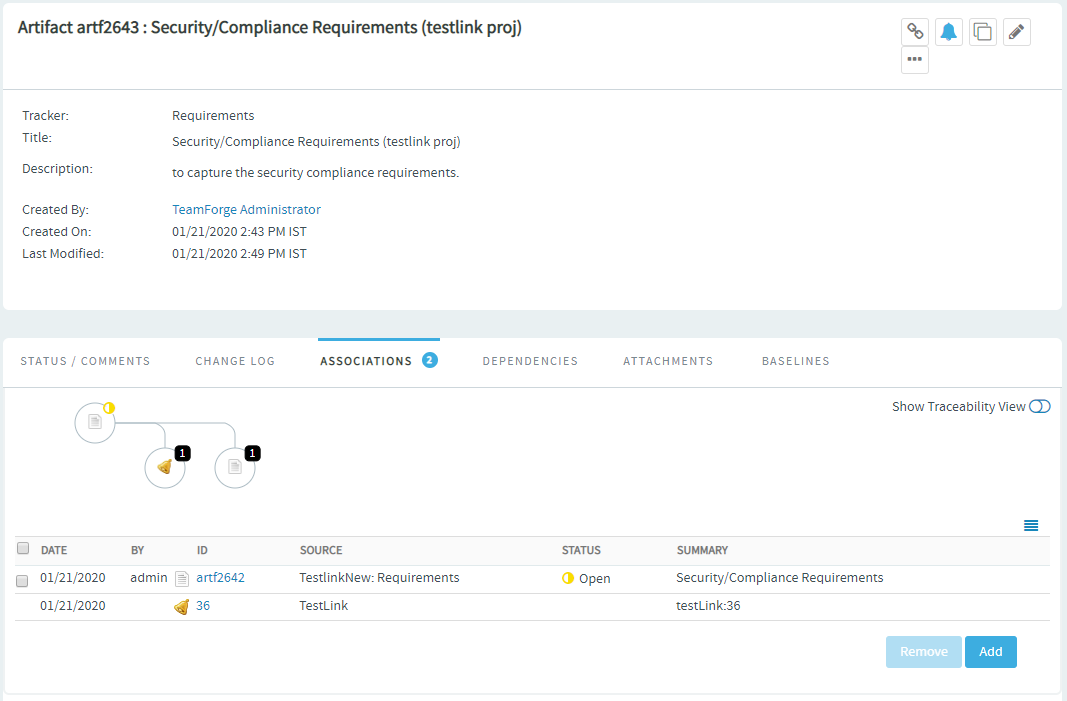
Select the Associations tab and view the association between the requirements artifact and the test suite.
Enable Single Sign-On (SSO) Between TeamForge and TestLink
You can enable SSO between TeamForge and TestLink. Once you enable SSO, you cannot directly log on to TestLink. TestLink becomes one of the site-wide linked applications in TeamForge and you must log on to TeamForge to access TestLink.
With SSO set up, TeamForge Administrator and non-admin users, from a role-mapping perspective, are mapped by default to the TestLink Administrator and Leader roles respectively.
- Log on to the TestLink server.
- Add the following configuration tokens to the
<TestLink installation directory>/custom_config_inc.phpfile.$tlCfg->authentication['SSO_enabled'] = true;
$tlCfg->authentication['SSO_method'] = 'WEBSERVER_VAR';
$tlCfg->authentication['SSO_uid_field'] = 'REMOTE_USER';
$tlCfg->authentication['SSO_user_target_dbfield'] = 'login';
$tlCfg->authentication['TeamForge_BASE_URL'] = 'https://<your TeamForge domain URL>'; - Apply the
SSO_TL_patch.diffpatch file that comes with the plugin to the<TestLink installation directory>/lib/functions/doAuthorize.phpfile. - Log on to the TeamForge Application server.
- [Create a site-wide linked application][externalapplications.html#sitewidelinkedapp] for TestLink.
For example, create a site-wide linked application using the following information.
Application Name: TestLink
URL: http://testlink-domain/testlink-1.9.17/plugin.php?page=Teamforge/index.php
Open Link In: New Window
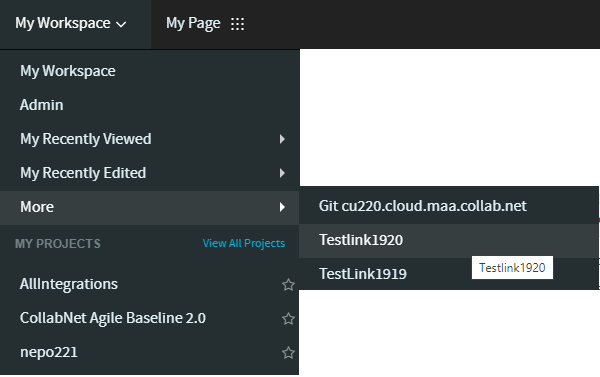
SSO Enabled: True - SSO is now enabled between TeamForge and TestLink and you can now access TestLink directly from the My Workspace > More TeamForge menu.
- You can also access the TestLink application from within the TeamForge's defect association viewer.
