GitOps-enabled Folder Versioning
GitOps-enabled folder versioning in Digital.ai Release lets you store and manage all folder content—such as templates, workflows, triggers, connections, and variables—as YAML in a version control system like GitHub, GitLab, Bitbucket, or Azure Repos. This enables a GitOps-style workflow to author, review, and promote changes across Release environments.
Think of it as giving each Release folder the same version-controlled workflow that development teams use for source code.
Instead of managing folder configurations manually inside Release, you can store them in Git, track every change, compare versions to see what changed, and version them reliably
How It Works
To start using GitOps-enabled folder versioning in Release:
- Link a Git repository – Link the Release folder to a Git repository (GitHub, GitLab, Bitbucket, or Azure Repos). For details, see Set Up a Git Repository Connection.
- Save a version – Save a new version to capture the folder’s current state. This creates a commit in the Git repository with all folder content. See Saving a New Version.
- Apply a version – Apply any previously saved version to roll the folder back to that exact state. See Applying an Existing Version.
- Compare versions – Compare a saved version with the folder’s current state or with another version to see what changed. See Comparing Versions.
Prerequisites
Before you start using GitOps-enabled folder versioning, you'll need:
- Administrator Access - You must be an administrator in Digital.ai Release to enable this feature. See Enable Git Folder Versioning.
- Git Repository - A repository in GitHub, GitLab, Bitbucket, or Azure Repos where you want to store your Release configurations.
- Authentication Credentials - The appropriate credentials to access your Git repository (username/password, personal access token, or other authentication method). See Authentication Methods.
Enable Git Folder Versioning
- To enable or disable this feature, go to Settings > System settings > General and use the Enable Folder Git versioning checkbox. For more information, see GitOps-enabled Folder Versioning (Recommended).
- By default, the Enable Folder Git versioning checkbox is selected, enabling GitOps-based version control in your Release environments.
note
You must have Administrator access to change this setting.
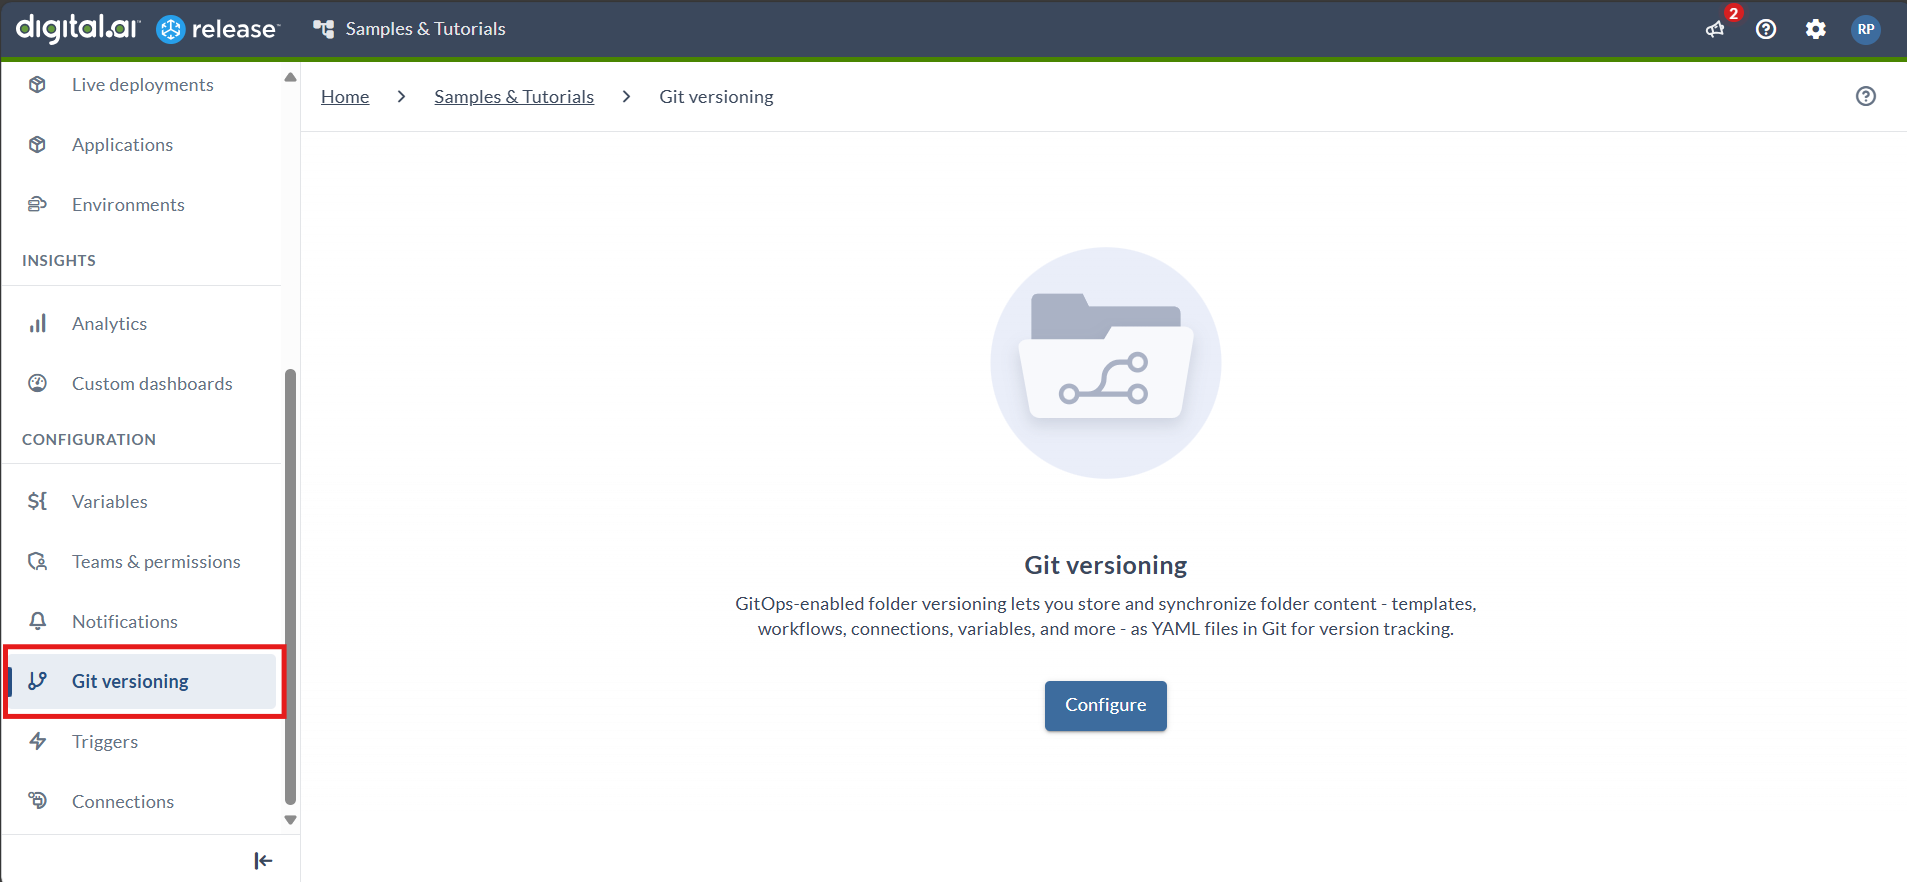
- When Enable Folder Git versioning checkbox is selected, a Git versioning tab appears under the Configuration section of the selected folder.
Set Up a Git Repository Connection
You can define a Git repository connection at two levels:
-
Global level: From the left navigation menu, under the CONFIGURATION section, click Connections. Connections created at the global level are available to all folders.
-
Folder level: Open the desired folder and, under the CONFIGURATION section, click Connections. Connections created at the folder level are available only to that folder and its subfolders.
To create a new Git repository connection:
- Navigate to one of the locations listed above.
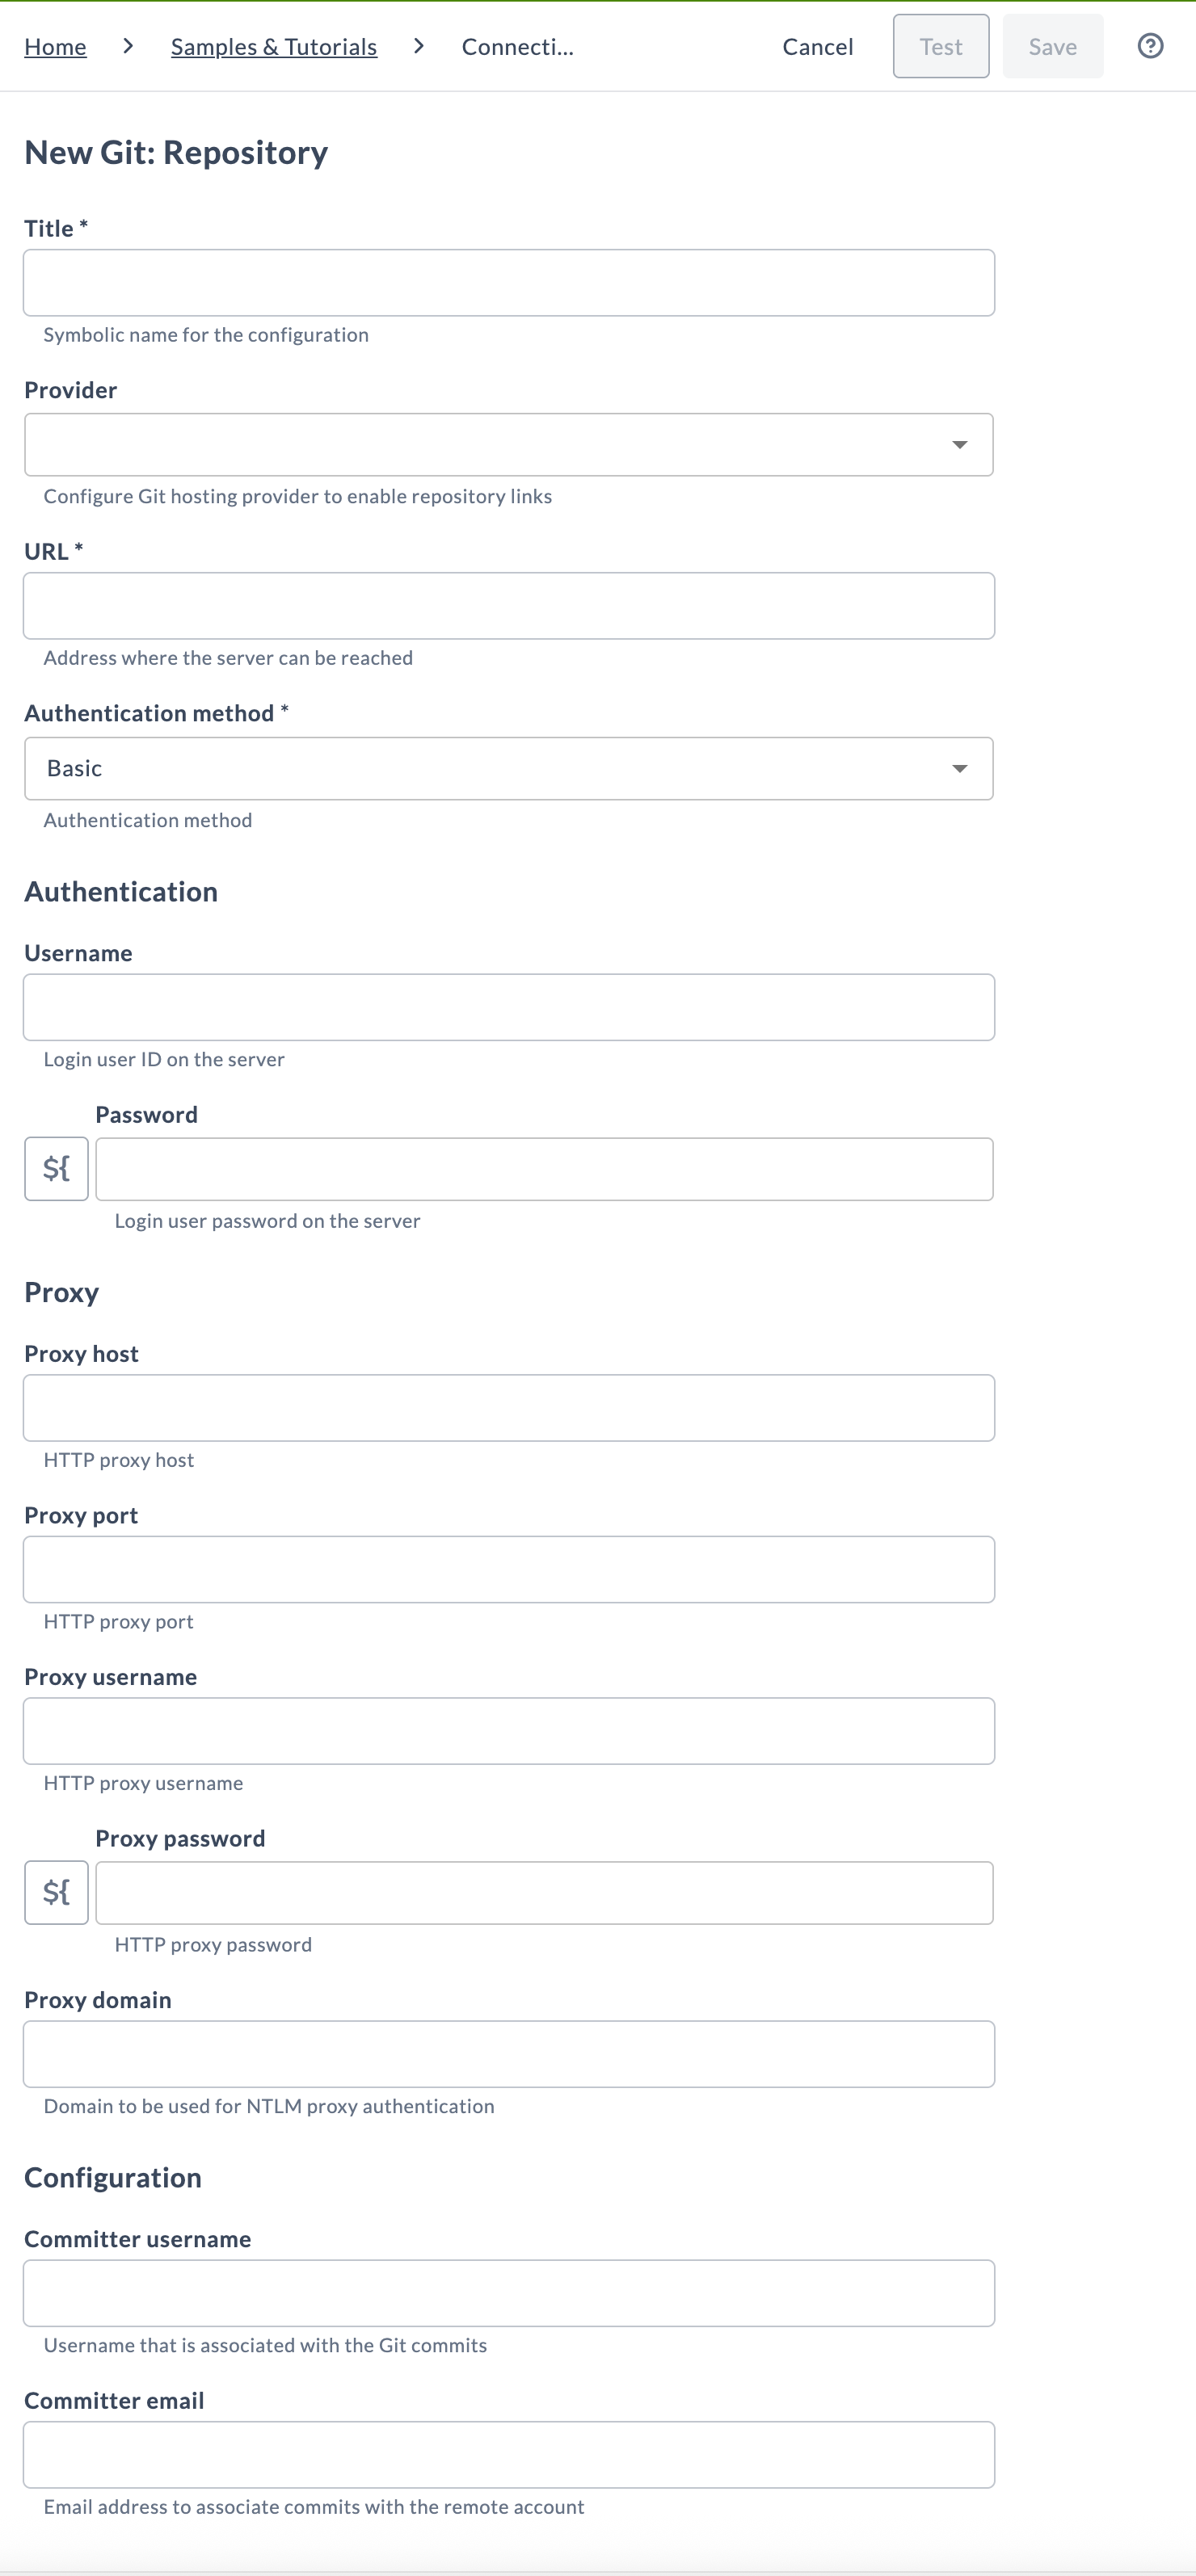
- Click the + icon next to Git: Repository.
- Enter the following details:
General Settings
- Title - A symbolic name for the configuration.
- Provider (optional) - Select your Git hosting provider (GitHub, GitLab, Bitbucket, or Azure Repos). This activates the View on Git Repository feature in the UI, allowing quick access to the version in the Git repository.
- URL - The repository URL (including the repository name).
Authentication Method
Select an authentication method from the dropdown:
-
No Authentication: No credentials are required. Use this when the repository is publicly accessible.
-
Basic Authentication: Requires a username and password.
- Username - Login user ID on the Git server.
- Password - Login user password on the Git server.
-
PAT Authentication: Use a Personal Access Token (PAT) instead of a username and password.
- Password - Enter your PAT. This token is used to authenticate with the remote Git repository.
note
For PAT authentication, enter the token into the Password field.
A username is not required.
- Password - Enter your PAT. This token is used to authenticate with the remote Git repository.
-
NTLM Authentication: Available when connecting through NTLM-enabled environments.
- Username - Login user ID for NTLM authentication.
- Password - Login user password for NTLM authentication.
- Domain - Domain name used for NTLM authentication.
Proxy (Optional)
If your network requires a proxy for outbound Git access, provide the following:
- Proxy host
- Proxy port
- Proxy username
- Proxy password
- Proxy domain (for NTLM proxy authentication)
Committer Information
Used to associate commits created by Digital.ai Release with an identity:
- Committer username
- Committer email
This information appears on commits generated by GitOps folder versioning.
- Click Test to validate the connection.
- Click Save to create the configuration.
Configure Git Folder Versioning
-
Go to the desired folder and, under the CONFIGURATION section, click Git Versioning.
-
Click Configure.
-
Select an existing Git repository, or click Create new repository to add a new Git connection without leaving the page.
Enter the required fields described in Set Up a Git Repository Connection. -
Select a Branch from the dropdown list.
This menu is populated with branches detected in the connected remote repository. -
Enter the Repository path, which determines where the folder’s YAML files will be stored.
By default, this value matches the folder name and also becomes the tag prefix used when creating versions.:::tip Example Tag Format
If the folder path isMainand the version isv1.0.0, the resulting Git tag will be:
Main/v1.0.0
::: -
Select a Versioning style to define how Release exports folder entities into YAML files.
Versioning style Multiple files – one per entity Multiple files – one per type Single file Description Each supported entity is exported as a separate YAML file. All entities are grouped by type; one YAML file per type. All folder content is exported into one YAML file. Applicable to entities Separate files for Templates, Workflows, Patterns, Triggers, Dashboards.
Always grouped (one file per type): Applications, Environments, Connections, Notifications, Permissions, Variables.Applies to all supported entities. Applies to all supported entities. Example TemplateA.yaml,TemplateB.yaml
Workflow1.yaml,Workflow2.yaml
Grouped entities:
Environments.yaml(Dev, QA, Prod)
Variables.yaml(all variables)Templates.yaml(all templates)
Workflows.yaml(all workflows)
Environments.yaml(all environments)Releasefile.yamlcontaining everythingOutput (number of files) • One file per entity (supported types)
• One file per type (grouped entities)One file per entity type Always a single file :::tip Available Entities
The following entities can be exported and versioned:- Templates
- Workflows
- Patterns
- Triggers
- Variables
- Connections
- Dashboards
- Notifications
- Teams & Permissions
- Applications
- Environments
:::
-
Click Save.
noteTo configure folder version control, you need the Edit Git versioning settings permission.
See Teams and Permissions for details.
After saving, Release begins cloning the repository locally. For large repositories, this process can take several minutes.
If a folder uses a Git repository connection for versioning, and that connection is defined within the same folder, it is automatically excluded from exported YAML files. This ensures the connection is not overwritten when applying a version.
Enable or Disable Entity Export in Git Version
To control which entities are exported to the Git repository:
- In the navigation pane, under the OVERVIEW group, click Folders.
- On the Folders page, select the folder you want to modify.
- In the navigation pane, click Git versioning.
- On the Git versioning page, click Configure.
- In the Select entities to export section:
- Check an entity to include it in the exported YAML files.
- Uncheck an entity to exclude it from being exported.
- Use Enable all to select all entities.
- Use Disable all to clear all selections.

Git Folder Versioning Indicator
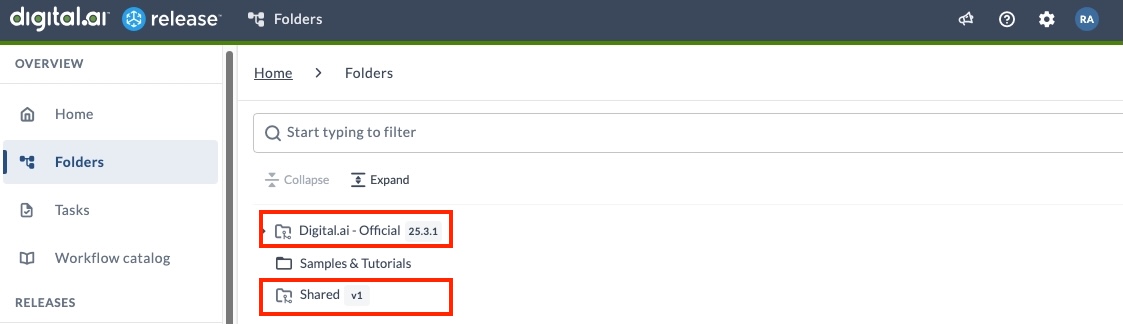
When a folder has GitOps-enabled Git versioning configured, Release displays a Git icon and, if applicable, the currently applied version number. Use this indicator to quickly confirm which folders are under Git version control and which version is active.
The indicator appears in the following locations:
- Top menu (expanded view only)
- Folders page
- Folder selectors (for example, Tasks page filter and CRT task Folder selector)
Subfolders inherit Git versioning from the parent folder, but they do not display the Git icon.
Delete Configuration
Deleting the configuration only removes GitOps-enabled folder versioning from the folder. The Git repository connection itself remains available in Release for use by other folders. No data is removed from the Git repository.
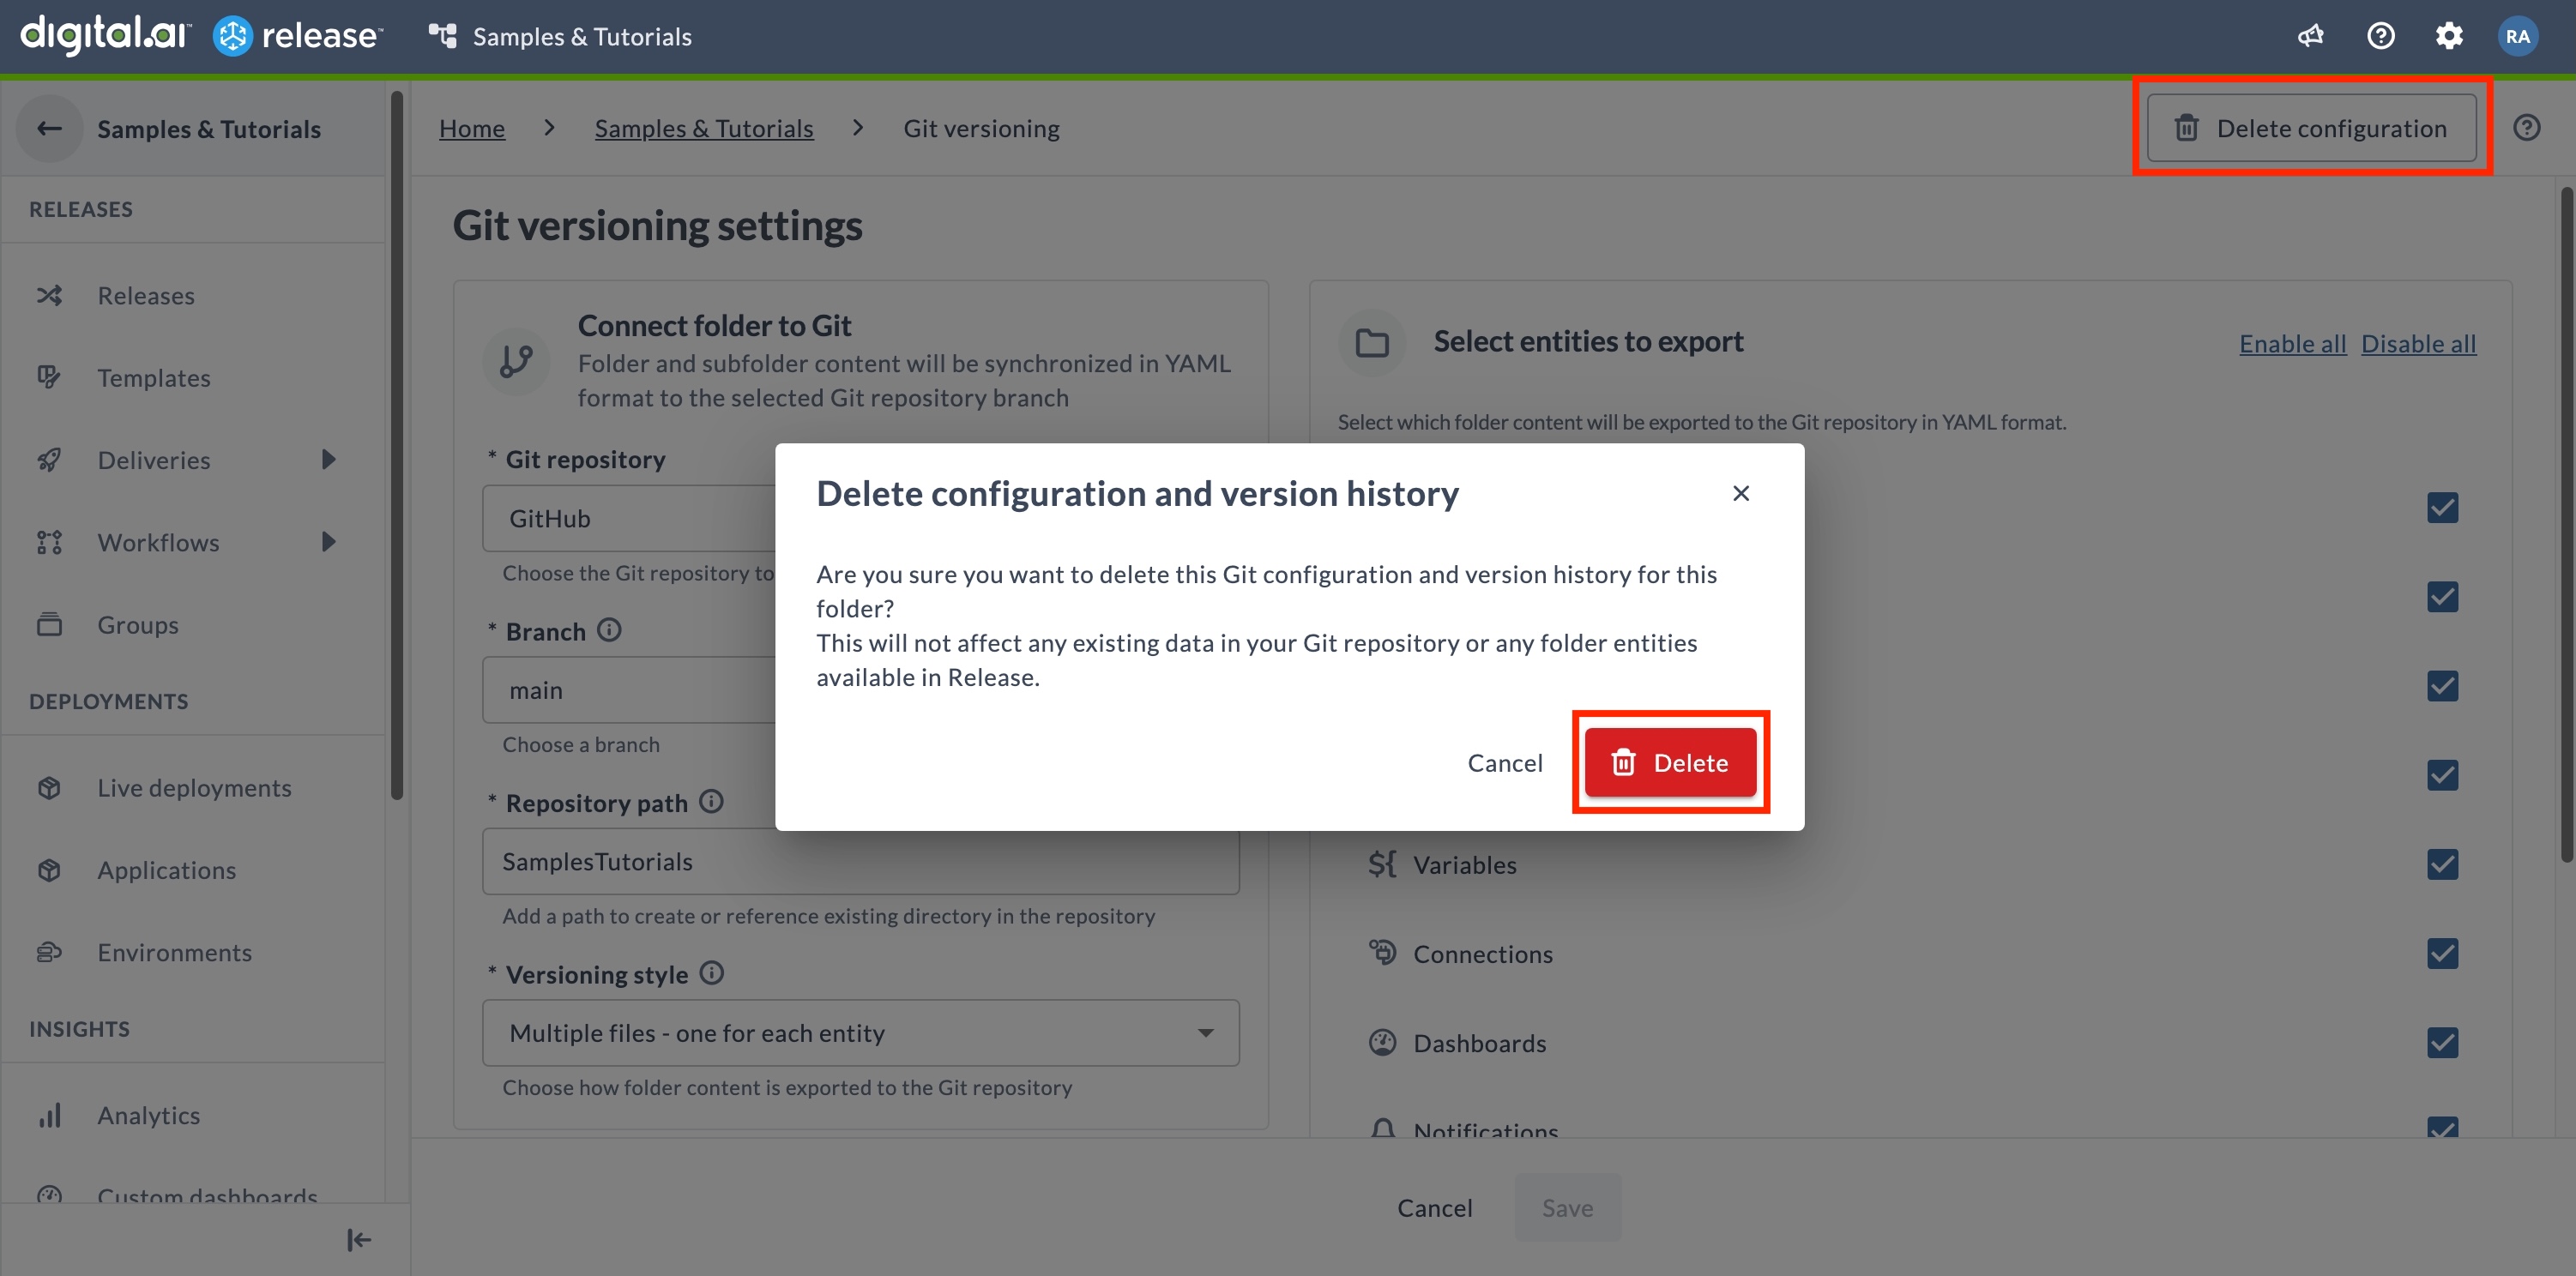
To delete the Git versioning configuration for a folder:
- Navigate to the Git versioning page.
- Click Configure to open the Git versioning settings page.
- Click Delete configuration.
- Click Delete in the confirmation dialog.
You need the Edit Git versioning settings permission to delete the configuration. See Teams and Permissions for more details.
Using GitOps-Enabled Folder Version Control
With GitOps-enabled folder version control, you can view version history, pull updates from the Git repository, save new versions, and restore folder configurations using previously saved versions.
Listing the Versions
- Only commits tagged with the configured prefix appear in the version history.
- Versions are sorted by creation date, with the most recent at the top.
- You need the appropriate permissions to view the version history.
To view the version history:
- Select Git Versioning from the left navigation pane in the folder.
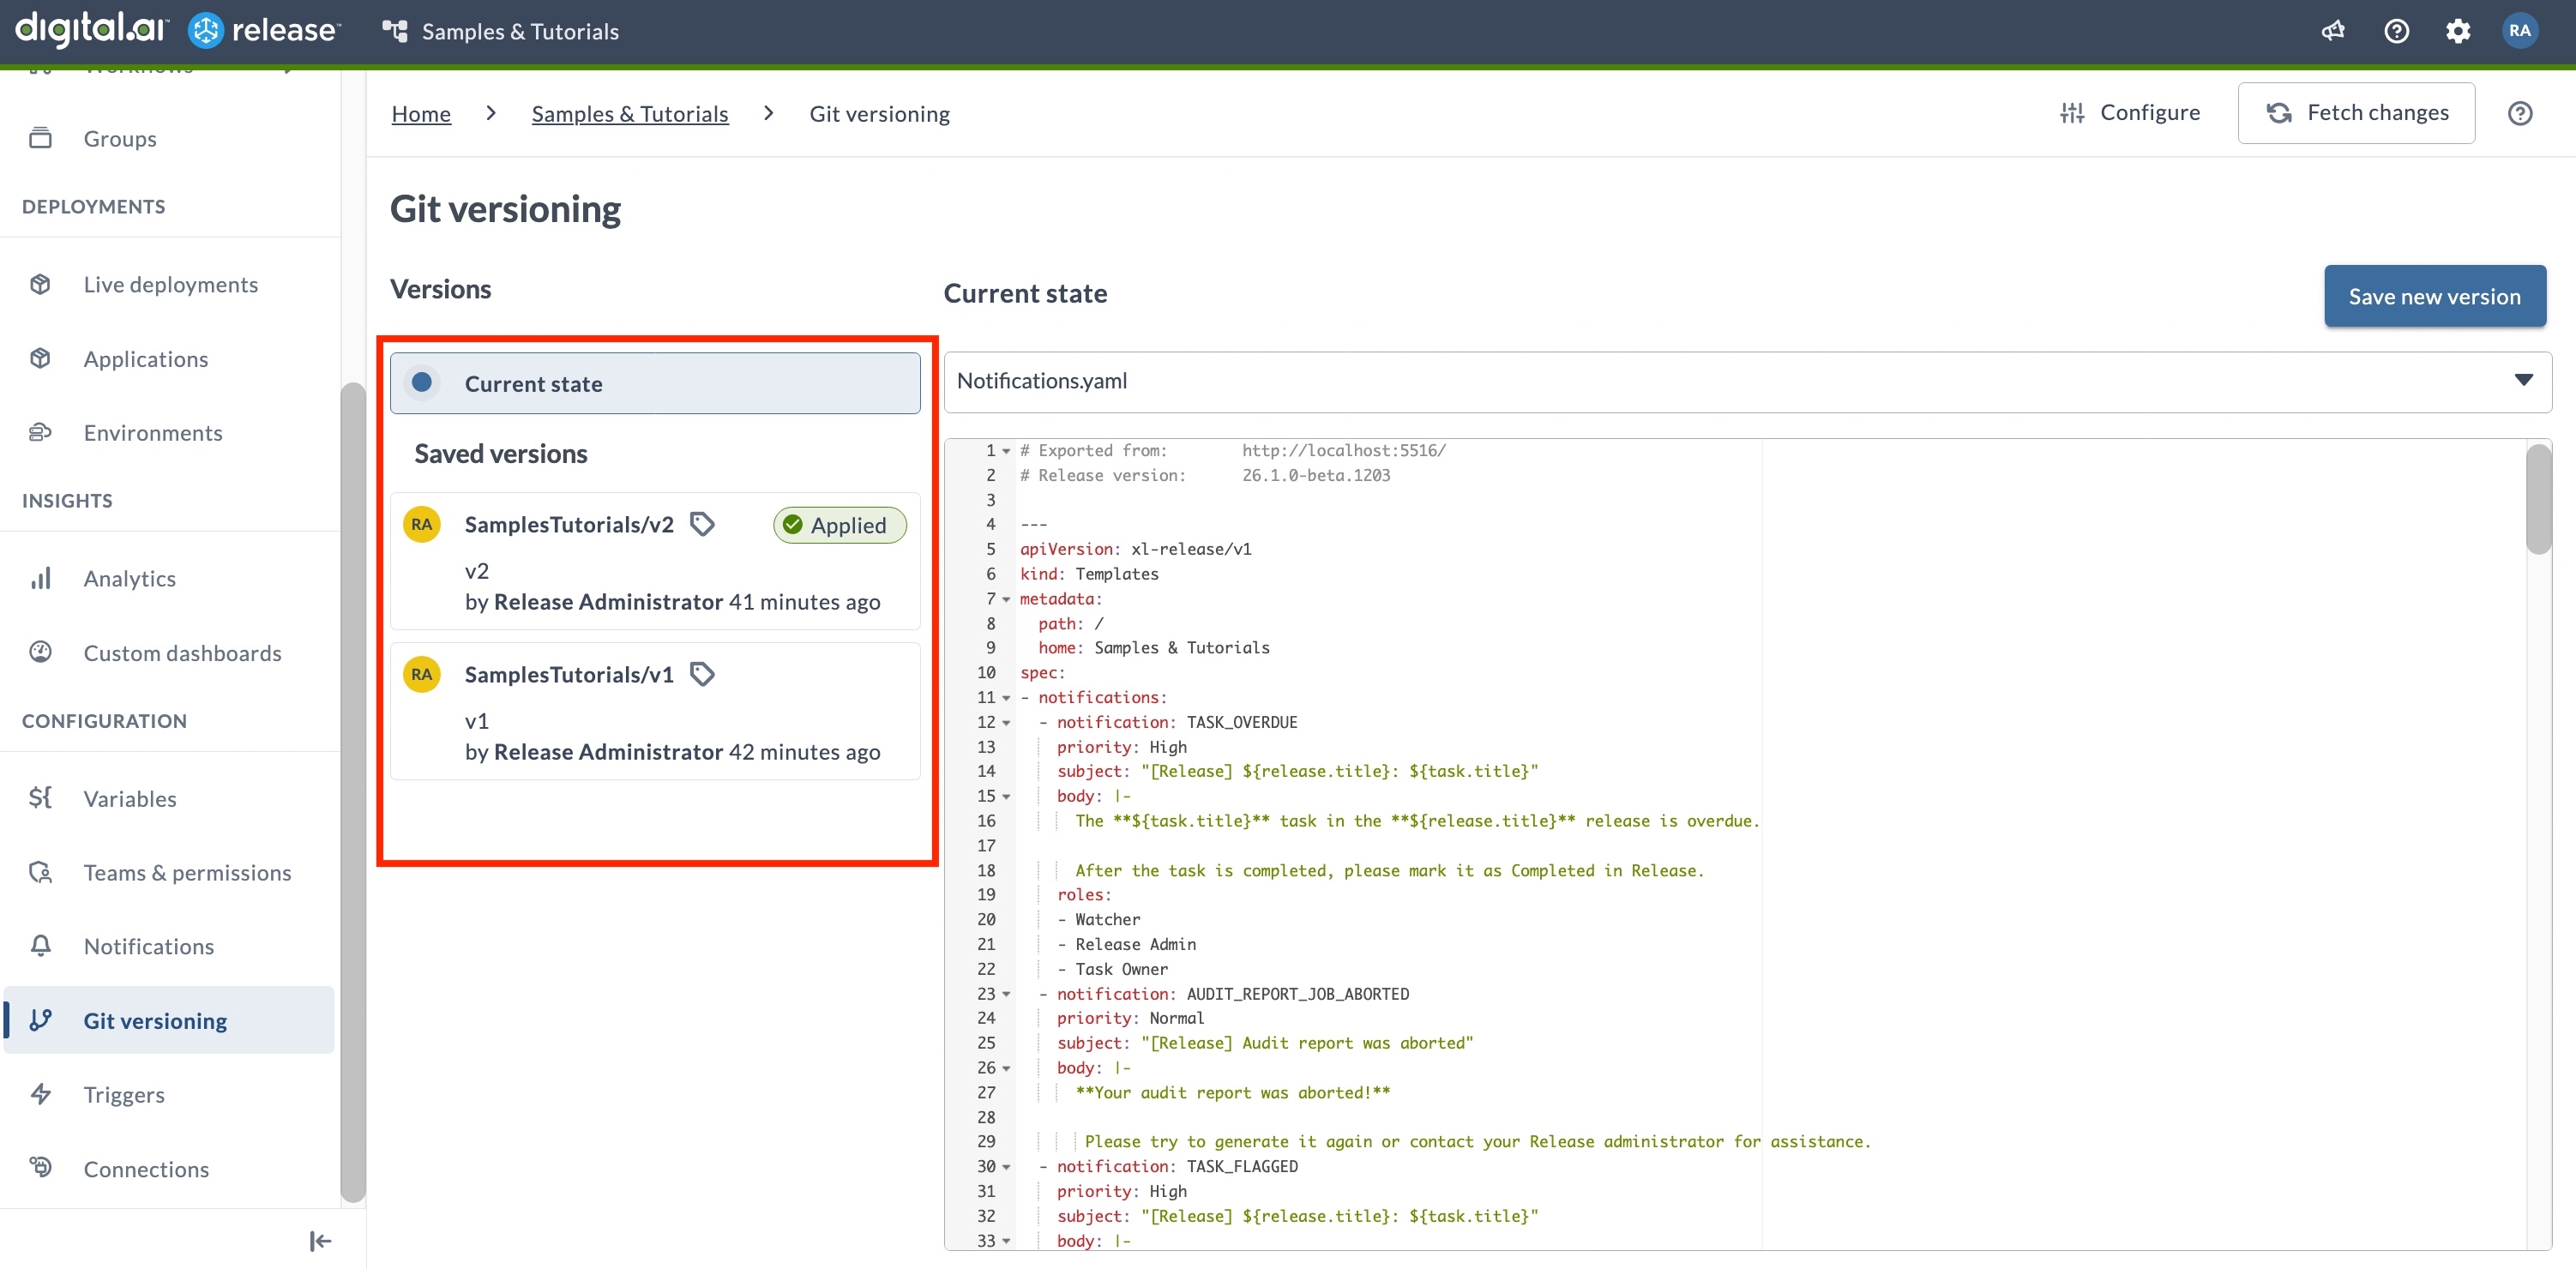
- Review the list of tagged versions shown under Saved versions.
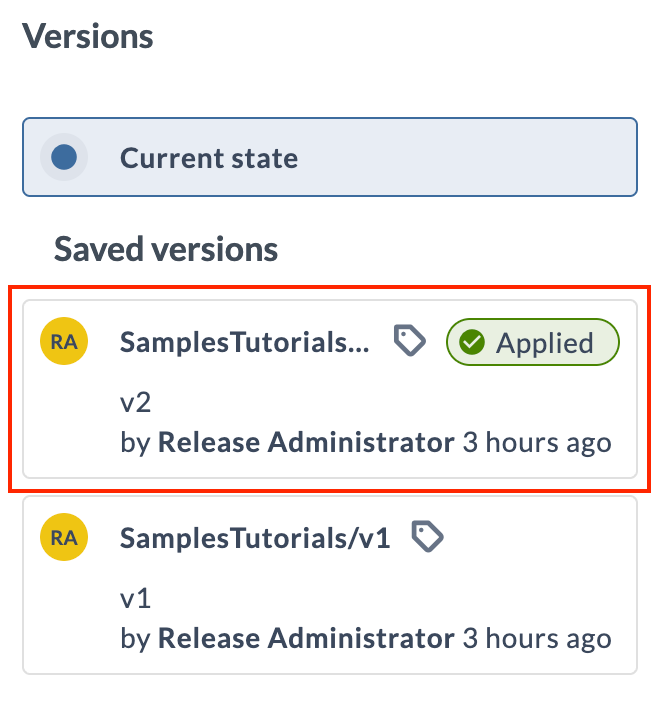
The version list shows three types of entries:
- Current state - Represents the unsaved state of your folder. This includes any changes that have not yet been committed as a new version.
- Applied version - Indicates the version that is currently active in the folder.
note
If changes were made after this version was applied, they will appear under Current state.
- Saved versions - Tagged commits stored in your configured Git repository.
Previewing Version Contents
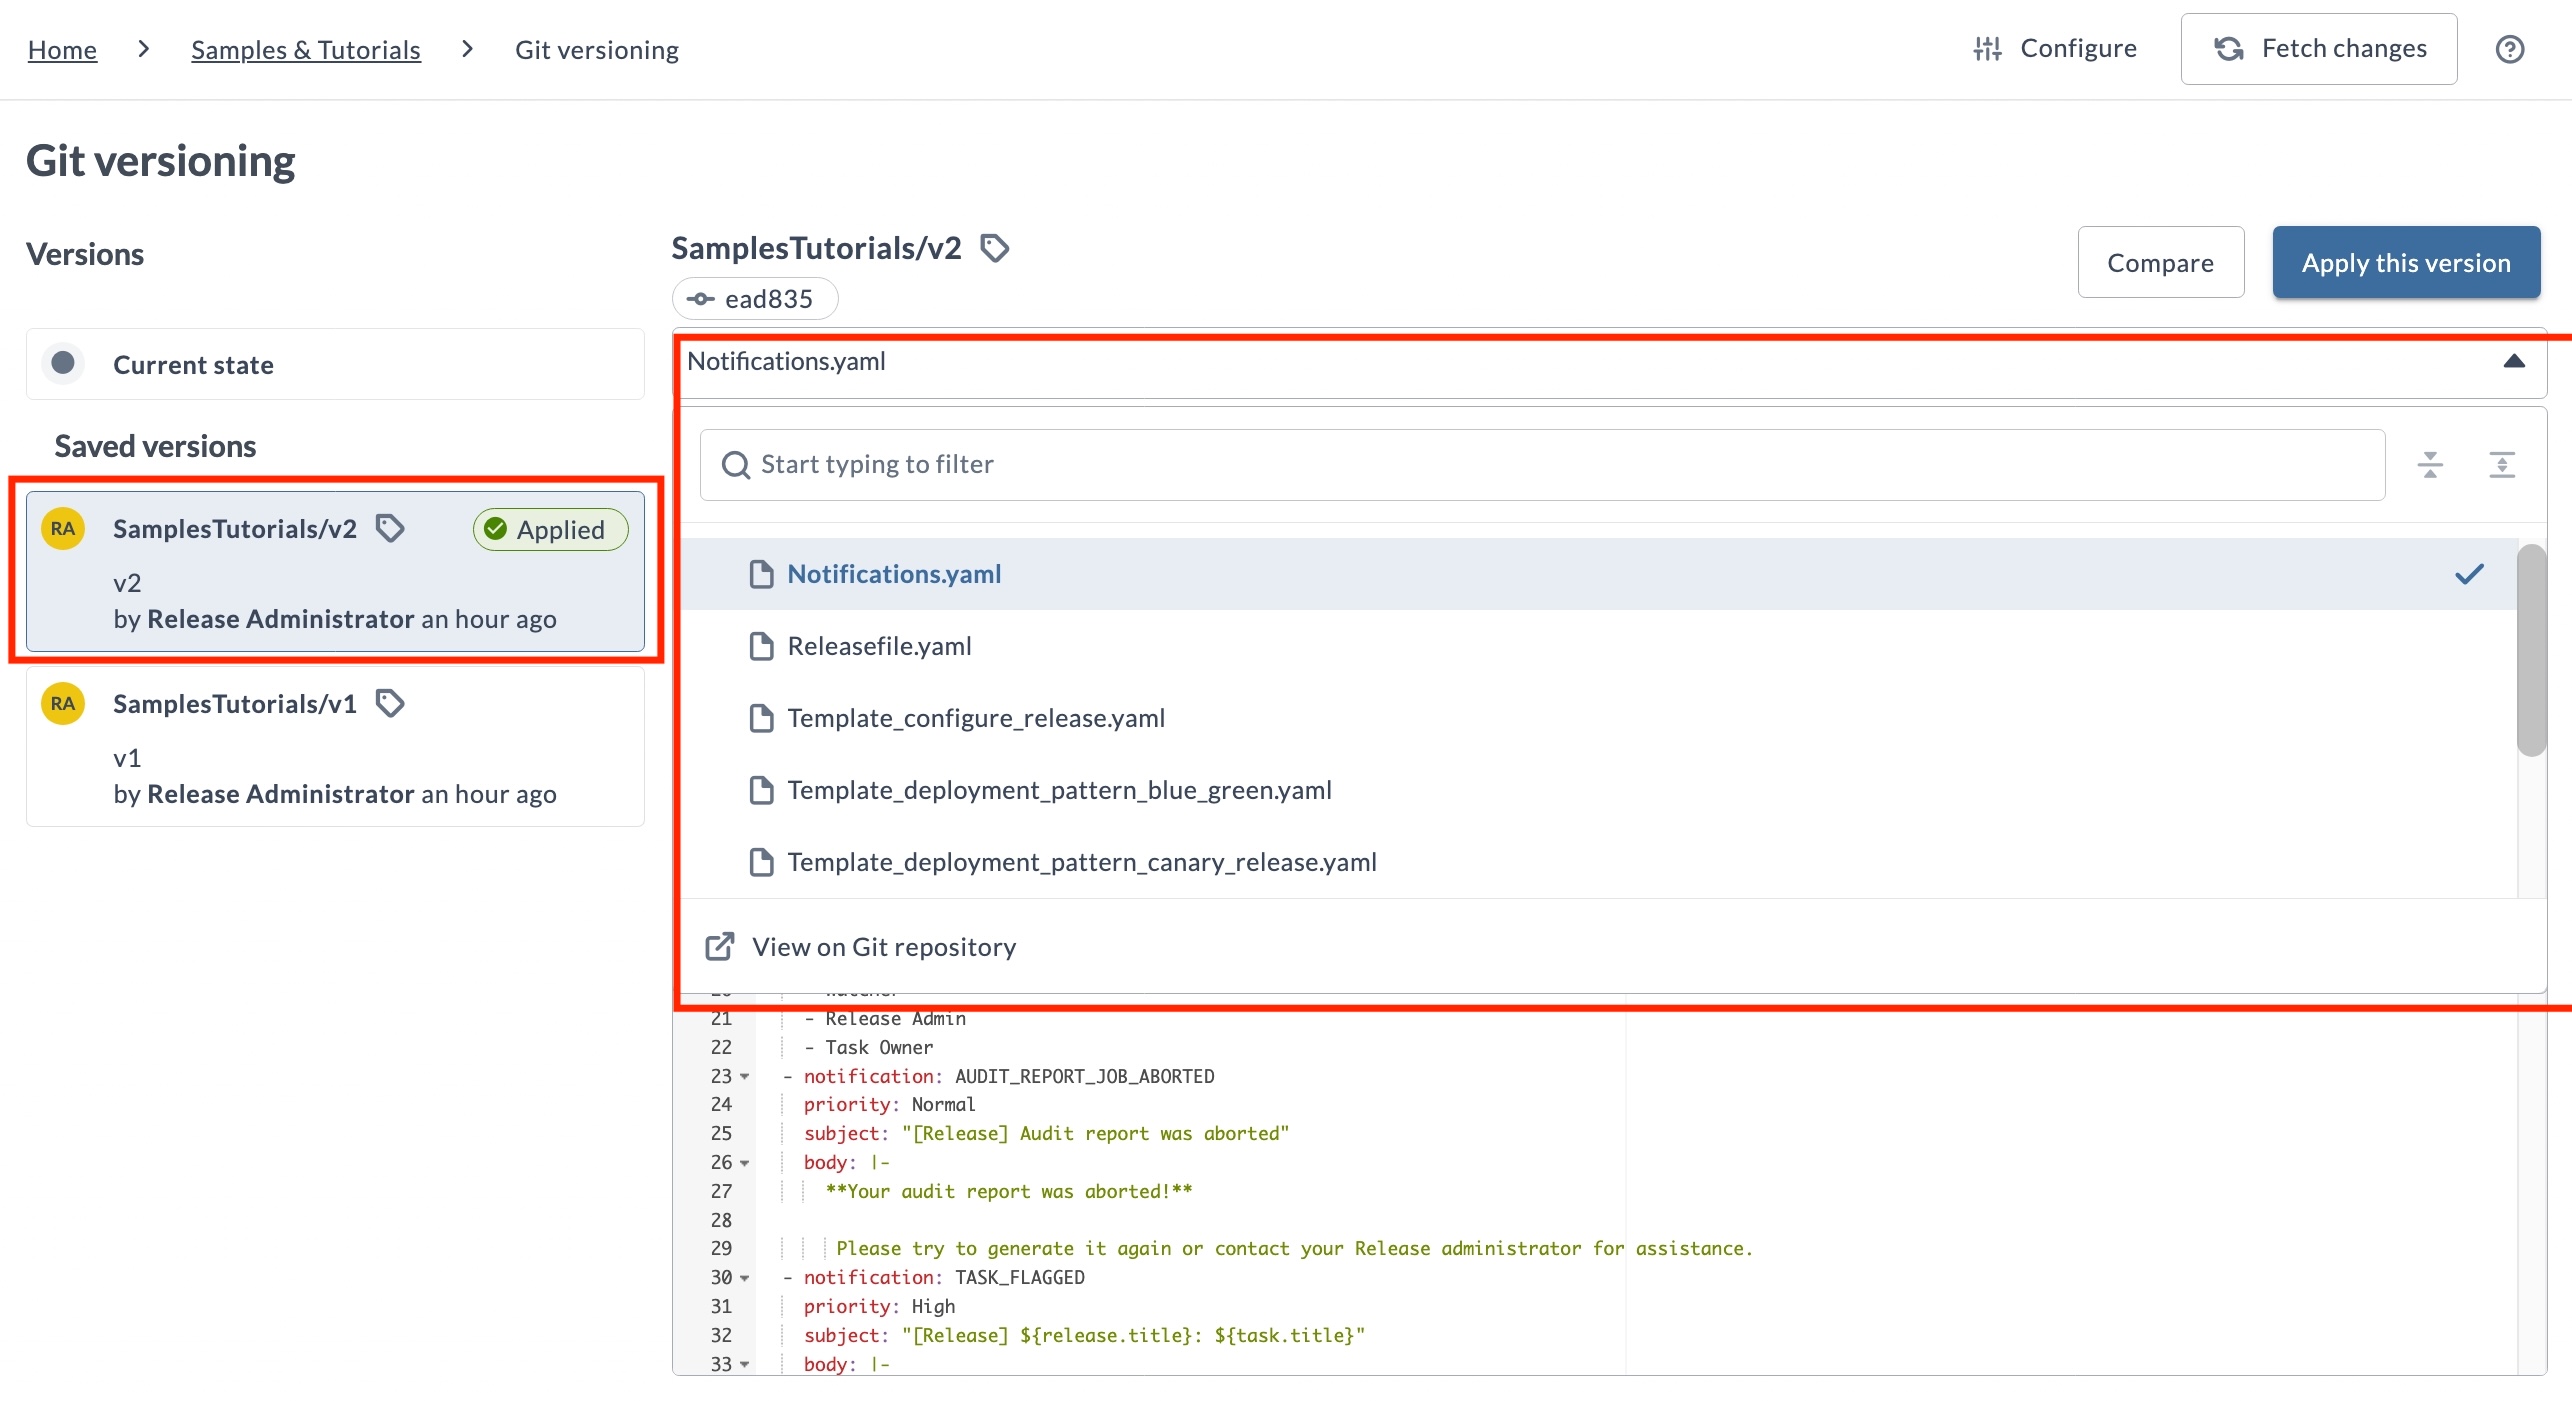
You can preview the YAML files for a selected version using the file selector above the YAML viewer. Use the file selector to browse the files included in the version and load a file into the preview pane.
The file selector lets you search for files by name, scroll through all available YAML files, and select a file to view its contents, making it easy to navigate and inspect large versioned folders.
To view versions and preview YAML files, you must have the View Git versioning permission.
See Teams and Permissions for details.
This feature helps you quickly navigate large versioned folders by allowing you to locate and preview specific YAML files.
Version Actions
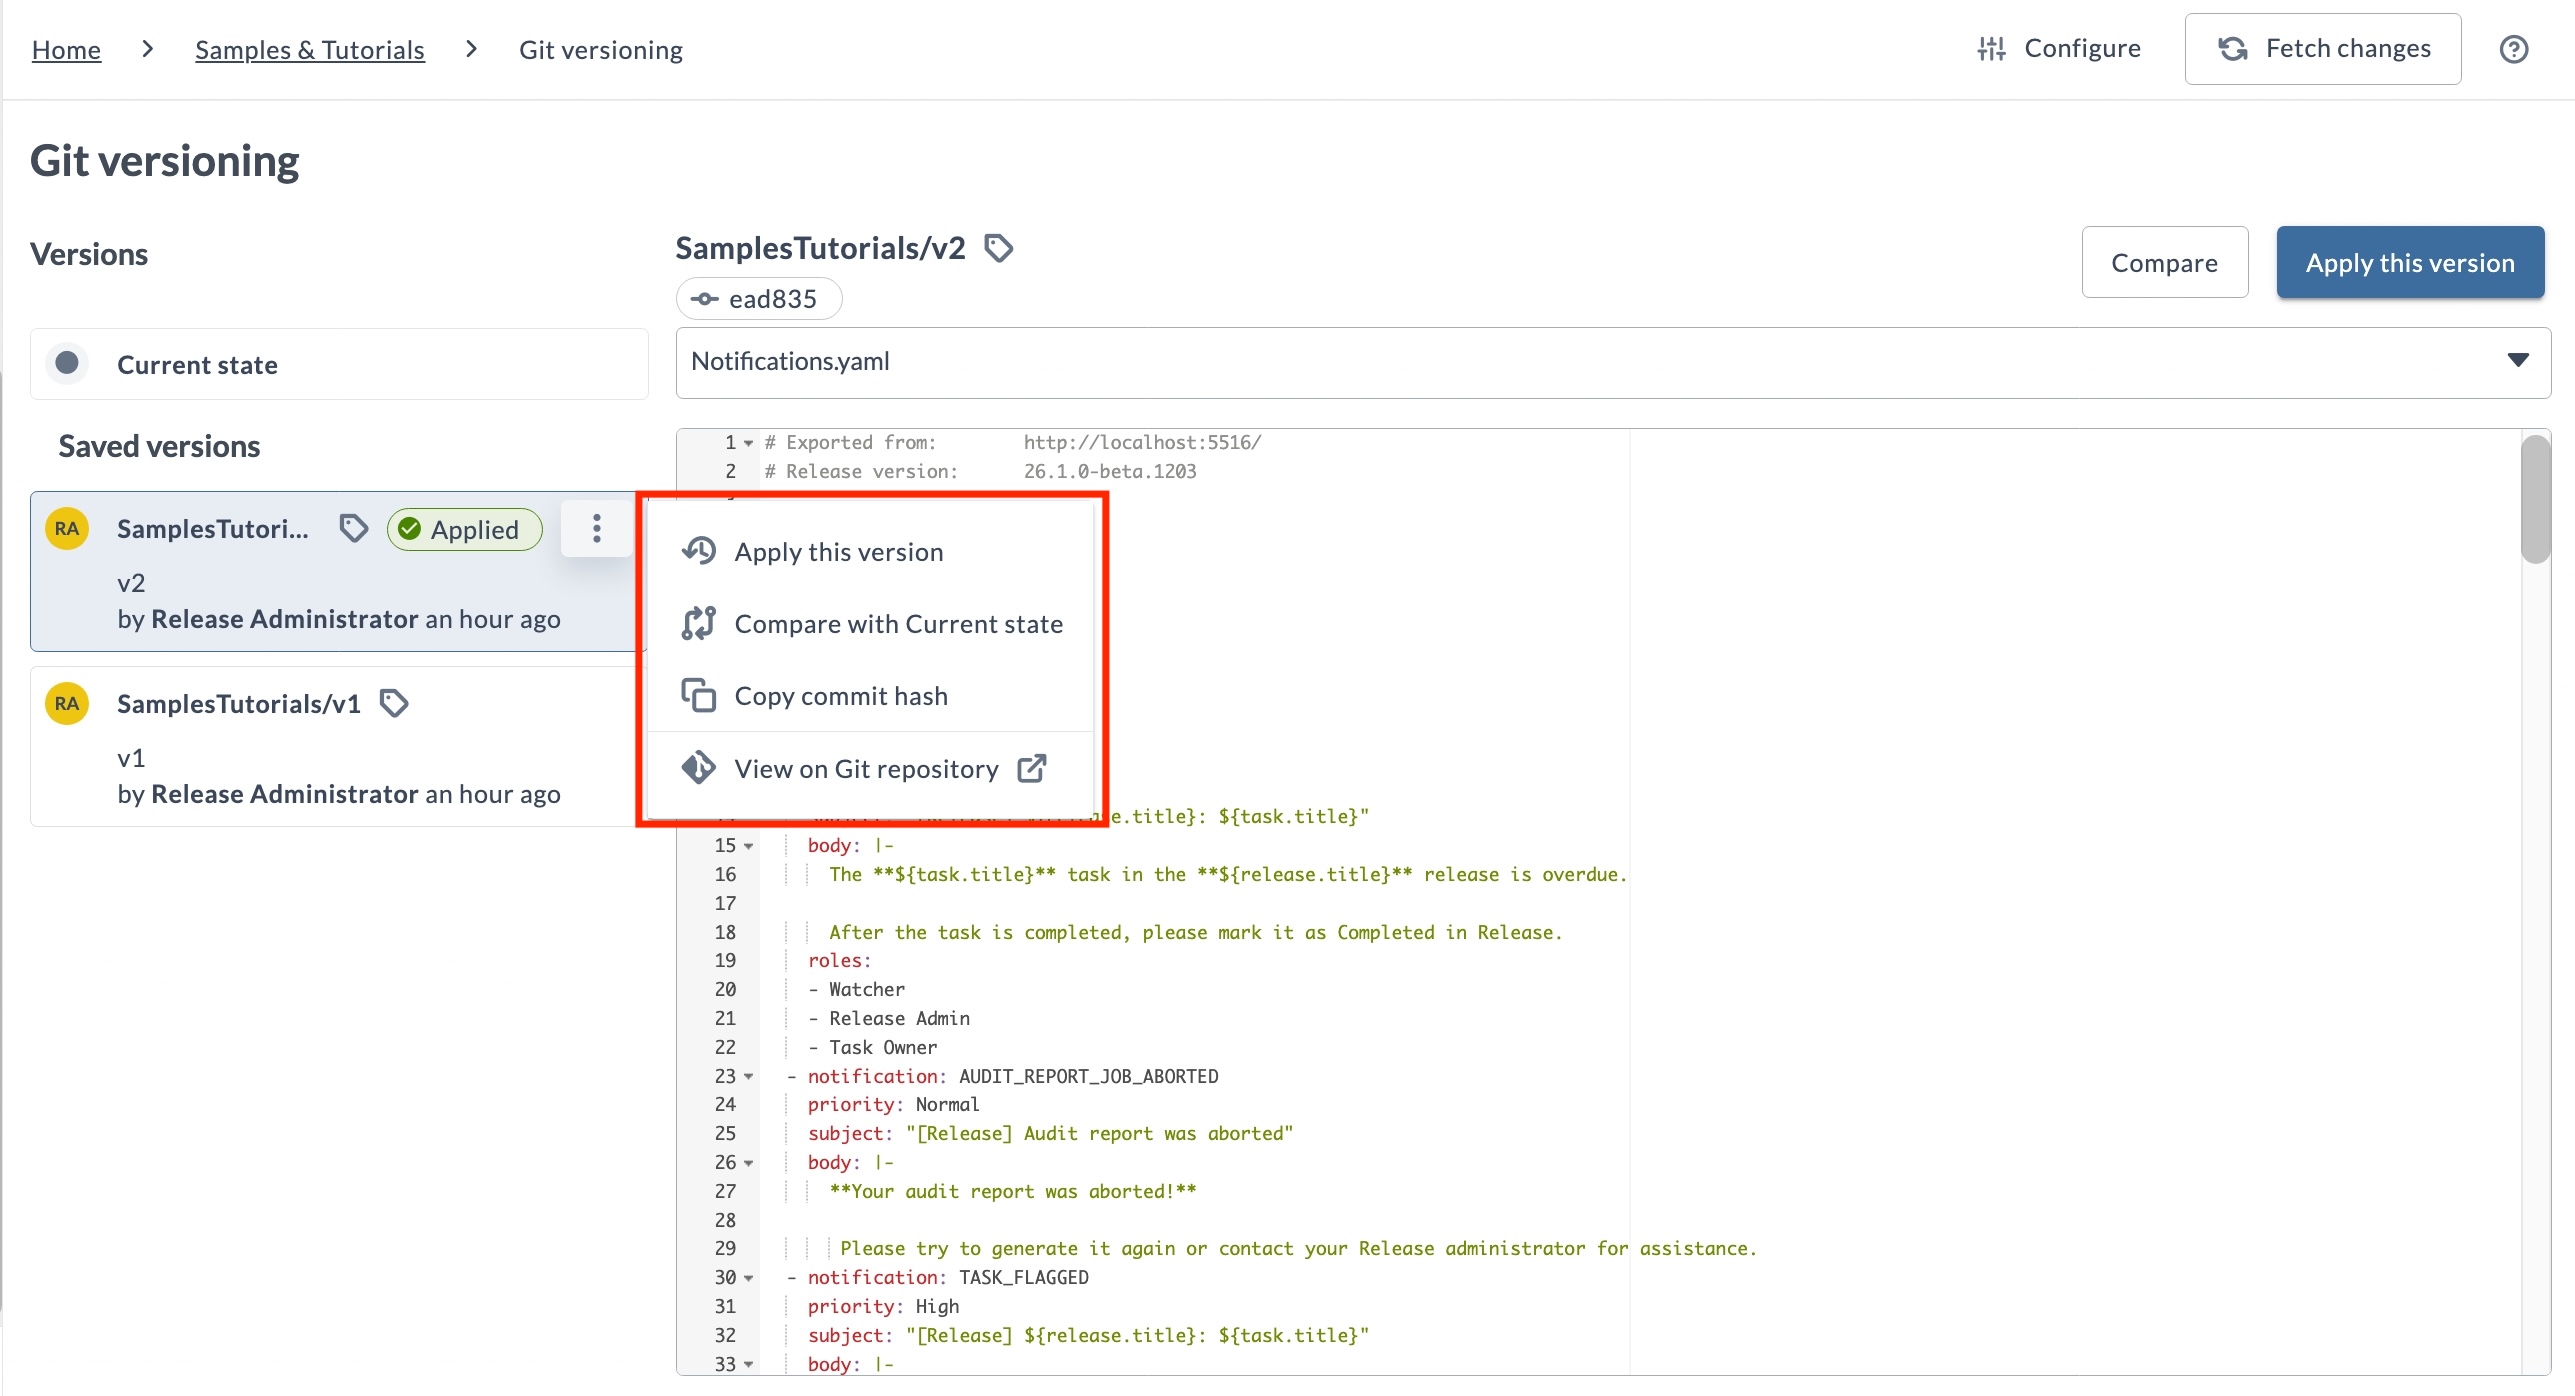
Each saved version card has an ellipsis menu with the following options:
- Apply this version - Apply the selected version to the current folder.
- Compare with Current state - Compare the YAML content of the selected version with the current state of the folder. For more information, see Comparing Versions.
- Copy commit hash - Copies the commit hash associated with the version to your clipboard.
- View on Git repository - Opens the commit in your configured Git provider (GitHub, GitLab, Bitbucket, or Azure Repos). If no provider is configured, a Configure Git dialog appears, allowing you to select a Git provider from the dropdown menu.
To use the View on Git Repository option, the Git repository must have a Git provider configured. If no provider is configured, this feature will remain unavailable until configuration is completed. Configuring a Git provider requires the Edit connections permission (folder#edit_configuration). See Connection permissions for more details.
Fetching Latest Changes
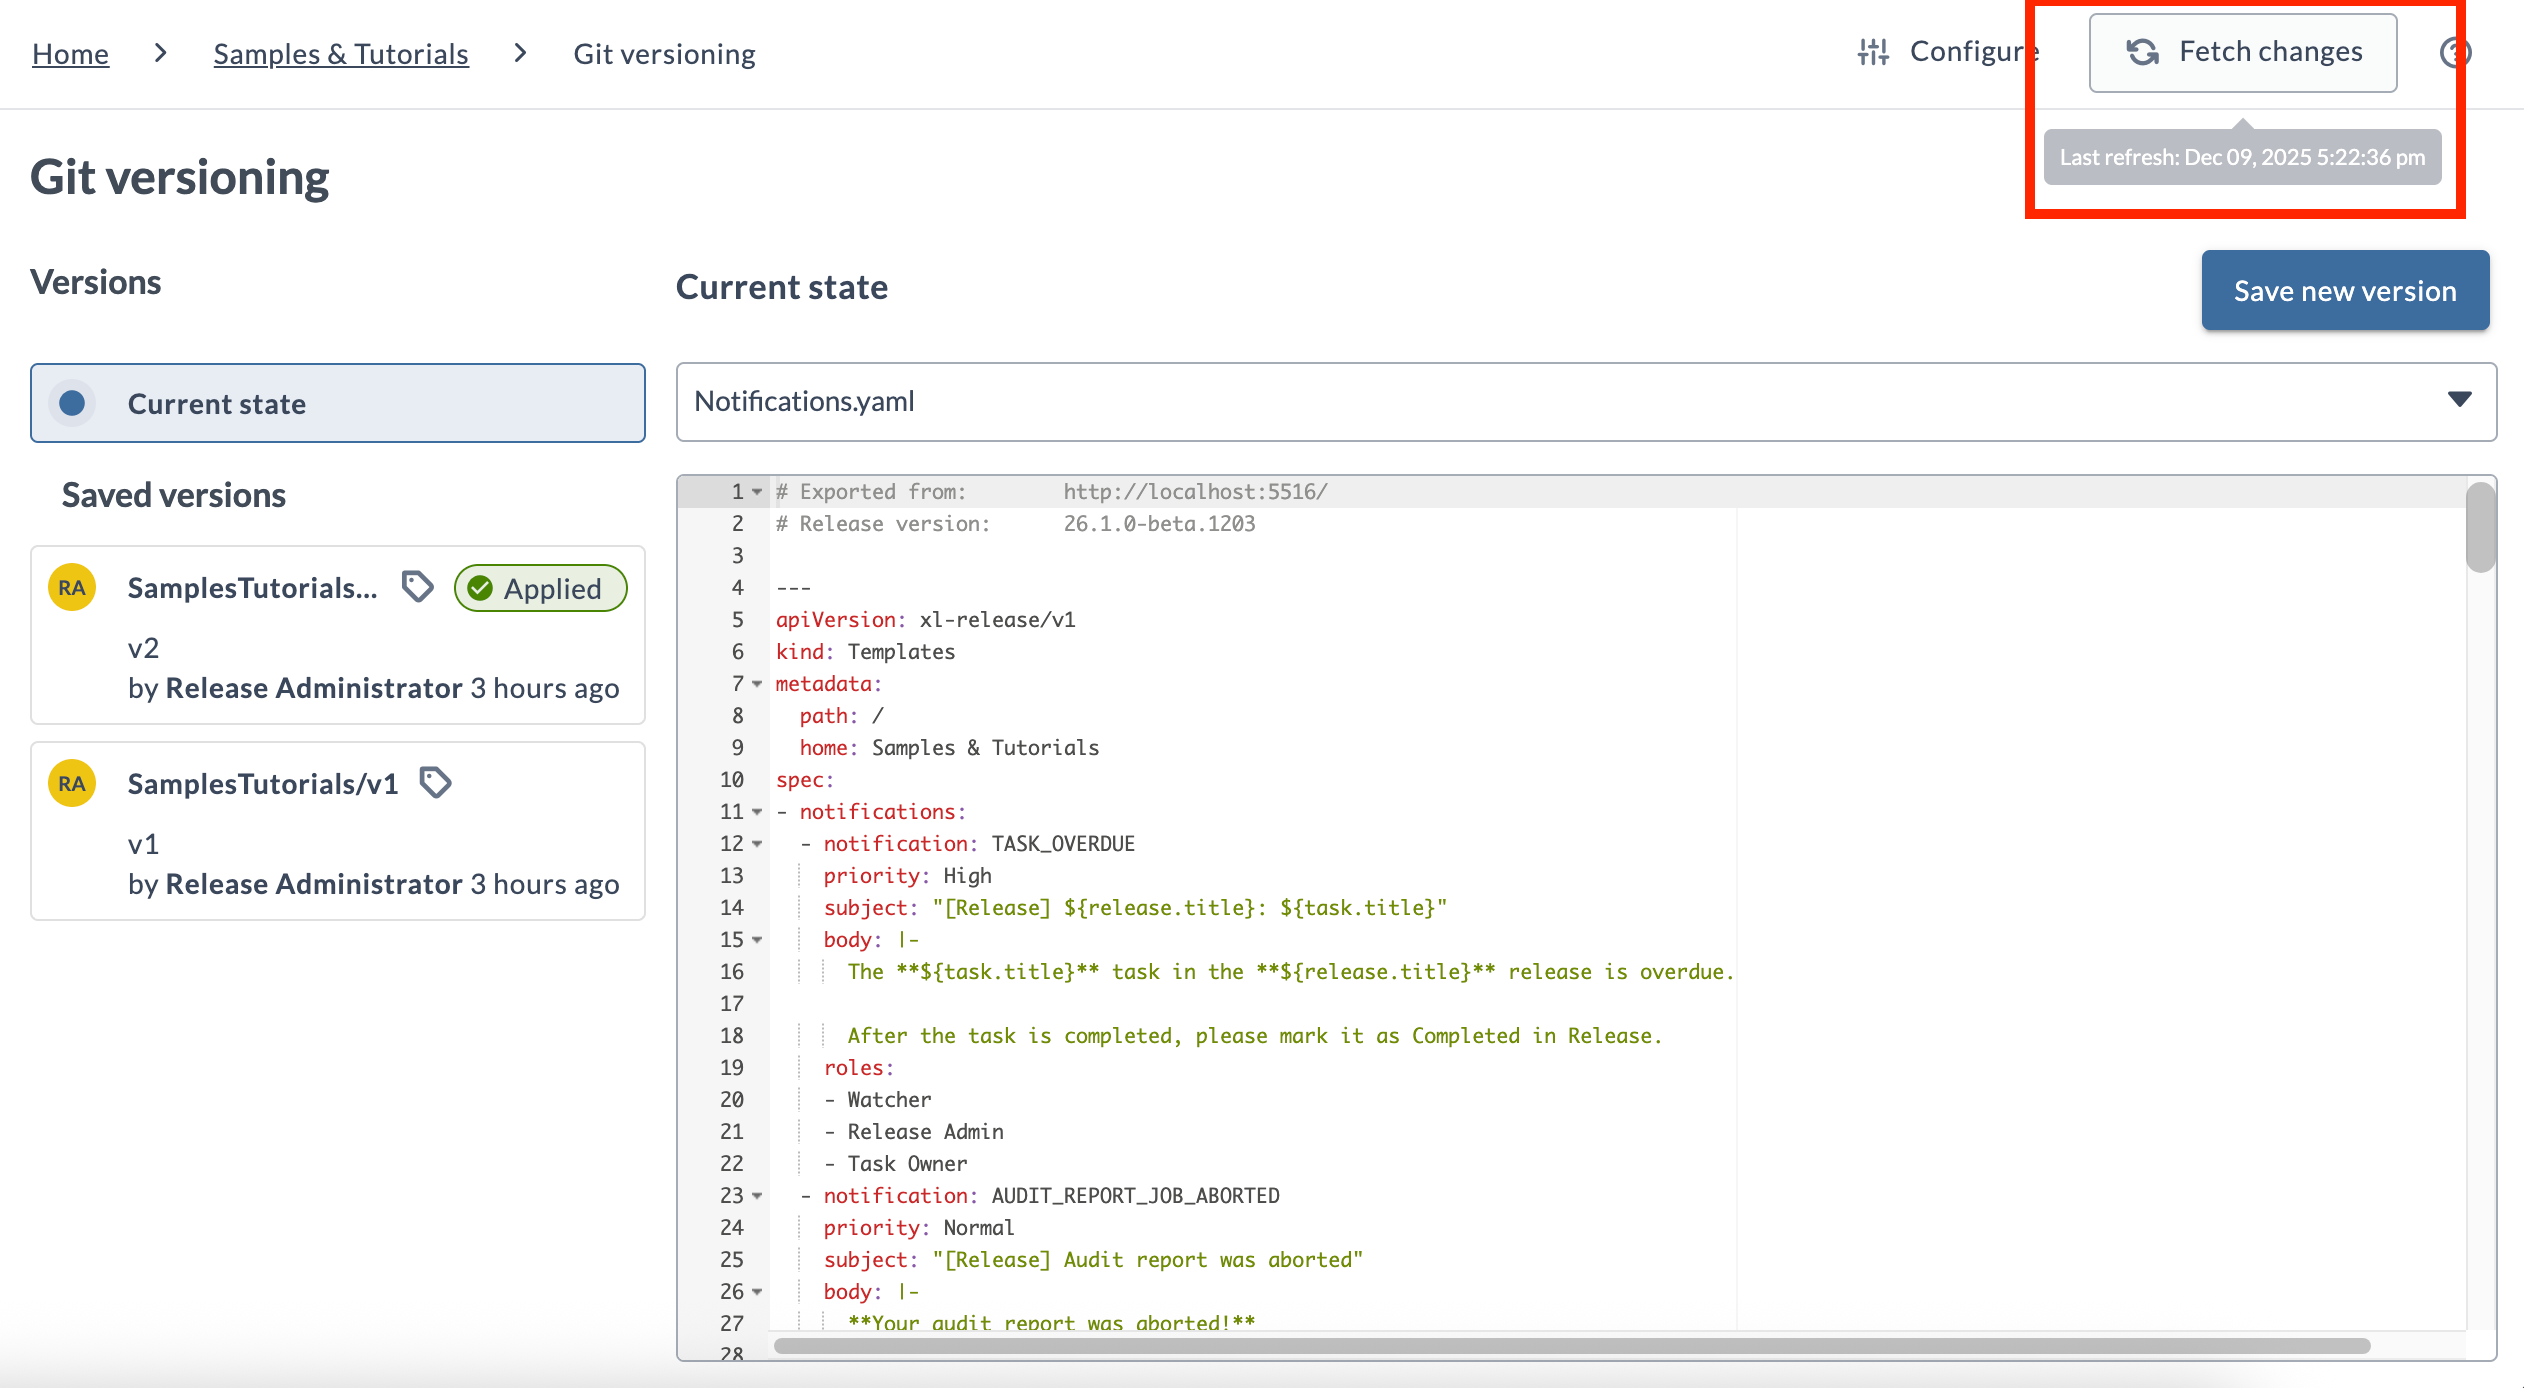
The commits shown in the Versions list come from the local Git repository stored on the Release server.
To update this list with the latest changes from the remote repository, click Fetch changes.
When you hover over Fetch changes, a tooltip displays the timestamp of the most recent fetch.
To fetch changes, you need the View Git versioning permission.
See Teams and Permissions for more details.
Saving a New Version
To save a new version, you need the Create new version permission. Folder owners have this permission by default. See Teams and Permissions permissions for more details.
To export the current state of the folder into the remote repository:
- Go to Git versioning.
- Under Version, click Current state (pre-selected).
- Click Save new version.
- Enter the version name in the Version name field.
This field will be used in the tag of the commit and appended to the configured tag prefix. :::tip Example Tag Format If the folder path isMainand the version isv1.0.0, the resulting Git tag will beMain/v1.0.0- a combination of the folder path and version to represent a specific version. ::: - Enter the commit description in the Description field.
This field will be used in the commit message. If left empty, the Name field will be used in the commit message. - Click Save.
Folder names must not contain the following invalid characters: < > : " / \ | ? *
You cannot create a Git version if any folder name contains invalid characters. This also applies when any item in the folder references a folder with an invalid name.
This can affect, for example:
- Create Release tasks that reference templates in folders with invalid characters
- Triggers that reference folders with invalid characters
- Dashboards with filters that reference folders with invalid characters
If you try to create a Git version when invalid folder names are present, Release shows an error listing the affected folders. Rename those folders to remove invalid characters, then create the Git version again.
For more information, see Folder Naming Restrictions.
Applying an Existing Version
To apply a version, you need the Apply version permission. See Teams and Permissions for more details.
To revert the folder to the state defined in the YAML files of a previously saved version:
- Go to Git versioning.
- Under Versions, click the version you wish to apply.
- Click Apply this version.
- Click Apply in the modal. After a version is successfully applied, it will display an Applied badge on the version card until a new version is saved or another version is applied.
Create Release task templates, triggers, and dashboards store references to items within the versioned folder as relative paths and references to items outside the versioned folder as absolute paths. When you apply a version to a different folder, relative paths resolve against the destination folder while absolute paths continue to point to the original location.
Comparing Versions
You can compare any version with previously saved versions or with the current state of your folder to understand what has changed. This is useful for reviewing differences before applying a version or auditing configuration changes over time.
Compare with Current State
To quickly compare a version with your current folder state:
- Go to Git versioning in your folder.
- Click the version card you want to compare.
- Click the Compare button at the top right.
- Select Current State.
Alternatively, you can click the ellipsis menu (![]() ) on the version card, then select Compare with Current state.
) on the version card, then select Compare with Current state.
For more information, see Version Actions.
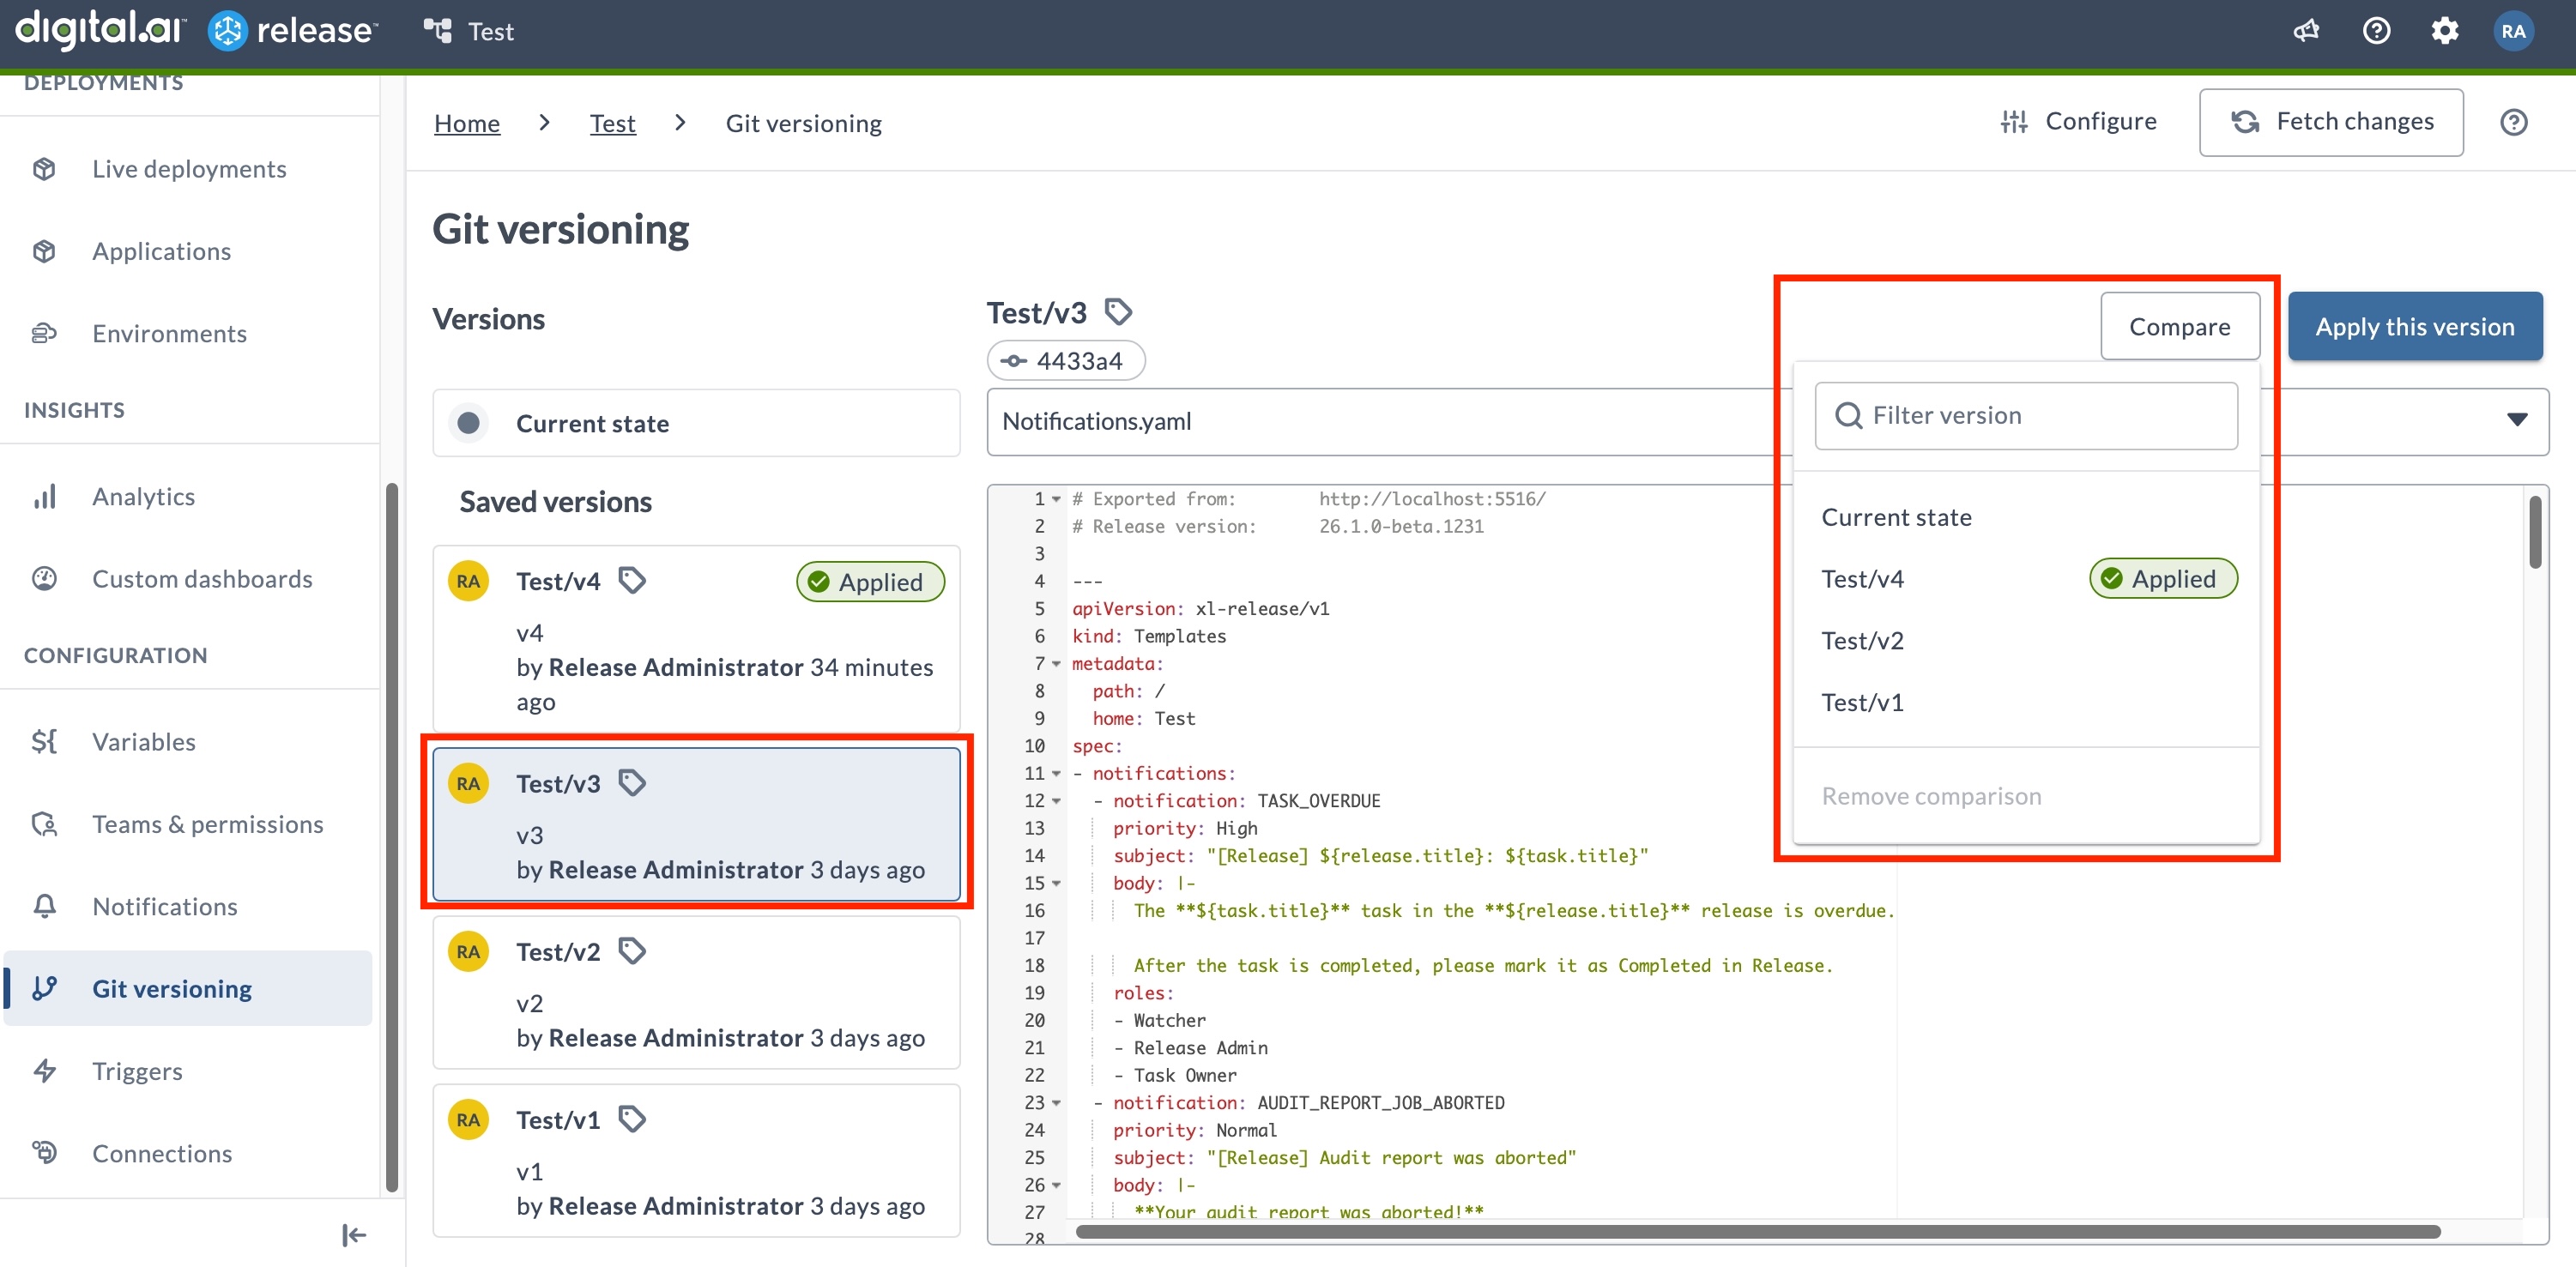
Compare with Another Saved Version
To compare a version with a different previously saved version:
- Go to Git versioning in your folder.
- Click the version card you want to use as the base for comparison.
- Click the Compare button at the top right.
- Select the version you want to compare against from the list of available versions. Use the search box in the compare dialog to quickly find the version you want to compare.
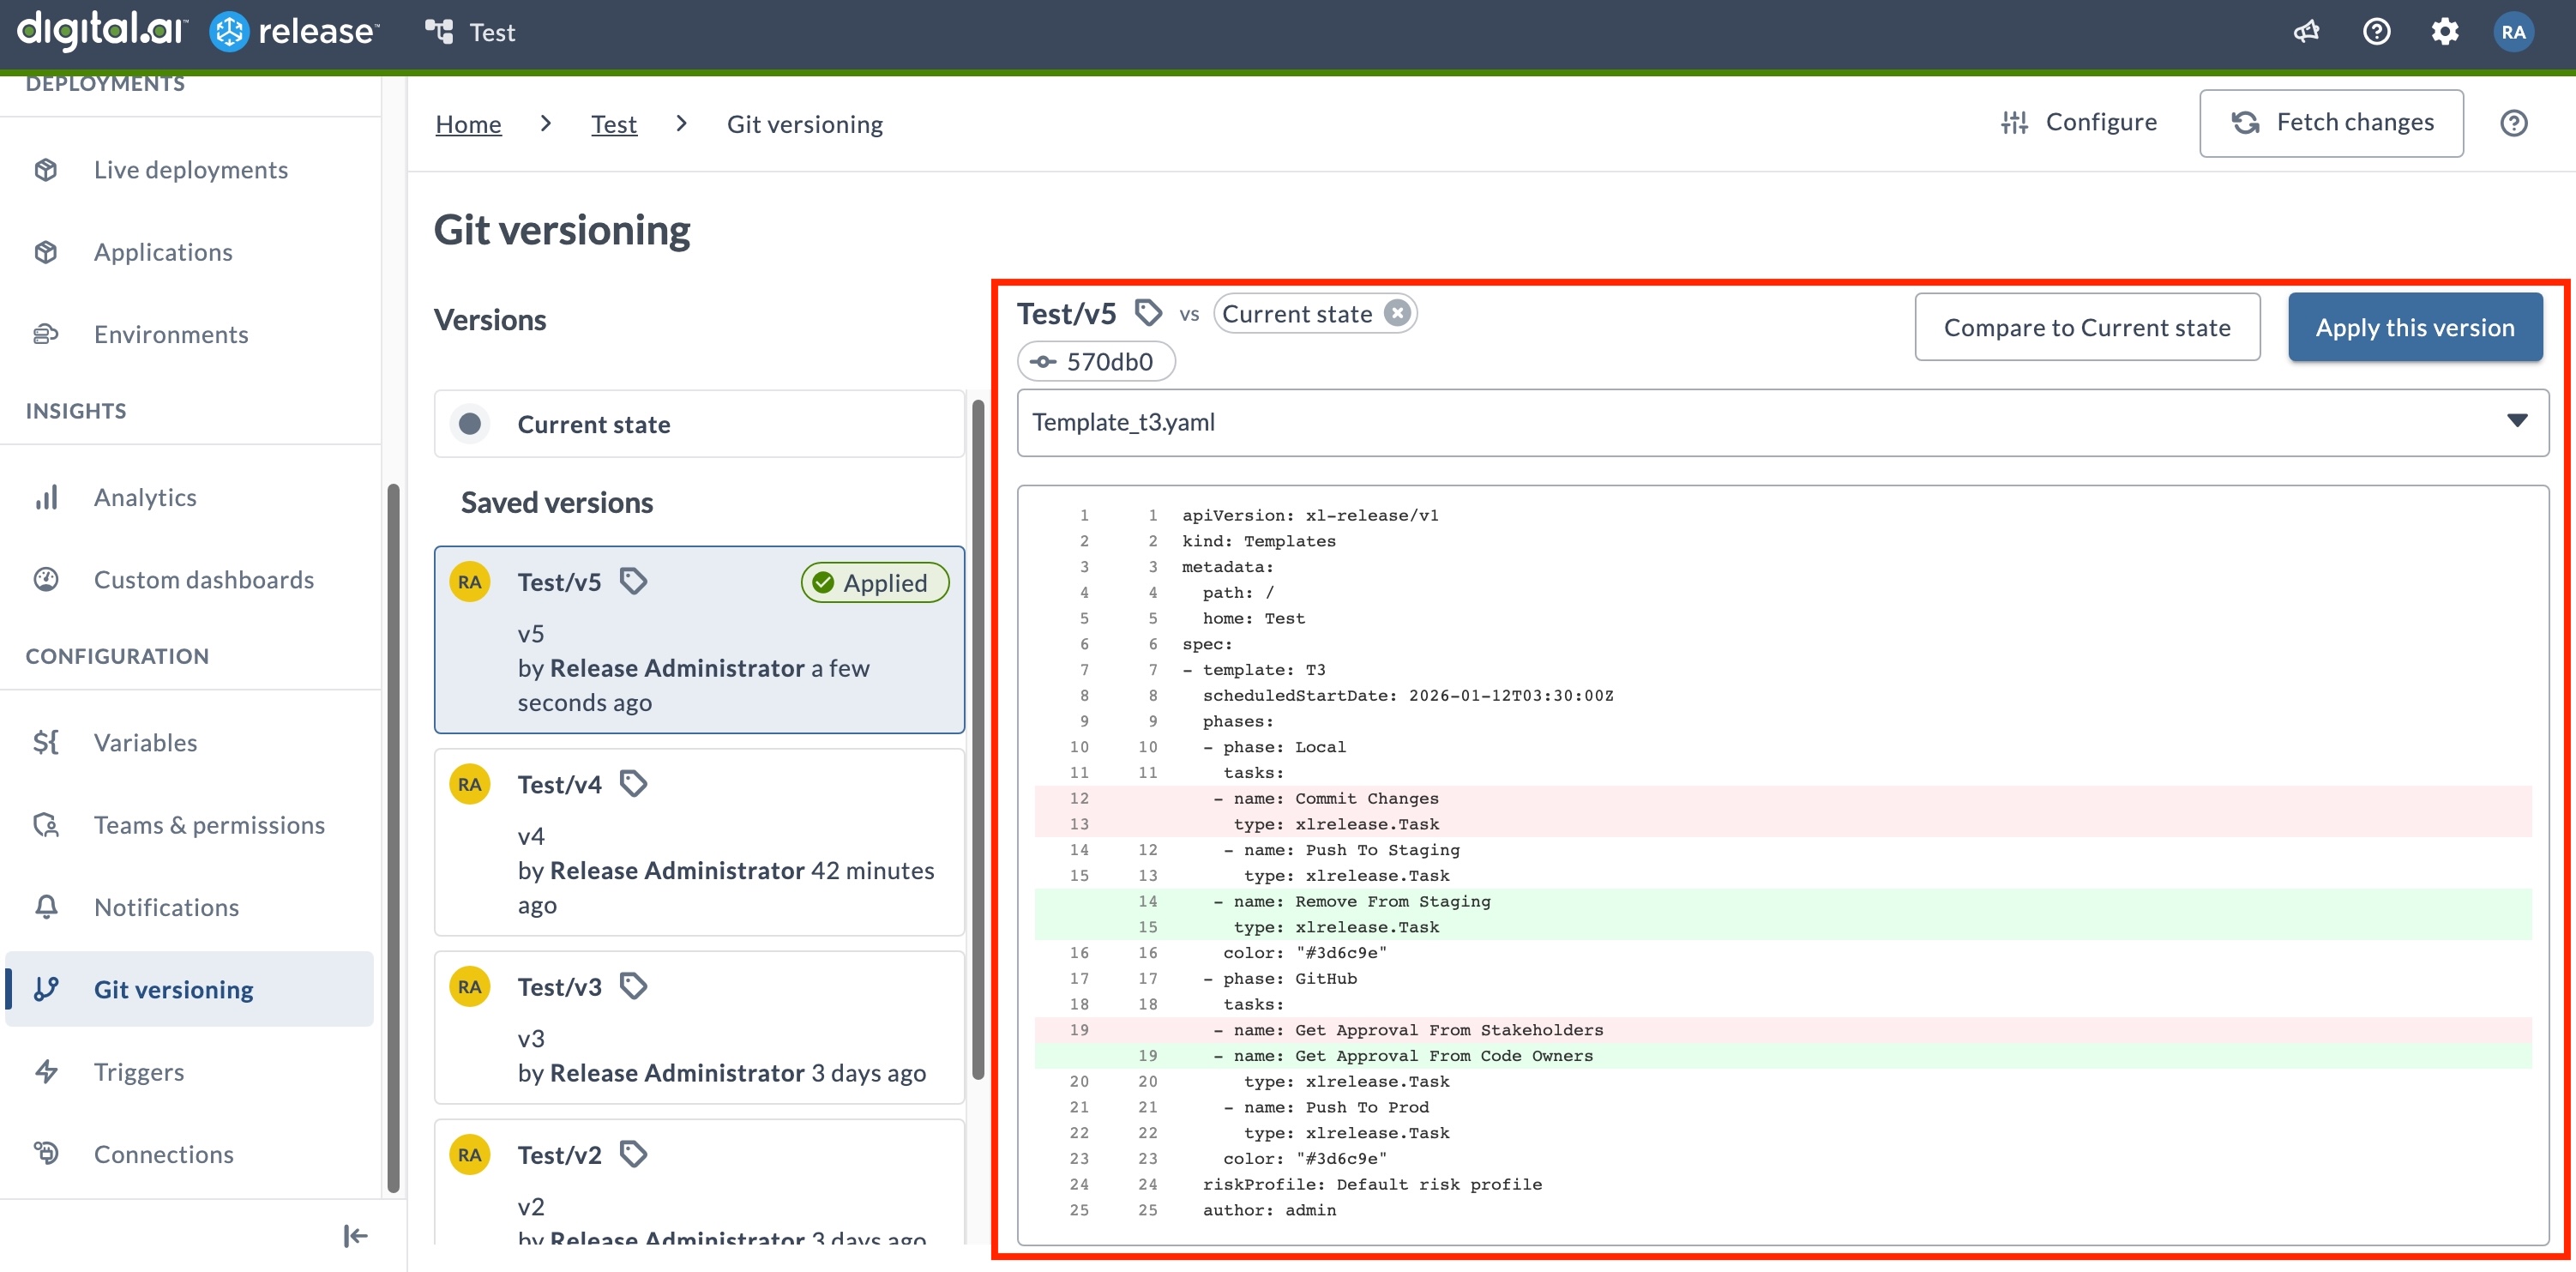
Viewing File Differences
When you select a file in the comparison view, the preview pane displays an inline diff for the main version against the selected version to compare. This allows you to review additions, removals, and modifications.
The diff viewer uses clear visual cues to indicate changes:
- Red highlights – Lines that exist in the main version but are not present in the compared version. These lines were removed in the compared version.
- Green highlights – Lines that do not exist in the main version but are present in the compared version. These lines were added in the compared version.
- No highlight - Lines that are unchanged.
These indicators provide a familiar experience similar to Git diffs.
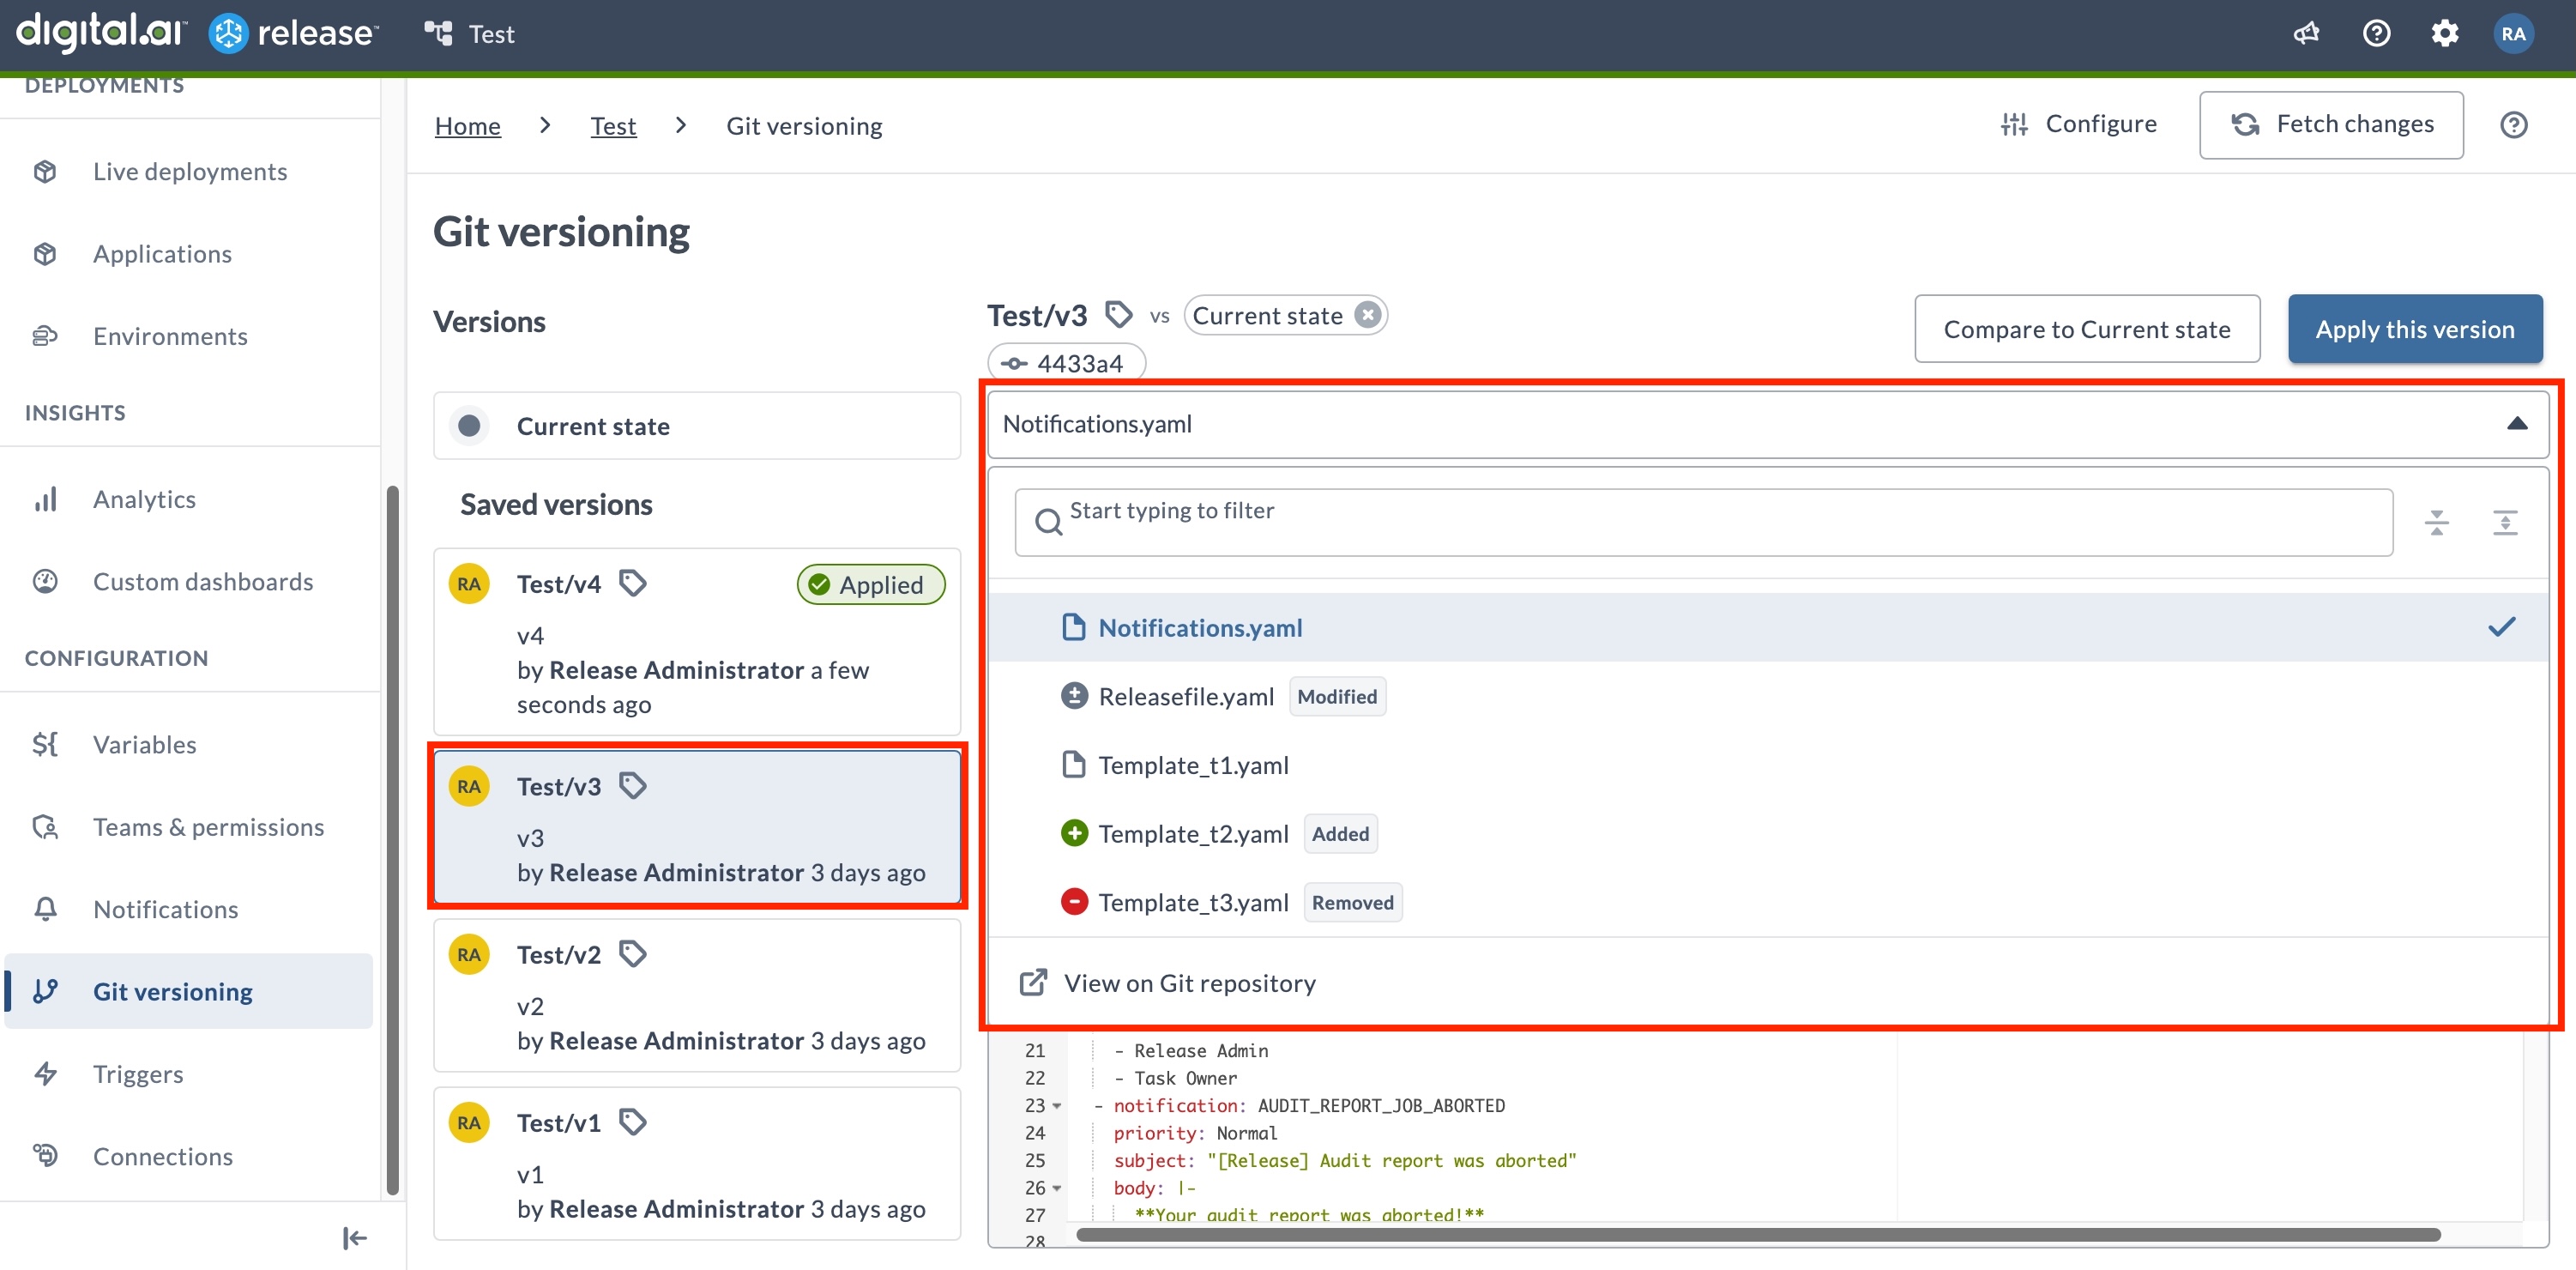
File Change Indicators
The dropdown file explorer in the comparison view uses visual indicators to show what changed:
- Modified - Files that have been changed between the two versions
- Removed - Files that were deleted
- Added - New files that were created
- Unchanged - Files that are identical between both versions (no pill indicator)
You can click any file in the dropdown to switch the preview and view a diff of that specific file against the selected comparison version.
Exit Comparision View
To exit comparision view, click Compare > Remove comparison or alternatively click the x on the comparision pill.

Relative Path References
When using the Multiple files Git versioning strategies, template and folder fields in a Create Release task, trigger or dashboard are stored as relative paths, resolved from the folder where Git versioning is configured — the home directory. If these fields reference a location outside the versioned folders the path will be created as an absolute path.
path vs home in YAML Metadata
Each versioned YAML file carries two metadata fields:
| Field | Meaning |
|---|---|
home | The absolute path of the folder containing this entity. All relative references (./, ../) resolve from here. |
path | The entity's location relative to the Git versioning folder (the folder where Git versioning is configured). |
Path Notation
| Notation | Resolves to |
|---|---|
./ | The home folder itself |
../ | One level up from home |
../../ | Two levels up from home |
| No prefix | Absolute path — used when the target is outside the home folder hierarchy |
Example
Consider this folder structure, where Git versioning is configured on Folder A:
Main/
├── Folder A/                 ← Git versioning root
│   ├── Template A
│   ├── Folder B/
│   │   ├── Template B
│   │   └── Folder C/
│   │       ├── Template C1
│   │       ├── Template C2
│   │       └── Folder D/
│   │           └── Template D
└── Other/
    └── Template Other
For Template C1, the YAML metadata is:
metadata:
  path: Folder B/Folder C                      # location relative to Folder A (the Git versioning root)
  home: Main/Folder A/Folder B/Folder C        # absolute path — base for all relative references
Create Release Tasks within Template C1:
| Task target | template | folder | Release created in |
|---|---|---|---|
| Same folder | ./Template C2 | ./ | Main/Folder A/Folder B/Folder C |
| Subfolder | ./Folder D/Template D | ./Folder D | Main/Folder A/Folder B/Folder C/Folder D |
| One level up | ../Template B | .. | Main/Folder A/Folder B |
| Two levels up | ../../Template A | ../.. | Main/Folder A |
| Outside hierarchy | Other/Template Other | Other | Main/Other |
Handling Passwords in Configurations and Templates
The plain text passwords in versioned entities will not be exported, instead the generated YAML file will have !value somePassword placeholder tags. This is to avoid leaking passwords to a plain text file on an external server.
The variables should be one of the following:
- Global password variables
- Folder password variables of a parent folder (not versioned)
- Folder password variables of the versioned folder, if you disable versioning for variables in folder version control configuration
- Folder password variables of the versioned folder, if they are External Password Variables with the Secrets Server configured outside the versioned folder
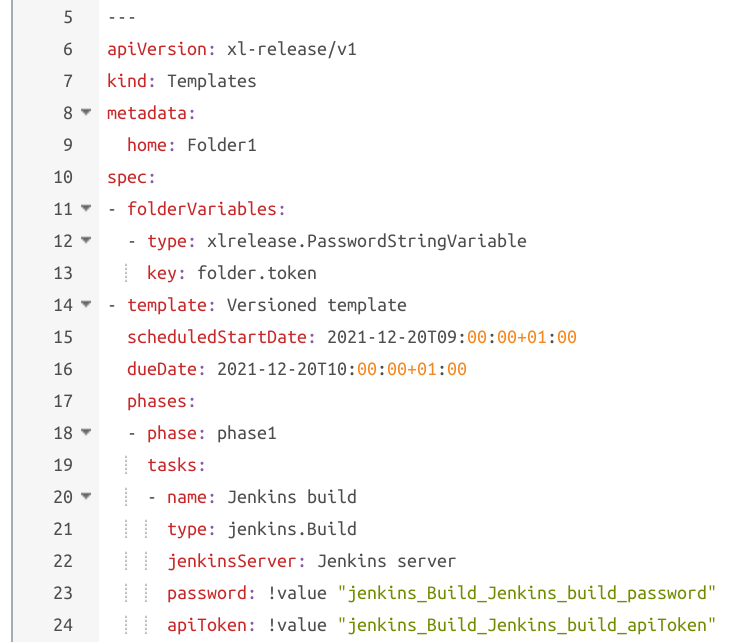
Password Placeholders
When you create a new version, all properties containing plain text passwords in the generated YAML files are replaced with !value tags with placeholders. The actual passwords are never included or displayed in the YAML file.
For example:
!value "jenkins_Server_jenkins1_password"
This applies to password values found in:
- Connections - password/secret fields in versioned Connections
- Templates - properties, run automated tasks as user password field
- Templates - template tasks with Connection password/secret fields
- Triggers - passwords for Connections for Git, Jira, Nexus and others
- Triggers - create release password-type variable values
- Variables - password-type variable values
The mapping between placeholder and actual password of every versioned folder is saved and maintained in the Release database, and is automatically updated every time you create a new version or apply an old version. You can switch to an older folder version with different entities without losing the passwords, as the older mappings are not deleted.
- When you apply an existing version, the current folder state is generated and the mapping is updated before you apply the version.
- There is no UI to view the mapped values. However, you can use XL CLI to extract the password.
Password Validation Warnings
The system displays two types of password validation warnings:
- Hard-coded passwords: Appears when plain text passwords are used instead of variables
- Missing passwords: Appears when password placeholders lack corresponding values
A Warning icon appears next to versions that have unresolved password issues.
![]()
Warning About Hard-coded Passwords
When creating a new version, a warning message is displayed if any of the properties defined in the YAML files uses a hard-coded password (plain text password), and you try to save as new version.
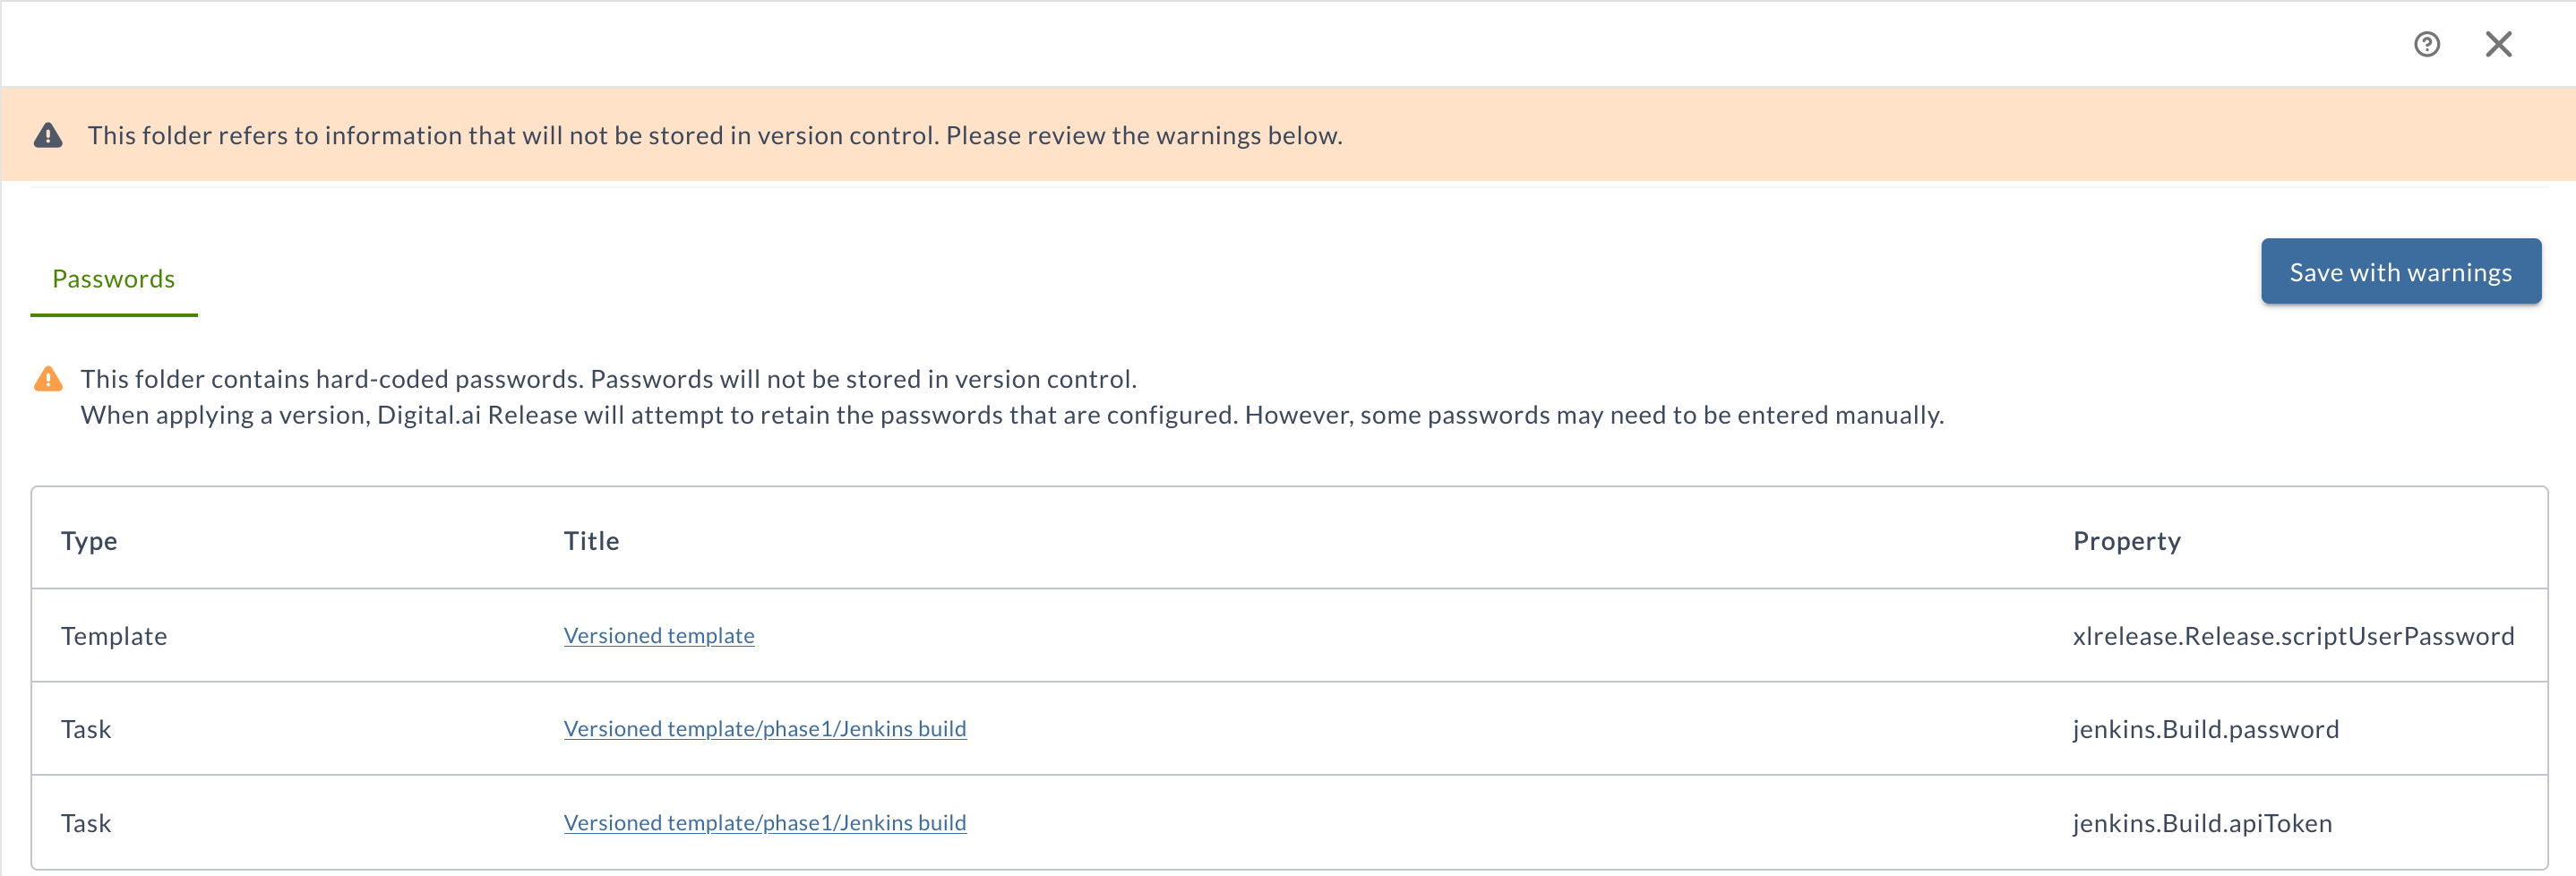
You may create a new version by clicking Save with warnings button. However, it is recommended to resolve the warnings and use password variables instead of plain text passwords.
To resolve the warnings:
-
Click the link in the Title column.
The folder template page appears. -
In the Template details section, click the
${toggle button to switch from password to password variable.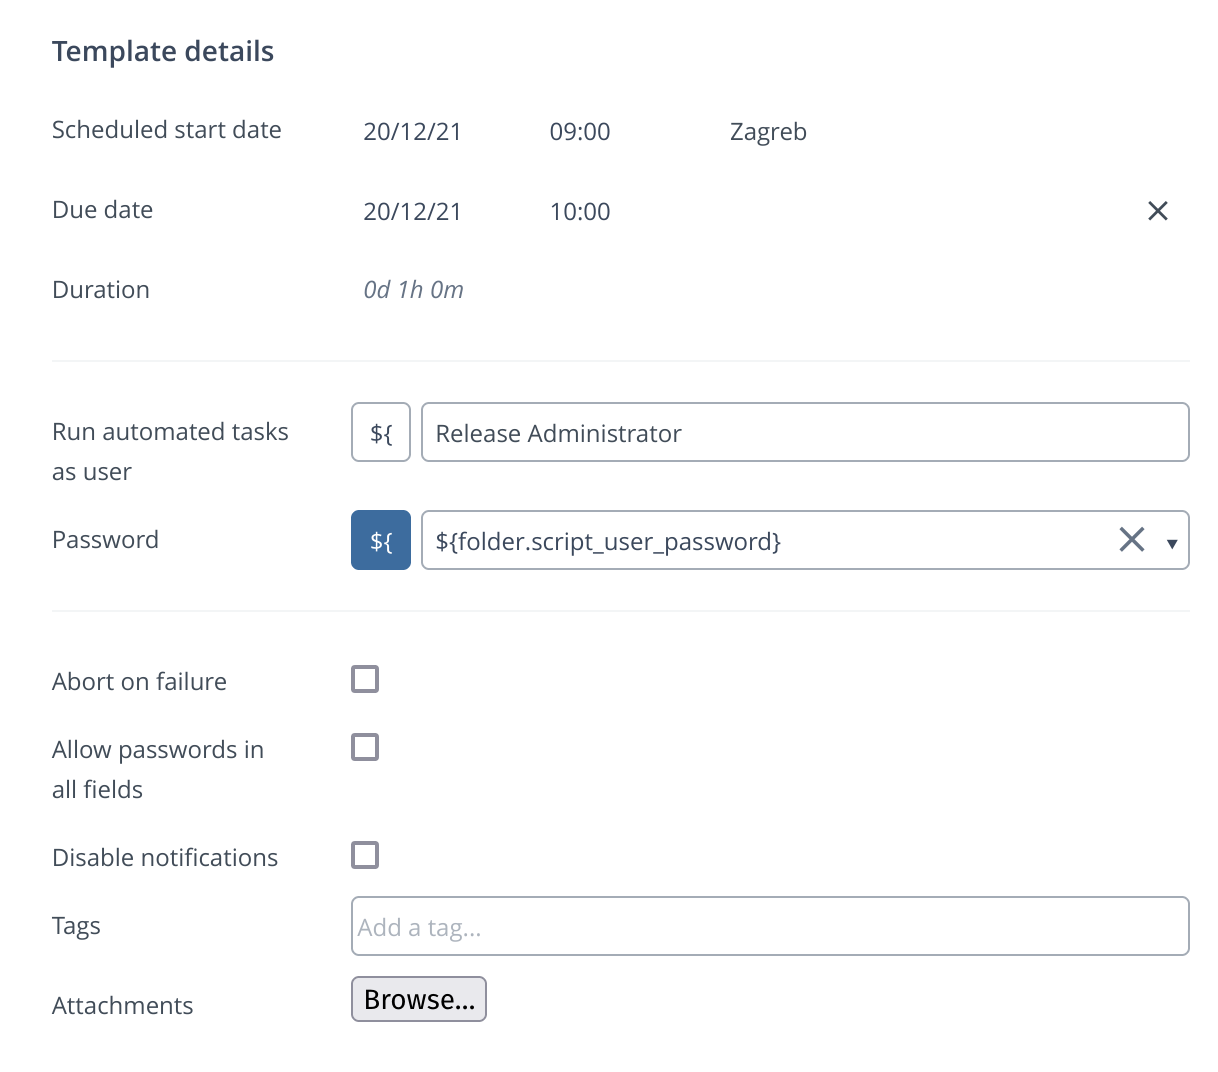
-
In the Password box, click to select the variable from the drop-down menu.
noteIf you have not created a password variable already, you can create the variable from Configuration > Global variables. For more information, see Create Release Variables.
Warning About Missing Passwords
When applying an existing version, a warning message is displayed if any of the properties defined in the YAML files has a placeholder in the password field (!value tags) but there is no password mapped to the placeholder in the Release database.
You may ignore the warnings after applying the version. The Password fields with missing passwords will be kept blank.
To resolve the warnings:
-
After updating the missing passwords for the properties in the YAML file, select the Done checkbox in the Status column.
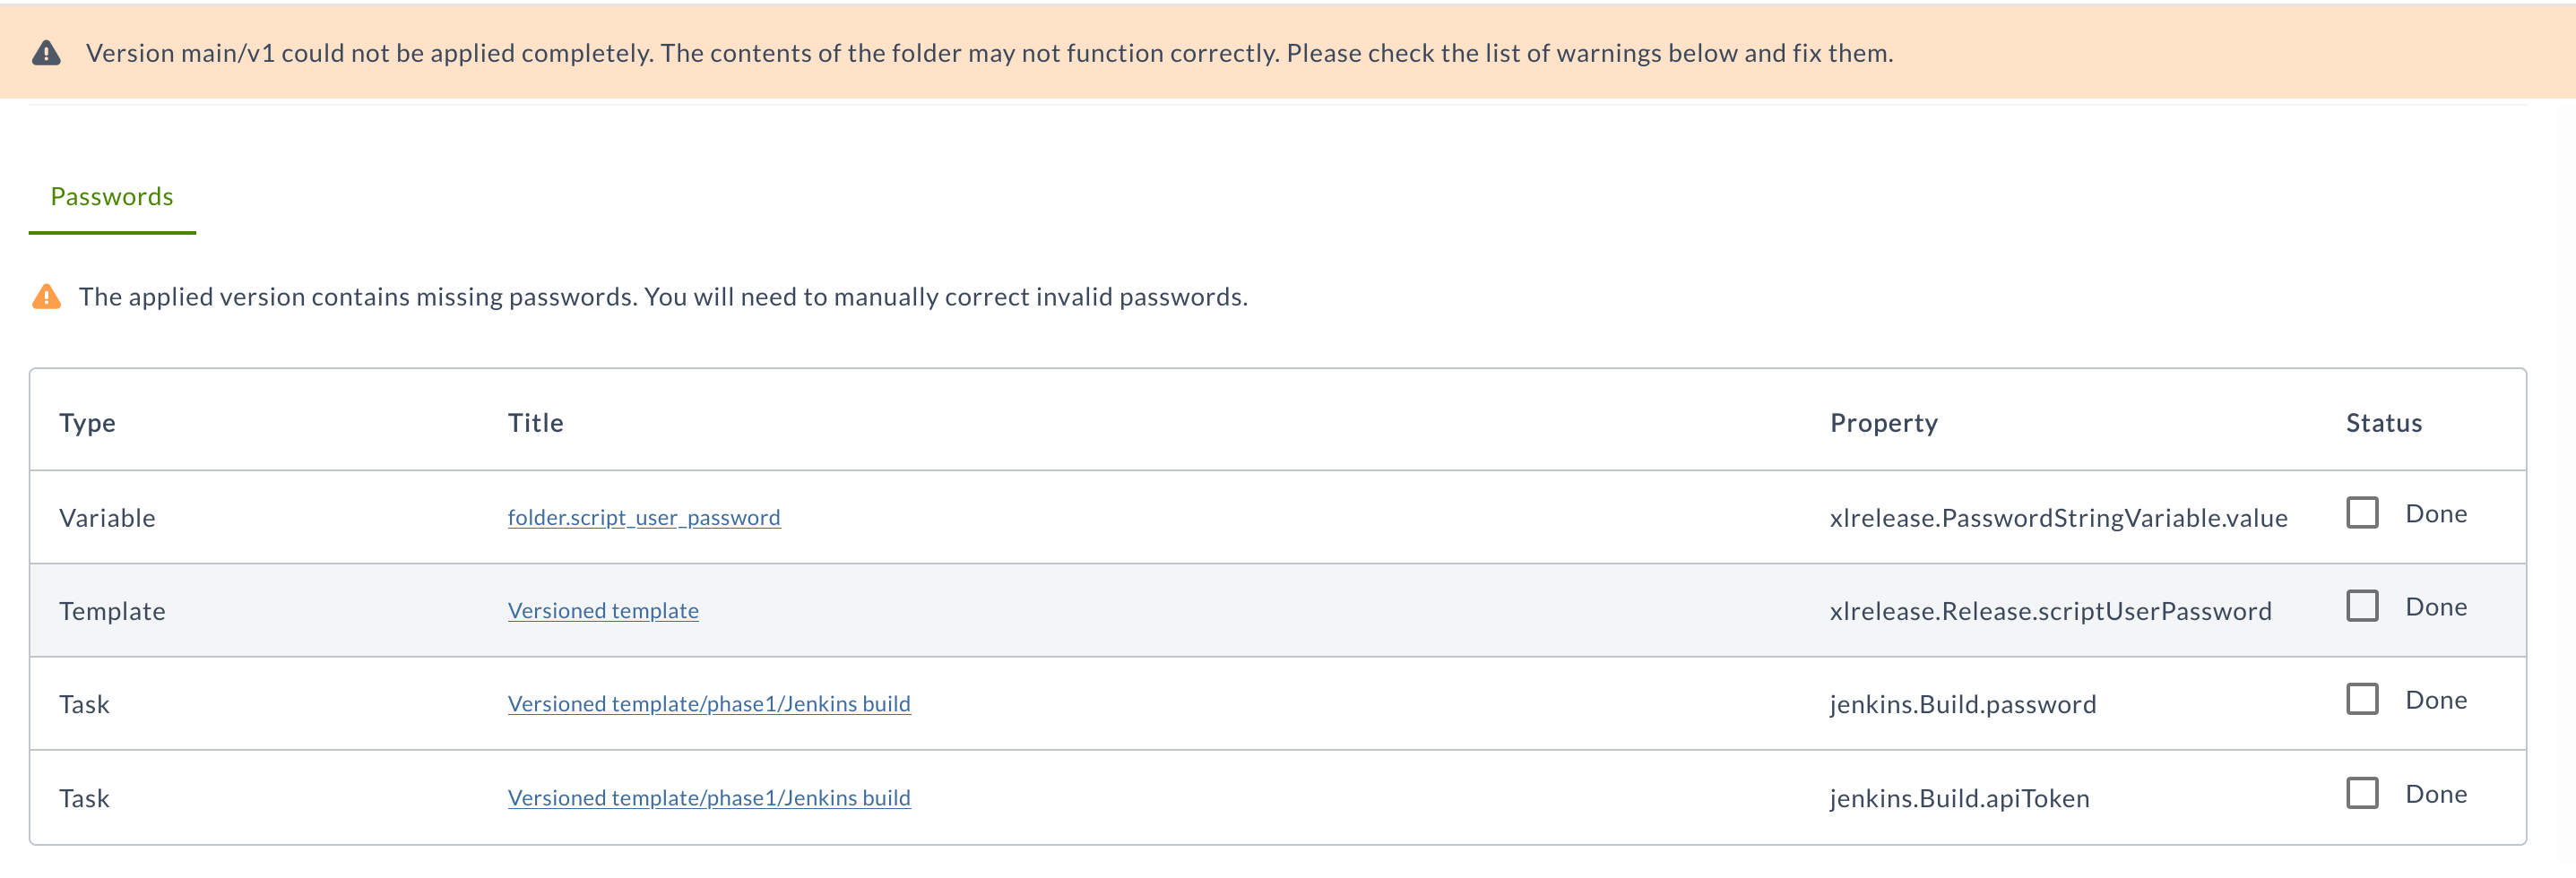
-
Click Close, then click Apply this version.
The Warning icon next to the version disappears.