Create Custom Task Types
Digital.ai Release allows you to extend its functionality by creating custom task types that seamlessly integrate with the release flow. Custom tasks are defined using a special XML configuration file called synthetic.xml and implemented using Python scripts. This powerful combination enables you to integrate with third-party tools, automate complex workflows, and create organization-specific tasks that appear natively in the Release user interface.
About synthetic.xml
The synthetic.xml file is the cornerstone of creating custom task types in Release. It serves as a type definition system that allows you to:
- Define new custom task types with their properties and behaviors
- Specify input and output parameters for tasks
- Configure how tasks appear in the UI
- Set up task dependencies and relationships
- Define validation rules for task properties
Where synthetic.xml is used
The synthetic.xml file can be present in two main locations:
- The
extdirectory of your Release server (commonly used during development) - The root level of every plugin (packaged for production use)
At server startup, all instances of synthetic.xml from every plugin and the ext directory are merged and evaluated. This allows you to define and extend task types across multiple plugins and the main server extension directory.
When you modify any synthetic.xml file, Release needs to be restarted to pick up the changes, making it a fundamental part of the Release customization system.
YAML Alternative: type-definitions.yaml
There is an alternative YAML syntax for defining custom task types and connections, called type-definitions.yaml. This format is the default for the container-based Release Integration SDK. The YAML format provides a subset of the functionality of synthetic.xml and is primarily used for container-based plugins.
- The
type-definitions.yamlfile should be placed at the root of your plugin package. - When using the YAML format, you do not need to provide a
synthetic.xmlfile for the same definitions. - The server processes both
synthetic.xmlandtype-definitions.yamlfiles at startup, merging all definitions.
type-definitions.yaml is the YAML-based alternative to synthetic.xml for defining custom tasks and connections in container-based plugins. At server startup, all type-definitions.yaml and synthetic.xml files from all plugins and the ext directory are merged and evaluated by Release.
Location of Custom Tasks
Custom tasks can be stored in two locations in the Release server:
ext- Used during development of custom tasks. Contains:synthetic.xml- The task type definitions- Subdirectories with Python scripts implementing the tasks
plugins/__local__- Contains packaged custom tasks in.jarfiles for production use, each with its ownsynthetic.xmlortype-definitions.yamlat the root level
A typical ext directory layout looks like this:
synthetic.xml
jira/
   CreateIssue.py
   UpdateIssue.py
Defining a Custom Task
You define custom tasks in the synthetic.xml file using XML syntax. Here's an example of a "Create Jira Issue" task definition:
<synthetic xmlns:xsi="http://www.w3.org/2001/XMLSchema-instance"
       xmlns="http://www.xebialabs.com/deployit/synthetic"
       xsi:schemaLocation="http://www.xebialabs.com/deployit/synthetic synthetic.xsd">

  <type type="jira.CreateIssue" extends="xlrelease.PythonScript" label="Create issue">
    <property name="jiraServer"  category="input" label="Server" referenced-type="jira.Server" kind="ci"/>
    <property name="username"    category="input"/>
    <property name="password"    category="input" kind="string" password="true" />
    <property name="project"     category="input"/>
    <property name="title"       category="input"/>
    <property name="description" category="input" size="large" />
    <property name="issueType"   category="input" default="Task"/>
    <property name="issueId"     category="output"/>
  </type>

</synthetic>
Synthetic Element
The <synthetic> element is the root node. It contains the XML grammar definitions and should not be changed. For Deploy users: this is the same definition language that is used to extend Deploy.
The <type> element in <synthetic> defines the custom task. The type attribute defines the name of the custom task and is always of the form prefix.TaskName:
- The prefix is the category of the task (for example, 'jira'). It should be in lowercase.
- The task name is a descriptive name of the task (for example, "CreateIssue"). It should be in camel case.
The extends="xlrelease.PythonScript" attribute defines the type as a custom task for Release. You must not change it.
The label attribute defines the name of the task that will appear when adding a new task in the release flow. By default, if not defined, Release will create a label for you with the following format: Prefix: Task Name using the capital letters as new words (example: "Jira: Create Issue"). You can override the prefix by adding a colon in the label attribute. Example: label="Integration: Create Issue".
You can add the following properties to the <type> element to further customize your task:
scriptLocation: Specifies a custom script location that overrides the default rules.iconLocation: Location of an icon file (PNG or GIF format) that is used in the UI for this task.taskColor: The color to use for the task in the UI, specified in HTML hexadecimal RGB format.
Example:
<type type="myplugin.MyTask" extends="xlrelease.PythonScript">
    <property name="scriptLocation" required="false" hidden="true" default="my/custom/dir/script.py" />
    <property name="iconLocation" required="false" hidden="true" default="my/custom/dir/icon.png" />
    <property name="taskColor" hidden="true" default="#9C00DB" />
    ...
Property Element
The properties are defined as nested <property> elements. The following attributes can be set on each property:
| Property | Description |
|---|---|
name | Name of the property. This is also the name of the variable by which it is referred in the Python script. |
category | Release supports two categories.input appear in the task in the Release UI and must be specified before the task starts. They are then passed to the Python script. If you add an input type and do not specify the value for the required field, it will be set to the default value true. output can be set in the Python script. When the script completes, they can be copied into release variables in Release. |
label | Group and label used in the Release UI. If you do not specify a group and label, Release will attempt to make a readable version. For example, myCompany.myTask will appear as a My Task task type in the My Company group.You can group task types in your preferred groups by adding the group before a colon in the label; for example, Other Items: My Task. |
description | Help text explaining the property in more detail. This will appear in the UI. |
kind | The property type, which is string, integer, boolean, ci, list_of_string, set_of_string, map_string_string, or enum. If omitted, this attribute defaults to string. |
password | Set this attribute to true to instruct Release to treat the property as a password. The content of password fields are obscured in the UI and encrypted in network traffic and storage. |
size | Indicates how much space the UI assigns to the property. Supported levels are default, small, medium, and large. |
default | The default value of the property. |
referenced-type | Indicates the type of CI this property can reference (only apply if kind is set to ci). |
Output Properties Size Limit
To prevent performance issues, output properties of type string are limited to 32 Kb. If your script adds content that exceeds the limit, Release will truncate the property. You can still print the property inside the script and Release will attach the content to the task.
You can change this limit for each task type in the XL_RELEASE_SERVER_HOME/conf/deployit-defaults.properties file. For example:
#webhook.JsonWebhook.maxOutputPropertySize=18000
To change the limit, delete the number sign (#) at the beginning of the relevant line, change the limit as desired, save the file, and restart the Release server.
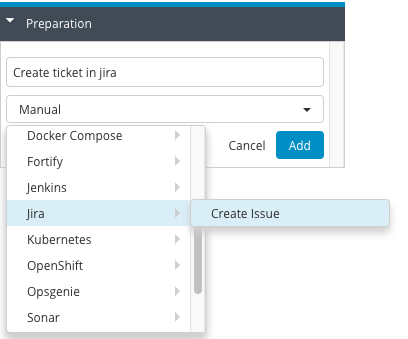
Add Custom Tasks
After you save synthetic.xml and restart the Release server, the custom task appears in the UI and you can add it to the release flow editor like any other task.
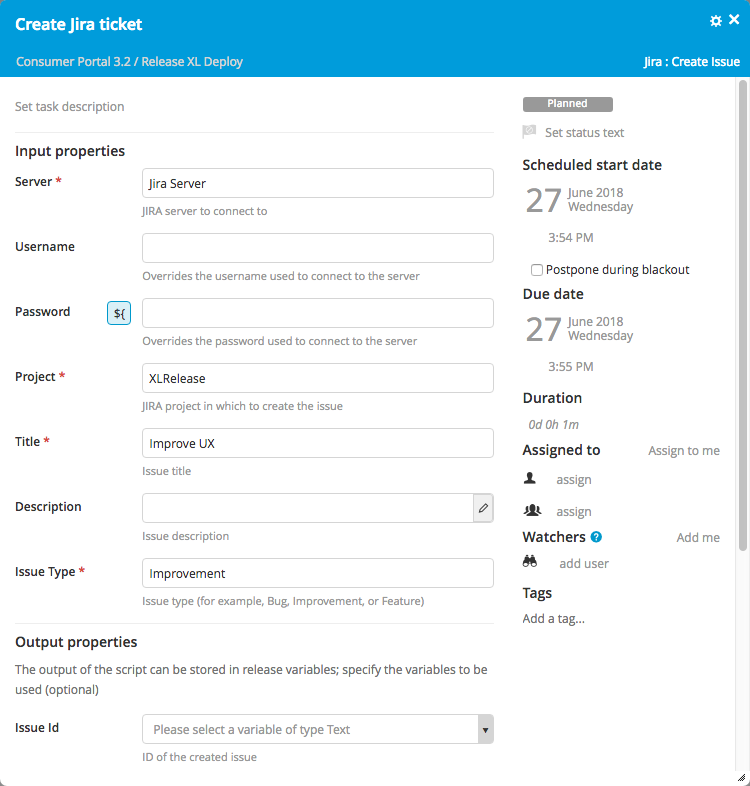
This is how the above task definition looks like in the task details window:
Implementing Task Logic
Once you've defined your custom task type in synthetic.xml, you need to implement the actual task behavior using Python scripts. The implementation consists of two main components: the Python script itself and the HttpRequest utility class for making HTTP calls.
Python Scripts
When the custom task becomes active, it triggers the Python script that is associated with it. For information about the script, see API and scripting overview.
Store scripts in a directory that has the same name as the prefix of the task type definition. The script file name has the same name as the name of the task, followed by the .py extension. For example, the Python script for the jira.CreateIssue task must be stored in jira/CreateIssue.py.
Input properties are available as variables in the Python script. You can set output values by assigning values to their corresponding variables in the script. After execution, the script variables are copied to the release variables that were specified on the task in the UI.
To concatenate multiple Python scripts and have Release schedule them, see Using scheduling in scripts to connect to long running jobs.
For example, this is a possible implementation of the jira.CreateIssue task in Python:
import sys, string
import com.xhaus.jyson.JysonCodec as json

ISSUE_CREATED_STATUS = 201

content = """
{
    "fields": {
       "project":
       {
          "key": "%s"
       },
       "summary": "%s",
       "description": "%s",
       "issuetype": {
          "name": "%s"
       }
   }
}
""" % (project, title, description, string.capwords(issueType))

if jiraServer is None:
    print "No server provided."
    sys.exit(1)

jiraURL = jiraServer['url']
if jiraURL.endswith('/'):
    jiraURL = jiraURL[:len(jiraURL)-1]

# You can pass custom headers to the request
headers = {'myCustomHeaders': 'myValue'}

# jiraServer object may contains proxy information (field proxyHost and proxyPort)
request = HttpRequest(jiraServer, username, password)
response = request.post('/rest/api/2/issue', content, contentType = 'application/json', headers = headers)

if response.status == ISSUE_CREATED_STATUS:
    # In order to debug your script, you can print the status, the body and the headers
    print response.status
    print response.response
    print response.headers

    # you can access the http headers of the response
    if response.headers['Content-Type'].startswith('application/json'):
        # Parsing the response body as JSON
        data = json.loads(response.response)
        issueId = data.get('key')
        print "Created %s in JIRA at %s." % (issueId, jiraURL)
else:
    print "Failed to create issue in JIRA at %s." % jiraURL
    response.errorDump()
    sys.exit(1)
HttpRequest
HttpRequest is a class provided by Release that is used to perform HTTP calls. For more information, see the Jython API.
Examples
Here are some common examples of how to use the HttpRequest class to interact with external systems:
Posting JSON
request = HttpRequest({'url': 'http://site'})
response = request.post(
    '/api/addObject',
    '{"json": "content"}',
    contentType = 'application/json')
content = response.getResponse()
status = response.getStatus()
Using Connection Credentials
request = HttpRequest({'url': 'http://site'}, "username", "password")
response = request.get('/api/tasks')
content = response.getResponse()
status = response.getStatus()
Using a Proxy
request = HttpRequest({
    'url': 'http://site',
    'proxyHost': 'proxy.company',
    'proxyPort': '8080'})
response = request.get('/api/tasks')
content = response.getResponse()
status = response.getStatus()
Getting Results Using a Configuration Object
If your task definition has a configuration object defined using:
<property name="jiraServer" category="input" label="Server" referenced-type="jira.Server" kind="ci"/>
You can use the jiraServer instance like that:
request = HttpRequest(jiraServer)
response = request.get('/api/tasks', contentType = 'application/json')
content = response.getResponse()
status = response.getStatus()
HttpRequest will then use the settings of the HttpConnection.
Working with the Release API
The Release platform provides a comprehensive API that allows you to interact with various Release components from your custom task scripts. Here's what you need to know about using the API:
The Release API is available for scripts. To find a complete description of the methods you can call, see the Jython API.
Managing Custom Task Types
Managing custom tasks involves several administrative aspects, from making changes to existing tasks to packaging them for deployment. Here's what you need to know:
Changing or Removing Customizations
Before changing or removing a custom task type or one of the properties of a custom task type, ensure that the type is not used in any releases or templates. Changing or removing a type that is in use may result in errors.
Packaging Custom Tasks
You can compress the contents of the ext folder into a single file with a .jar extension and place this file in the plugins directory. Release reads custom tasks from this location.
When compressing, do not include the ext folder as part of the path. The synthetic.xml file should be in the root of the .jar file. On Unix systems, use these commands:
cd ext
zip -r ../myplugin.jar .
On Microsoft Windows systems, use Windows Explorer to compress the individual files in the ext folder.
Do not use .zip as the extension of the compressed file.
You can have multiple plugins and define contents in the ext folder at the same time. The ext directory takes precedence over the plugins directory.
If you change ext/synthetic.xml or the contents of the plugins folder, you must restart the Release server. You do not need to restart the server if you change the contents of a Python script.
Advanced Topics
Here are some advanced techniques for working with custom tasks that can help you handle specific use cases and improve task behavior.
Prevent Cleaning Output Properties When Retrying Custom Script Task
You can keep previously executed output results by using property keepOutputPropertiesOnRetry. If that property is set to true, the output will not be updated.
If, on retry, you do not want to execute the part of the script that already populated a specific output property, then you must write your own custom script section.
Here is an example of a python script that does not execute a part of the original script, if the output is already populated:
prev_result = task.getPythonScript().getProperty("result")

if not task.keepOutputPropertiesOnRetry or not prev_result:
    result = calculate_new_value()
You can also use it on the UI in the custom HTML:
<div class="form-group">
    <label class="col-xs-3 control-label" for="keepPreviousOutputPropertiesOnRetry">
        Retain Properties
    </label>
    <div class="col-xs-9">
        <input type="checkbox" id="keepPreviousOutputPropertiesOnRetry"
               data-ng-model="task.keepPreviousOutputPropertiesOnRetry"
               data-ng-change="saveTask(task)"
               data-ng-disabled="ctrl.areTaskPropertiesReadonlyOrLocked" title="Keep Previous Output Properties On Retry">
        <div class="description">Keep the previous output properties on retry</div>
    </div>
</div>