Review Code (Gerrit Single-commit and Pull Request Reviews)
Git repositories are hosted and service in TeamForge via Gerrit. Gerrit is most widely known for providing powerful code review features. While Gerrit includes a powerful code review feature, the way it works and the workflow is different from the Pull Request style that was introduced by GitHub. A Google search of "Gerrit Pull Request" will yield a bounty of passionate viewpoints on these differences. Hashing through the pros and cons would just add another result to that search. Instead, just know that with TeamForge, you are free to use either style of code review methodology, even on the same Git repository.
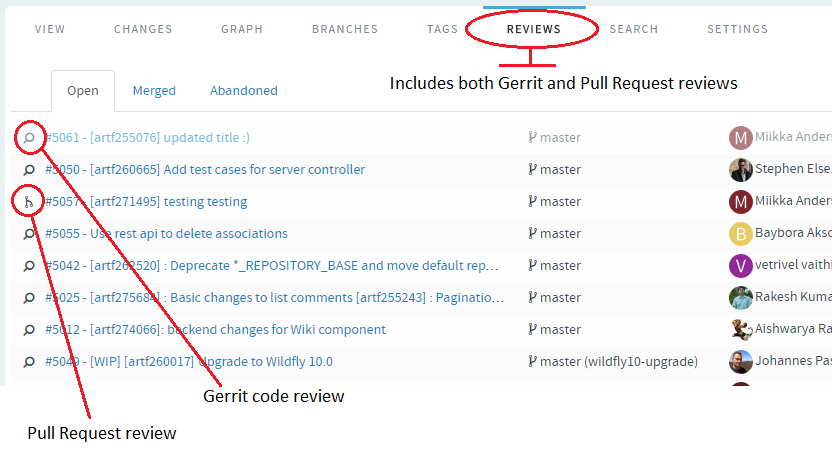
While TeamForge supports both pull request and single-commit Gerrit reviews, this topic focuses more on the Pull Request type reviews.
Pull Request Configuration
In order to use pull requests in your Git repository, there is some configuration that must be done first. This is to set up proper permissions in your repository so that your policies are being followed.
Open the repository in the code browser, select the Settings > Policies tab. This is where you configure the pull request-based code review policy. For more information, see Configure Pull Request for Repositories: Step by Step.
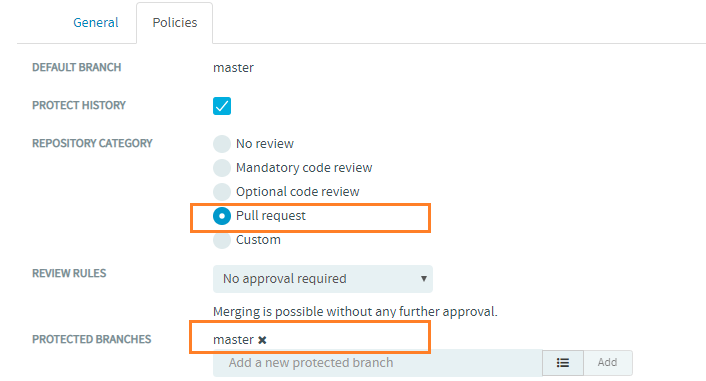
Repository Category and Protected Branches: A new category named "Pull request" has been added. What this category does is set up the repository permissions so that users can create and push to feature branches but require pull requests to certain "protected branches". Once you change the repository category to "Pull request", the Protected Branches field shows up. This will be the list of branches that you will be merging your pull requests into. Typically, this would be the "master" branch but you may also have various "release" branches that you would like to protect. Users will not be able to directly push changes to these protected branches. Instead, the user will create a feature branch with their changes in it, and then create a pull request when they are ready for their changes to be reviewed and merged to the protected branch.
From TeamForge 19.2, once a "Pull Request" category Git repository is created, the master branch becomes the default protected branch.
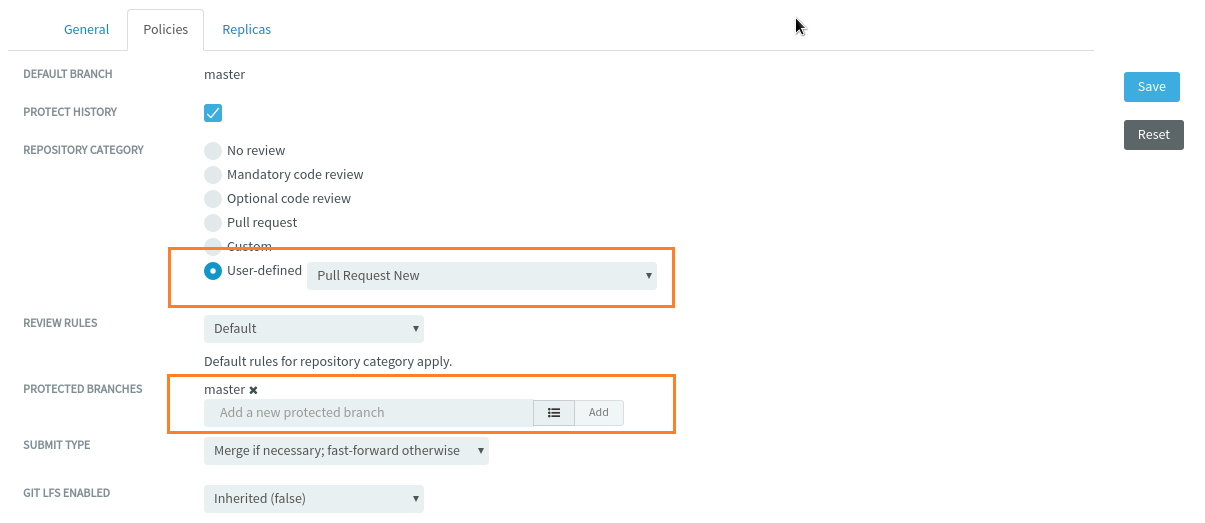
Similarly, the master branch becomes the default protected branch for repositories that belong to the user-defined repository category, provided that the category name is prefixed with "Pull Request". For more information, see Create a User-Defined Repository Category.

Once the repository is created, the master branch becomes a protected branch of the repository by default.
Review Rules: These review rules govern the requirements for a given change to be eligible to be merged. There are four new policies available:
From TeamForge 19.2, the review rules can only be configured from the Settings > Policies tab of the repository, after the repository has been created.
-
No Approval Required: This is similar to the policy on sites like GitHub. This basically means anyone with the proper TeamForge permission can accept and merge any pull request. This means you probably favor "social" policies and trust that your reviewers will do the right thing. Pull requests become a tool to aid with code review and it is still possible for users to use the voting tools in the review to communicate their feedback but the votes on a review do not prevent the review from being merged.
-
Code Review Required: With this policy, the voting tools begin to matter. The change cannot be merged until it has a net positive vote total, not counting the owner of the review. In other words, if two users give a thumps up and one a thumbs down, then it will be eligible to be merged -- assuming the owner of the review is not one of the two thumbs up. The owner can vote, but their votes do not count towards the total.
-
CI Required: The assumption here is that the relevant votes are being cast by a "bot" or "process" such as a Jenkins CI job. There is no UI in the pull request provided to cast these votes, it will be done via API or by using the Gerrit UI. The pull request shows a check mark when a positive Verified vote has been cast and an X when a negative vote has been cast. With this policy, the change cannot be merged unless there is at least one positive verified vote and no negative votes. Users can still provide thumbs up and down votes but they do not control whether or not the change is eligible to be merged. Of course, the person that decides to merge the change can still factor in the code review votes and comments.
-
Code Review and CI Required: This is obviously just a combination of the two previous policies. So a positive Verified vote is necessary, with no negative verify votes, and a total positive Code Review vote is required.
-
Default: The final policy is to just use the Gerrit code review default policy. This requires a +2 code review vote and a +1 verified vote and there cannot be a -2 code review vote as that acts as a veto. Users that are not familiar with Gerrit tend to find these voting rules confusing. For example, two +1 votes does not equal a +2 vote and your permissions determine what votes you are able to cast. We do not recommend you use this policy if you are using pull requests, but it is an available option and might be desired if you are already using Gerrit reviews and do not want to change the voting rules.
Pull Request Workflow Walkthrough
The primary difference between the pull request workflow and the normal Gerrit change-based model is the use of branches. In the pull request model, the assumption is that work will being on a feature branch and you create a pull request when you are ready to start receiving feedback on the branch. This could mean the work is ready to be merged, but it could also mean that you just want to get feedback from the CI system or initial feedback from code review. Once all feedback and review is complete and the pull request is eligible to be merged, then the request can be merged and the feature branch deleted.
Create feature branch (locally)
If working in a small team, you might want to create the feature branch on the server or create one locally and push to the server right away. For now, we will assume that ther is just a single developer. Typically, it is best to just begin the process by creating a feature branch locally. It is a good idea to fetch all changes from the server before beginning this process:
$ git checkout master && git pull origin master
$ git checkout -b feature_branch
Give your feature branch a meaningful name.
Commit to feature branch and push to server
The next steps are of course to just do your work and commit changes locally. Before you have pushed the changes to the server, it is OK to do things like squashing your commits or rebase your branch on master, but once you have pushed your branch to the server, you should no longer do this. The first time you push to the server, you will need to set the upstream branch to the name you want to give your feature branch on the server.
git push --set-upstream origin feature_branch
Create pull request
When you are ready to merge the change, or at least to start getting feedback, you should create a pull request, add reviewers and have reviewers share feedback on your changes. See Create Pull Request: Step by Step for more information.
Pull requests are implemented as merge commits between your feature branch and the target branch. The pull request subject and description will combine to form the commit message for the merge commit. You can also provide a Markdown summary of the change that will be captured as the first comment on the pull request. If no summary is provided, then the commit message will serve as the first comment. If you have automated CI configured, then it will typically run as soon as the pull request is created and whenever it is updated. So you could also create a pull request early in your process so that you can benefit from the feedback of your CI system. If youare posting a pull request that is not ready to be merged, it is a good convention to follow to cast a Thumbs Down vote in the pull request to signify this to potential reviewers.
-
Reviewers: Reviewers are anyone that you potentially want to provide feedback on the change. Adding a user does not require the user to review the change, it just notifies th euser of its existence and see it in lists and filters of reviews they are assigned to. Likewise, users that have not been added to the review are still free to cast votes on the review.
-
Voting: Tools are provided to cast votes on the review. If you are using one of the four code review policies provided with TeamForge, you will see simple Thumbs Up/Down buttons to cast your vote.
Commit and Push More Changes
As you continue to work on your feature branch, you can just commit changes to your local branch and push them to the server. If you are working in a team on the same branch, then you will need to fetch and rebase changes made by other team members to the feature branch.
$ git add/commit etc.
$ git push
Update Feature Branch and Pull Request
If new changes are pushed to the feature branch, the pull request must be updated to include the new changes. This involves updating the merge commit to recognize the new HEAD of the feature branch. To update the pull request, you simply need to open it in the Web UI. It will then update itself as needed.
When a pull request is updated, all existing votes will be reset and need to be cast again based on the new review.
Resolve Conflicts
When working in a feature branch, it is not uncomment for conflicts to arise between your feature branch and the target. When this happens, you will not be able to merge the pull request and you will see a warning of the conflict in the web UI. To resolve the conflicts, you must fetch and merge the changes from the target branch into your feature branch and resolve and commit the conflict resolution. Then push the result back to your feature branch on the server and update the pull request.
$ git fetch $ git merge origin/master
$ git add/commit etc. $ git push
Of course, you can also rebase and force push to update your feature branch as long as you understand the ramifications of this when collaborating with a team that is sharing the same branch.
Merge Pull Request
Once a pull request is eligible to be merged, meaning there are no merge conflicts with the target and all voting requirements have been satisfied, the Merge button will be enabled in the web UI. Anyone who can see this button has the permissions to merge the pull request and just needs to click the button to merge it. See Merge pull requests: Step by Step for more information. This ends the life cycle for this pull request and if the user has the necessary permissions, they will also be given the ability to delete the feature branch from the server.
It is possible to continue to use the feature branch and create new pull requests to merge subsequent changes, but this is not recommended. It is generally a good idea to delete feature branches once they have been merged.
Pull Request: Step-by-Step
Pull requests allow developers to collaborate with each other on a code change begore merging it into another branch on a Git repository.
Pull request is a fully integrated solution of the code browser component. It supports all the basic functionality such as creating, viewing, updating, abandoning, rebasing and merging of pull requests. Using a pull request, you notify others about a feature or fix change that needs attention.
You can access the pull request feature only when the repository owner enables the feature and sets the code review policy on the Settings > Policies tab.
Configure "Pull Request" for Repositories
In order to use pull requests in your Git repository, you need to set up proper permissions in your repository so that your policies are being followed. Configure the repository from the Settings tab.
-
Click SOURCE CODE from the Project Home menu.
-
Browse and open the Git repositoy in the code browser.
-
Select Settings > Policies.
-
Select Pull request for Repository Category. The Protected Branches and Review Rules fields show up.
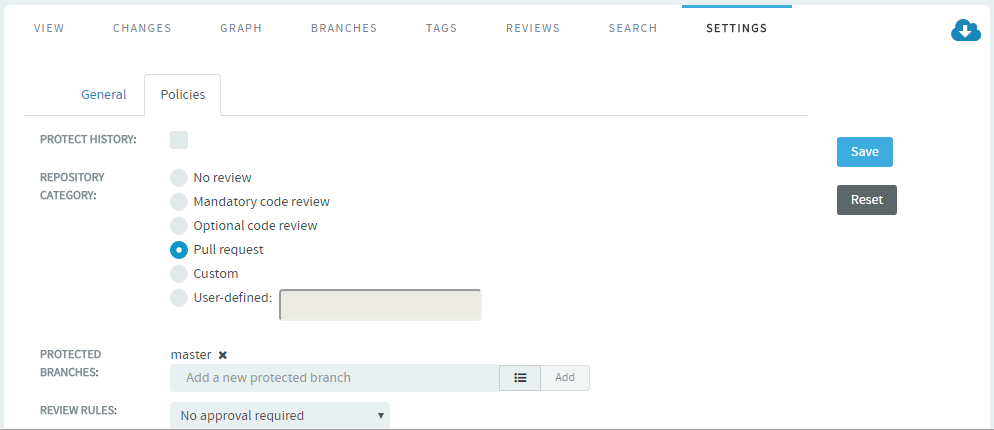
Add one or more protected branches. Type the branch name, select the branch and click Add.
-
Click Save.
From TeamForge 19.2, after a Git repository is created, the master branch is automatically added as the default protected branch for the Pull request repository category on the Settings > Policies tab of the repository.

Just in the case of Pull request repository category, the master branch is automatically added as the default protected branch for the user-defined repository category as well, provided that its name is prefixed with "Pull Request"..
For instance, add a user-defined repository category "pull_request_new" (this is shown in title case as "Pull Request New" in the UI) in TeamForgeGerritMappings.xml file and select the "Pull Request New" as the User-defined review category when creating a Git repository. For more information on adding a user-defined repository category, see How to add user-defined repository category?

After the repository is created, the master branch is automatically added as the default protected branch on the Settings > Policies tab of the repository.

Create a Pull Request
When you are ready to merge the change, or at least to start getting feedback, you should create a pull request. You can do this easily from the Branches tab by clicking on the Create button for your feature branch.
-
Go to the Branches tab on a Git repository page.
-
Click Create.
-
Select the source branch which is wanted to be merged.
-
Select the target branch to which you want the changes to be merged.
-
Give an appropriate subject line and description that will be used as a commit message for a merged pull request.
Optionally, you can provide a summary of the pull request. This supports markdown formatting.
The Commits tab at the bottom of the page displays the list of commits made in the selected source branch. The Files tab shows the difference between the source and target branch.
-
Click Create Pull Request.
-
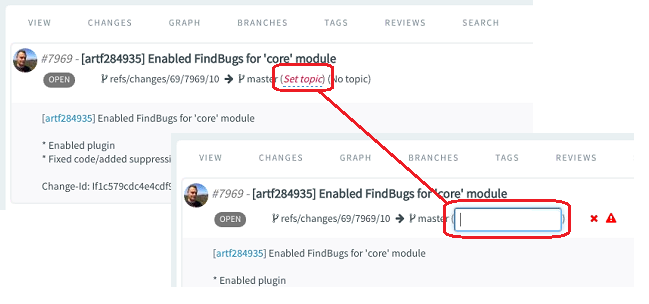
Submit whole topic: You can now bundle related changes (code reviews) by topic and submit the whole topic for review instead of just submitting changes one-by-one. Just open a review, click the Set Topic link and enter the topic name.
-
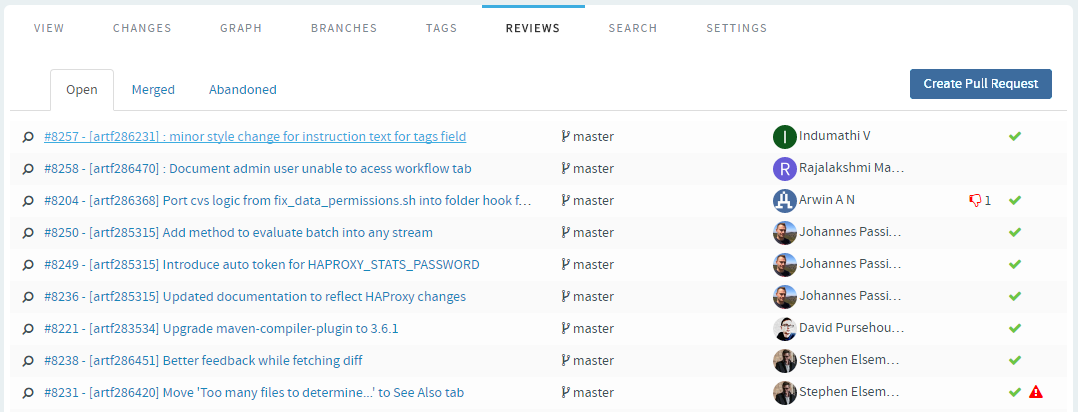
As a reviewer, click the pull request that you want to review from the list of open pull requests on the Reviews tab.
Review a Pull Request
In addition to the requested reviewers, anyone with access to the repository and who wishes to comment on the pull request can review and post their comments on the pull request details page.
-
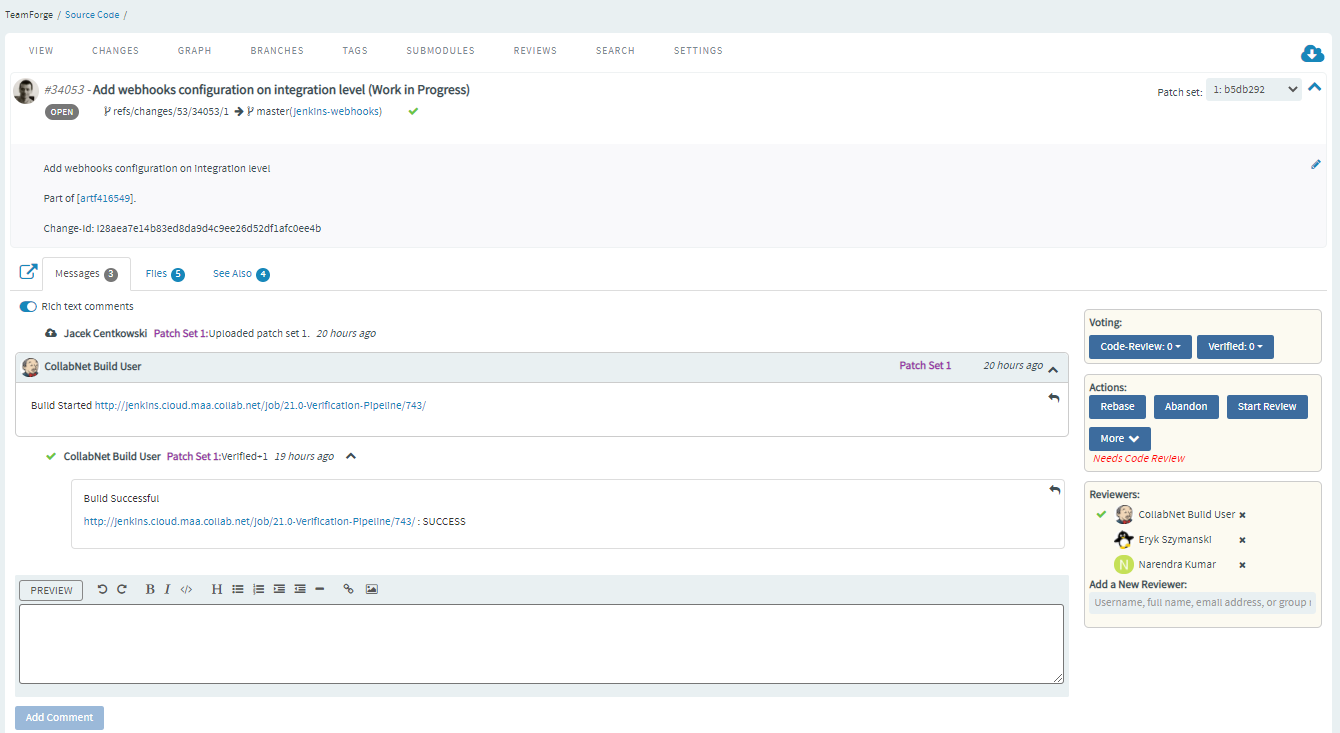
On the pull request details page, you can switch between three views: Messages, Commits and Files. Click the Commits tab to view the list of commits. Click the Files tab to review the code changes made in each file. You have the option to view the difference between the source and target branches.
-
Once you have reviewed the changes, on the Messages tab, enter your comments and give an appropriate voting as well.
noteThe message section supports markdown formatting with a preview option.
-
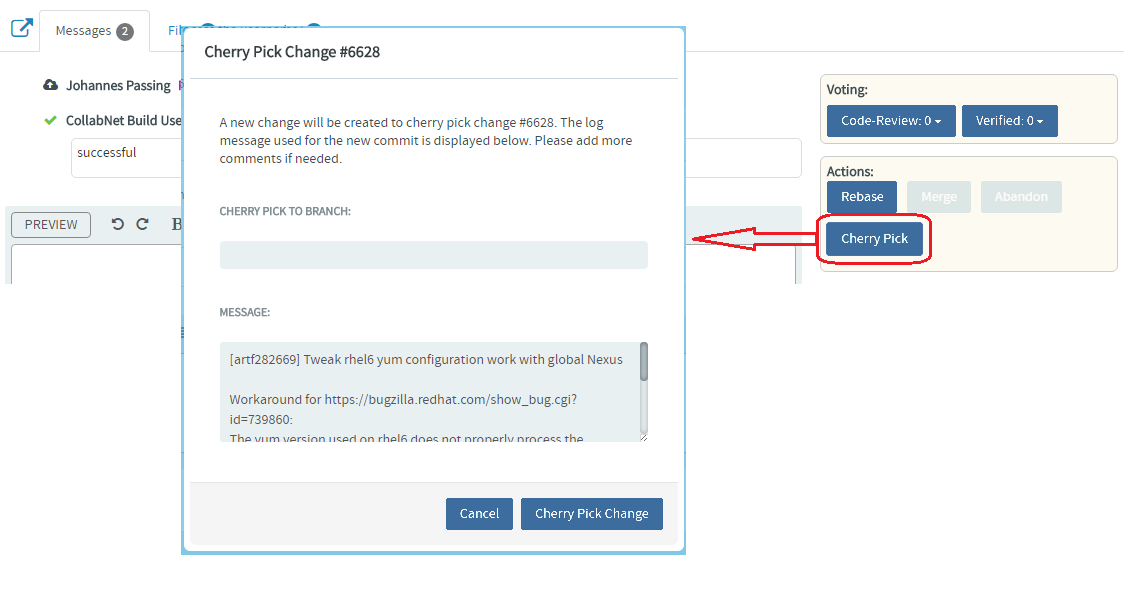
Cherry Pick: Apply the changes introduced by existing commits: You can also cherry pick and apply changes introduced by existing commits to another branch. For example, you can now use this Cherry Pick function in TeamForge's native code browser to apply a commit in master to a release branch.
Inline Editing of Files
-
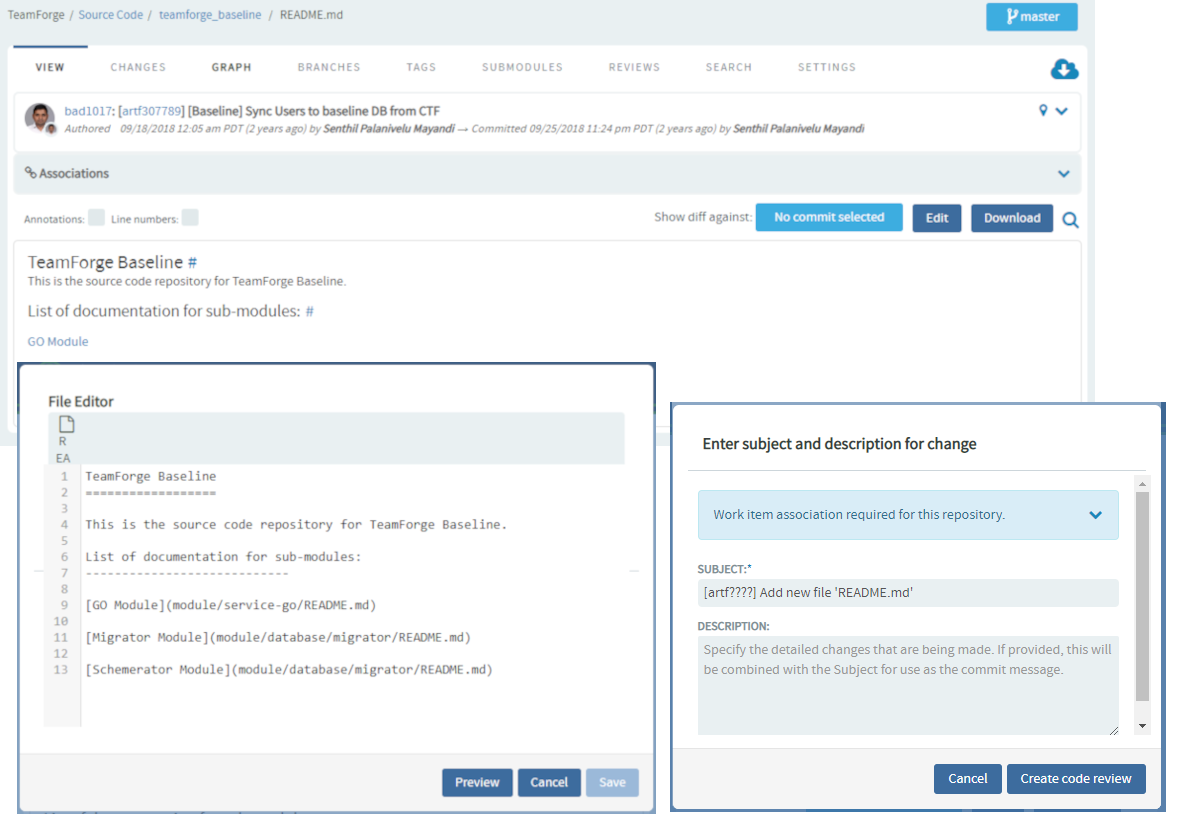
Quick changes to files, if required only to few files, can be done using the inline edit feature from within the code browser without having to clone an entire repository. Browse the repository, locate and open the file in the View tab, click Edit to open the file in the File Editor, make your changes, Create code review and Publish your changes for review.
-
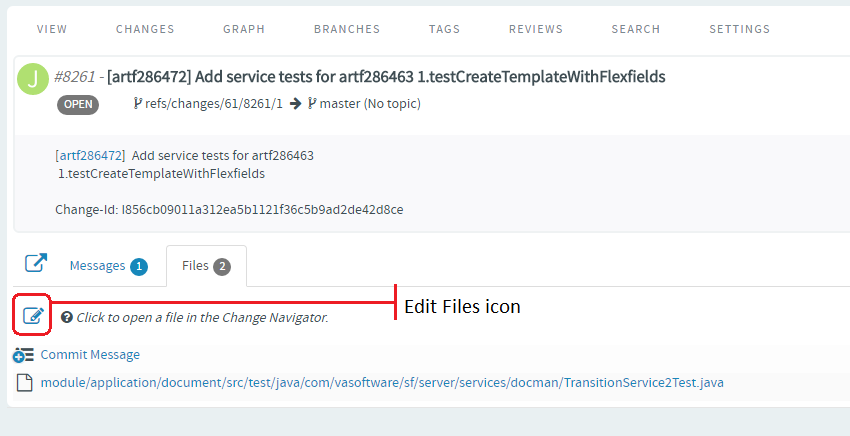
You can also add new files to a review and delete files from a review by clicking the Edit Files icon and then the "+" and "-" icons respectively.
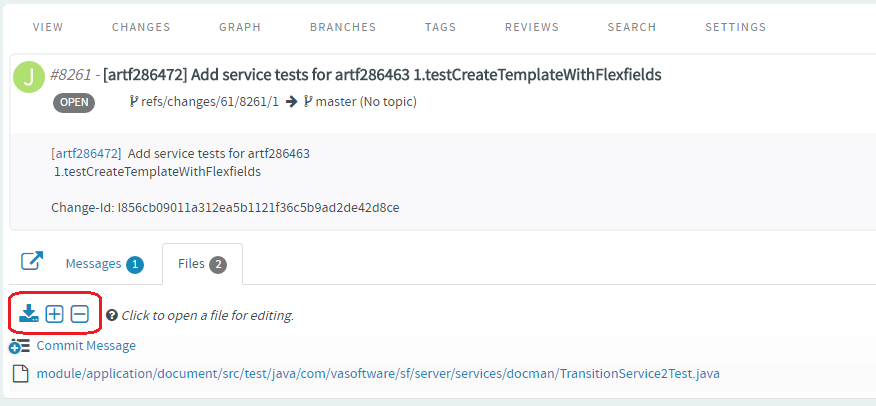
Type the name of the file to see results matching the file name, select a file and click Add File.
Type the name of the file you want to delete to see results matching the file name, select the file and click Delete File.
-
Click the Complete File Edits icon.
Merge (close) a Pull Request
Once the pull request is reviewed, it is ready to be merged, that is the Merge button on the pull request details page is enabled only if the pull request satisfies all the repository specific qualification criteria. For example, it is possible to merge pull requests even without any voting if "no voing" has been defined as gating criteria. Also, it might require both voting AND acceptance by Continuous Integration; basically it totally depends on the gating criteria of the repository in question.
These criteria are set by the repository owner in Settings > Policies tab for the Pull Request Repository Category.
-
Click the Merge button to merge the source branch into the target branch.
- If the source branch is not updated with the latest changes, a merge conflict is detected prompting you to rebase your request.
- Click the Rebase button. Once rebased, the pull request has to be revalidated after which you can merge the pull request into the target branch.
-
The newly-merged pull request is added to the list of merged pull requests.
noteOnce merged, on the Graph view, you can see that the merged branch has been added to the graph. A link to the pull request is also provided.
View Pull Requests
-
Click the Reviews tab on a GIT repository page. The pull request details page displays the list of Open, Merged and Abandoned pull requests under appropriate tabs.
- For each pull request, the author, title, number of thumbs up/down, and the time elapsed since the pull request was created, are shown.
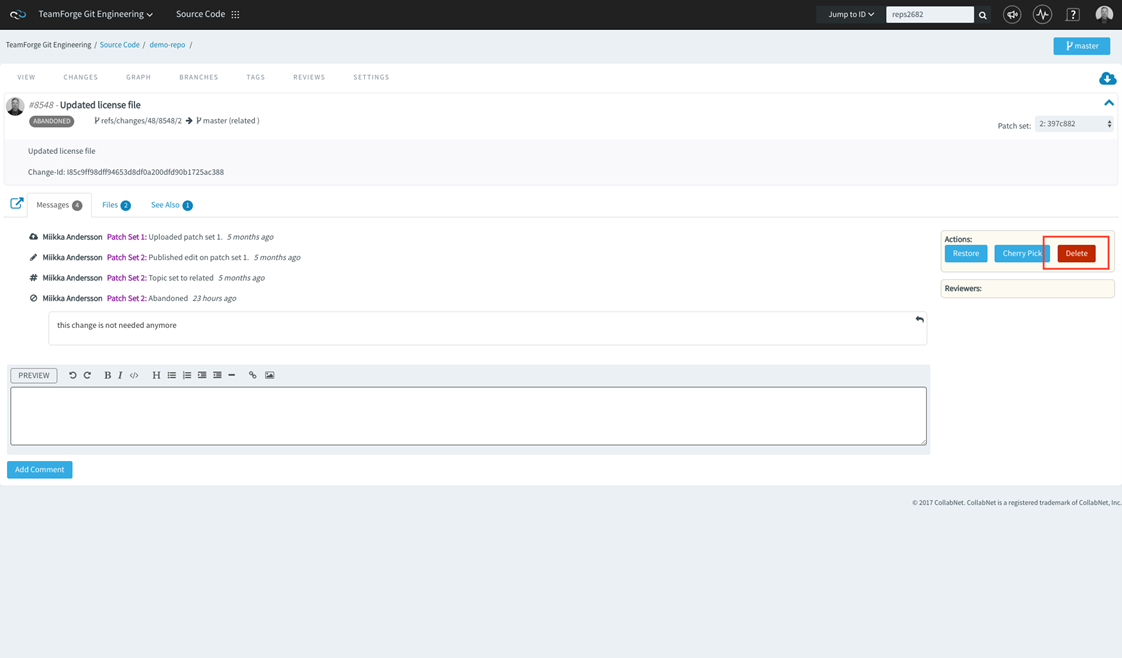
- On the Abandoned pull request details page, you have the option to restore or delete an abandoned pull request. To restore or delete an abandoned review, open the review in the code browser and click Restore or Delete respectively from Actions.
