Install or Upgrade the TeamForge—Nexus Integration Plugin
TeamForge—Nexus 2 integration is no longer supported by TeamForge 19.2 and later. If you have TeamForge—Nexus 2 integration, Upgrade to Nexus 3 and integrate TeamForge and Nexus 3.
You must keep the following information handy before installing the TeamForge—Nexus integration plugin:
- Nexus absolute path—This is the path to the directory where you have Nexus installed. In other words, the path to the directory where you have your Nexus files unzipped. For example,
/nexus-3.29.2-02-unix/sonatype-work/nexus3(Nexus 3). - TeamForge host URL—The URL to access TeamForge. For example, http://ctf.cloud.collab.net.
- TeamForge administrator user name and password.
- Nexus Application Name—The name given to your Nexus integration. In other words, the name found in the Nexus integrated application configuration file.
- Nexus Application Prefix—The prefix chosen for Nexus. In other words, the prefix found in the Nexus integrated application configuration file.
- Nexus URL: The fully qualified Nexus URL.
Install and Configure the TeamForge-Nexus 3 Integration Plugin
-
Log on to the Nexus server.
-
Stop Nexus if it's running.
- Linux:
./bin/nexus stop - Windows:
\bin\nexus stop
- Linux:
-
Download the TeamForge—Nexus 3 integration plugin.
TeamForge—Nexus 3.77.2 integration plugin— Download the
CTF-Nexus-3-Integration-Plugin-3.3.84 .zipfile.noteContact Digital.ai Support to request access credentials for the Nexus repository and for download support
-
Unzip the
CTF-Nexus-3-Integration-Plugin-3.3.84 .zipfile.- Linux:
cd <nexus-install-directory>/nexus/system
unzip CTF-Nexus-3-Integration-Plugin-3.3.84 .zip - Windows: Use a utility such as WinRAR.
- Linux:
-
Install the TeamForge-Nexus 3 integration plugin.
sudo java -jar <nexus-install-directory>/nexus/system/CTF-Nexus-3-Integration-Plugin-3.3.84 /installer.jar -enable -
Enter the Nexus absolute path and TeamForge host URL when prompted.
-
Start Nexus.
- Linux:
cd <nexus-install-directory>
./bin/nexus start - Windows:
cd <nexus-install-directory>
\bin\nexus start - Linux:
-
Log on to Nexus 3 as a Site Administrator.
-
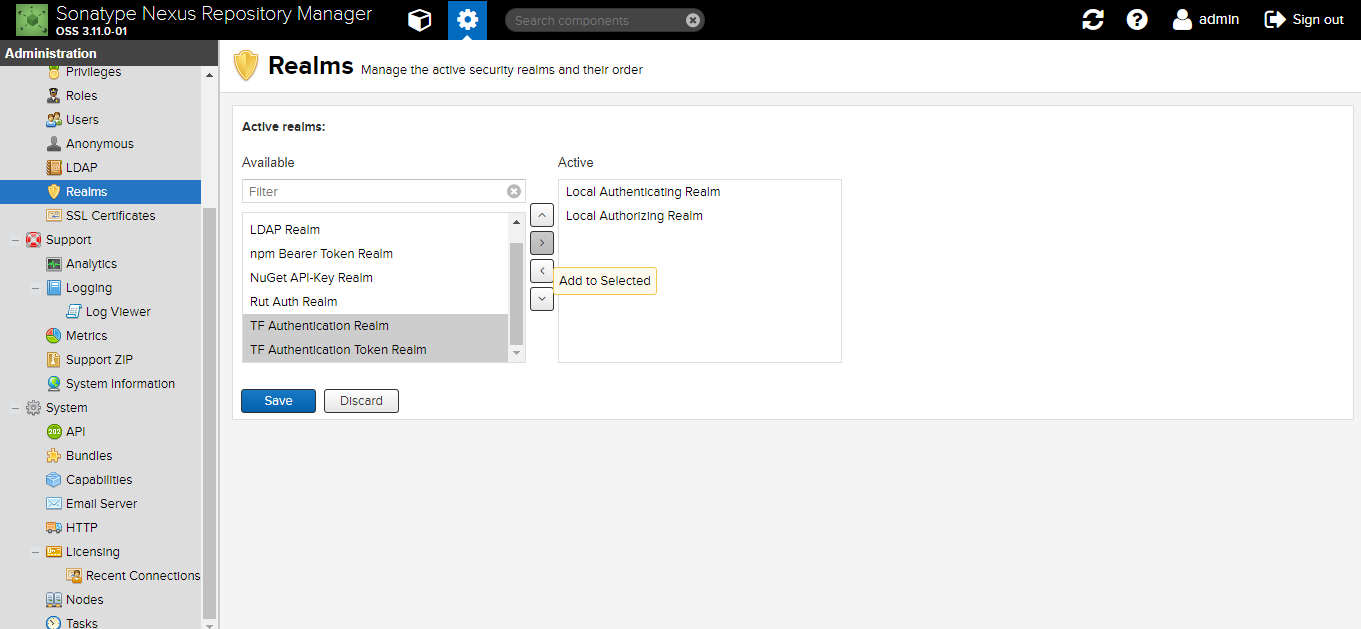
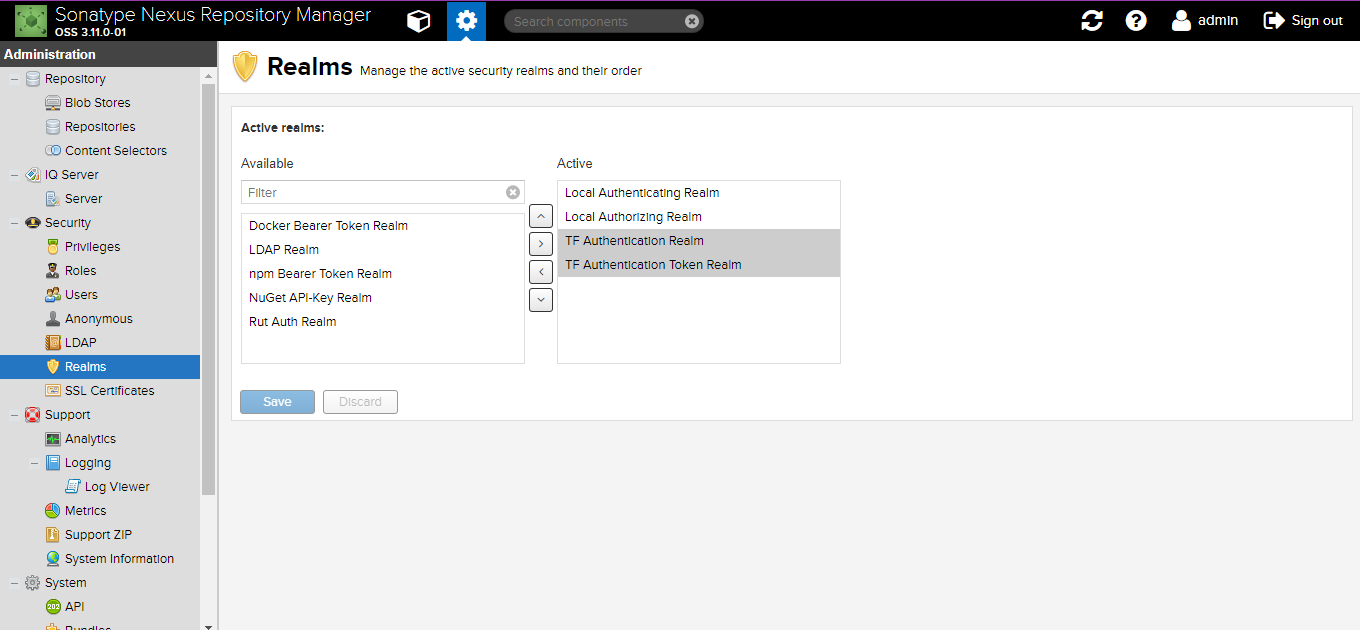
Click Realms under the Security section on the Administration menu.
-
Select TF Authentication Realm and TF Authentication Token Realm from the available list of realms.

-
Add them to the list of active realms and click Save.

-
Once Nexus is up and running, upload the Nexus IAF descriptors to TeamForge.
java -jar <nexus-install-directory>/nexus/system/CTF-Nexus-3-Integration-Plugin-3.3.84 /installer.jar -installxml
Enter the TeamForge Host URL, TeamForge admin user name and password, Nexus application name, Nexus application prefix and Nexus URL when prompted.
Upgrade the TeamForge—Nexus 3 Integration Plugin
You must upgrade your TeamForge—Nexus 3 integration plugin to CTF-Nexus-3-Integration-Plugin-3.3.84 .zip if you are upgrading to TeamForge 25.0.
-
Download the TeamForge—Nexus 3 integration plugin.
TeamForge—Nexus 3.77.2}} integration plugin—Download the
CTF-Nexus-3-Integration-Plugin-3.3.84 .zipfile. -
Unzip the
CTF-Nexus-3-Integration-Plugin-3.3.84 .zipfile.- Linux:
cd <nexus-install-directory>/nexus/system
unzip CTF-Nexus-3-Integration-Plugin-3.3.84 .zip - Windows: Use a utility such as WinRAR.
- Linux:
-
Install the TeamForge-Nexus 3 integration plugin.
sudo java -jar <nexus-install-directory>/nexus/system/CTF-Nexus-3-Integration-Plugin-3.3.84 }}/installer.jar -enable -
Log on to Nexus 3 as a Site Administrator.
-
Click Realms under the Security section on the Administration menu.
-
Select TF Authentication Realm and TF Authentication Token Realm from the Active list of realms, move them to the Available list of realms and move them back to the Active list of realms.