Release and Triggers Settings
This article explains how to configure settings for releases, workflows, and triggers in Digital.ai Release. Settings are grouped by theme for easier navigation.
Navigate to the upper-right corner of the screen, click > System Settings > Releases and Triggers.
The System Settings page is available only to Administrators with the Admin global permission.
Before configuring these settings, review How Archiving Works to understand the process in Digital.ai Release.
Archive and Clean-up Releases and Workflows
Archiving and clean-up options help manage completed or aborted releases and workflows.
- Use increment/decrement buttons in text fields to adjust values.
- The Time drop-down lets you select hours, days, weeks, or years.
-
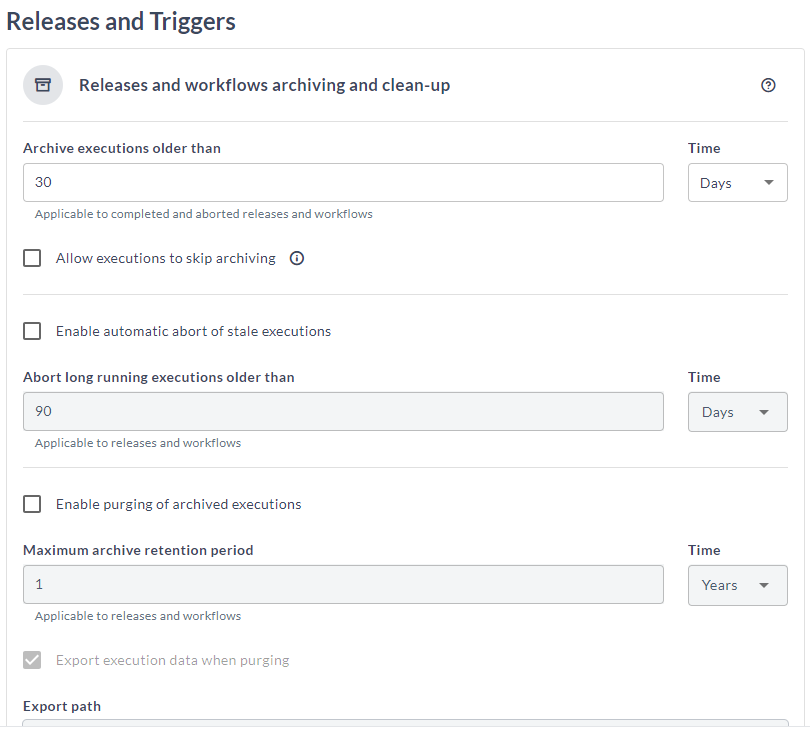
Archive executions older than: Set a value (hours or days) to define when completed or aborted releases/workflow executions are archived. Default:
30days. Purging of archived releases is disabled, by default. -
Allow executions to skip archiving: Enable this to exempt specific releases/workflows from archiving. When enabled, the Archive release checkbox appears on the Properties sub-page and release templates.
noteIf a release is marked to skip archiving, it is deleted (not archived) upon completion or abortion. Use this for transient releases that have no business value and should be excluded from reporting/statistics.
-
Enable automatic abort of stale executions: Automatically aborts incomplete releases/workflows after a specified period. When enabled, set the value in the Abort long running executions older than field (days or weeks). Default:
90days. -
Enable purging of archived executions: Automatically deletes archived releases/workflows after the retention period. Enabling this opens a confirmation modal. Click Confirm to proceed. This also enables the Maximum archive retention period field.
-
Maximum archive retention period: Set the maximum duration (days or years) for which releases/workflows remain archived.
-
Export execution data when purging and Export path: These options are enabled after confirming purging. By default, they are disabled.
noteIt is recommended that you configure a shared folder for your purging location so that all your purged data goes to one single location.

For more information, see How archiving works.
Release reports for finished releases use only archived data. Delaying archiving can result in outdated reports and reduced performance. For database configuration, see Configure the archive database.
Before removal from the database, release content is exported to the file system location set in Export path. Exported releases are organized by end date: purged/<year>/<month>/<day>/<release-id>.zip.
Example contents of a purged release zip file:
release.json
activity-log.json
attachments/<attachment-id>/<attachment-file-name>
Limits in Release
Configure limits to optimize performance and control system behavior.

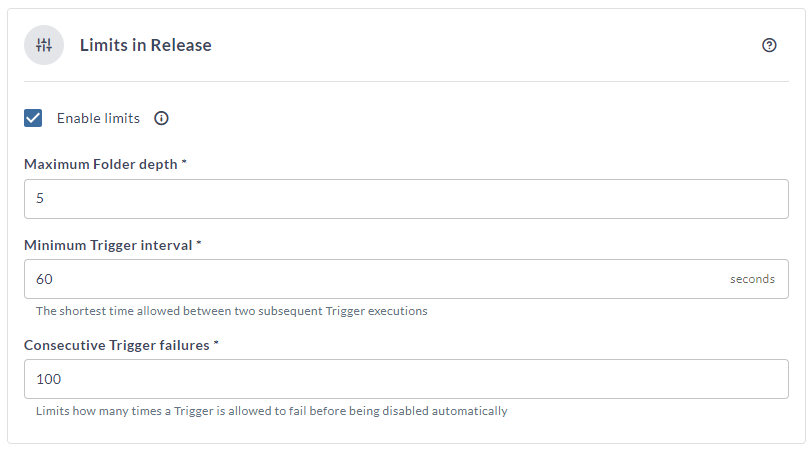
By default, Enable limits is selected. You can:
- Limit the maximum number of folders
- Set the interval between trigger executions
- Limit the number of allowed trigger failures
These settings help maintain system performance.
Limit Folder Depth in Release
Deeply nested folder structures (over 5-6 levels) can cause:
- General slowness
- High CPU usage
- Unreliable CLI tasks
- Issues with creating releases
Set the Maximum Folder depth to limit nesting. Default: 5.
Administrators can increase folder depth beyond 5 if needed.
Limit Minimal Trigger Polling Interval
The minimum polling interval for triggers is now 60 seconds (was 1 second) to reduce system load.
Set the Minimum Trigger interval to define the minimum polling interval. Default: 60 seconds.
Limit Triggers Failures
Set the maximum number of consecutive trigger failures before a trigger is disabled.
In Consecutive Trigger failures, enter the allowed number of failures. Default: 100.
When a trigger is disabled, the Administrator receives a notification.
Trigger Data Purging
Purge Release trigger execution data to remove it from the database.

- Enable purging of trigger data: Select to activate purging. This enables the Purge Trigger data older than field.
- Purge Trigger data older than: Set the retention period (hours or days) for trigger data. Default:
30days.
After changing any setting, the Save button is enabled:
- Click Save to apply changes.
- Click Reset to revert to default settings.
Risk Calculation
Enable or disable the risk calculation feature in Digital.ai Release.
- When enabled, Release evaluates and assigns a risk score to each release based on defined risk profiles.
- When disabled, risk evaluation is paused and risk indicators are removed from the UI.
For more information, see Risk-Aware View.
