Adding Release Plugin to Your Backstage IDP
Before You Begin
Ensure that you have installed the Backstage application. If not, you can follow the Getting Started guide on Backstage to create one. Once you have the Backstage application installed, you can proceed with installing the plugins.
Installing and Configuring the Frontend Plugin
The frontend plugin needs to be added to your application. To do so:
- Run the following command from the Backstage root directory:
yarn --cwd packages/app add @digital-ai/plugin-dai-release
- Add Active Releases to your Backstage.
a. Add the DaiReleasePage extension to your App.tsx to include the ReleaseHomePage component exported from the plugin. For example,
// In packages/app/src/App.tsx
import {DaiReleasePage} from '@digital-ai/plugin-dai-release';
const routes = (
     <FlatRoutes>
        {/* ...other routes */}
        <Route path="/dai-release" element={<DaiReleasePage/>}/>
b. Add Digital.ai Release to your app sidebar.
i) In packages/app/src/components/Root/Root.tsx
import '@digital-ai/dot-icons/index.css';

export const activeReleaseIcon = () => {
return <span className="dot-icon">
<i className="icon-release"/>
</span>
}
ii) Add the following to display in the dropdown menu.
In packages/app/src/components/Root/Root.tsx

<SidebarItem icon={ReleaseSvgIcon} onClick={() => {}} text="digital.ai Release">
<SidebarSubmenu title="Release">
<SidebarSubmenuItem
title="Active releases"
to="dai-release"
icon={activeReleaseIcon}
/>
</SidebarSubmenu>
</SidebarItem>
- Add Release template to your Backstage.
a. Add the DaiTemplatePage extension to your App.tsx to include the ReleaseHomePage component exported from the plugin. For example,
   // In packages/app/src/App.tsx
import {DaiTemplatePage} from '@digital-ai/plugin-dai-release';

const routes = (
     <FlatRoutes>
        {/* ...other routes */}
        <Route path="/dai-template" element={<DaiTemplatePage/>}/>
b. Add Digital.ai Template to your app sidebar.
/ In packages/app/src/components/Root/Root.tsx
import '@digital-ai/dot-icons/index.css';

export const activeReleaseIcon = () => {
return <span className="dot-icon">
<i className="icon-release"/>
</span>
}
c. Add the following to display in the dropdown menu.
<SidebarItem icon={ReleaseSvgIcon} onClick={() => {}} text="digital.ai Release">
<SidebarSubmenu title="Templates">
<SidebarSubmenuItem
title="Templates"
to="dai-release"
icon={templateIcon}
/>
</SidebarSubmenu>
</SidebarItem>
Installing and Configuring the Backend Plugin
For Legacy Backend System
It is a simple plugin that makes API requests to Digital.ai Release.
If you're using new Backstage backend system, refer to Backstage New Backend System.
- Run the following command from the Backstage root directory.
yarn --cwd packages/backend add @digital-ai/plugin-dai-release-backend
- Create a plugin file for deploy backend in the
packages/backend/src/plugins/directory.
// packages/backend/src/plugins/dai-release.ts
import { createRouter } from '@digital-ai/plugin-dai-release-backend';
import { Router } from 'express';
import type { PluginEnvironment } from '../types';
export default function createPlugin(
  env: PluginEnvironment,
): Promise<Router> {
  return createRouter({
        logger: env.logger,
    config: env.config,
    permissions: env.permissions
  });
}
- Modify your backend router to expose the APIs for Release backend.
// packages/backend/src/index.ts
import daiRelease from './plugins/dai-release';
// ...
async function main()
  // ...
  // Add this line under the other lines that follow the useHotMemoize pattern
  const daiReleaseEnv = useHotMemoize(module, () => createEnv('dai-release'));
  // ...
  // Insert this line under the other lines that add their routers to apiRouter in the same way
  apiRouter.use('/dai-release', await daiRelease(daiReleaseEnv));
- Configure the Release instance by adding the following to your app-config.yaml files.
Release plugin supports multi instance integration option. All values are mandatory, and if any of the keys or values are missing, the application fails to start.
For single instance setup:
daiRelease:
   instances:
      - name: {name-of-first-instance} #
        host: {host-of-first-instance} #http://digital-ai-1.release.com:4516
        token: {token-of-first-instance}
For multi instance setup:
daiRelease:
   instances:
      - name: {name-of-first-instance} #
        host: {host-of-first-instance} #http://digital-ai-1.release.com:4516
        token: {token-of-first-instance}
      - name: {name-of-second-instance}
        host: {host-of-second-instance} #http://digital-ai-2.release.com:4516
        token: {token-of-second-instance}
Configuration Details:
name: is used to display in UI for choosing instance.host: is your release application host.token: You must set an environment variable for your release application's API token. Create an account with read permissions and use the token from that account.
Installing and Configuring the Backend Plugin - New Backend System
The Dai Release backend plugin has support for the new backend system. To add the new backend system:
- Run the following command from the Backstage root directory:
yarn --cwd packages/backend add @digital-ai/plugin-dai-release-backend
- In your packages/backend/src/index.ts make the following changes:
import { createBackend } from '@backstage/backend-defaults';

  const backend = createBackend();

  // ... other feature additions

+ backend.add(import('@digital-ai/plugin-dai-release-backend'));

  backend.start();
- Configure the Release instance by adding the following to your app-config.yaml files.
Release plugin supports multi instance integration option. All values are mandatory, and if any of the keys or values are missing, the application fails to start.
For single instance setup:
daiRelease:
   instances:
      - name: {name-of-first-instance} #
        host: {host-of-first-instance} #http://digital-ai-1.release.com:4516
        token: {token-of-first-instance}
For multi instance setup:
daiRelease:
   instances:
      - name: {name-of-first-instance} #
        host: {host-of-first-instance} #http://digital-ai-1.release.com:4516
        token: {token-of-first-instance}
      - name: {name-of-second-instance}
        host: {host-of-second-instance} #http://digital-ai-2.release.com:4516
        token: {token-of-second-instance}
Configuration Details:
name: is used to display in UI for choosing instance.host: is your release application host.token: You must set an environment variable for your release application's API token. Create an account with read permissions and use the token from that account.
Creating Users in Release
Before you can use the Release plugin for Backstage, certain prerequisites needs to be met within the Digital.ai Release. These involve creating a new API access token. For example,
- Login as admin or user and create an access token with “Audit data” permission.

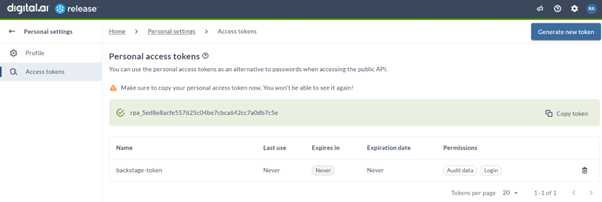
- Alternatively, you can create a new user in Digital.ai Release for Backstage. For example, ‘backstage-user’.

- Create a new role “backstage-role” and add principal “backstage-user”.
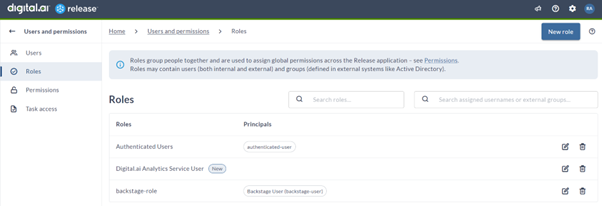
- Assign “Audit data” permission to “backstage-role”.
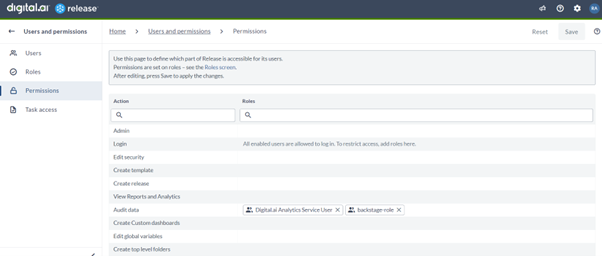
- Login as “backstage-user” and create an ccess token with all permissions.


Using the Release Plugin in Backstage
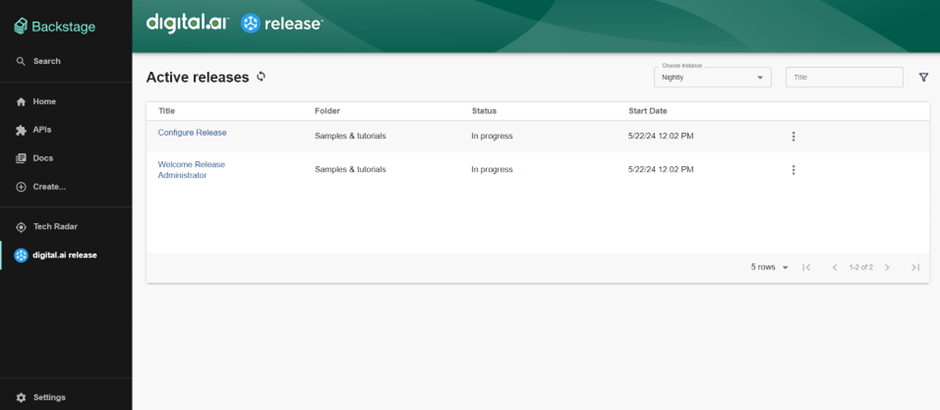
- Open your Backstage application and from the sidebar, click Digital.ai release. The Release plugin dashboard appears.
You can view active release details such as release Title, Folder, Status, and Start Date.
- Under Title, click the link to view the release flow.
The latest release appears on top.
-
From Choose Instance dropdown, select the instance required.
-
Click the filter icon. This opens the Filters dialog,initially empty.
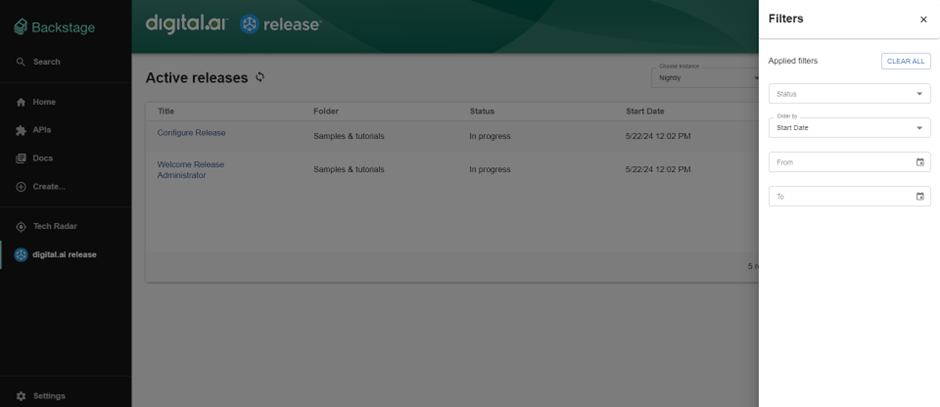
As needed, you can filter based on Release Status, and Start Date, From, and To. The dashboard displays the active release details for your selected filter.
- You can use the pagination option at the bottom to navigate through the multiple pages of active releases.
Warnings
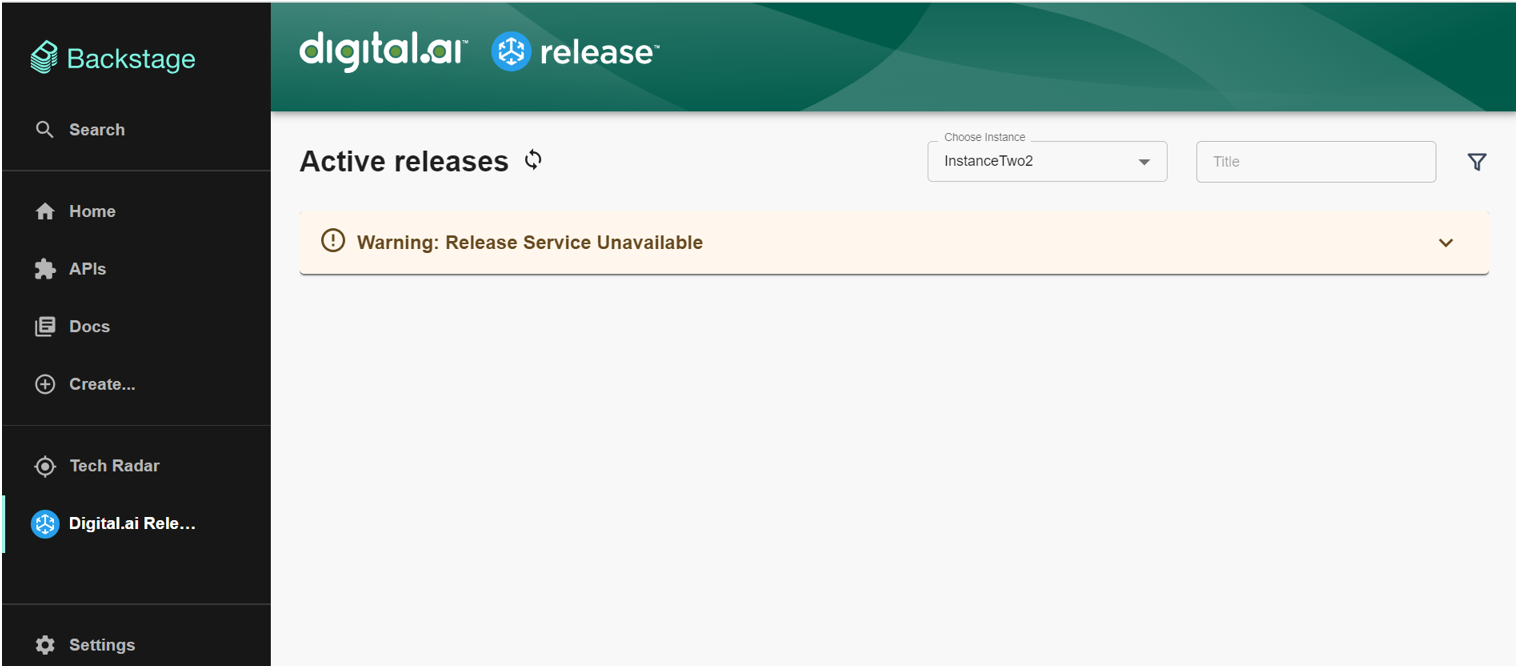
Connectivity Warnings
The following error occurs if you do not have network connectivity. Verify your network connectivity to prevent this error.
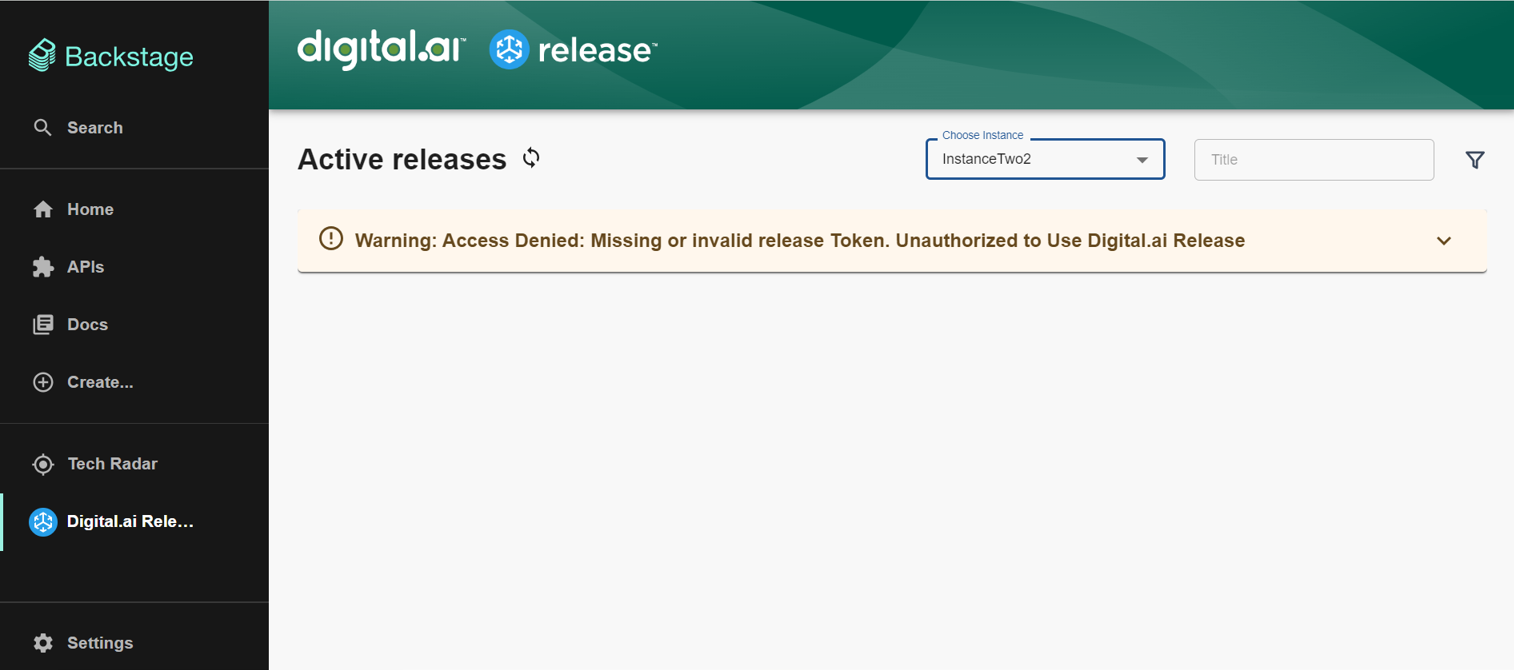
Permission Warnings
The following error occurs if you do not have the required permissions. Verify the permissions assigned to the Backstage user in Release to prevent these errors.
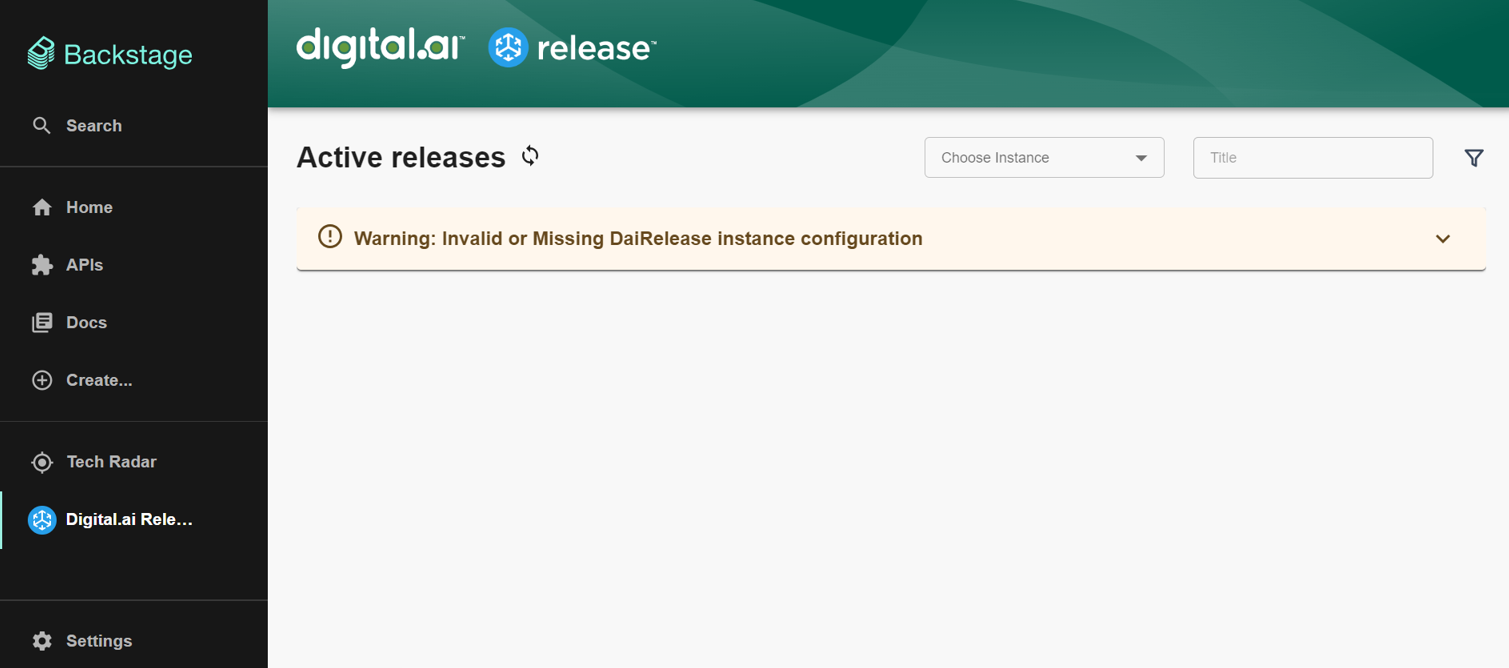
Configuration Error
The following error occurs if you miss or add invalid instance configurations while creating a multi-instance setup.
Enabling Permissions
The Digital.ai Release plugin supports the permissions framework. The following sections outline how you can use them with the assumption that you have the permissions framework setup and working.
These sections are intended as guidance and are completely optional.
Secure Sidebar Option
To use the permission framework to secure the Digital.ai Release sidebar option do the following:
- Add the @backstage/plugin-dai-release-common package to your frontend app:
# From your Backstage root directory
yarn --cwd packages/app add @backstage/plugin-dai-release-common
- Open the packages/app/src/components/Root/Root.tsx file, and add imports after all the existing import statements:
import { daiReleaseViewPermission } from '@digital-ai/plugin-dai-release-common';
import { RequirePermission } from '@backstage/plugin-permission-react';
Then make the following changes:
+   <RequirePermission
+     permission={daiReleaseViewPermission}
+     errorPage={<></>}>
+     <SidebarItem icon={ReleaseSvgIcon} to="dai-release" text="Digital.ai Release" />
+   </RequirePermission>
Secure the dai-release Route
To use the permission framework to secure the dai-release route do the following:
- Add the @backstage/plugin-dai-release-common package to your frontend app (skip this step if you've done already):
# From your Backstage root directory
yarn --cwd packages/app add @backstage/plugin-dai-release-common
- Open the packages/app/src/App.tsx file, and add import after all the existing import statements:
import { daiReleaseViewPermission } from '@digital-ai/plugin-dai-release-common';
Then make the following change:
+   <Route path="/dai-release"
+     element={
+     <RequirePermission permission={daiReleaseViewPermission}>
+       <DaiReleasePage/>
+     </RequirePermission>
+     }
+   />
Permission Policy
Here is an example permission policy for legacy backend system that you might use to secure the Digital.ai Release plugin.
// packages/backend/src/plugins/permission.ts

class TestPermissionPolicy implements PermissionPolicy {
  async handle(request: PolicyQuery): Promise<PolicyDecision> {
    if (isPermission(request.permission, daiReleaseViewPermission)) {
      if (
        user?.identity.ownershipEntityRefs.includes(
          'group:default/release-admins',
        )
      ) {
        return { result: AuthorizeResult.ALLOW };
      }
      return { result: AuthorizeResult.DENY };
    }

    return { result: AuthorizeResult.ALLOW };
  }
}
To use this policy ensure to add the @backstage/plugin-dai-release-common package to your backend plugin. Run the following command:
# From your Backstage root directory
yarn --cwd packages/backend add @backstage/plugin-dai-release-common
Also, add these imports:
import { daiReleaseViewPermission } from '@digital-ai/plugin-dai-release-common';
Note: The group "group:default/release-admins" is simply an example and might not exist. You can point this to any group you have in your catalog instead.
Here is an example permission policy for new backend system that you might use to secure the Digital.ai Release plugin.
// packages/backend/src/index.ts

import { createBackendModule } from '@backstage/backend-plugin-api';
import {
  PolicyDecision,
  AuthorizeResult,
  isPermission
} from '@backstage/plugin-permission-common';
import {
  PermissionPolicy,
  PolicyQuery,
} from '@backstage/plugin-permission-node';
import { policyExtensionPoint } from '@backstage/plugin-permission-node/alpha';
import {
    catalogConditions,
    createCatalogConditionalDecision,
} from '@backstage/plugin-catalog-backend/alpha';
import {
    daiReleaseViewPermission
} from "@digital-ai/plugin-dai-release-common";
import {
    catalogEntityDeletePermission,
} from '@backstage/plugin-catalog-common/alpha';

// ...
class CustomPermissionPolicy implements PermissionPolicy {
  async handle(
      request: PolicyQuery,
      user?: BackstageIdentityResponse,
  ): Promise<PolicyDecision> {

    if (isPermission(request.permission, daiReleaseViewPermission)) {
      if (
          user?.identity.ownershipEntityRefs.includes(
              'group:default/backstage-admins',
          )
      ) {
        return { result: AuthorizeResult.ALLOW };
      }
      return { result: AuthorizeResult.DENY };
    }

    return {
      result: AuthorizeResult.ALLOW,
    };
  }
}

const customPermissionBackendModule = createBackendModule({
  pluginId: 'permission',
  moduleId: 'custom-policy',
  register(reg) {
    reg.registerInit({
      deps: { policy: policyExtensionPoint },
      async init({ policy }) {
        policy.setPolicy(new CustomPermissionPolicy());
      },
    });
  },
});

backend.add(customPermissionBackendModule);
// ...
Support Information
Plugin: @digital-ai/plugin-dai-release-backend
Tested Version:
| Backstage | @backstage/create-app | |
|---|---|---|
| Legacy Backend System | 1.23.0 | 0.5.11 |
| New Backend system | 1.26.0 | 0.5.14 |