Create and Configure PlanningRooms
Learn how to create new PlanningRooms and customize them with project scope, schedules, programs, and mascots so planning teams can collaborate effectively.
Overview
PlanningRooms provide dedicated workspaces where planning teams can collaborate on plans, coordinate efforts, and track progress. When you create a PlanningRoom, you define its scope by selecting projects, schedules, and programs. You can further customize each room with a mascot for easy visual identification.
To create a PlanningRoom, your project role must be set to "Project Admin" or higher.
Create a PlanningRoom
-
Click the hamburger icon
 > Rooms > .PlanningRooms
 -
Click the Add PlanningRoom button.
-
In the Add PlanningRoom window:
- Enter the name of the room in the Title field.
- Select a project. This determines which items display in the room. Note that your project role must be set to Project Admin or higher.
- (Optional) Select a Schedule to narrow the focus of your PlanningRoom.
- (Optional) Select a Program to further narrow the focus of your PlanningRoom.
- (Optional) Enter a Description that summarizes the intent of the room.
-
Click Save.
Add a mascot to a PlanningRoom
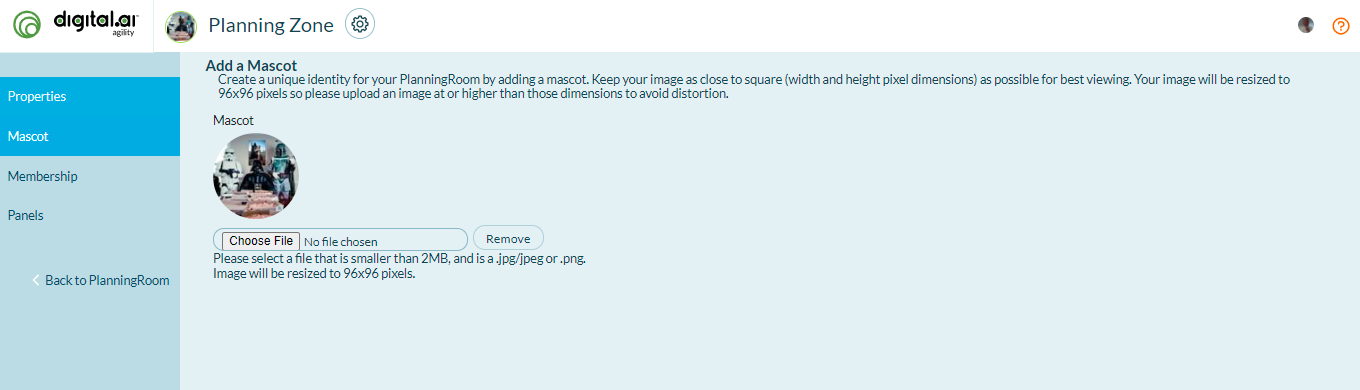
You can use mascots to uniquely brand a PlanningRoom so members can easily identify it in the list. Note that mascots are optional. If you do not add a mascot, the default mascot is used instead.
Mascot format and size recommendations
- For best results, the mascot image should be in .jpg or .jpeg or .png format.
- The system automatically resizes the image to 96x96 pixels.
- To avoid distortion, make sure your image is as close to square as possible and at that resolution or higher.
- The maximum file size is 2MB.
Add the mascot
-
Choose one of the following:
- Click the hamburger icon > Rooms > .PlanningRooms and click on the name of a room.
- Select PlanningRooms to view all of your rooms.
- Click the hamburger icon
-
Click on the name of a PlanningRoom, and then click on the Settings icon (or gear) next to the room name.
-
Click Mascot and select an image.
Next steps
After creating and configuring your PlanningRoom, you can:
- Add members to collaborate in the room
- Install and configure panels to visualize different aspects of your work
- Set up room-specific settings and permissions
For details, see Manage PlanningRoom Members and Panels.
Related topics
- Get Started with PlanningRooms - Learn how to access PlanningRooms
- Use PlanningRoom Panels - Display and track metrics
- Manage PlanningRoom Members and Panels - Administer room settings
- PlanningRooms Overview - Comprehensive PlanningRooms guide