Checkmarx Plugin
With the Digital.ai Release Checkmarx plugin, you can trigger scans in Checkmarx for your application, verify scan results, and check compliance directly from the Digital.ai Release user interface.
Features
- Create a Checkmarx: CxOSA - Check Compliance task
- Create a Checkmarx: CxSCA - Check Compliance task
- Create a Checkmarx: CxSAST - Check Compliance task
- Create a Checkmarx: CxSAST Scan - Git task
- Create a Checkmarx: CxSAST Scan - Svn task
- Create a CheckmarxOne: CxOneSCA - Check Compliance task
- Create a CheckmarxOne: CxOneSAST - Check Compliance task
- Create a CheckmarxOne: Git Trigger - Git task
- Configure a CxOSA Scan Summary tile
- Configure a CxSAST Scan Summary tile
- Configure a CheckmarxOne SAST and SCA Scan Summary tile
Requirements
The Digital.ai Release Checkmarx plugin requires the following:
- Checkmarx CxSAST versions 9.0.0 or 9.2.0
- Checkmarx CxSCA Release August 26, 2021 and above
- For older Checkmarx CxSAST versions such as 8.8.0 8.9.0 use version 9.8.0 of the Release Checkmarx plugin.
Set Up a Checkmarx server
There are two locations where you can define a Checkmarx: Server configuration:
- On a global level in Connections under the Configuration group
- On a folder level in Overview > Folders of the navigation pane, under the Configuration tab of the desired folder
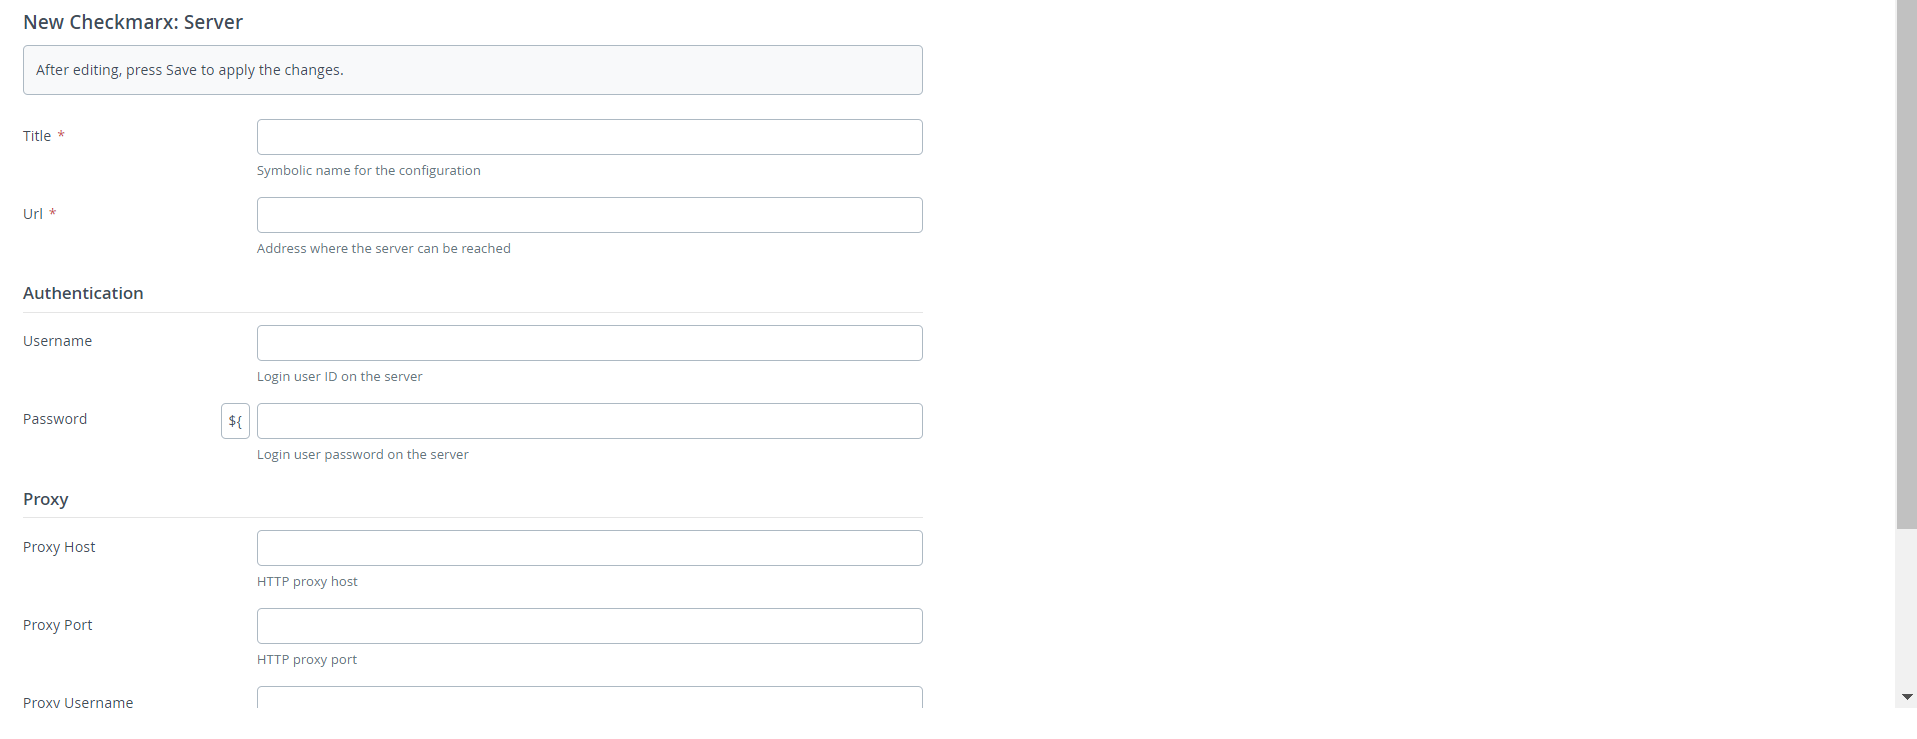
To set up a connection to a Checkmarx server:
- In Release, go to one of the two specified locations.
- Click
next to the Checkmarx: Server.
- In the Title field, specify a name for your Checkmarx server.
- In the URL field, specify the URL where to connect to the Checkmarx server.
- In the Username and Password fields, specify the login user name and password of the user on the server.
- If you are using a proxy connection, specify the host, port, username, password, and Domain in the Proxy section.
Note: Domain is used for the NTLM proxy authentication
- To test the server connection, click Test.
- Click Save.
Set up a Checkmarx SCA server
There are two locations where you can define a Checkmarx: Server configuration:
- On a global level in Connections under the Configuration group of the navigation pane
- On a folder level in Overview > Folders of the navigation pane, under the Configuration tab of the desired folder
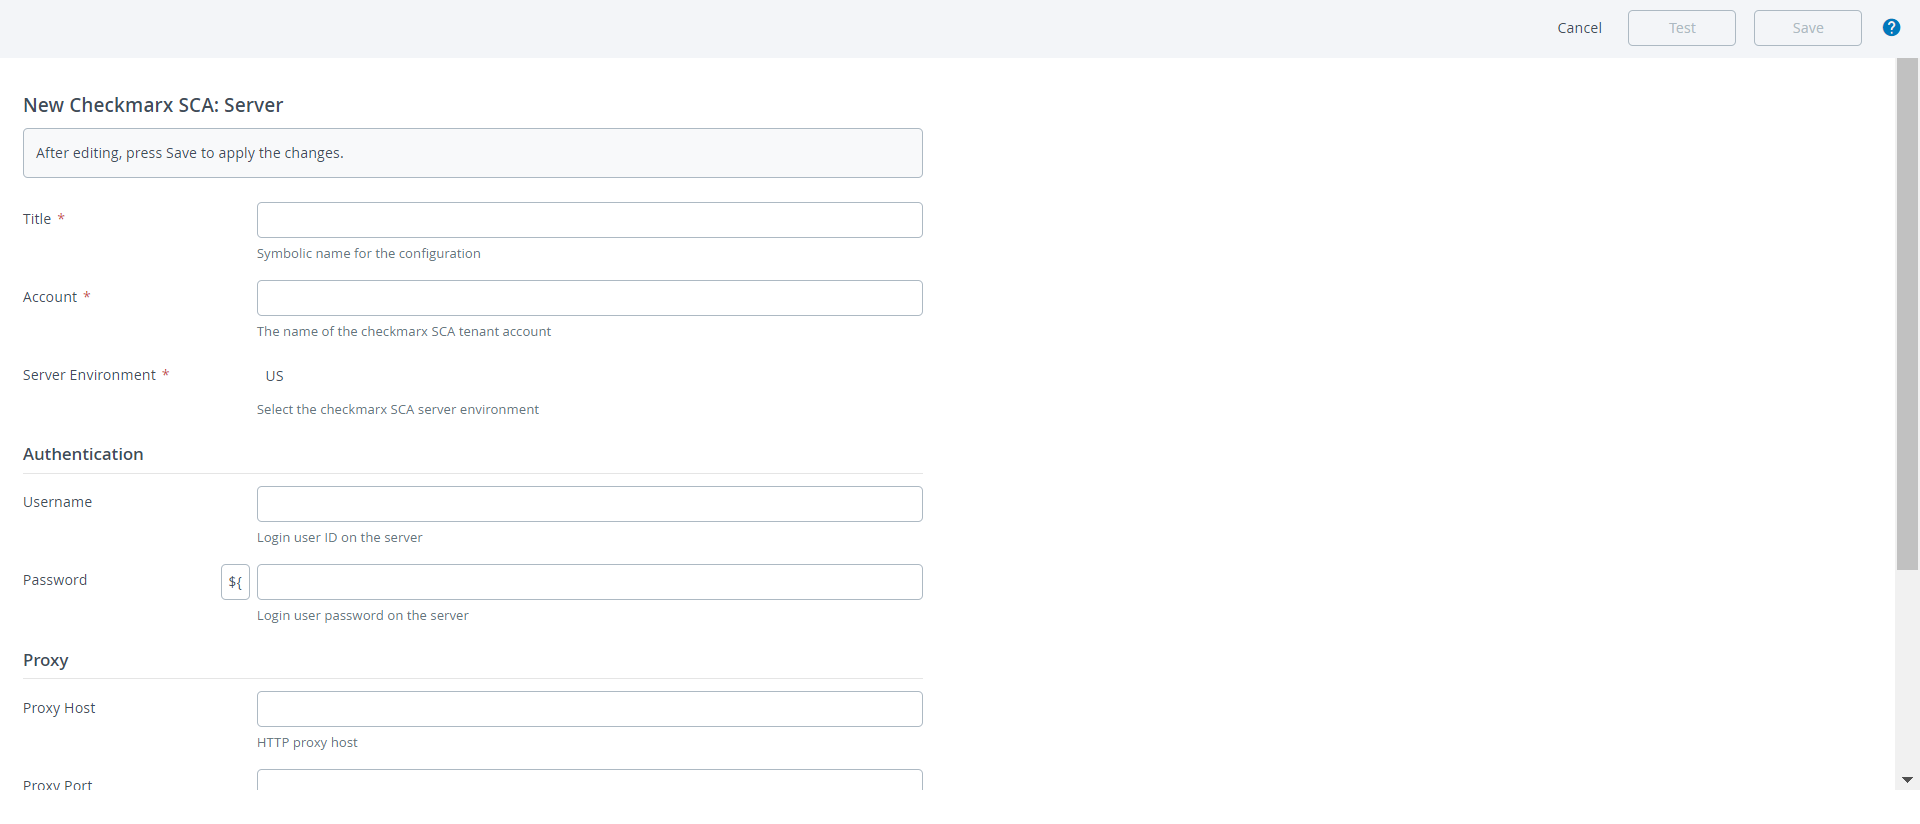
To set up a connection to a Checkmarx SCA server:
- In Release, go to one of the two specified locations.
- Click
next to the Checkmarx SCA: Server.
- In the Title field, specify a name for your Checkmarx SCA server.
- In the Account field, specify a name for the Checkmarx SCA tenant account.
- In the Server Environment field, select the checkmarx SCA server environment.
- In the Username and Password fields, specify the login user name and password of the user on the server.
- If you are using a proxy connection, specify the host, port, username, password, and Domain in the Proxy section.
Note: Domain is used for the NTLM proxy authentication
- To test the server connection, click Test.
- Click Save.
Set Up a CheckmarxOne server
There are two locations where you can define a CheckmarxOne: Server configuration:
- On a global level in Connections under the Configuration group of the navigation pane
- On a folder level in Overview > Folders of the navigation pane, under the Configuration tab of the desired folder
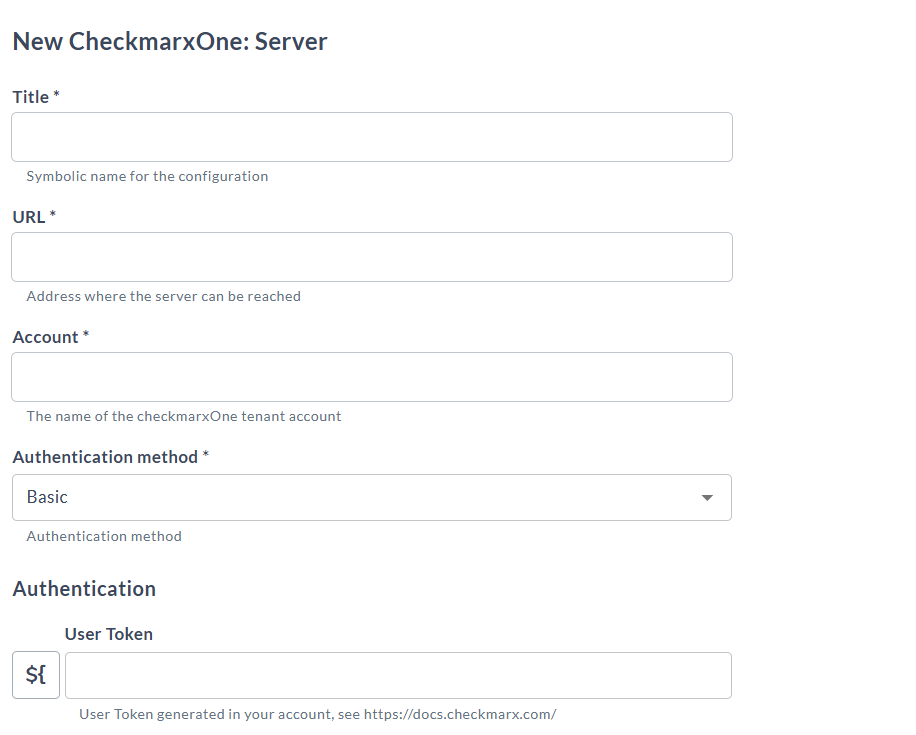
To set up a connection to a CheckmarxOne server:
- In Release, go to one of the two specified locations.
- Click
next to the CheckmarxOne: Server.
- In the Title field, specify a name for your CheckmarxOne server.
- In the Account field, specify a name for the CheckmarxOne tenant account.
- In the Url field, specify the server api URL.
- In the Authentication method dropdown, select either Basic or OAuth2:
- If you select Basic, specify the user token of the user on the server.
- If you select OAuth2, specify the client ID and client secret.
- If you are using a proxy connection, specify the host, port, username, password, and Domain in the Proxy section.
- To test the server connection, click Test.
- Click Save.
Create a Checkmarx: CxSAST - Check Compliance task
The Checkmarx: CxSAST - Check Compliance task type verifies the level of the severity threshold for your project on the Checkmarx server. If the issues count is higher than the configured threshold for a task, the task fails. The task also automatically saves audit reporting information including risk values by severity and their thresholds as well as Checkmarx server and user information. This information can be accessed through Release audit reporting functionality.
To add a Checkmarx: CxSAST - Check Compliance task:
- In the release flow view of a release or a template, add a task of the type Checkmarx > CxSAST - Check Compliance.
- Open the added task and in the Server field, select the Checkmarx server connection.
- In the Project Name field, enter the name of your project from the Checkmarx server.
- In the Team field, enter the name of the team from the Checkmarx server.
- In the Scan ID field, enter the ID of the project scan for which you want to retrieve the results. If you do not specify the Scan ID, it will retrieve data for latest finished scan.
- In the High, Medium, and Low fields, add a maximum value for each severity threshold level.
Create a Checkmarx: CxOSA - Check Compliance task
The Checkmarx: CxOSA - Check Compliance task type verifies the risk levels of the security and license thresholds for your project open source libraries. If the issues count is higher than the configured threshold for a task, the task fails. The task also automatically saves audit reporting information including risk values by severity and their thresholds as well as Checkmarx server and user information. This information can be accessed through Release audit reporting functionality.
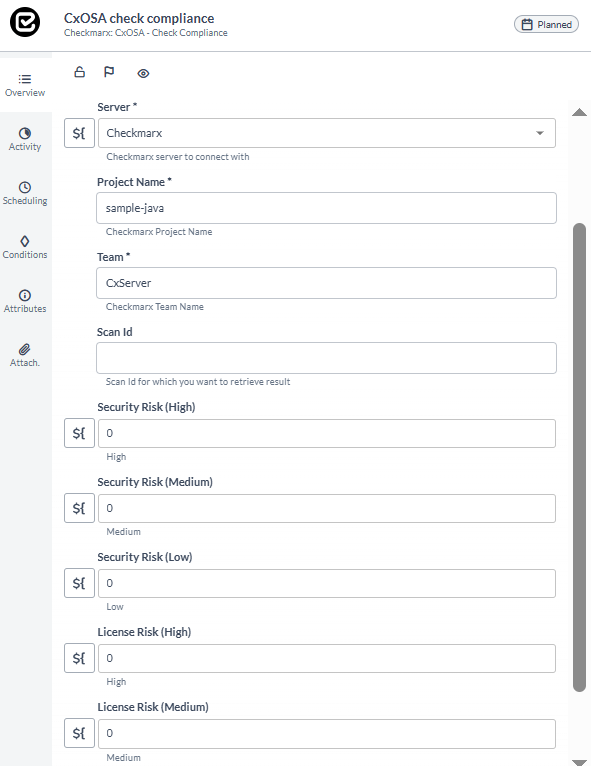
To add a Checkmarx: CxOSA - Check Compliance task:
- In the release flow view of a release or a template, add a task of the type Checkmarx > CxOSA - Check Compliance.
- Open the added task and in the Server field, select the Checkmarx server connection.
- In the Project Name field, enter the name of your project from the Checkmarx server.
- In the Team field, enter the name of the team from the Checkmarx server.
- In the Scan ID field, enter the ID of the project scan for which you want to retrieve the results. If you do not specify the Scan ID, it will retrieve data for latest finished scan.
- In the High, Medium, and Low fields for the Security Risk Threshold, add a maximum value for each security risk threshold level.
- In the High, Medium, and Unknown fields for the License Risk Threshold, add a maximum value for each license risk threshold level. If the server cannot find the license for a library, it returns Unknown license type.
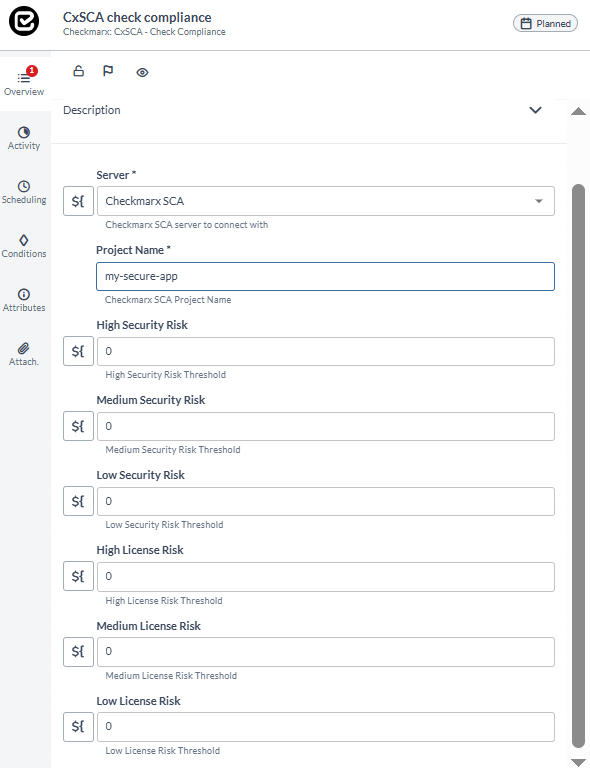
Create a Checkmarx: CxSCA - Check Compliance task
The Checkmarx: CxSCA - Check Compliance task type verifies the risk levels of the security and license thresholds for your project source code. If the issues count is higher than the configured threshold for a task, the task fails. The task also automatically saves audit reporting information including risk values by severity and their thresholds as well as Checkmarx SCA server and user information. This information can be accessed through Release audit reporting functionality.
To add a Checkmarx: CxSCA - Check Compliance task:
- In the release flow view of a release or a template, add a task of the type Checkmarx > CxSCA - Check Compliance.
- Open the added task and in the Server field, select the Checkmarx SCA server connection.
- In the Project Name field, enter the name of your project from the Checkmarx server.
- In the High Security Risk, Medium Security Risk, and Low Security Risk fields for the Security Risk Threshold, add a maximum value for each security risk threshold level.
- In the High License Risk, Medium License Risk, and Low License Risk fields for the License Risk Threshold, add a maximum value for each license risk threshold level.
Create a Checkmarx: CxSAST Scan - Git Task
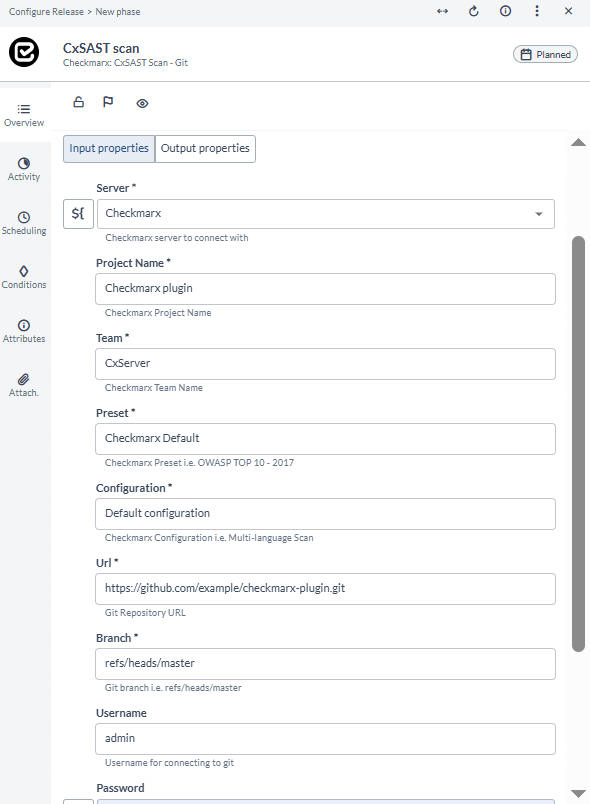
The Checkmarx: CxSAST Scan - Git task type triggers a scan on the Checkmarx server for your project from a specified Git repository.
To add a Checkmarx: CxSAST Scan - Git task:
- In the release flow view of a release or a template, add a task of the type Checkmarx > CxSAST Scan - Git.
- Open the added task and in the Server field, select the Checkmarx server connection.
- In the Project Name field, enter the name of your project from the Checkmarx server.
- In the Team field, enter the name of the team from the Checkmarx server.
- In the Preset field, specify the preset value to use for the scan from the Checkmarx server.
- In the Configuration field, specify the configuration value to use for the scan from the Checkmarx server.
- In the URL field, enter the URL of your Git repository.
- In the Branch field, enter the Git branch for you project.
- In the Username and Password fields, specify the login user name and password to connect to Git.
- In the Token field, enter the personal token to connect to Git. Note: If you used the username and password credentials, the token is not required.
- In the Timeout field, set the number of minutes for the scan timeout threshold. If the scan task execution time is higher than the threshold, the task fails.
The output property of this task is the Scan ID from the Checkmarx server. You can use this Scan ID to check the compliance of you project.
Create a CheckmarxOne: Git Trigger - Git Task
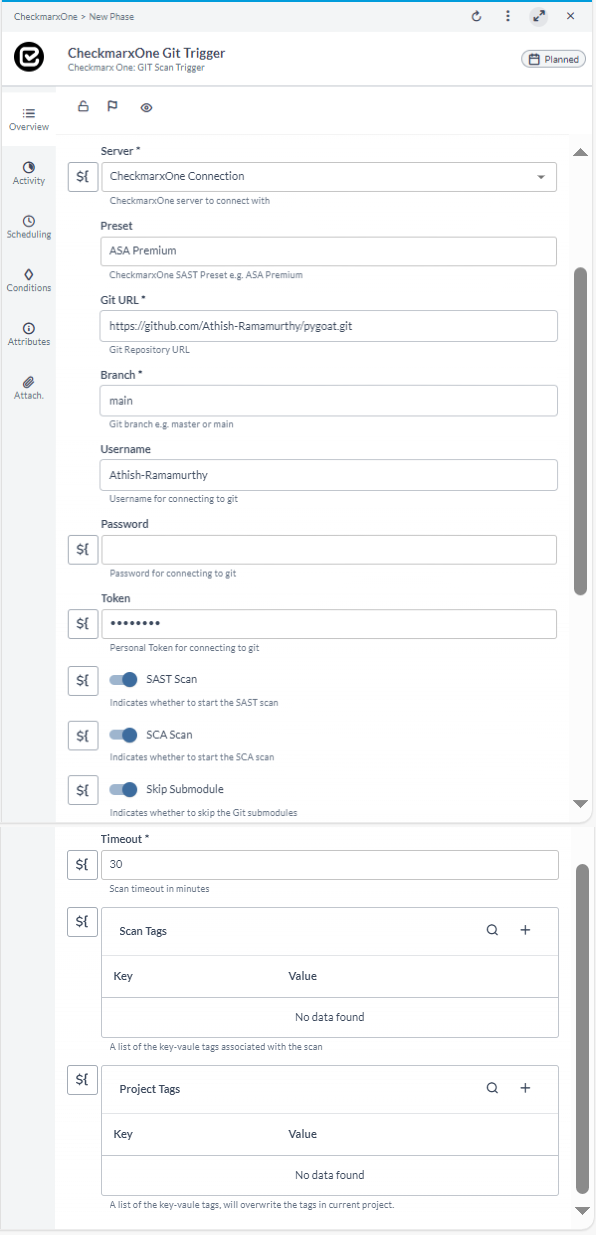
The CheckmarxOne: Git Trigger - Git task type triggers a scan on the CheckmarxOne server for your project from a specified Git repository.
To add a CheckmarxOne: Git Trigger - Git task:
- Open the added task and in the Server field, select the CheckmarxOne server connection.
- In the Preset field, enter the preset value (eg) ASA Premium .
- In the URL field, enter the URL of your Git repository.
- In the Branch field, enter the Git branch for you project.
- In the Username and Password fields, specify the login user name and password to connect to Git.
- In the Token fields, specify the Personal Access Token(PAT) to connect to Git.
- In the SAST Scan SCA Scan Toggle Switch, choose one or both to retrieve the results.
- In the Skip Submodule Toggle Switch, Indicates whether to skip the Git submodules
- In the Timeout field, enter the Scan timeout in minutes.
- In the Scan Tags field, enter the list of the key-vaule tags associated with the scan.
- In the Project Tags field, enter the list of the key-vaule tags, will overwrite the tags in current project.
Create a Checkmarx: CxSAST Scan - SVN Task
The Checkmarx: CxSAST Scan - SVN task type triggers a scan on the Checkmarx server for your project from a specified Git repository.
To add a Checkmarx: CxSAST Scan - SVN task:
- In the release flow view of a release or a template, add a task of the type Checkmarx > CxSAST Scan - SVN.
- Open the added task and in the Server field, select the Checkmarx server connection.
- In the Project Name field, enter the name of your project from the Checkmarx server.
- In the Team field, enter the name of the team from the Checkmarx server.
- In the Preset field, specify the preset value to use for the scan from the Checkmarx server.
- In the Configuration field, specify the configuration value to use for the scan from the Checkmarx server.
- In the URL field, enter the URL of your SVN repository.
- In the Port field, enter the port to connect to SVN.
- In the Branch field, enter the SVN branch for you project.
- In the Username and Password fields, specify the login user name and password to connect to SVN.
- In the Timeout field, set the number of minutes for the scan timeout threshold. If the scan task execution time is higher than the threshold, the task fails.
The output property of this task is the Scan ID from the Checkmarx server. You can use this Scan ID to check the compliance of you project.
Create a CheckmarxOne: SAST - Check Compliance
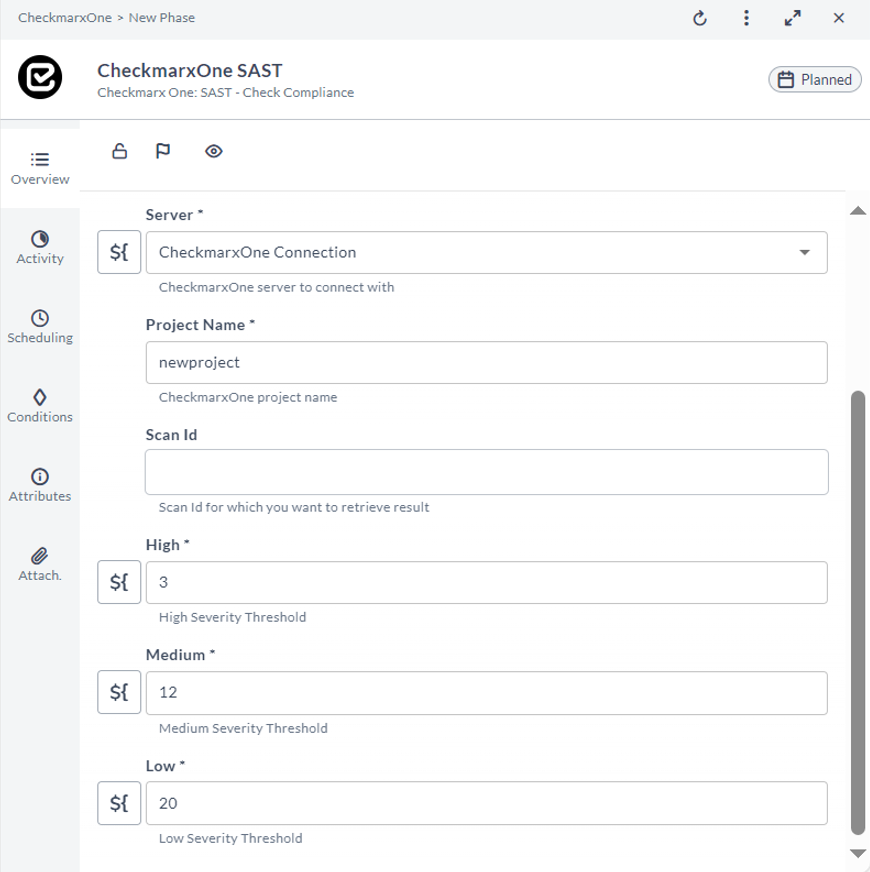
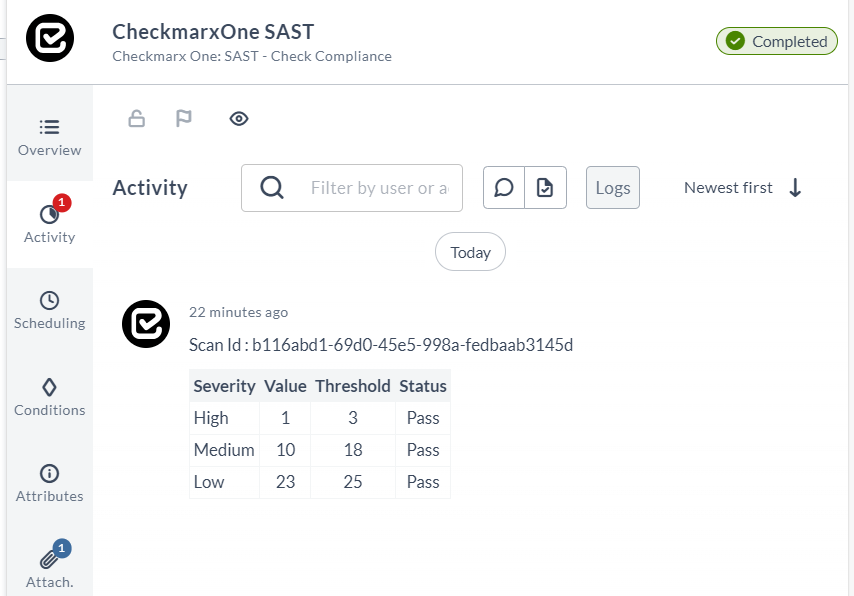
The CheckmarxOne: SAST - Check Compliance task type verifies the level of the severity threshold for your project on the CheckmarxOne server. If the issues count is higher than the configured threshold for a task, the task fails. The task also automatically saves audit reporting information including risk values by severity and their thresholds as well as CheckmarxOne server and user information. This information can be accessed through Release audit reporting functionality.
To add a CheckmarxOne: SAST - Check Compliance task:
- In the release flow view of a release or a template, add a task of the type CheckmarxOne > SAST - Check Compliance.
- Open the added task and in the Server field, select the CheckmarxOne server connection.
- In the Project Name field, enter the name of your project from the CheckmarxOne server.
- In the Scan ID field, enter the ID of the project scan for which you want to retrieve the results. If you do not specify the Scan ID, it will retrieve data for latest finished scan.
- In the High, Medium, and Low fields, add a maximum value for each severity threshold level.
Create a CheckmarxOne: SCA - Check Compliance Task
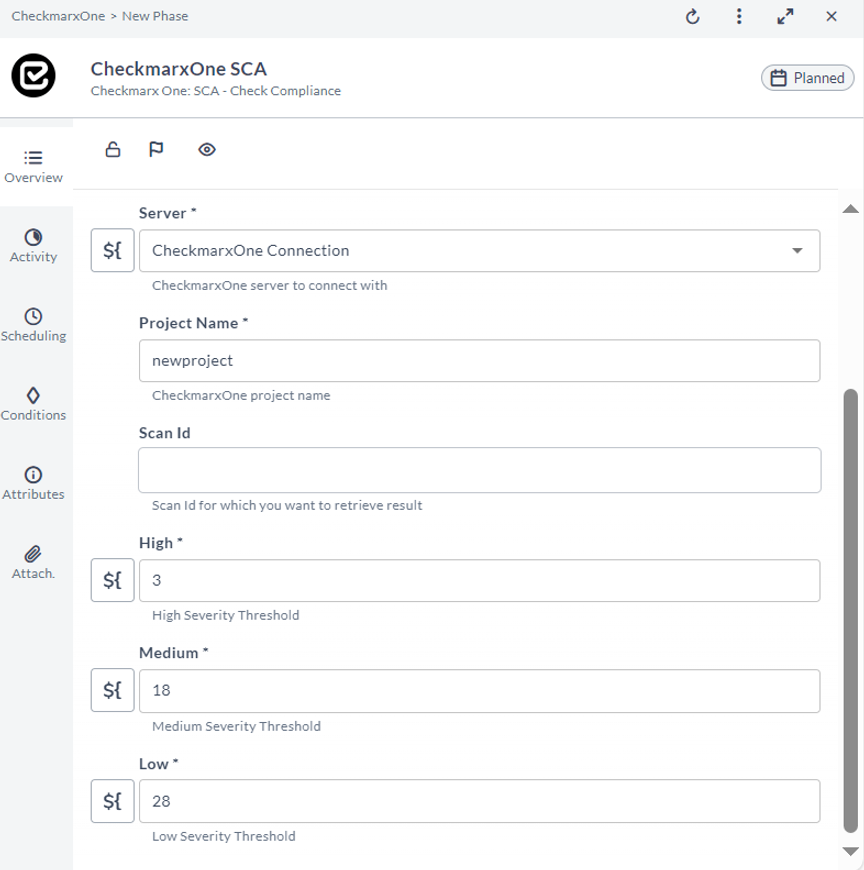
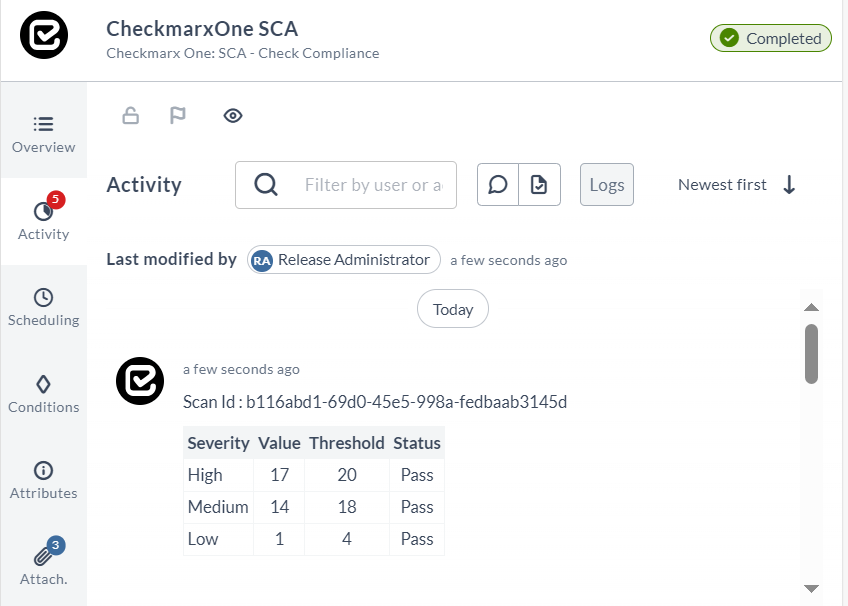
The CheckmarxOne: SCA - Check Compliance task type verifies the level of the severity threshold for your project on the CheckmarxOne server. If the issues count is higher than the configured threshold for a task, the task fails. The task also automatically saves audit reporting information including risk values by severity and their thresholds as well as CheckmarxOne server and user information. This information can be accessed through Release audit reporting functionality.
To add a CheckmarxOne: SCA - Check Compliance Task:
- In the release flow view of a release or a template, add a task of the type CheckmarxOne > SCA - Check Compliance.
- Open the added task and in the Server field, select the CheckmarxOne server connection.
- In the Project Name field, enter the name of your project from the CheckmarxOne server.
- In the Scan ID field, enter the ID of the project scan for which you want to retrieve the results. If you do not specify the Scan ID, it will retrieve data for latest finished scan.
- In the High, Medium, and Low fields, add a maximum value for each severity threshold level.
Create a CheckmarxOne Scan Summary Tile
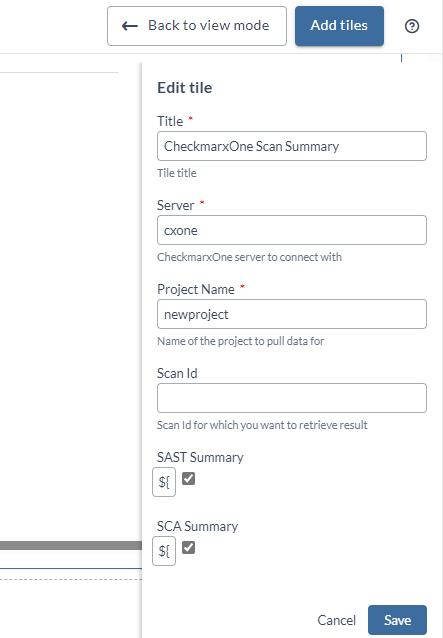
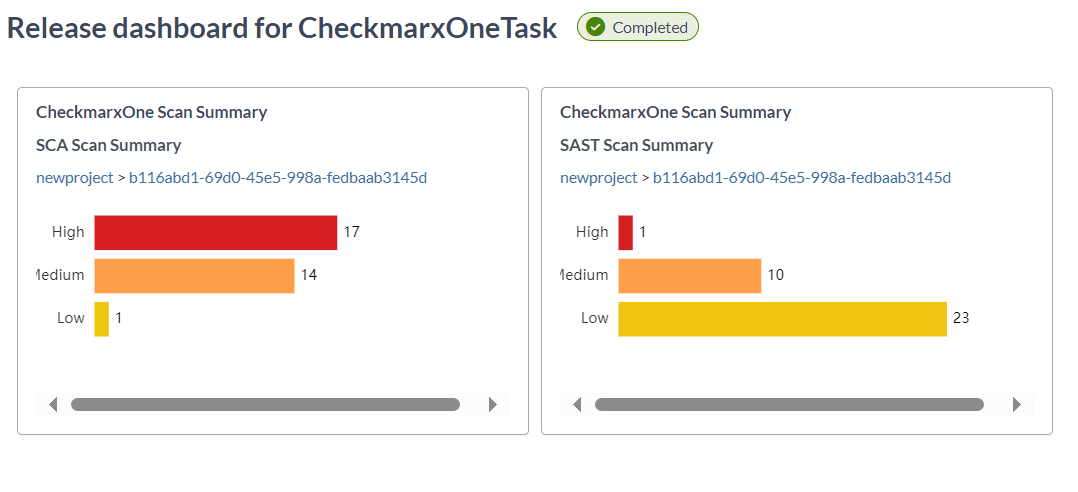
The CheckmarxOne Scan Summary tile type creates a dashboard tile that displays the metrics of your selected project, configured for a CxOneSAST scan from the CheckmarxOne server.
To configure a CxOne Scan Summary tile:
- Go to the release dashboard view of a release or to a custom dashboard from the Dashboards menu.
- Click Configure > Add tile > CheckmarxOne Scan Summary.
- Open the added task and in the Server field, select the CheckmarxOne server connection.
- In the Project Name field, enter the name of your project from the CheckmarxOne server.
- In the Scan ID field, enter the ID of the project scan for which you want to retrieve the results. If you do not specify the Scan ID, it will retrieve data for latest finished scan.
- In the SAST Summary SCA Summary checkbox, click any one or both to retrieve the results.
Create a CxSAST Scan Summary Tile
The CxSAST Scan Summary tile type creates a dashboard tile that displays the metrics of your selected project, configured for a CxSAST scan from the Checkmarx server.
To configure a CxSAST Scan Summary tile:
- Go to the release dashboard view of a release or to a custom dashboard from the Dashboards menu.
- Click Configure > Add tile > CxSAST Scan Summary.
- Click the gear icon to configure the added tile.
- In the Server field, select an existing Checkmarx server configuration.
- In the Project Name field, enter the name of your project from the Checkmarx server.
- In the Team field, enter the name of the project team to retrieve the metrics from the Checkmarx server.
- In the Scan ID field, enter the ID of the project scan for which you want to retrieve the metrics. If you do not specify the Scan ID, it will retrieve data for latest finished scan.
- Click Save.
The tile displays the metrics of your project configured for a CxSAST scan from the Checkmarx server or an error message if an error occurs.
Create a CxOSA Scan Summary Tile
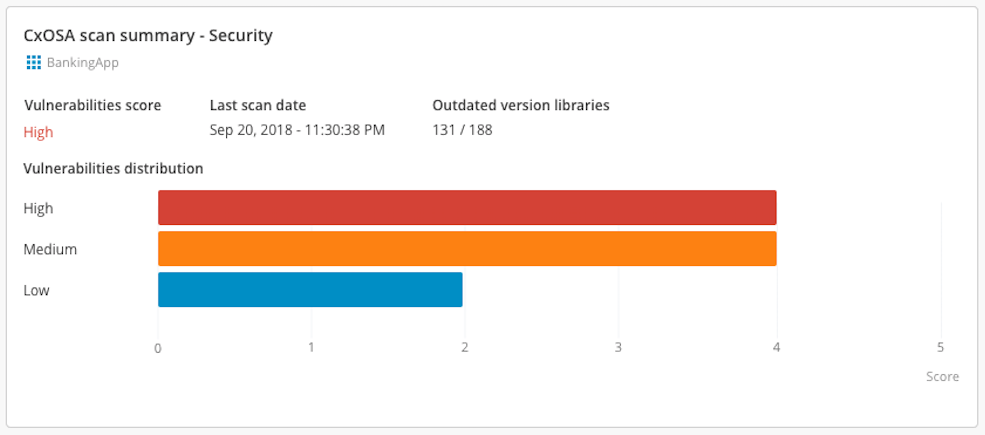
The CxOSA Scan Summary tile type creates a dashboard tile that displays the metrics of your selected project configured for a CxOSA scan from the Checkmarx server.
To configure a CxOSA Scan Summary tile:
- Go to the release dashboard view of a release or to a custom dashboard from the Dashboards menu.
- Click Configure > Add tile > CxOSA Scan Summary.
- Click the gear icon to configure the added tile.
- In the Server field, select an existing Checkmarx server configuration.
- In the Project Name field, enter the name of your project from the Checkmarx server.
- In the Team field, enter the name of the project team to retrieve the metrics from the Checkmarx server.
- In the Scan ID field, enter the ID of the project scan for which you want to retrieve the metrics. If you do not specify the Scan ID, it will retrieve data for latest finished scan.
- In the Risk Type field, select the type of risk for which you want to display metrics.
- Click Save.
The tile displays the metrics of your project configured for a CxOSA scan from the Checkmarx server or an error message if an error occurs.
Create a Checkmarx: CxSAST - Get Compliance Task
This task gets the compliance data in JSON format.