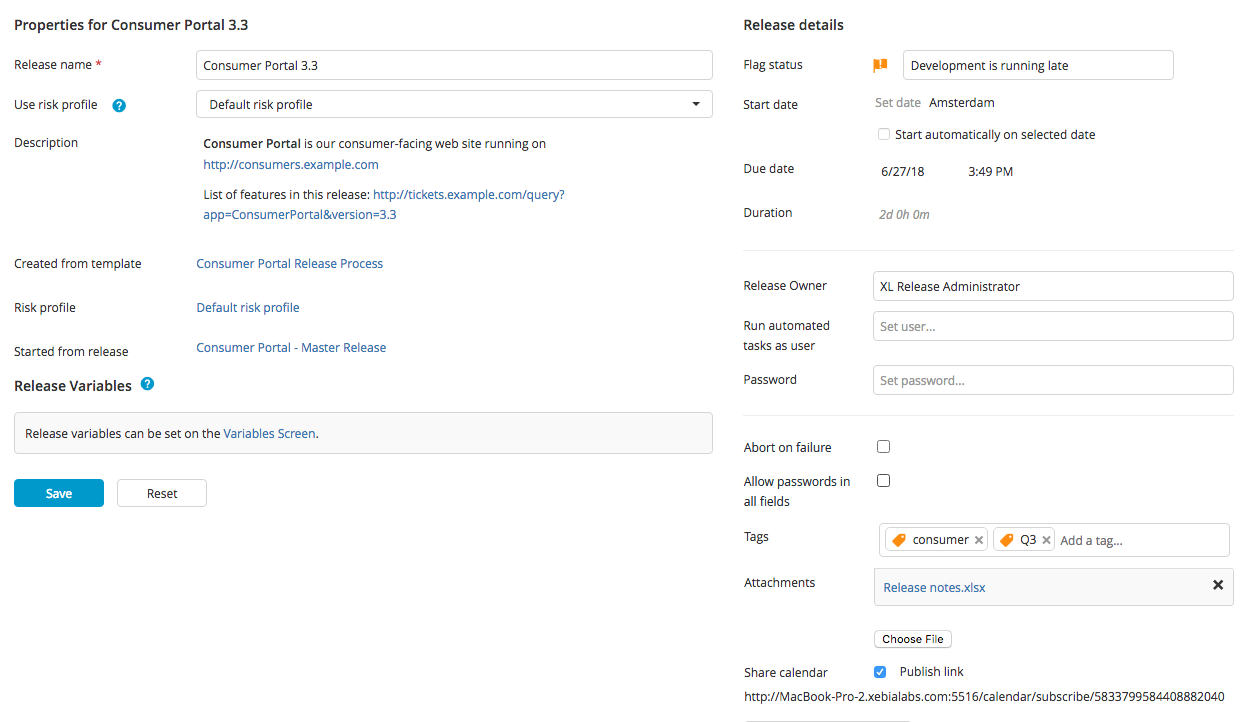
Release Properties
This topic covers Release properties, which are configurable attributes that influence the behavior and execution of a release.
To specify metadata for a release or template, select Properties from the Show menu to go to the release properties page.

Note that, the Properties option in the Show menu from the Release Flow Editor is moved to the left navigation bar when you select a Release or a Template.
Release View

Template View

To configure release properties:
-
In the Release Name box, enter the name of the release. If the release is running, you can change its name.
-
In Use risk profile, select a risk profile from the drop down list. If no risk profile is selected, the Default risk profile is used. For more information, see Configure profile risk settings.
-
In the Description box, enter detailed information about the release. You can use Markdown language in this field.
Under the description, you can see links to the template that the release is based on and, if applicable, the release that started it.
-
Next to Flag status, you can select a yellow (attention needed) or red (release at risk) icon and enter a status message. Flagged releases are highlighted in overviews.
-
In Start date and Due date, set the planned start and end dates of the release. Release uses these dates to show the release on the calendar. These are not the dates that the release actually started or ended.
You can set a release to start automatically at the specified start date by enabling the Start automatically on selected date checkbox. You can override this setting by manually starting the release. The default state of the Start automatically on selected date checkbox is disabled.
-
Select the user responsible for the release from the Release Owner list. This user will receive additional notifications if tasks fail or are flagged.
Release owners are automatically added to the Release Admin team when the release is created. This team has all permissions on the release.
-
In Run automated tasks as user and Password, enter the user name and password of the Release user account that should be used to execute scripts in this release.
-
If you want the release to be aborted when a task fails, select Abort on failure.
-
Selecting the Allow passwords in all fields checkbox allows you to inject password values in non-password fields of custom script tasks. For example, for an Ansible plugin task, using a command line argument property, which is a string, you can pass a password variable like
-Dusername=${ansibleUsername} -Dpassword=${ansiblePassword}, if the checkbox is enabled. Passwords values are masked in the UI and logging output but are decrypted before the task execution. -
Next to Tags, you can add tags to the release to make it easier to find in the release overview.
-
Optionally add attachments by clicking Choose File next to Attachments. To delete an attachment, click the X next to it.
-
To publish a link that you can add to a calendar application such as Microsoft Outlook or Apple iCal, select Publish link. If the release dates change, the event is automatically updated in your calendar.
Everyone who can reach the Deploy server can access this link, which may be a security concern.
- To download an ICS file that you can open with a calendar application, click Download calendar event.
- Under Release Variables click Variables Screen to enter values for the variables that have been defined in the release.
- Click Save to save your changes to the release properties. Changes are not saved automatically.
To discard your changes without saving, click Reset.