Configuring Deployables Using Google Cloud Compute Plugin
This topic covers the Deploy Google Cloud Compute plugin, which supports Deploy Instance Spec, Deploy Template Spec, and DialogFlow Agent Zip Spec deployables.
Prerequisites
- Digital.ai Deploy 10.3 or later releases
- Google Cloud Platform infrastructure
Step 1: Create google.AccountCloud Infrastructure
To create google.AccountCloud in Infrastructure:
- Log in to Digital.ai Deploy.
- Click Explorer, hover over Infrastructure, click
 , and select New > google > AccountCloud to create
 google.AccountCloud.
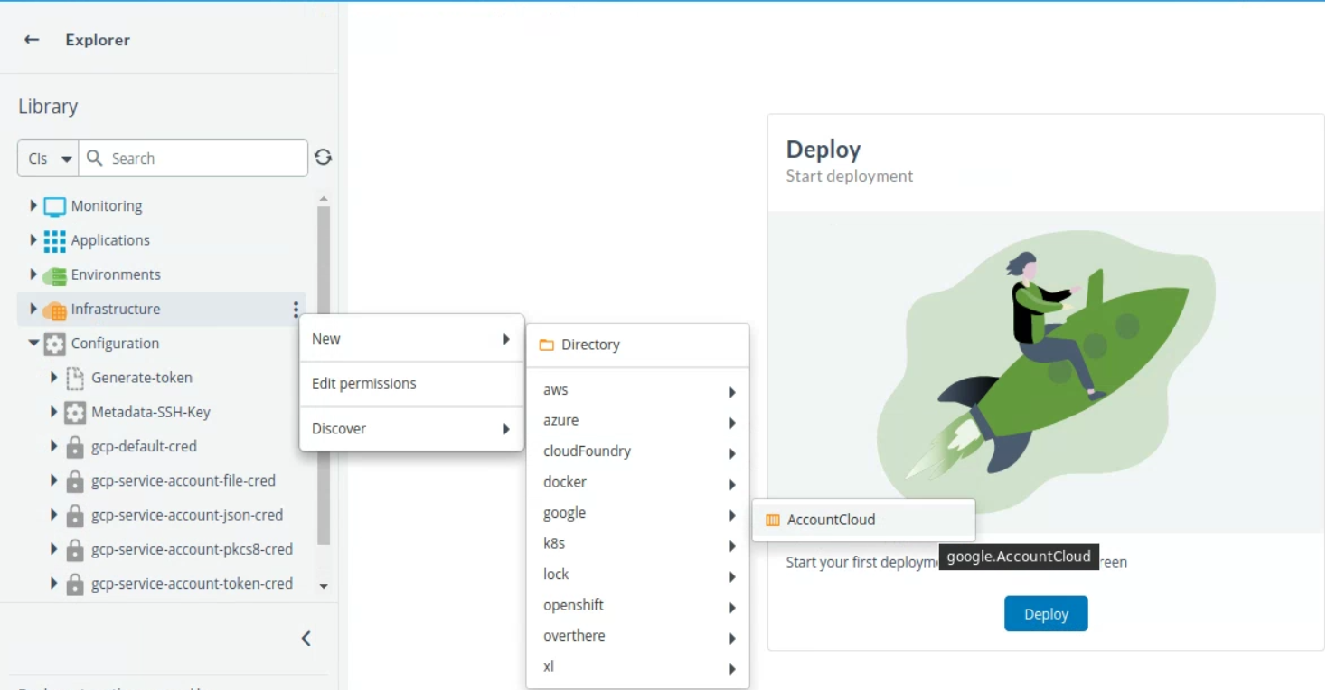
- Enter the details in Project Id, Clent Email, and Private Key fields.

- Click Save.
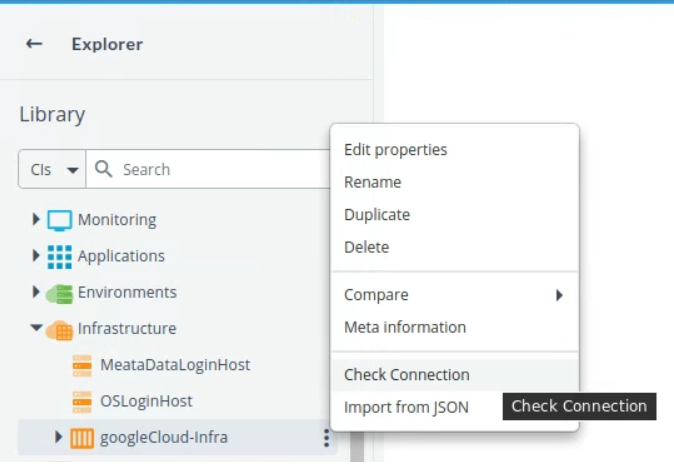
Make sure to check the connection is successful.
Step 2: Set up google.AccountCloud Enviornment
-
Create environment for
google.AccountCloud. See See create an environment to know more information. -
Select the container from drop down list.
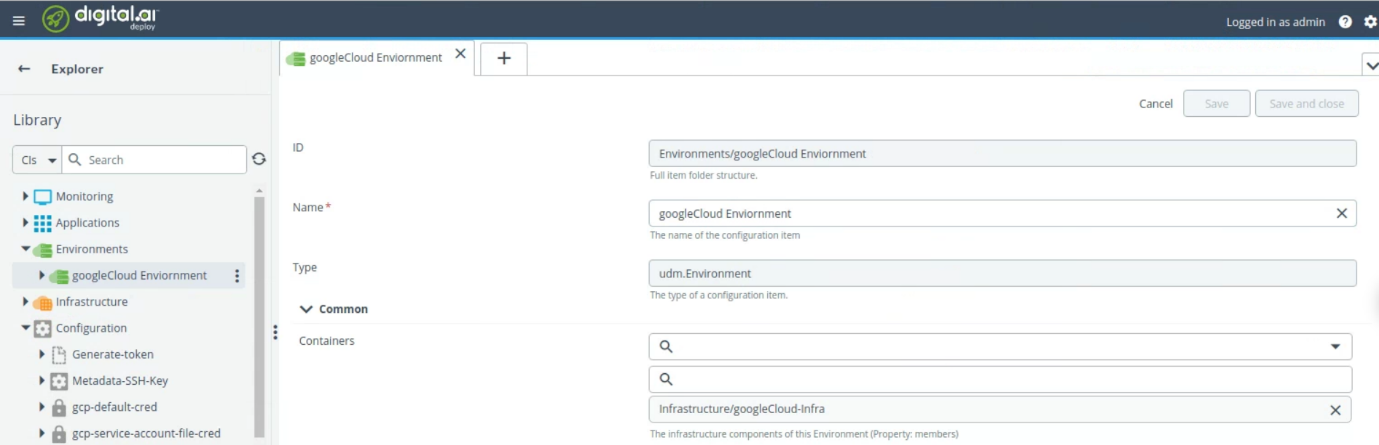
- Click Save
Step 3: Create and Deploy Application
Create and deploy provisioning package for Instance Spec, Template Spec and DialogFlow Agent ZIP Spec:
Step 3.1: Upload Deployment Artifacts to Google Cloud Storage
Ensure that the GCP plugin is installed and synchronized in your environment. For help, refer to Using the Plugins Manager.
- Click Explorer, hover over Applications, click , and select New > Application.
- Enter the name of the application in the Name field. For example,
GCP-Instance-Deploy. - Click Save and close.
- Click on the Applications dropdown, hover over the newly created application GCP-Instance-Deploy, click , and select New > Deployment Package.
- Enter the name of the deployment package in the Name field. For example,
1.0.0. - Click Save and close.
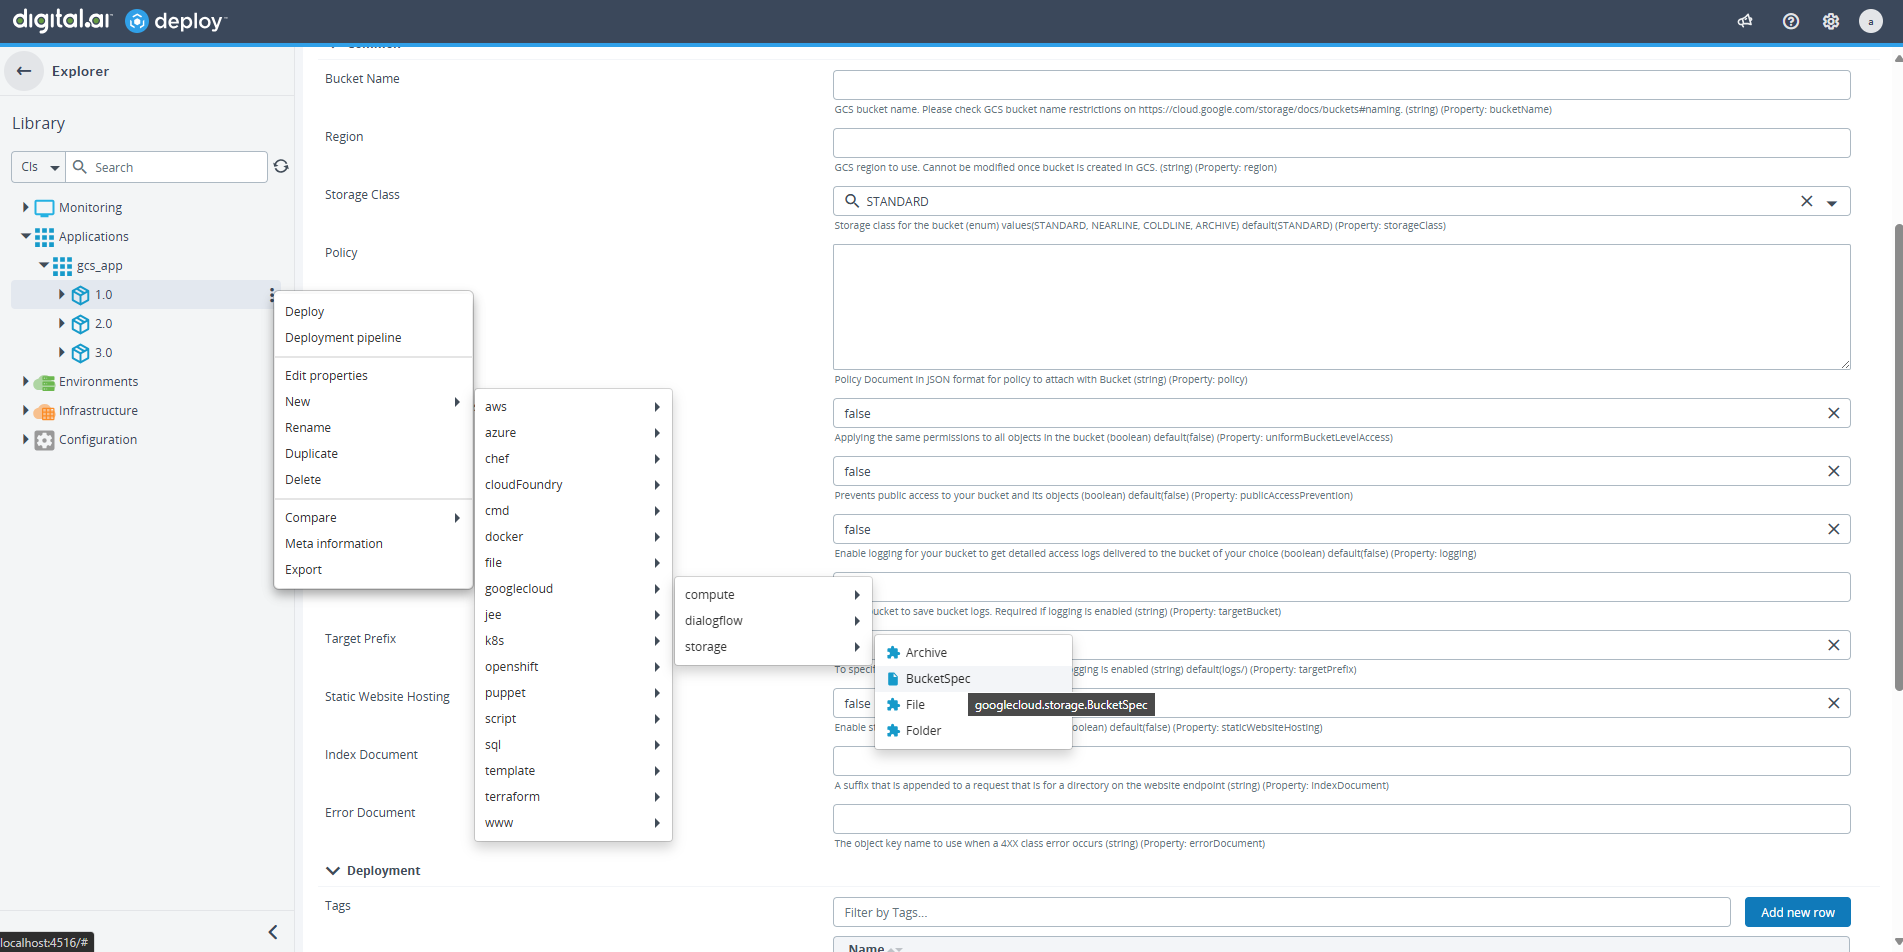
- Click on the GCP-Instance-Deploy dropdown, hover over the new package 1.0.0, click , and select
New > googlecloud > storage.
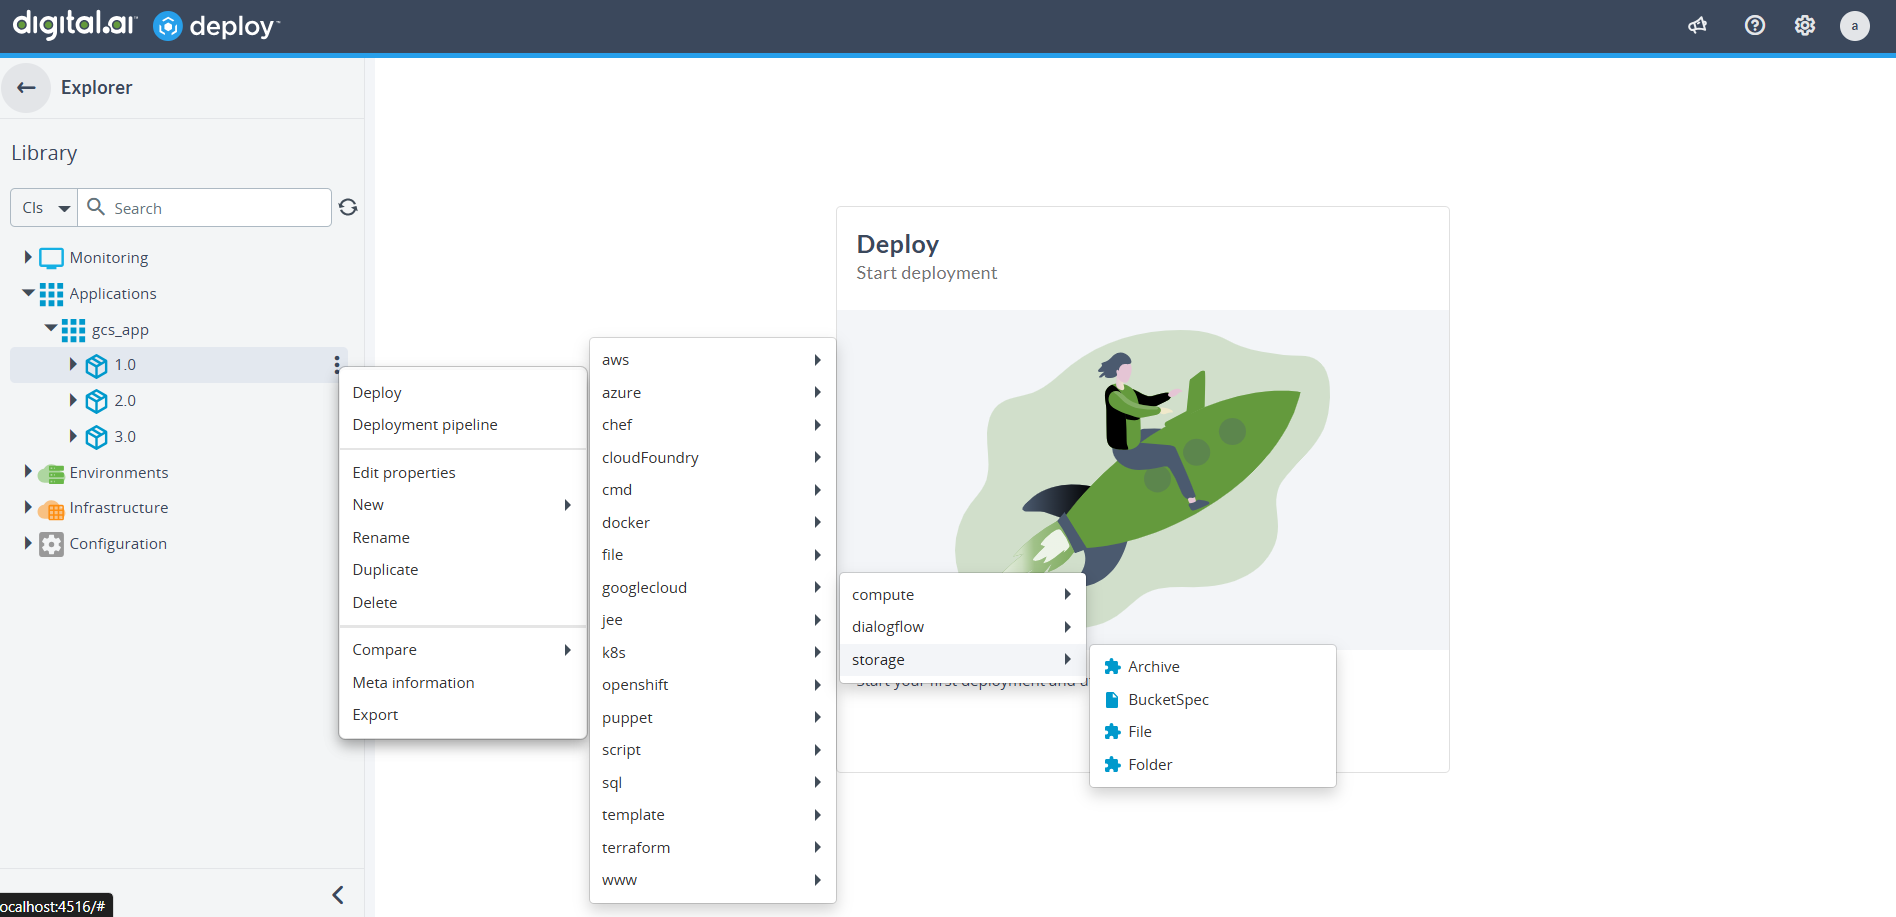
You will see the following four upload options:
- Archive
- File
- Folder
- Bucket
-
Select one of the upload options depending on the type of artifact you want to upload.
-
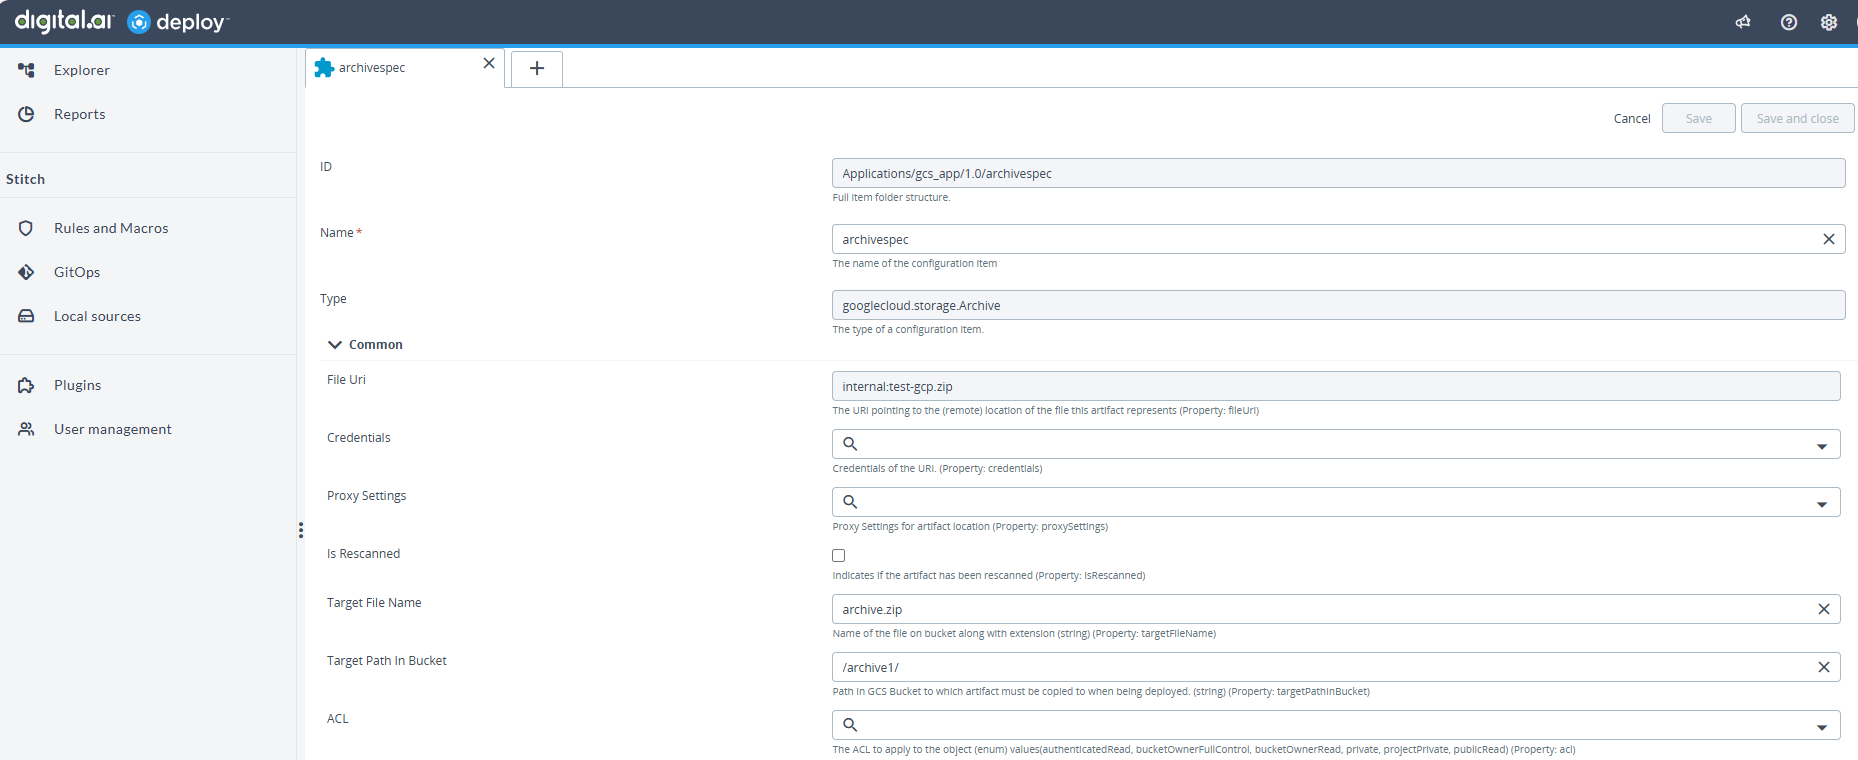
Fill in the required fields:
-
For File/Archive Spec:
- Target File Name (optional): Rename the file upon upload.
- Target Path in Bucket: Path inside the GCS bucket.
- Predefined ACL: Optional if Uniform Bucket-Level Access is disabled.

-
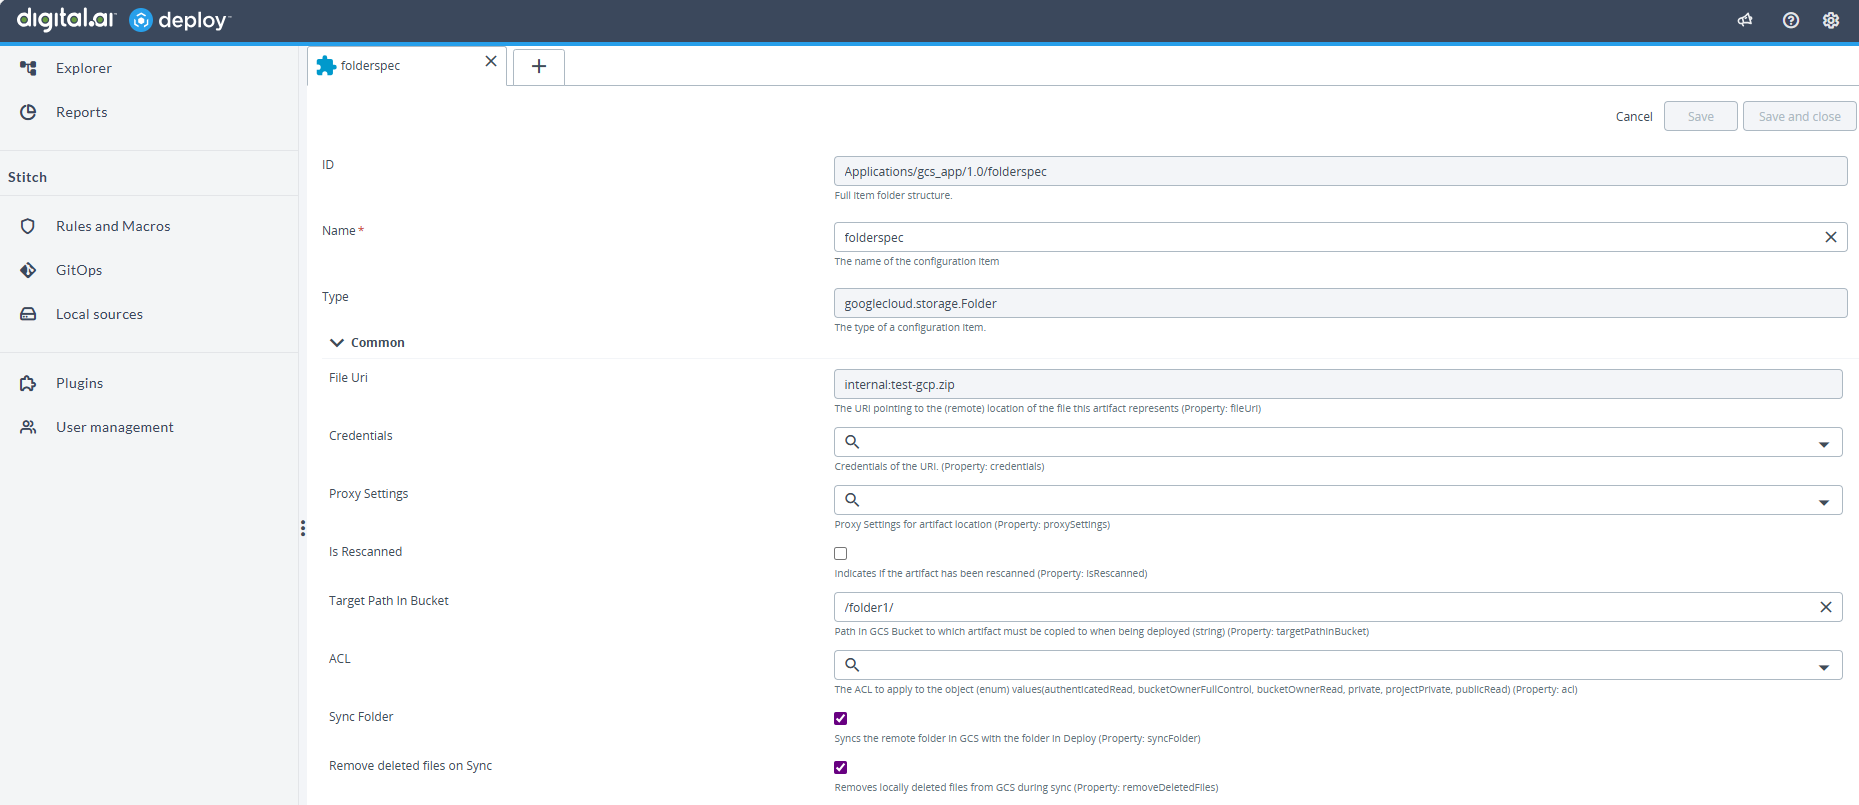
For Folder Spec:
- Target Path in Bucket: Required.
- Sync Folder: If enabled, syncs only changes (adds/updates).
- Remove Deleted Files on Sync: If enabled, removes deleted files from the bucket.
- Target File Name is not applicable for folders.
-
-
Click Save and close after configuring the upload spec.
Use the below examples to verify your initial configuration
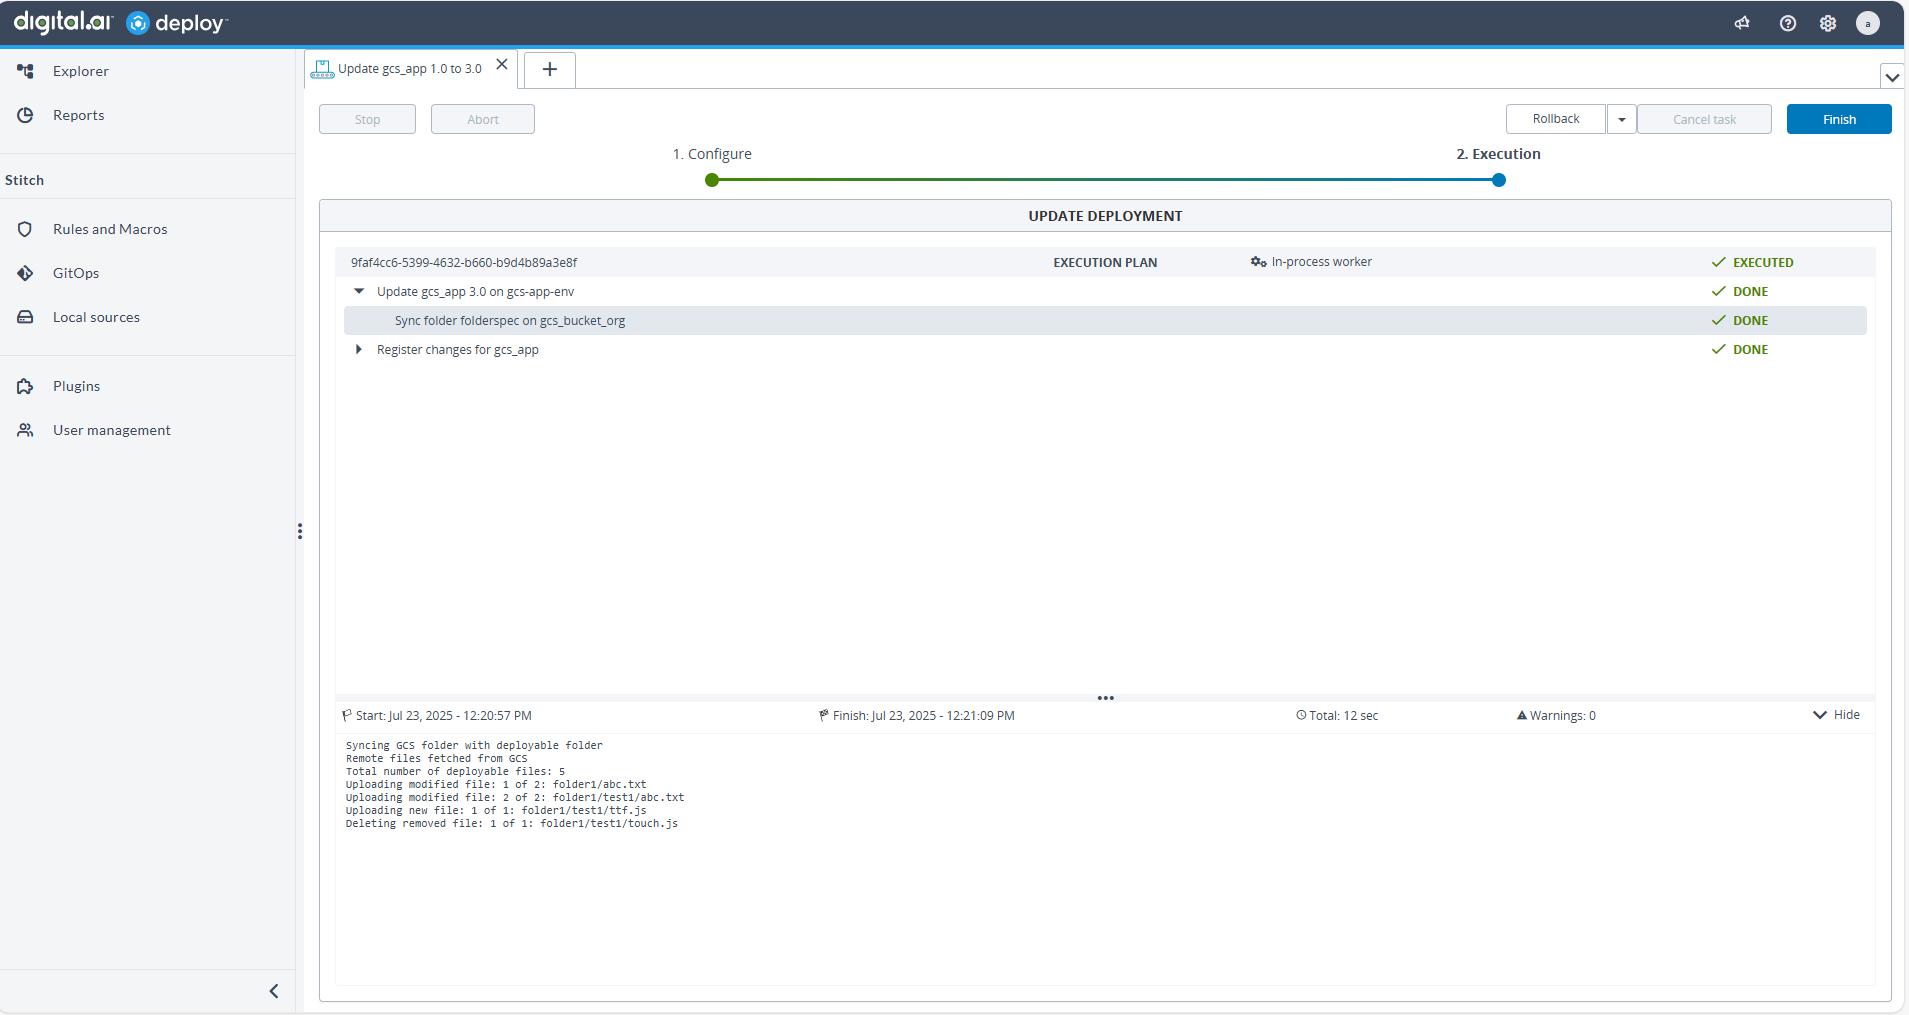
- Folder Spec – Sync Behavior
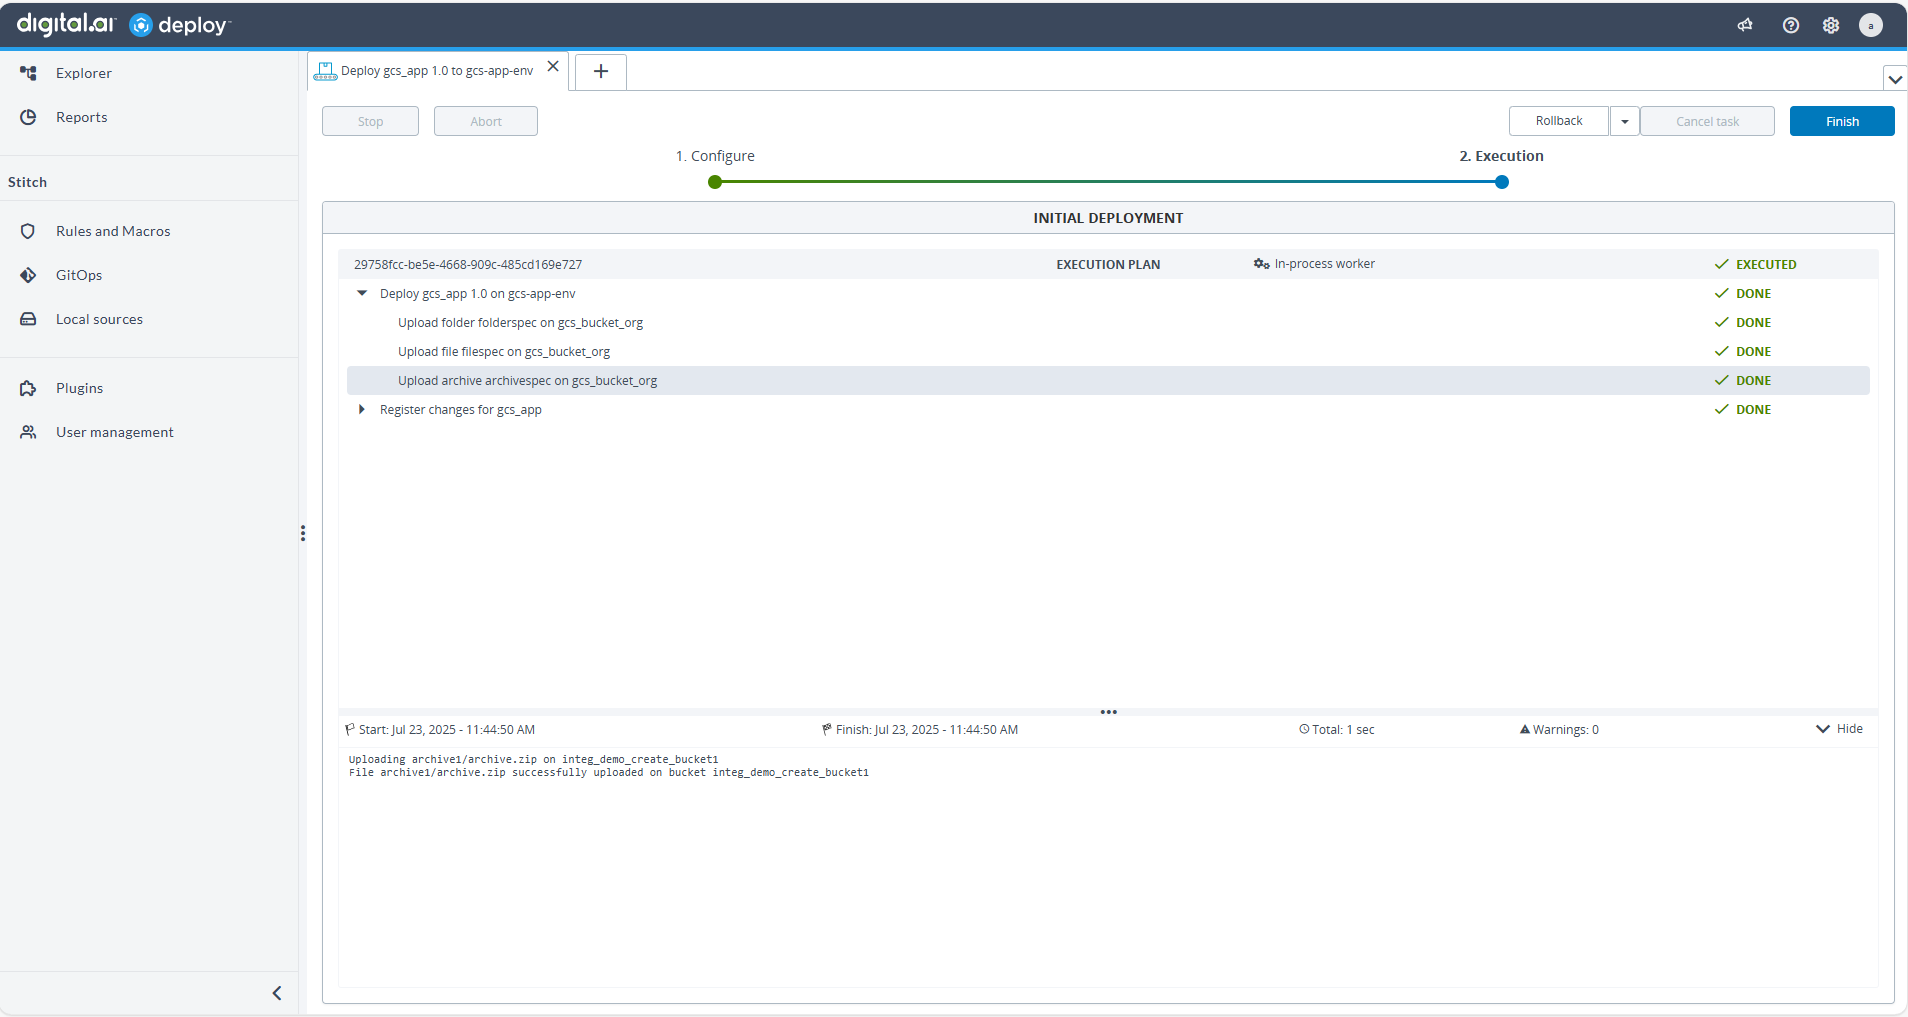
If Sync Folder is enabled, only new or modified files are uploaded, and deleted files in the source are also removed from the GCS bucket. This helps maintain an exact mirror of your local folder structure.
Repeat for each artifact you want to upload to GCS as part of the deployment package.
Step 3.2: Manage Google Cloud Storage Buckets
You can create, update, and delete GCS buckets as part of your deployment lifecycle.
Create a Bucket
-
Navigate to your deployment package as described in the previous steps.
-
Click Menu Button
 and select New > googlecloud > storage > BucketSpec.
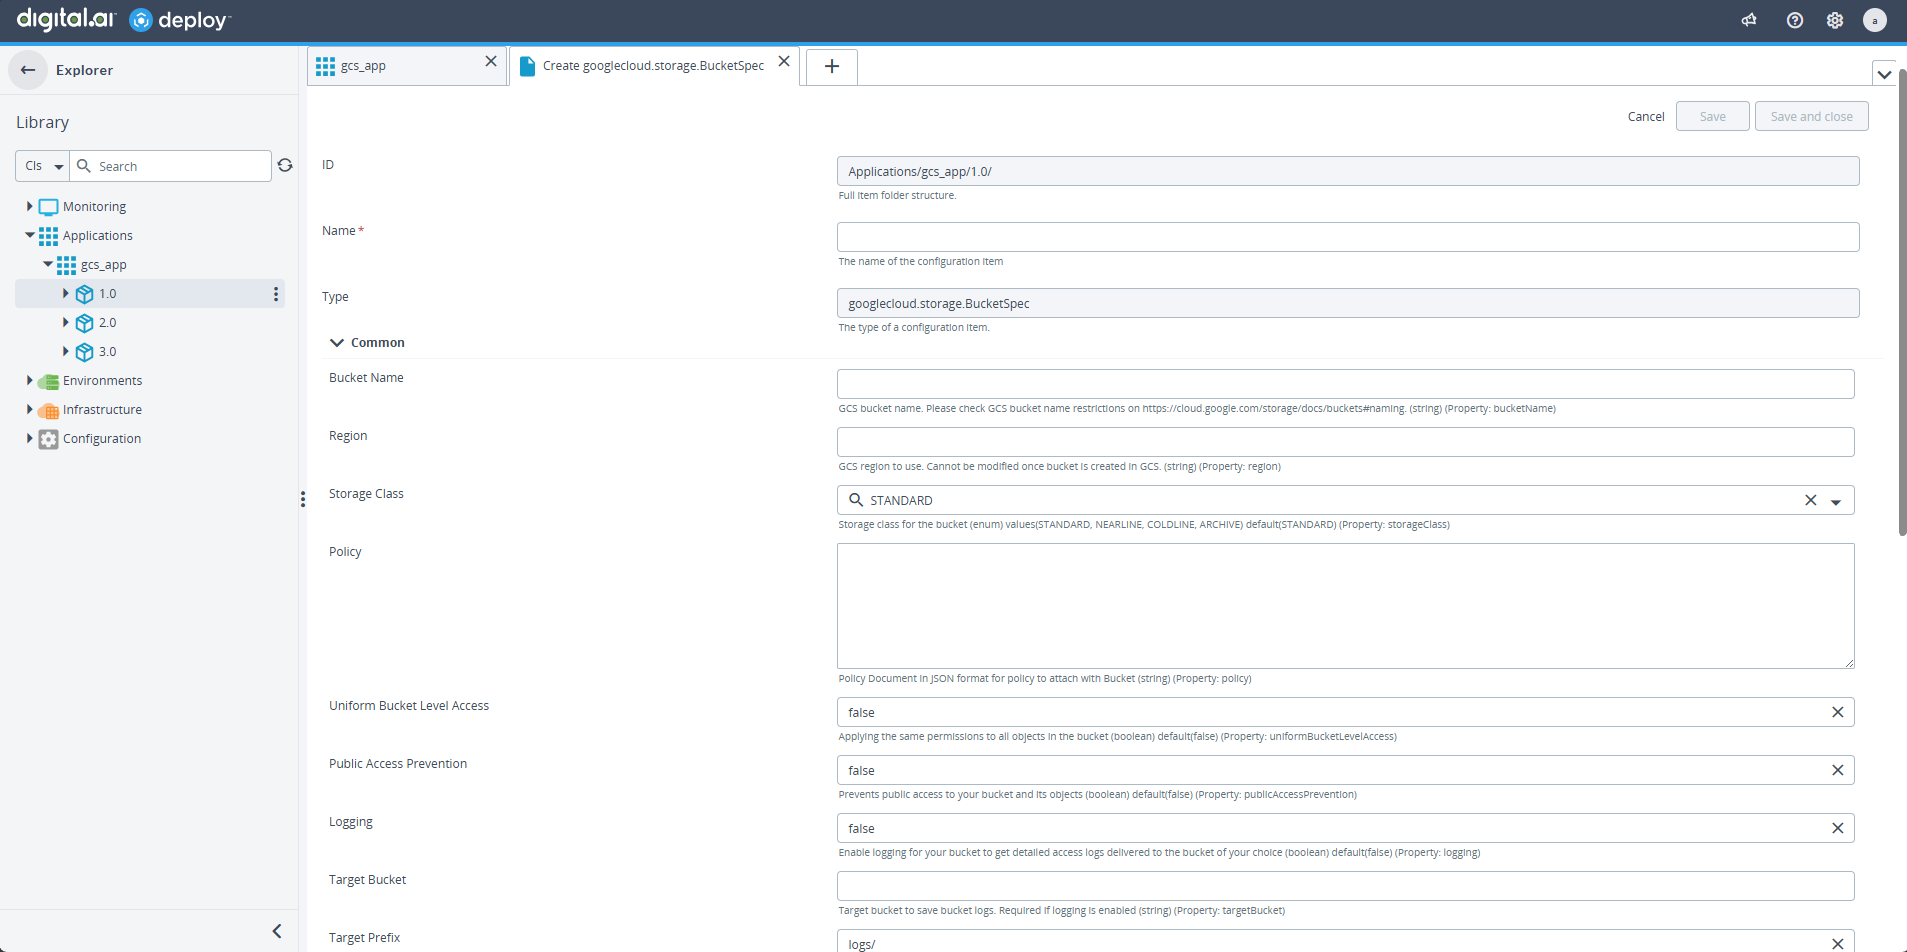
-
Configure the required properties:
- Bucket Name: Enter a globally unique name
- Region: Select the deployment region
- Storage Class: Choose from Standard, Nearline, Coldline, or Archive
-
Configure optional properties as needed:
- Policy: Attach IAM policies
- Uniform Bucket-Level Access: Enable if required
- Public Access Prevention: Enable to prevent public access
- Logging: Enable access logging and specify target bucket
- Target Bucket: Required when logging is enabled
- Target Prefix: Optional prefix for log files. Default value
/logs - Static Website Hosting: Enable for static websites and specify index document
- Index Document: Required when static hosting is enabled
- Error Document: Optional custom error page
-
Click Save.
-
Deploy the package to create the bucket.
Update a Bucket
- Create a new deployment package version.
- Modify the bucket configuration properties as needed.
- Deploy the updated package to apply changes to the existing bucket.
Delete a Bucket
- Empty the bucket first: Remove all objects from the bucket before attempting deletion.
- Undeploy the deployment package.
- The empty bucket will be deleted successfully.
- Only empty buckets can be deleted
- If the bucket contains objects, deletion will fail with error:
NotEmptyException: 409 BucketNotEmpty (bucket_name)
- You must remove all objects from the bucket before attempting deletion
- Bucket deletion is irreversible once the bucket is empty
Step 3.3: Deploy Instance Spec
- Click Explorer, hover over Applications, Click and select New > Application.
- Enter the name of the application in the Name field. For example
GCP-Instance-Deploy. - Click Save and close.
- Click on Applications drop down, hover over the new application created GCP-Instance-Deploy, Click and select New > Deployment Package.
- Enter the name of the configuration item in the Name field. For example
1.0.0. - Click Save and close.
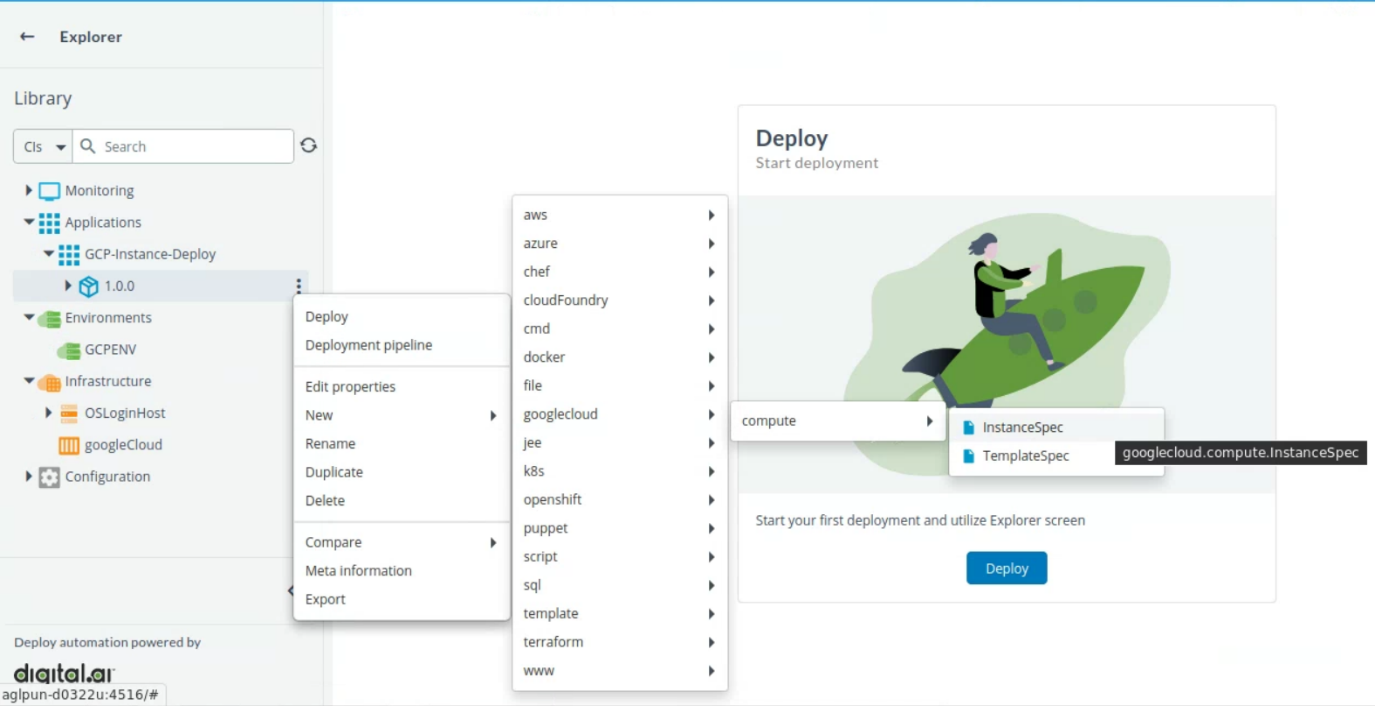
- Click on GCP-Instance-Deploy drop down, hover over the new package created 1.0.0. Click and select New > googlecloud > compute > InstanceSpec.
- Enter the name of the configuration item in the Name field.
- Provide the following values:
- Zone
- Machine
- Image Project
- Image
- Wait On Create*
- Wait On Destroy*
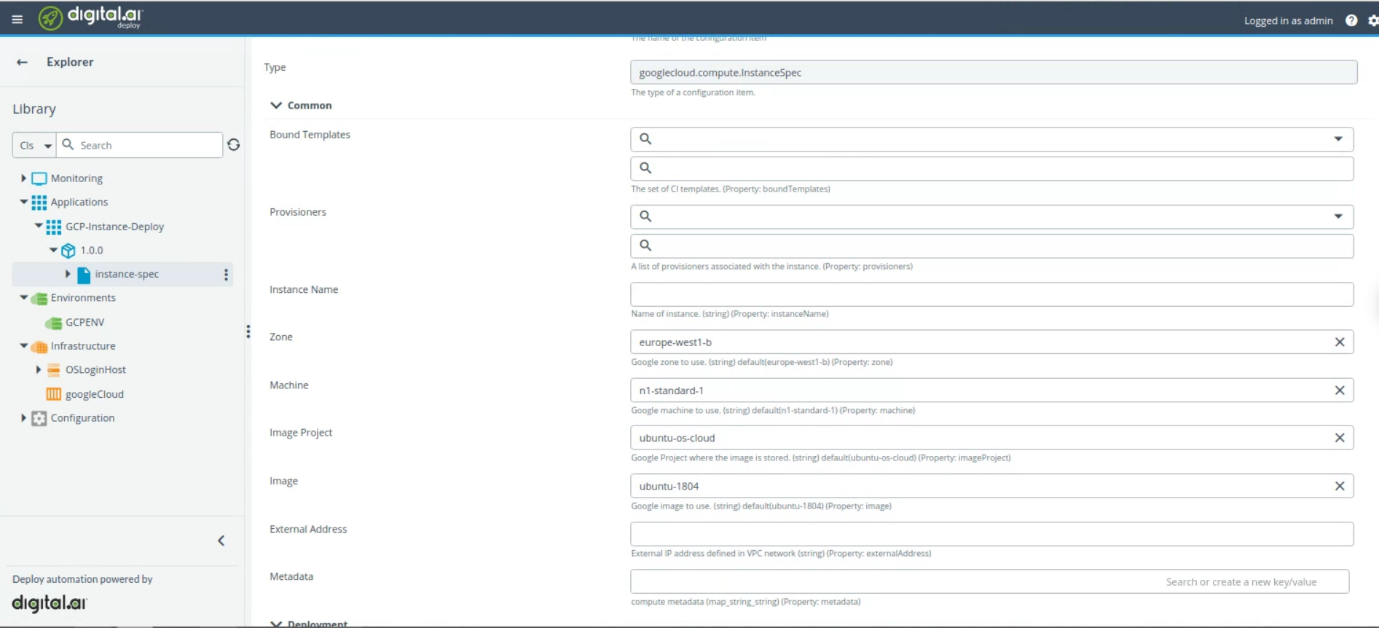
- Click Save.
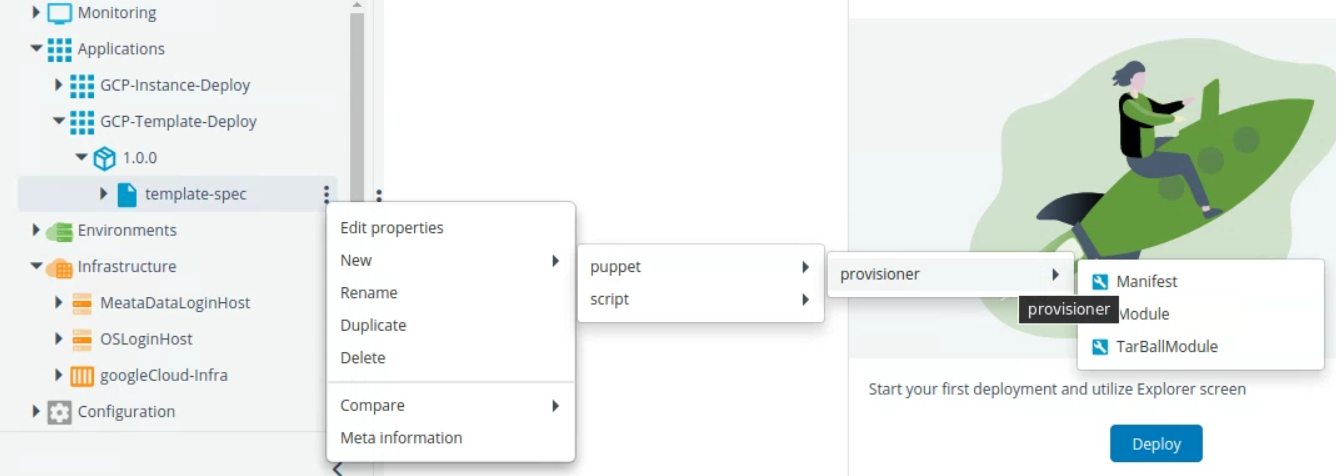
You can add additional configuration as per your requirement.
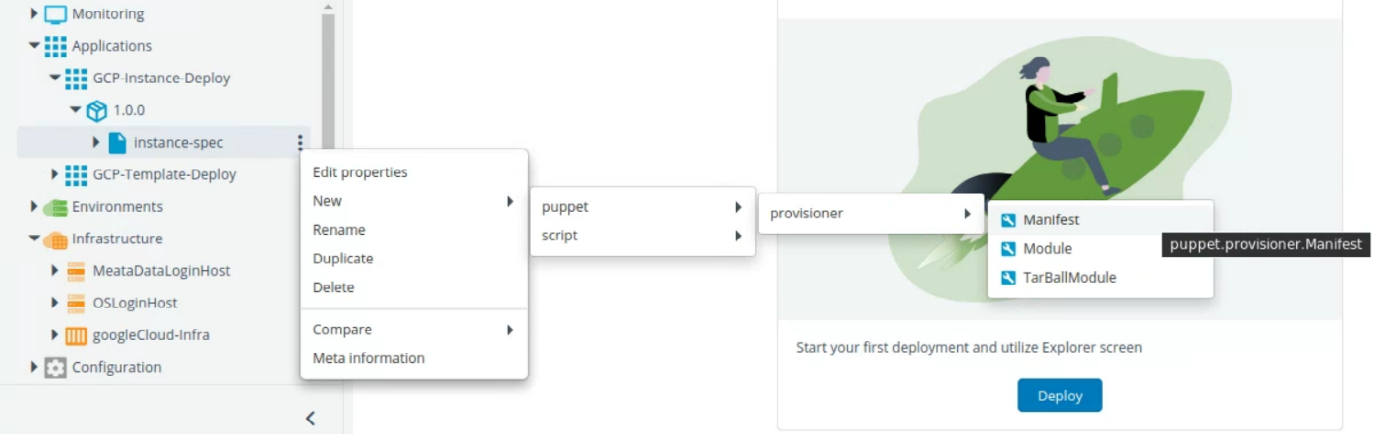
- To add additional configuration, hover over instance-spec, Click and select New > and select the required spec.
- Start the deployment. For more information, see Start a Deployment.
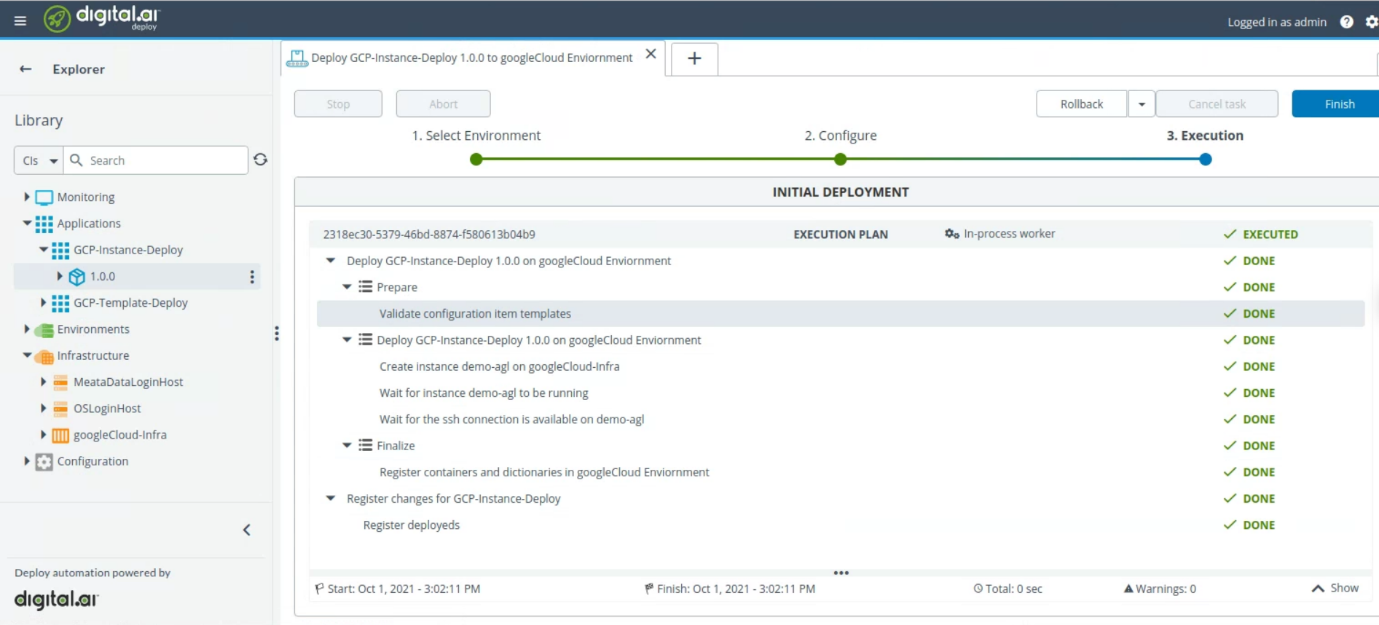
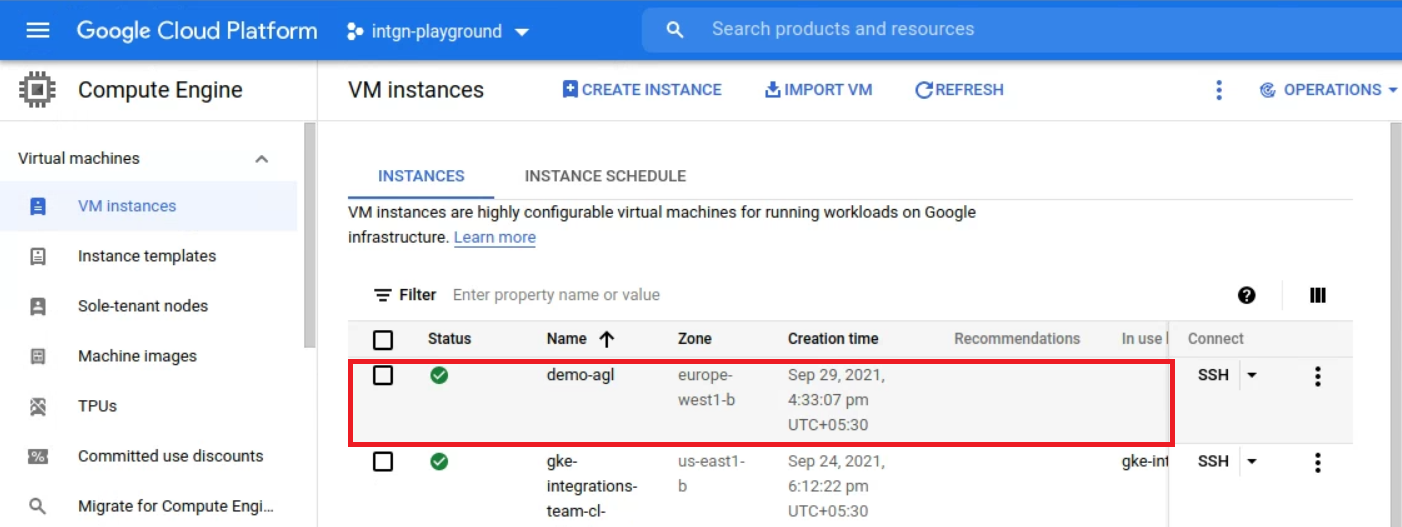
- Check the deployment on google cloud.
Step 3.4: Deploy Template Spec
- Click Explorer, hover over Applications, Click and select New > Application.
- Enter the name of the application in the Name field. For example
GCP-Instance-Deploy. - Click Save and close.
- Click on Applications drop down, hover over the new application created GCP-Instance-Deploy, Click and select New > Deployment Package.
- Enter the name of the configuration item in the Name field. For example
1.0.0. - Click Save and close.
- Click on GCP-Instance-Deploy drop down, hover over the new package created 1.0.0. Click and select New > googlecloud > compute > TemplateSpec.
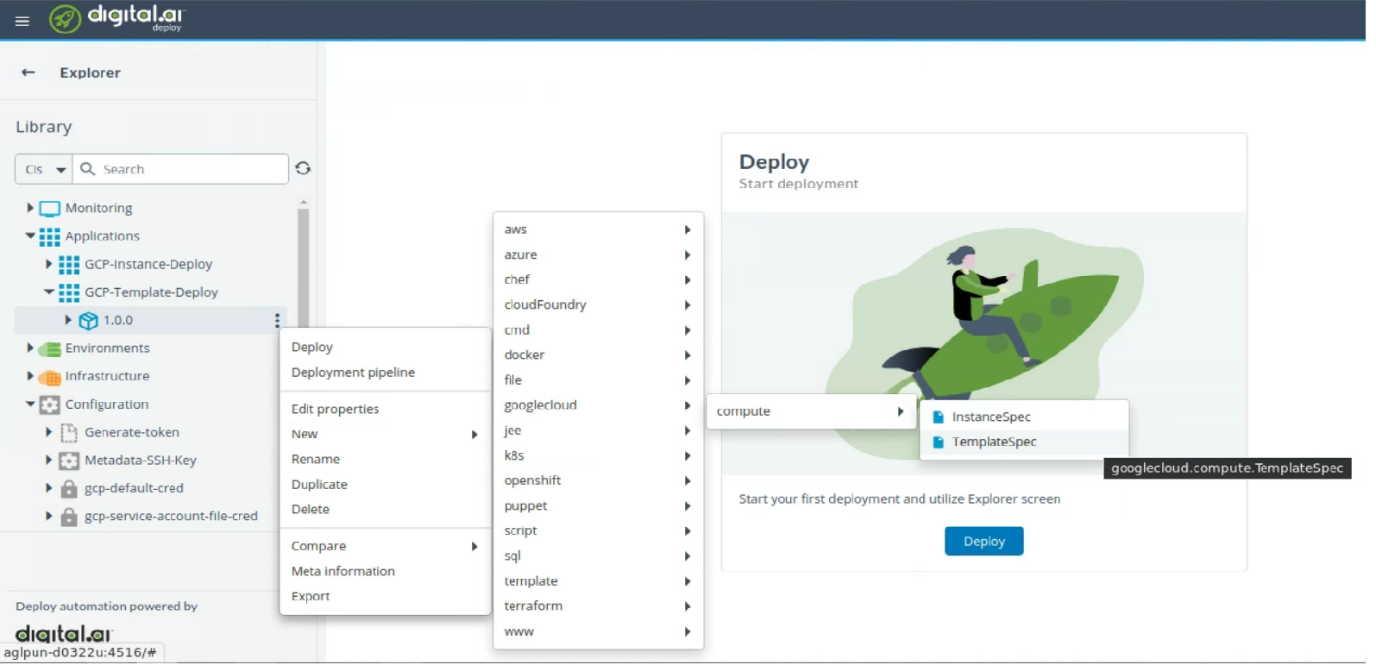
- Enter the name of the configuration item in the Name field.
- Provide the following values:
- Zone
- Machine
- Image Project
- Image
- Wait On Create*
- Wait On Destroy*
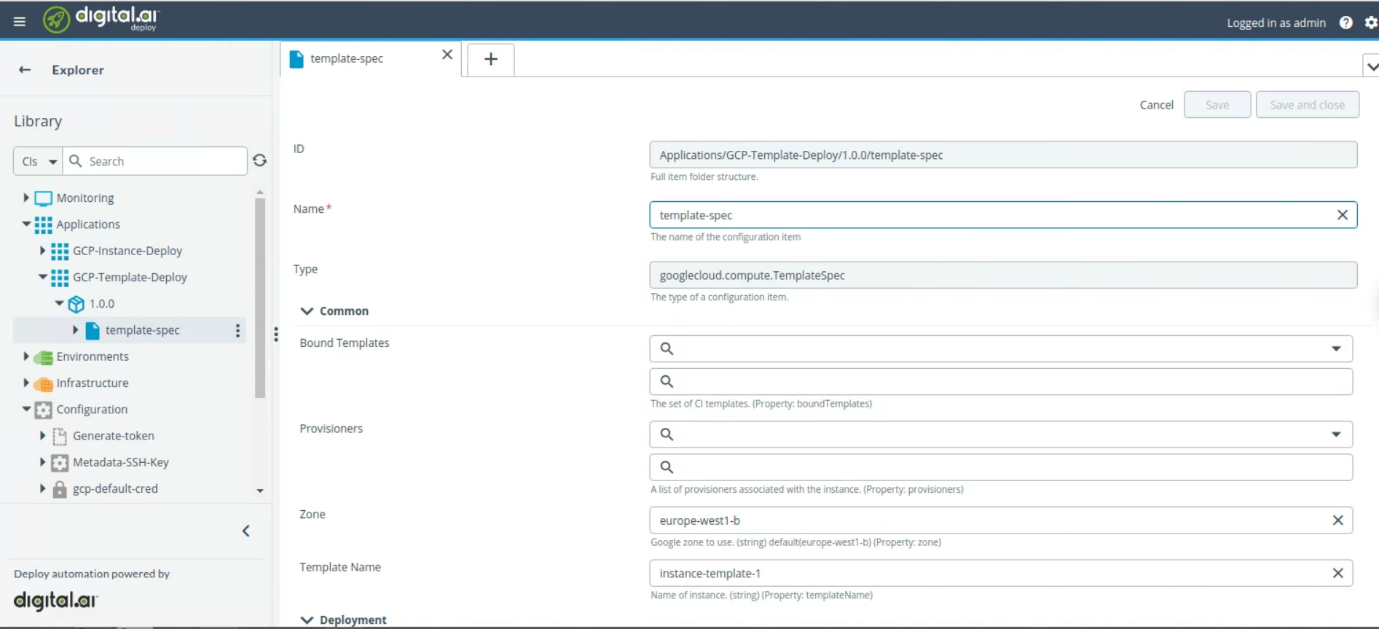
- Click Save.
You can add additional configuration as per your requirement.
- To add additional configuration, hover over instance-spec, Click and select New > and select the required spec.
- Start the deployment. For more information, see Start a Deployment.
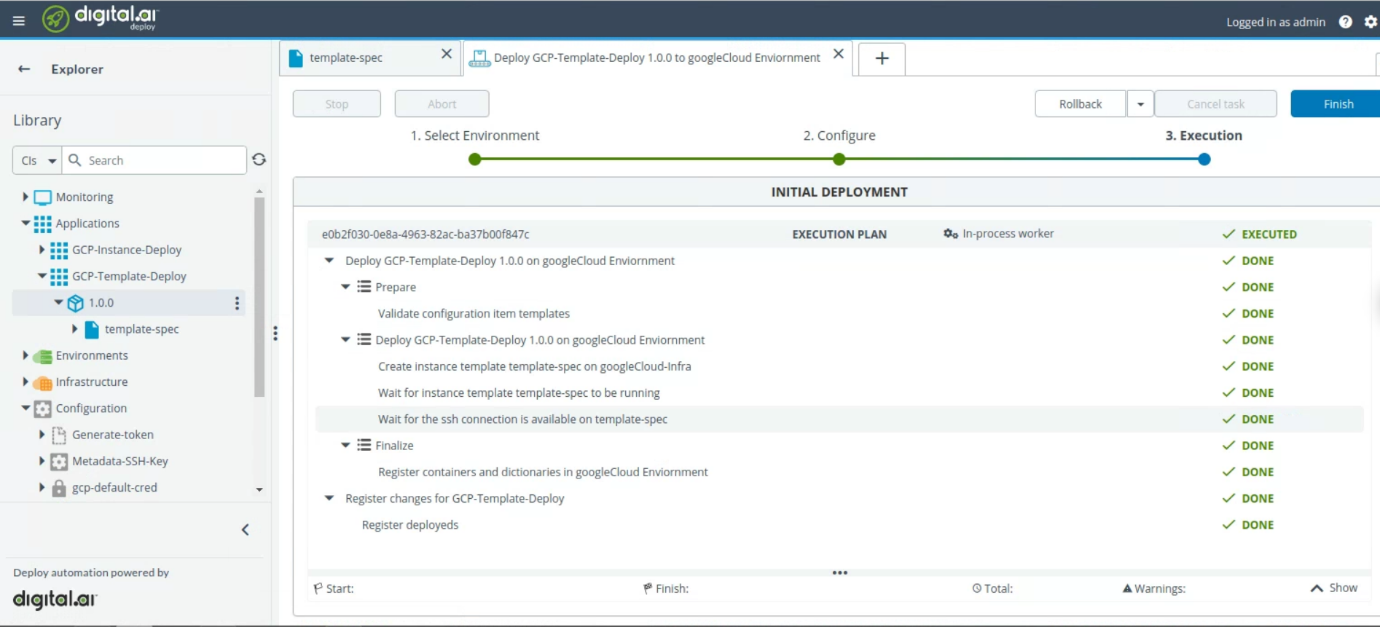
- Check the deployment on google cloud.

Step 3.5: Deploy DialogFlowAgentZIP Spec
- Click Explorer, hover over Applications, Click and select New > Application.
- Enter the name of the application in the Name field. For example
GCP-Instance-Deploy. - Click Save and close.
- Click on Applications drop down, hover over the new application created GCP-Instance-Deploy, Click and select New > Deployment Package.
- Enter the name of the configuration item in the Name field. For example
1.0.0. - Click Save and close.
- Click on GCP-Instance-Deploy drop down, hover over the new package created 1.0.0. Click and select New > googlecloud > dialogflow > AgentZipSpec.
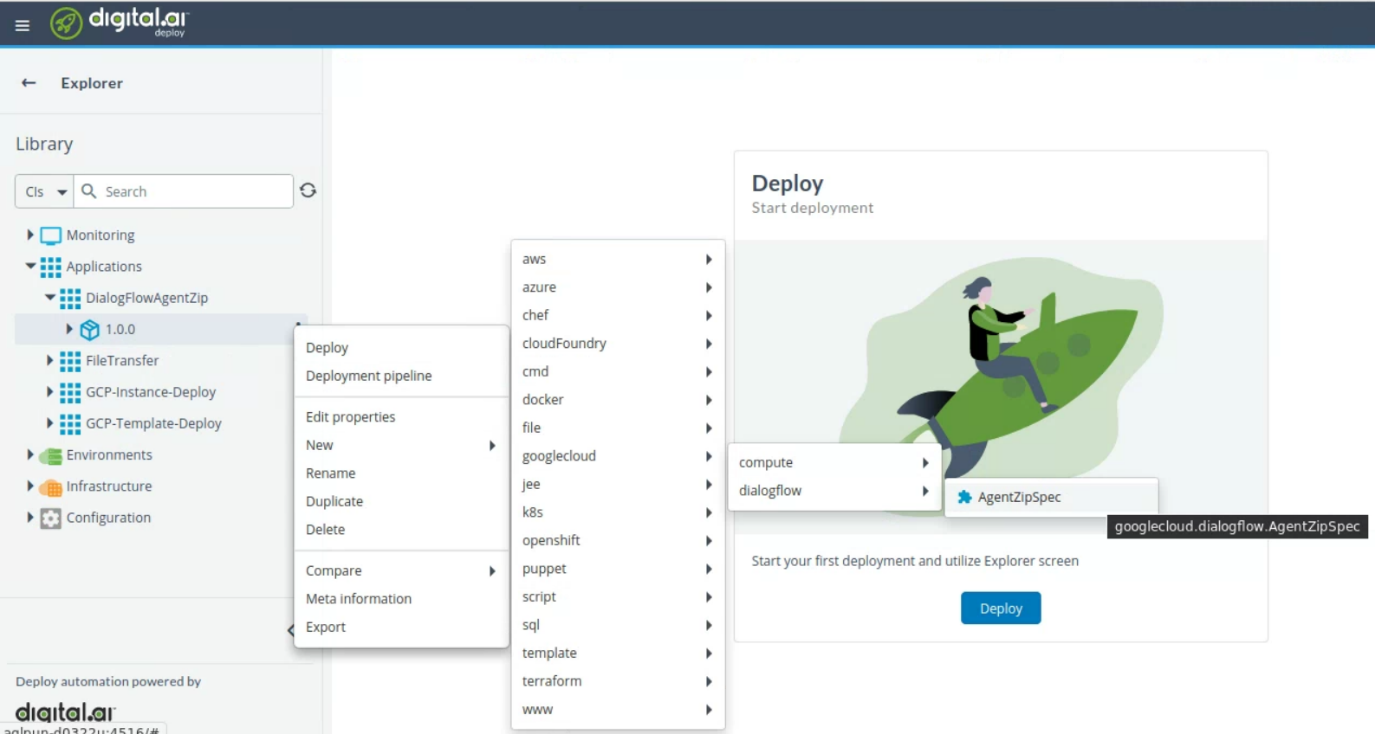
- Type the name of the configuration in Name field.
- Browse the file from Choose file field.
- Type
truein Restore Agent field.
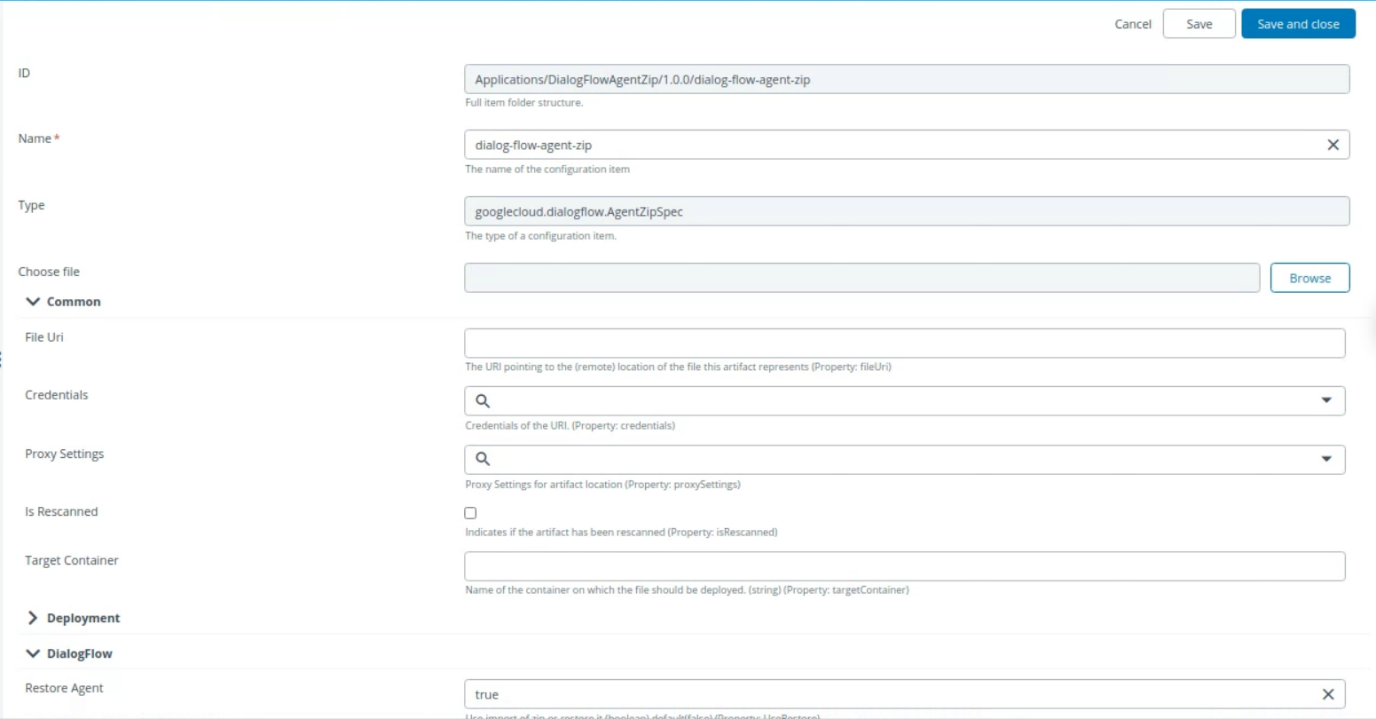
- Click Save and close.
The File Uri field updates once you save the configuration.
- Start the deployment. For more information, see Start a Deployment.

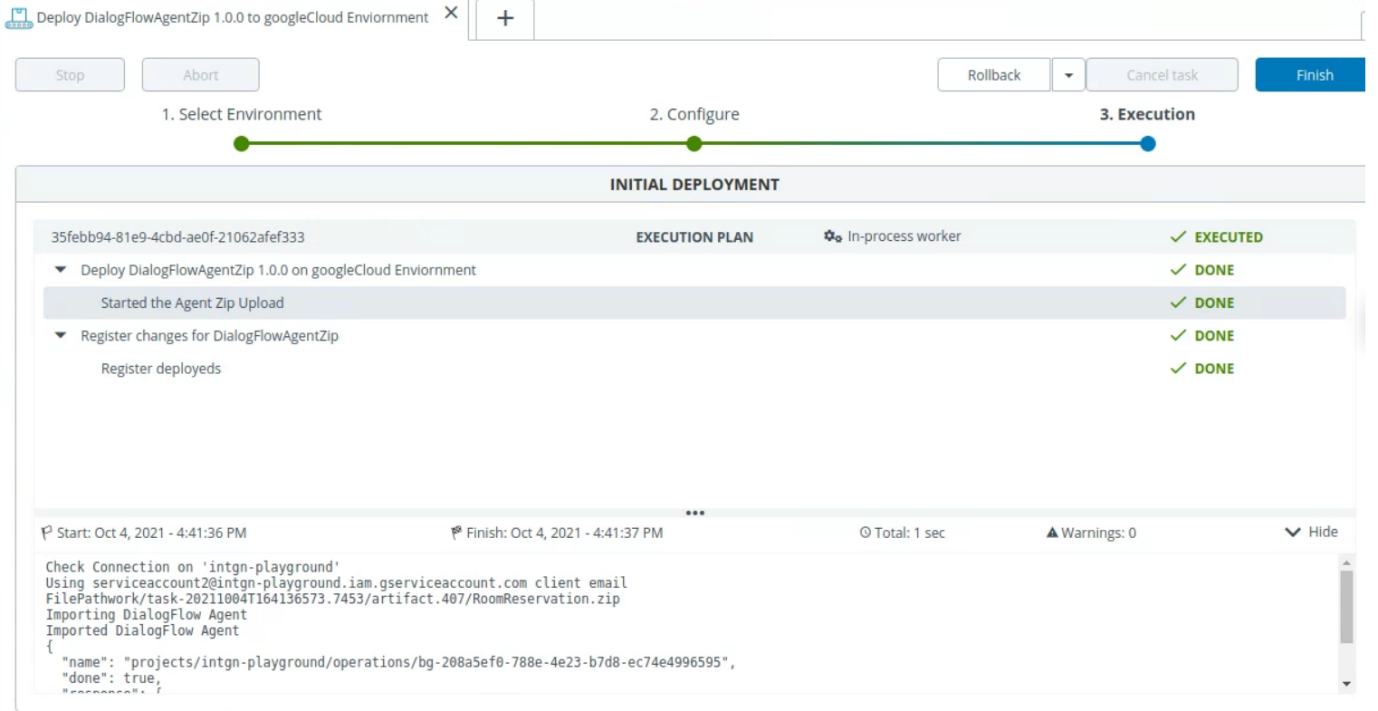
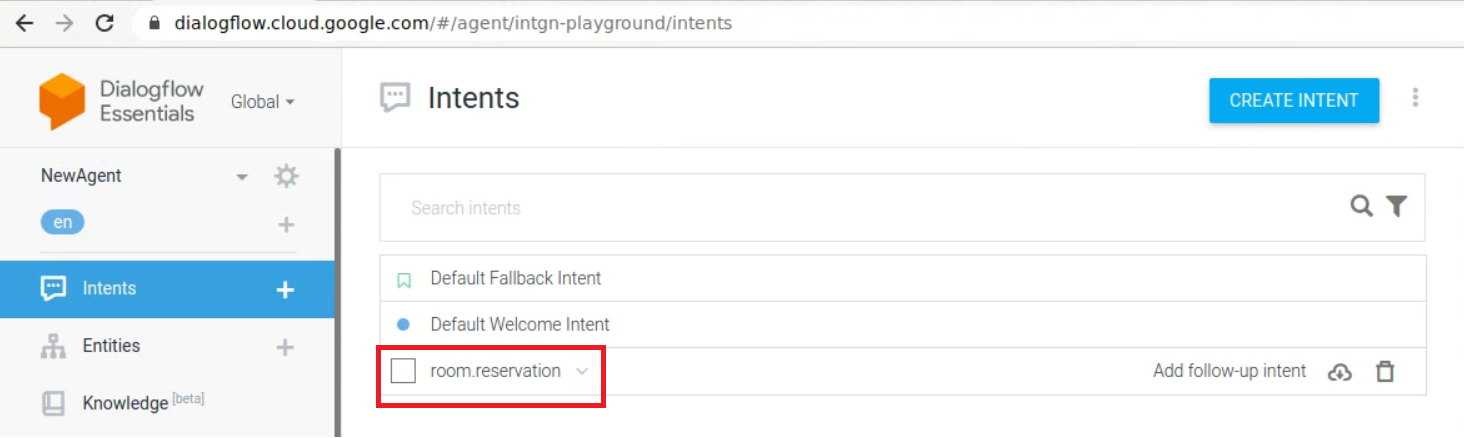
- Check the output at
dialogflow.cloud.google.comfor the selected zip file.