AS - Managing Applications
Please note that this tool is classified as a Legacy tool. We recommend transitioning to our updated solutions to maintain optimal performance and security in your workflows. For more information on this matter, please reach out to technical support .
Application Manager
The Application Manager is located just under the device tab and is used to manually instrument and manage the different applications imported into AppiumStudio.
Note: All actions performed manually from the Application Manager can also be integrated into your automation scripts by means of the equivalent utility commands.
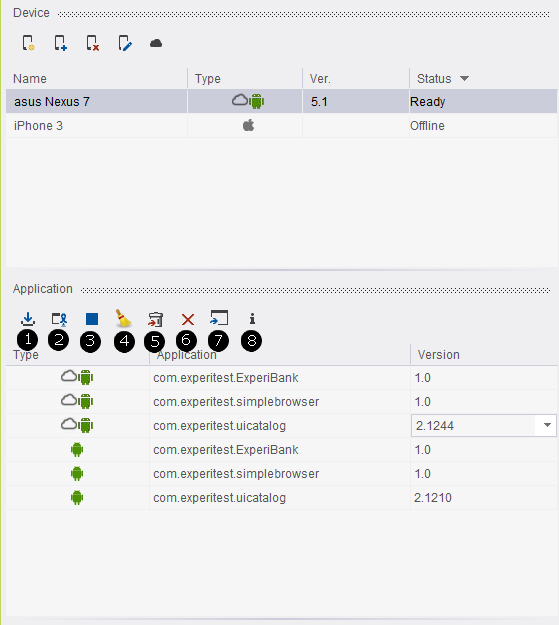
When a device is selected on the device tab, the Application Manager will display all imported applications which are compatible this device’s operating system.
Command Icons and Pop-up Menu Commands
Clicking the appropriately numbered icon performs the following actions:
-
Install Application - Installs the selected application on the selected device. Can be automated in scripts using the Install command.
-
Launch Application - Launches the selected application (in the instrumented mode) on the selected device. Can be automated in scripts using the Launch command.
-
Close Application - Closes the selected application on the device (if it is open). Can be automated in scripts using the ApplicationClose command. Note: The application will still be available in the background apps
-
Clear Application Data - Clear Application Data [Compatible only with Android devices]. Clears the data of the selected application on the device. If the application is open, activating this command will also close it. Can be automated in scripts using the ClearData command.
-
Uninstall Application - Uninstalls the selected application from the device. Can be automated in scripts using the Uninstall command.
-
Delete Application - Deletes the selected application from the Application Manager. Invoking this command will not affect the device itself.
-
Import/Sign Application - Imports an application into the AppiumStudio and instruments it. Can be automated in scripts using the Install command (with the sign parameter set to true). For more on this process, see Preparing Native Applications For Testing.
To import applications from an Android cloud device:
-
Click the Import Application button.
-
Click Import application from Android device, then click OK.
-
Import the application from the device applications list.
The application will then be found in the applications list.
Importing applications from Android cloud devices not enabled by default. For more information see Secured Network Connection (TLS & HTTPS).
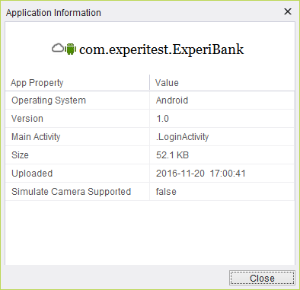
Application info opens a detailed app information window.
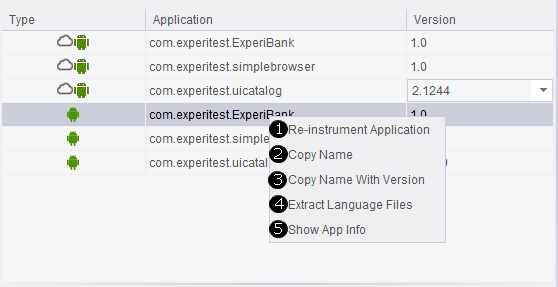
When you right-click on the name of a selected application the following commands are displayed:
-
Re-instrument Application - Updates the instrumented version of the imported application. We recommended that you perform this operation on all imported applications when upgrading the version of the studio. Doing so will ensure that each application is instrumented with its latest framework.
-
Copy Name - Copies the name of the selected application to the clipboard.
-
Copy name with version - Copies the name of the selected application and its version number to the clipboard.
-
Import Language Files - Imports all the various languages files packaged with the selected application. After having imported these files, you can create a test set that will run on different language versions of the application. For details on using this feature, see Language Properties Files.
-
Show App Info -open the detailed app information window.
Managing a Multi-Version App
Continuous Testing Cloud supports multiple version application handling.
Multiple versions of the same application can be uploaded to the Cloud server. For more information see here.
Once the application was uploaded with multiple versions, a list of versions is displayed to select from next to the application in the application manager.
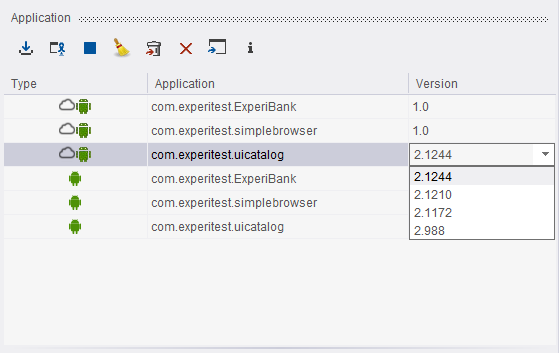
Once a version was selected from the list, the install command (from code environment or from Appium Studio) and the install button (from the application manager) install the selected version.
The Launch command does not refer to the selected version but to the application that is already installed on the device.
Using Language Properties Files
You can use a language properties file to test your application in a different language. In this way, the same test script originally prepared to test an application in one language can be utilized to test it in any number of other languages.
This is done by using the SetLanguagePropertiesFile which specify which properties file to use.
Extracting Language Properties Files
You can either create the properties file manually or generate it automatically.
To extract all of the language properties files packaged with an application automatically:
-
Perform Preparing Applications For Testing.
-
Right-click the name of the application from which you want to extract the language files.
-
Click Import Language Files.
-
Navigate to the location to which the files are to be extracted, then click OK.
Language Properties File Structure
A languages properties file is a text properties file (ends with the suffix .properties) which maps a key and the identifier of the element. In your script, you use the key to identify the element. You can use the same key for all languages file and this way the same script will run for any language.
For example, the following lines represent a portion of the English language properties file for a certain banking application:
automatic_alerts_text=General Alerts

delete_pay_to=Delete Pay To

show_hidden_deals=Show hidden deals

accounts_heloc_footnote=1This payment amount may reflect the minimum amount due from your last statement period. View your statement for more details.

mrd_check_photo_status=Received

p2p_added_recipient_message=The recipient has been added, and you can now request a transfer.
A Spanish language version of this same application might begin something like what appears below:
automatic_alerts_text=Alertas Generales

delete_pay_to=Eliminar la Paga a
In order to operate on the first element appears on the file, create command on the script with the identifier as key "delete_pay_to".
In order to run the application in each language, use SetLanguagePropertiesFile accordingly.
Supported Properties
These are the properties that you can use in the text properties file:
- text
- partial_text
- placeholder
- accessibilitylabel
- accessibilityidentifier
- accessibilityvalue
- name
- XPath