TeamForge 23.0 Update 3 Release Notes
Release Information
| Version | Released On |
|---|---|
| GA Version: 23.0.192 | Jun 20, 2023 |
| Update 1: 23.0.236-413 | Nov 30, 2023 |
| Update 2: 23.0.255-467 | Feb 05, 2024 |
| Update 3: 23.0.257-468 | Jun 12, 2024 |
What's New in TeamForge 23.0 Update 3 Release
Protected Branches UI Enhancement
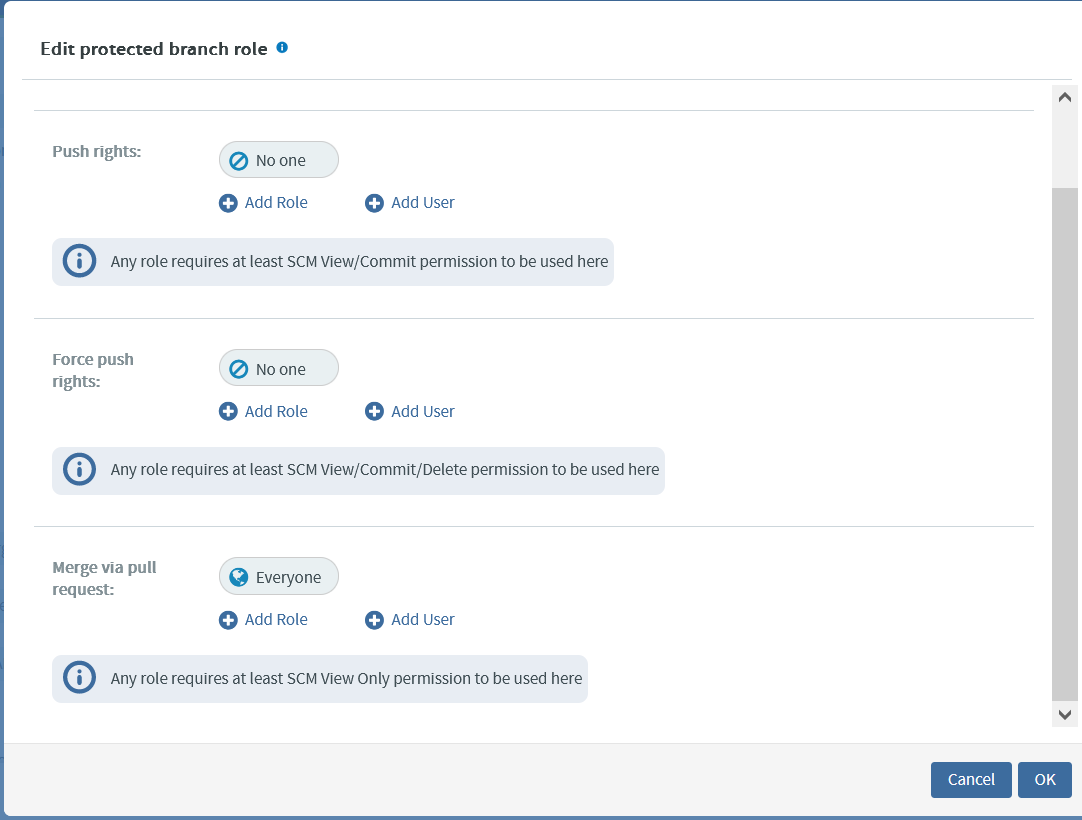
The Protected Branches UI now includes information messages to outline the required permissions for selected roles within the protected branch modal. This enhancement provides clarity on the necessary permissions for Push rights, Force push rights, and Merge via pull request.

Apply TeamForge 23.0 Update 3
TeamForge 23.0 Update 3 is now available. Apply TeamForge 23.0 Update 3 on your site if you are on Teamforge 23.0.
TeamForge add-on packages can remain installed when you apply TeamForge 23.0 Update 2. No updates are required. However, you should verify the compatibility of Add-ons applied to your site as some may be more specific to your site.
If you have any questions regarding compatibility or updating a specific add-on, contact Digital.ai Support.
You must log in as a root user to apply TeamForge 23.0 Update 3.
-
Stop TeamForge.
noteStop TeamForge on all the servers in a distributed setup.
teamforge stop -
Skip this step if your site has internet access. This step is to configure TeamForge 23.0 Update 3 installation repository on sites without Internet access.
a. Contact the Digital.ai Support to get the auxiliary installer package for TeamForge 23.0 Update 3 disconnected installation and save it in
/tmp.- Red Hat Enterprise Linux/CentOS 8.6 64 bit RPM package: CTF-Disconnected-media-23.0.257-468.rhel8.x86_64.rpm
- Red Hat Enterprise Linux/CentOS 7.9 64 bit RPM package: CTF-Disconnected-media-23.0.257-468.rhel7.x86_64.rpm
b. Back up the old repo file.
For example:
mv /etc/yum.repos.d/CTF-Disconnected-media-23.0.411.repo /etc/yum.repos.d/CTF-Disconnected-media-23.0.411.repo.cn_backupc. Unpack the 23.0 Update 3 disconnected installation package.
rpm -Uvh <package-name>d. Verify your yum configuration files.
yum list httpd
yum list apr -
Configure your TeamForge installation repository. This step is to configure TeamForge 23.0 Update 3 installation repository on sites with Internet access.
a. Remove the existing TeamForge repository package.
yum erase collabnet-teamforge-repo-23.0-0.noarchb. Contact the Digital.ai Support and download the TeamForge 23.0 Update 3 installation repository package to
/tmp.c. Install the TeamForge 23.0 Update 3 installation repository package.
yum install -y /tmp/collabnet-teamforge-repo-23.0-0.noarch.rpmd. Refresh your repository cache.
yum clean all -
Install the TeamForge 23.0 Update 3.
yum install teamforgeThe above command installs all the TeamForge updates available in the digital.ai yum repository for Teamforge 23.0.
-
Check the
/opt/collabnet/teamforge/var/scm/gerrit/gitrootdirectory. If it is empty, remove it manually.rm -rf gitroot -
Deploy services.
teamforge provision -
Update file permissions on your site's data.
importantDo this if and only if you are upgrading from TeamForge 17.1 (or earlier) to 23.0 on a new hardware.
teamforge apply-permissionsnoteThis process can take a long time on sites with a lot of data.
-
Restart TeamForge.
teamforge restart