Manage the Document Settings
Document Settings
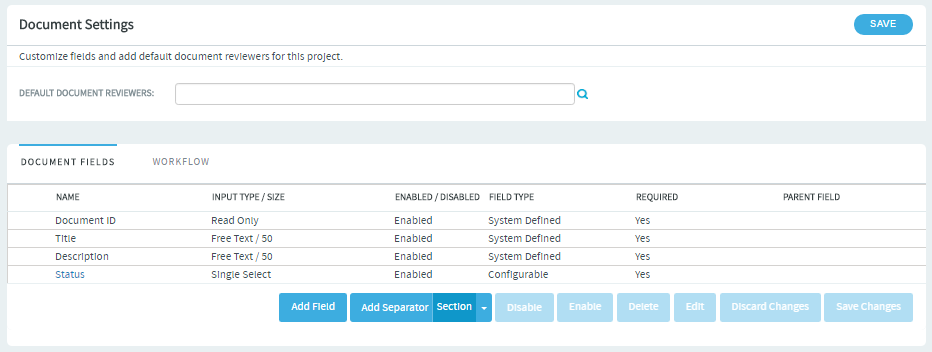
You can configure the document settings in TeamForge 17.1 and later versions. At the project level, document administrators can set up document fields, document workflow and mandatory document reviewers.
In addition to the system defined fields Document ID, Title and Description, a new configurable single select field, Status has been added in TeamForge 17.1. In addition to the default values, DRAFT and FINAL, you can now add custom statuses for documents.
You can also select one or more TeamForge users, for example project administrators and scrum masters, as mandatory document reviewers. This ensures that all project documents are reviewed by them when document reviews are initiated.
-
To configure document settings for a project, select the project from My Workspace menu and select Projects > Project Admin > Document Settings.

-
Add one or more default document reviewers. Click the Default Document Reviewers field's search icon. Search and select users from the Find a User dialog box and click OK.
-
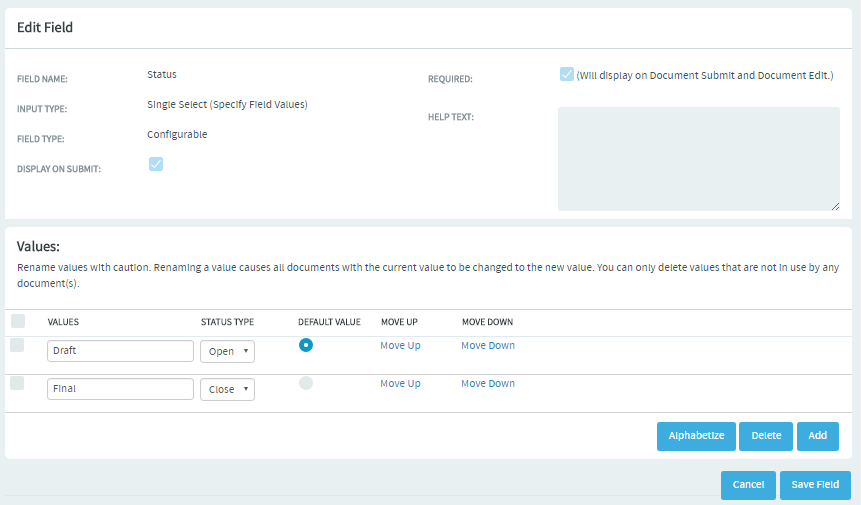
Set up custom dcoument statuses. In addition to the default document statuses,
DRAFTandFINAL, you can add one or more custom document statuses.a. Select the DOCUMENTS FIELDS tab and click the Status field. The Edit Field page appears.

b. Click Add. A new row is added in the Values section.
c. Type the name of the new document status, select a status type (open or close) from the drop-down list and select the Default Value option if you want to make this the default status when a document is created. You can move the row up or down by clicking the Move Up and Move Down links, if required.
d. When done, click Save Field. A confirmation message appears.
e. Click OK to save the new status.
f. Repeat the about steps to add more custom document statuses.
-
Add custom document fields (flex fields), if required. For more information, see Create Your Own Document Fields.
Create Your Own Document Fields
To track data that is not captured by the default set of fields, create new fields that fit your project's purposes.
You can create the following user-defined fields for your documents:
-
Up to 30 text entry fields.
-
Up to 30 date fields.
-
Up to 30 single-select fields.
-
Up to 30 multiple-select fields.
Create a Text Field
To let users type in date, create a text entry field. You can have up to 30 text fields.
-
Click PROJECT ADMIN from the Project Home menu.
-
Click Document Settings.
-
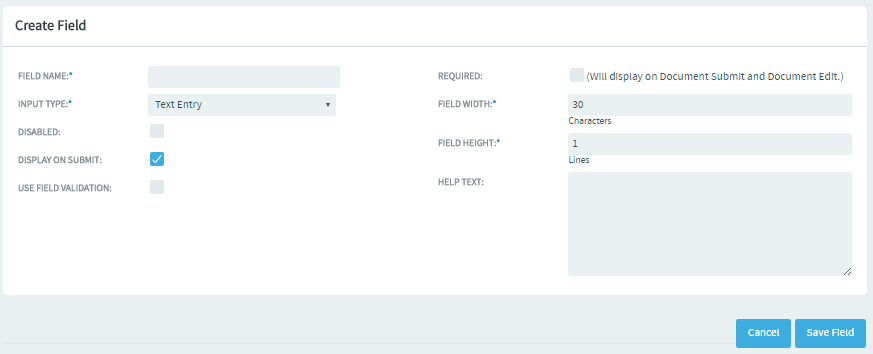
On the DOCUMENT FIELDS tab, click Add Field. The Create Field page appears.

-
On the Create Field page, provide a name for the field.
-
Configure the shape of the field with the Field Width and Field Height fields.
-
Select Text Entry from the Input Type drop-down list.
-
To help users enter the right text values, select Use Text Validation and supply a regular expression that describes the appropriate values. This can help reduce errors and keep your team's data as meaningful as it can be. For more detailed instructions, see Validate Text Field Values.
-
Click Save Field. The new field is created.
Validate Text Field Values
You can help users contribute useful information by testing their text entries against rules you configure. Text fields can be error-prone because they invite free-form input. You can help users provide usable information by automatically rejecting values that don't match the needs of the document.
This simplifies things for the user, but for the document administrator it can be complicated. So let's look at an example.
If your goal is to require users to enter some value, whatever the value is, don't use text field validation. Select the Required check box instead.
-
Click PROJECT ADMIN from the Project Home menu.
-
Click Document Settings.
-
On the DOCUMENT FIELDS tab, click Add Field. The Create Field page appears.

-
On the Create Field page, provide a name for the field. For example, name the text field Legs. This is for users to record the number of legs each specimen displays.
-
Configure the shape of the field with the Field Width and Field Height fields.
-
Select Text Entry from the Input Type drop-down list.
-
Select the USE FIELD VALIDATION check box and supply a validation rule that requires the user to enter a number. For example, if a given insect has six legs, you'll want the user to enter the numeral 6, and not a string such as "six" or "several".
Try this regular expression:
\d{1, 3}This rule requires the user to enter a number with one, two or three digits. Now, a user who means to record a centipede with 100 legs but enters 1000 by mistake will not be able to save the document until the error is corrected.
-
Enter a sample string to test your regular expression. Any part of the sample string that matches your regular expression appears under Match Results. If nothing appears, rework your regular expression until you get a match.
-
Create another text field and call it Location. This is where users will record the geographical spot where they collected the bug.
-
Select the USE FIELD VALIDATION check box and supply a validation rule that requires the user to enter a pair of geographical coordinates. For example, if a given insect was found outside CollabNet's California headquarters, you'll want the user to enter a string like 37.674689,-122.384652, and not something like "Brisbane" or "Out on the lawn".
Try this regular expression:
[-]?[0-9]*[.]{0,1}[0-9]{0,4}This rule requires the user to enter two numbers, separated by a comma, in the general format of a pair of mapping coordinates.
noteThis particular regular expression does not guarantee that the coordinates are valid, just that they look like coordinates.
-
Save your work. In the document whose settings you have been editing, try entering a number greater that 999 in Legs, or a street address in Location. The red X next to the field indicates that the text entry is incorrect. A green check indicates that the value meets the requirements.
noteAny field in which you are validating text entries is identified by 'Text Entry (with Field Validation)' when listed on the DOCUMENT FIELDS tab.
Create a "Select" Field
To let users choose values from a list that you define, create a "Select" field.
You can create up to 30 single-select and 30 multiple-select fields for documents.
-
Click PROJECT ADMIN from the Project Admin menu.
-
Click Document Settings.
-
On the DOCUMENT FIELDS tab, click Add Field. The Create Field page appears.
-
On the Create Field page, provide a name for the field.
-
Use the Input Type menu to specify whether users will be able to select one value or more than one. If you're going to make this a required field, pick one of the values to be the default value. This value is applied to existing documents and documents that are moved from another project.
-
Decide whether users must choose a value.
-
Required fields automatically appear on the Submit Artifact page.
noteIf you make the field required, you must specify a default value. If you make a
Userfield required, specify one or more default users. If you make aDatefield required, the default is 'today'. -
For optional fields, select DISPLAY ON SUBMIT if you want the field to appear when a user first creates a document.
-
To prevent the field from being used at all, select DISABLED. (By default, new fields are enabled.)
-
Use the Values section of the Create Field page to add more values for the user to choose from
-
Keep adding values until you have the list of options you want, then click Save Field.
Create a "People-picker" Field
To let users choose other users from a list, create a "People-picker" field.
For example, you may want to create a "Document Owner" field that can be used to identify the user who owns the document. You might create a people-picker field called "Document Owner" to specify who that person should be.
In people-picker fields you create, users can select multiple users.
-
Click PROJECT ADMIN from the Project Home menu.
-
Click Document Settings.
-
On the DOCUMENT FIELDS tab, click Add Field. The Create Field page appears.
-
On the Create Field page, provide a name for the field.
-
On the INPUT TYPE menu, select
Select User(s). -
In the DEFAULT FILTER field, choose whether the list of people available in your new field will include members of this project or everyone who is registered on the site.
-
Configure the size of the field with the FIELD WIDTH field.
-
Click Save Field. The new field is created.
Create a Document Workflow
To channel project members' work on documents, set up rules for how a document can move forward.
A workflow is a sequence of changes from one status to another. You can define status transitions for any combination of document statuses in Document Settings.
Before creating a document workflow, see that these criteria are met:
You have configured a set of statuses, such as "Draft", "Ready for Review", "Review In Progress" and so on.
Roles exist, and you can assign project members to them.
-
Click PROJECT ADMIN from the Project Home menu.
-
Click Document Settings.
-
Click the WORKFLOW tab.
noteThe WORKFLOW tab lists the transition rules for all the document statuses that you have configured already. You can also add new transition rules, if required.
-
Move your mouse over the status rows to view the edit transition icon.

-
Select one or more roles that can make the status transition and the Required Field for Status Transition from the drop-down lists.
-
Click Save.
-
To add a new transition rule, click Add Transition. A new row is added for the workflow.
-
Select the From Status and To Status from drop-down lists, select the Select Roles option and select one or more roles that can make the status transition, select the Required Fields for Status Transition, and click Save.
The workflow is now saved. When a user submits or edits the status of a document, he or she sees only the options that are allowed by the workflow.
Require Documents to be Associated with Artifacts
To help reduce the problem of orphan documents, require users who create a document anywhere on the site to associate the document with an artifact.
Orphan documents are documents that are abandoned because they are not connected to any tracked activity.
- Open the
conf/site-options.conffile in a text editor. - Change the value of the
sf.requireAssociationOnDocumentCreatevariable totrue. - Change the value of the
sf.allowedAssociationTypeOnDocumentCreatevariable to[TrackerArtifact]. - If you want to prevent users from associating documents with closed artifacts, change the value of the
sf.requireArtifactToBeOpenOnDocumentAssociationvariable totrue. - Save
conf/site-options.conf. - Recreate the runtime environment.
teamforge deploy