Use Task Board
With the Task Board, you can:
- View backlog items of a selected planning folder in the Backlog Items swimlane, which is the leftmost swimlane of the task board.
- View tasks (belonging to backlog items) pinned to swimlanes based on the status.
- Edit backlog items and tasks by clicking the artifact ID link.
- Move tasks (cards) from one swimlane to the other as tasks progress.
- Add new tasks for backlog items.
-
Click TRACKERS from the Project Home menu.
-
In the List Trackers, Planning Folders and Teams page, click TASK.
A Task Board for the current project context is displayed.
-
Select a planning folder from the drop-down list. The Task Board is populated with backlog items and their tasks.
-
If a selected planning folder has subfolders, the artifacts within the subfolders are not displayed.
-
Cards have a color-coded bar to visually identify the priority. In addition, the open and closed cards' background is color-coded to uniquely identify the status.
-
For each card, the artifact ID, title, priority, assigned to and effort (in terms of 'Points' for backlog items and 'Hours' for tasks) are displayed. Status information is shown on backlog cards only. Relevant tooltips appear when you hover your mouse over these data elements. You can also hover your mouse over the tracker icon in backlog and task cards to know the tracker name.
noteEarlier, the Tracker Artifacts without parent artifacts and with/without dependent or child artifacts were only displayed in the Backlog Items swimlane for a selected planning folder on the Task Board. From TeamForge 19.3, all the artifacts which have parent artifacts are also shown in the Backlog Items swimlane. In other words, the Backlog Items swimlane now shows all the artifacts irrespective of their dependencies.
Add New Tasks
-
-
Click the + icon.

The Create Task window appears.
-
Type a title and description and click Submit.
tipTo use the title you type as the description, select the `Use Title as Description' check box.
To edit a backlog item or task using the task ID link:
-
On the List Trackers, Planning Folders and Teams page, select the planning folder.
-
From the listed backlog items and tasks, click the artifact ID link you want to edit.

The View Artifact page appears.
-
Modify the backlog item or task and click Update to update the artifact and return to the Task Board.
To quickly edit a task
-
Click the edit artifact (
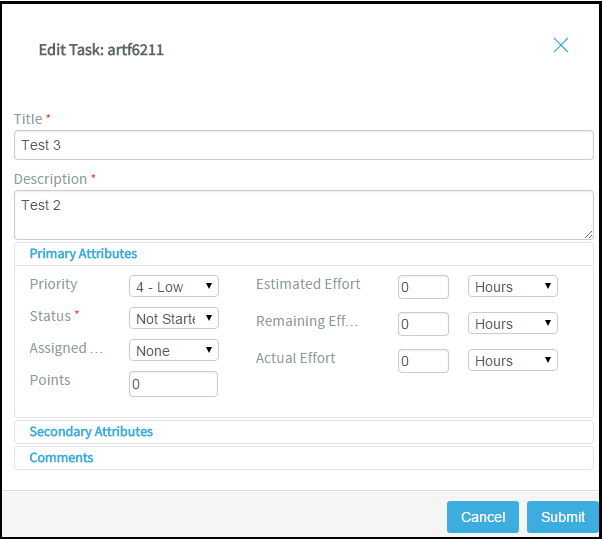
) button in a task. The Edit Task window appears.

-
You can edit the following on the Edit Task window:
-
Artifact title
-
Artifact description
-
Primary and secondary attributes
You have two expandable frames, Primary Attributes and Secondary Attributes, that list fields you can edit. Primary attributes include Priority, Status, Assigned To, Estimated Effort, Remaining Effort, Actual Effort, Points and Team. The expandable frames and the fields listed in them depend on your application configuration that you set in Tracker Settings. For example:
-
Configurable fields which are enabled. For more information, see Enable or Disable Fields.
-
User-defined fields (flex fields) with the field type Text Entry and Single Select and set as Required (Tracker Settings > Tracker Administration > Create Field). For more information, see Create Custom Tracker Fields.
-
Fields which are workflow configured. For more information, see Create a Tracker Workflow.
-
By default, the following field types, which you select while creating a user-defined field (Project Admin > Tracker Settings), are non-editable from the task board's Edit Task window: Multiple select (Multiple Select), Date picker (Select Date) and User picker (Select User(s)).
-
Comments
In this expandable frame, in addition to adding comments, you can view the last five comments for an artifact.
-
-
After editing an artifact, click Update.
Move tasks across swimlanes
-
To move tasks across swimlanes, drag a task card from the source swimlane and drop it on the destination swimlane.
noteYou need to have task tracker 'edit' permission to move cards across swimlanes.
View both 'open' and 'closed' backlog items
-
Click the Show/hide closed artifacts (
) toggle button to view both 'open' and 'closed' backlog items.
noteWhen you select a planning folder, the Task Board shows only 'open' backlog items by default.
Refresh the Task Board
-
Click the Refresh (
) button to refresh the Task Board.
Auto assign task
If a task is not assigned to anyone, that is, if it is assigned to None, then it can be assigned to the user who has logged in using the Auto Assign Task to Me feature. This check box appears only if:
- The Task Board is configured.
- The user who logged in has the edit permission to the task tracker.
- The project is not locked.
-
Select the Auto Assign Task to Me check box and drag the artifact from one swimlane to another (from one status to another) and the artifact is automatically assigned to you.
Position artifact cards
-
If you have the requisite permission, you can drag and drop a card above or below the other cards within a swimlane to position it in the order you want the artifact addressed.
noteThe positioning of cards is retained when you switch between the list and board views (planning, task and kanban). For related information on ranking artifacts in the list view, see Reorder the Contents of a Planning Folder.