Baseline Settings
Prerequisite: You must have Baseline Admin permission to view/access the Settings menu.
Manage Custom Attributes
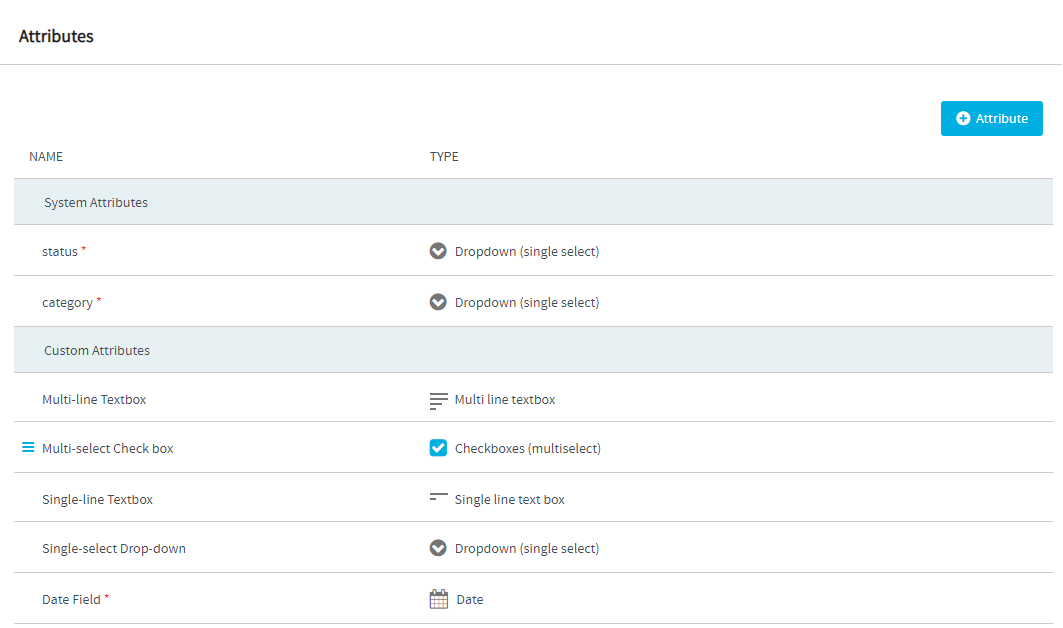
Custom attributes are user-defined attributes that a Baseline Administrator can configure for Baselines. You can add, edit, delete, and reorder custom attributes.
Add Custom Attributes
You can add custom attributes as required.
To add a new custom attribute:
-
Log on to TeamForge as Baseline Administrator.
-
Select a project from My Workspace.
-
Click Baselines from the Project Home menu.
-
Click Settings > Attributes from the side navigation menu.
noteThe Attributes page shows the list of both the system-defined attributes and custom attributes.

-
Click the + Attribute button.
-
Enter the Field Name and select the Field Type.
noteWhen adding single-select (drop-down list) and multi-select (check box) fields, you need to provide at least 2 values to each of these fields. Otherwise, while saving, you will be prompted to provide the values.
-
(This step is required only for single-select and multi-select fields): Add at least two values. To add more values, click the + Add Value button.
-
Select the Required Field check box to make the field mandatory.
-
Click Save.
Edit Custom Attributes
You can edit the existing custom attributes, if required. When editing the single-select and multi-select fields, you can add more values to them. However, you cannot edit the field type. In other words, you can only edit the field name, its values (applicable for single-select and multi-select fields), and select or clear the Required Field check box.
To edit any existing custom attribute/field:
-
Log on to TeamForge as Baseline Administrator.
-
Select a project from My Workspace.
-
Click Baselines from the Project Home menu.
-
Click Settings > Attributes from the side navigation menu.
-
click the edit (
) icon against the custom attribute that you want to edit.
-
Change the field name and its corresponding value(s) (if applicable).
noteYou cannot edit the field type.
-
Select the Required Field check box (if not already selected) to make the field
mandatory. Clear the check box to make the fieldoptional. -
Click Save.
Delete Custom Attributes
You can delete any existing custom attribute, if required. However, you cannot delete the system-defined attributes. To delete an existing custom attribute, click the delete ( ) icon against the custom attribute that you want to delete.
Reorder Custom Attributes
You can reorder both the system-defined and custom attributes, if required. To reorder a custom attribute, just drag the custom attribute and drop it anywhere within the list of custom attributes.
Based on the order appearing on the Attributes page, the attributes (fields) are shown when creating baselines and baseline definitions.
Manage Custom Statuses
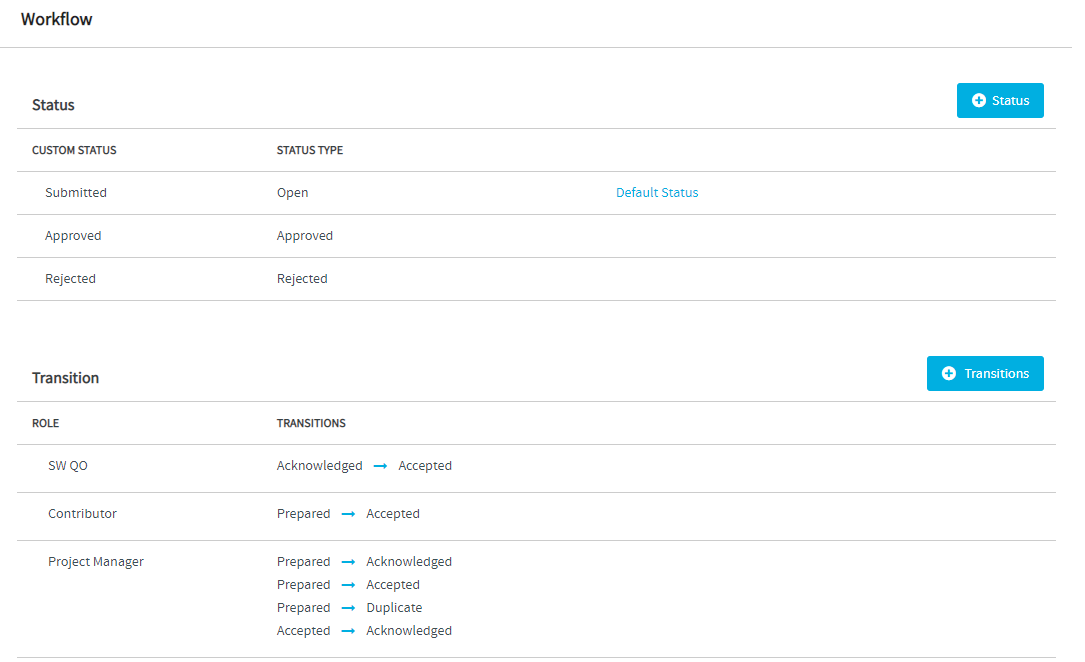
The status of a baseline changes at every stage of the baseline workflow. The baselines are categorized based on their statuses. You can create custom statuses based on your organizational requirements. However, the custom statuses are defined based on the system-defined status types.
Open, Approved, and Rejected are the available status types. You can create more than one custom status for each status type.
If a custom status has Approved or Rejected as its status type, then that custom status is considered as the terminal status.
Add Custom Statuses
To create a custom status:
-
Log on to TeamForge as Baseline Administrator.
-
Select a project from My Workspace.
-
Click Baselines from the Project Home menu.
-
Click Settings > Workflow from the side navigation menu.

-
Click the + Status button on the Workflow page to add a new custom status.

-
Enter the custom status name and select the system-defined status type.
-
Click Save.
Edit Custom Statuses
You can edit any existing custom status including the default custom status, if required.
To edit an existing custom status, click the edit ( ) icon against the custom status that you want to edit.

The edited status is also shown in the workflow transition(s) associated with the status. For more information on the status transition workflow, see Add Workflow for Status Transitions.
Delete Custom Statuses
You can delete any existing custom status, if required, except the default custom status. To delete an existing custom status, click the delete ( ) icon against the custom status that you want to delete.

Be aware that deleting a status will also delete the workflow transition associated with the status.
Reorder Custom Statuses
You can reorder the custom statuses as required. To reorder a custom status, just drag the custom status and drop it anywhere within the list of custom statuses.
Manage Workflow Status Transitions
You can add the workflow status transitions based on the organizational requirements and associate the project user roles having baseline review permission with these status transitions. You can add one or more workflow status transition for every user role.
To add a new workflow for status transition:
-
Log on to TeamForge as Baseline Administrator.
-
Select a project from My Workspace.
-
Click Baselines from the Project Home menu.
-
Click Settings > Workflow from the side navigation menu.

-
Click the + Transitions button on the Workflow page to associate a project role with the status transitions.

-
Select the project role and the from and to statuses.
noteThe From Status drop-down list contains only the custom statuses with the status type Open.
noteThe status that is already added to the To Status drop-down list will not be available in the From Status drop-down list.
-
Click the Add Transition link to add more status transitions.
-
Click Save.
Manage Field Inclusions
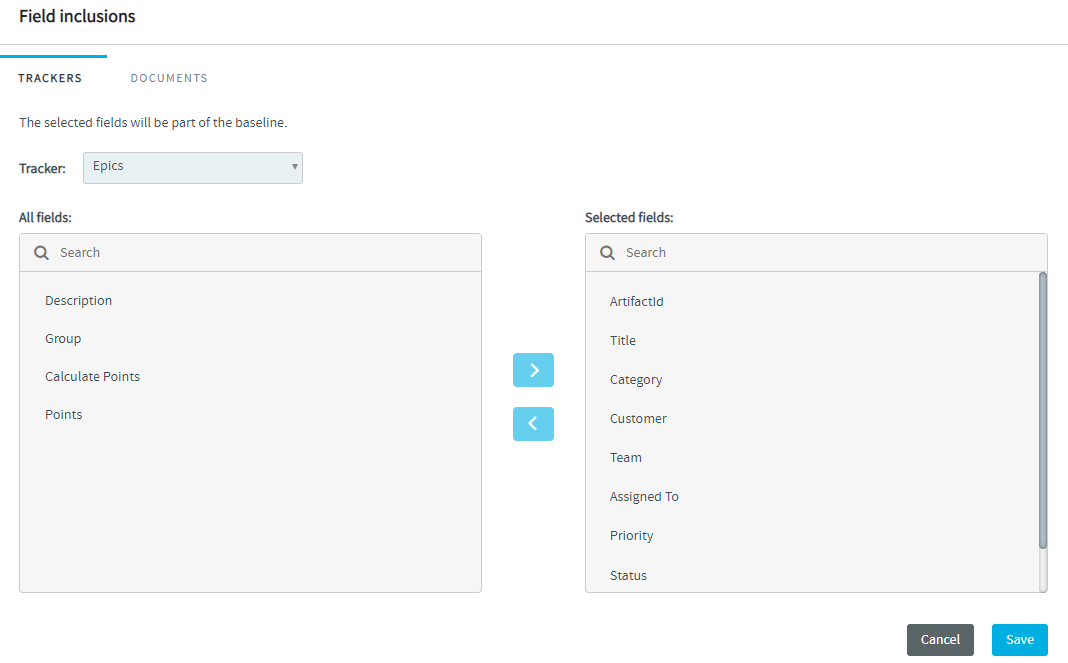
Baseline manifest field configuration involves selecting the fields of Trackers and Documents that must be included when baselines are created or exported. The Field Inclusions setting lets you select the fields that you want to include in baselines. Such selected fields included as part of baselines are called the baseline manifest fields.
Manifest field configuration is mandatory for baselining any newly created tracker.
Include Fields from Trackers
To select the Tracker fields that you want to include in baselines:
-
Log on to TeamForge as Baseline Administrator.
-
Select a project from My Workspace.
-
Click Baselines from the Project Home menu.
-
Click Settings > Field Inclusions from the side navigation menu.

-
Select the TRACKERS tab, if not already selected.
noteThe TRACKERS tab is selected by default.
-
Select the Tracker from the Tracker drop-down list.
-
Select a field from All fields list.
The following mandatory Tracker fields are included in baselines by default—ArtifactId, Title, Status and Planning Folder.
-
Click the
button to move the selected field to the Selected fields list.
-
To exclude a field, select the field from the Selected fields list and click the
button to move the field back to the All fields list.
-
Repeat steps 7 and 8 to include all the fields you want.
-
Click Save.
Include Fields from Documents
To include/add Document fields:
-
Log on to TeamForge as Baseline Administrator.
-
Select a project from My Workspace.
-
Click Baselines from the Project Home menu.
-
Click Settings > Field Inclusions from the side navigation menu.

-
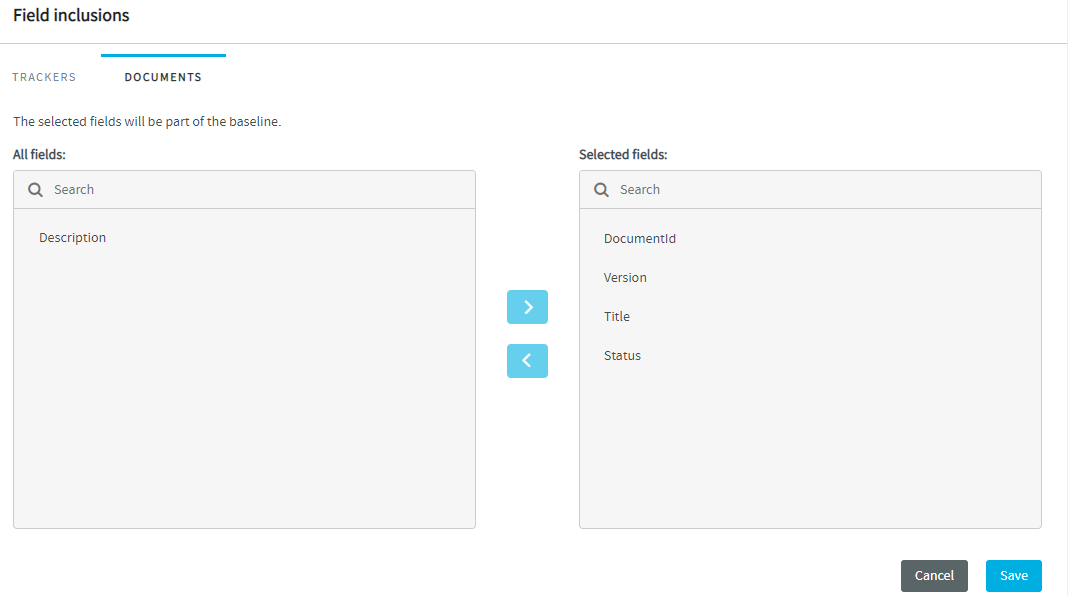
Select the DOCUMENTS tab.
noteThe TRACKERS tab is selected by default.

-
Select a field from All fields list.
-
Click the
button to move the selected field to Selected fields list.
The following mandatory Document fields are included in baselines by default—DocumentId, Title, Version, and Status.
-
To exclude a field, select the field from the Selected fields list and click the
button to move the field back to the All fields list.
-
Repeat steps 6 and 7 to include all the fields you want.
-
Click Save.
Reorder the Fields
You can reorder the fields added to the Selected fields list. To reorder a field within the Selected fields list, just drag the field and drop it anywhere within the list.
Based on the order set in the list of selected fields, the fields are shown on the preview window of Trackers and Documents and in the results of the Compare Baselines page. For example, if the Category field appears next to the Status field in the Selected fields list, both the fields appear on the preview window and the Compare Baselines page.