Create Tracker Artifacts
For more information on Trackers, see Set up Trackers.
Create a Tracker Artifact
Individual tracker entries are referred to as tracker artifacts, or just artifacts.
-
In any tracker, planning folder or teams view, click Create Artifact and select the tracker in which you want to create your artifact. By default, your new artifact is created in the tracker, planning folder or team you are currently looking at.
-
Answer the questions posed by the required fields.
noteDifferent trackers will have different combinations of fields to fill out, depending on what the tracker administrator has set up.
-
Provide a Title and Description that summarize the issue or work item in a few words.
tipDescriptions help users learn how best to provide the information you want from them. To maximize your chances of getting useful data, make your description as information as you can.
noteA new Markdown editor has been introduced for the description field. Now, you can change the format of the content of the description and make its look and feel better than ever. With this editor, you can preview your content, undo and redo the changes, set the bold and italics font styles, add a codeblock, include headers, add bulleted and numbered lists, choose to indent or outdent a paragraph, add horizontal rule and images.
TeamForge uses Showdown—a bidirectional Markdown to HTML to Markdown converter written in Javascript. For more information, see the official Showdown Documentation. Here's an abridged version of the Markdown syntax documentation.
Artifacts support @mentions: Artifact description and comments now support @mentions and users called out via @mentions are added to the monitoring list. Include usernames with "@" as prefix (for example, @mphippard) to add users to the monitoring list.
noteUsers called out via @mentions must have Artifact View permission to be added to the monitoring list.
-
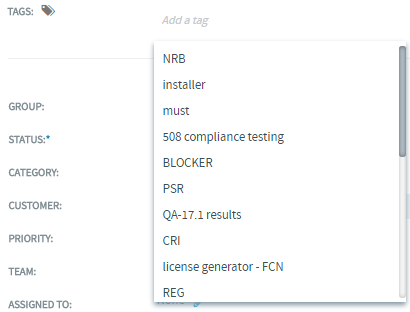
Now project members with CREATE/EDIT permissions can also create new tags or add existing tags, if required from Create Artifact page. Tags creation from Create Artifact page enables you to create tags on the go and overrides the limitation of creating tags only from the Tags page. However, you cannot rename or delete a tag from Create Artifact page. Click the Add tag button next to get the list of tags mapped to your project. You can add up to a maximum of 10 tags to any artifact and a message is displayed if your try to add more than 10 tags. If the entered tag name is not available already. a context menu Create a new tag shows up for you to create a new tag with the desired tag name.
 note
noteWherever the tag widget is not applicable, the associated tags are displayed as read only tags. For example in View Artifact page.
-
For Priority, select a value that expresses the important or urgency of the work you are describing.
-
Assign the artifact to a team by selecting a name from the Team list.
-
If you want to assign it to a specific project member, choose a name from the Assigned To list. This list displays the names of all the project members, irrespective of the team you may have selected in the previous step.
noteIf you project administrator has configured the tracker to automatically assign artifacts to project members, you can skip this step.
Reassigning artifacts can now be done in no time. Use the links under the Assigned To field to quickly unassign the artifact to "None", and reassign the artifact to yourself or to the previous assignee. You can also click the "Re-assign" icon to search and reassign the artifact to any other user.
-
Select the planning folder that the work belongs to from the Planning Folder list.
-
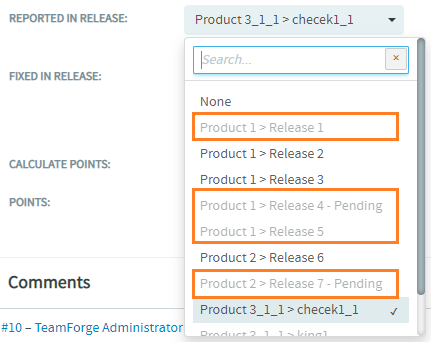
For defect trackers, the Reported in Release field shows up. Select a file release from this drop-down list.
A new check box, Show Pending/Obsolete releases added in TeamForge 19.2, if selected, lets you select one of the pending and obsolete file releases for the Reported in Release and Fixed in Release fields.
Selecting this check box, lists the pending and obsolete file releases in the Reported in Release and Fixed in Release fields. The pending and obsolete file releases are greyed out to distinguish them from active file releases.

The Show Pending/Obsolete releases check box becomes disabled, once you’ve selected a pending or an obsolete file release. To enable it, select an active file release or “None”.
-
-
Record any other information that may be appropriate. For example, if your project is using a Scrum-based methodology, your project manager may have provided a Points field to track estimates of relative effort.
-
Add a file attachment, if appropriate.
noteWhen creating or editing an artifact, you can drag and drop any number of files with their overall size not exceeding 25 MB in the Attachments field. You can also select multiple files using the Browse button. Make sure that you add only files of restricted file types. For more information on attaching restricted files types, see PROHIBITED FILE TYPES.
-
Save your changes.
From 17.8 release, TeamForge is configured to send HTML emails to users assigned to and users monitoring the artifact you create or update. For more details, see HTML EMails.
View Progress of File Uploads
When file attachments are uploaded while creating an artifact, a file upload progress indicator shows up on the Create Artifact page.

Attachment Reminder for Tracker Artifacts
Have you ever forgotten to attach files when creating or updating Tracker Artifacts? If yes, the Attach Reminder feature comes in handy to alert you in case you've missed attaching the files while submitting an artifact.
How it works?
If you've included one of the following keywords exactly in the Description field on the Create Artifact page or in the Comment Text field on the View Artifact page, the Attachment Reminder dialog shows up, when you try to save the changes without attaching the files.
| attach | attached are | attached to this artifact | attached is |
| attached file | attached files | attached document | attached documents |
| are attached | find attached | find the attached | find included |
| find the included | 've attached | have attached | is attached |
| I attached | I'm attaching | I am attaching | PFA |
| see attached | see attachment | see attachments | see the attachment |
| see the attached | see included |
Attachment Reminder, if keyword is included in the Description field on the Create Artifact page.
Attachment Reminder, if keyword is included in the Comment Text field of the View Artifact page.
Click Cancel to get back to the artifact for attaching the files. Click OK to submit the artifact without attaching the files.
Create a Tracker Artifact by Email
You do not have to be logged into TeamForge to submit a tracker artifact using email, but you must have the tracker submit permission for the tracker to which you are submitting.
Send an email message to <tracker id>@<TeamForge server>.
You can find the tracker ID on the List Artifacts page.
![]()
TeamForge maps your email to the tracker record like this:
| Email field | Tracker field |
|---|---|
| To | Tracker email address |
| Subject | Artifact title |
| Body | Artifact description |
| Attachments | Attachments |
Artifacts support @mentions: Artifact description and comments now support @mentions and users called out via @mentions are added to the monitoring list. Include usernames with "@" as prefix (for example, @mphippard) to add users to the monitoring list.
Users called out via @mentions must have Artifact View permission to be added to the monitoring list.