Work with Phases and Tasks
In Release, phases in a template or release represent blocks of activities that occur in succession. Activities in a template or release are modeled as tasks, which are logically grouped in phases. You can use the release flow editor to manage phases and tasks.
Work with Phases
Phases are the main building blocks of a release or template, organizing related tasks into logical groups. Managing phases helps structure your release process and makes it easier to track progress and dependencies.
Add a Phase
To add a phase:
-
In the template or release, select Release Flow from the left navigation bar.
-
Click Add Phase. A new phase with the title 'New Phase' appears.
-
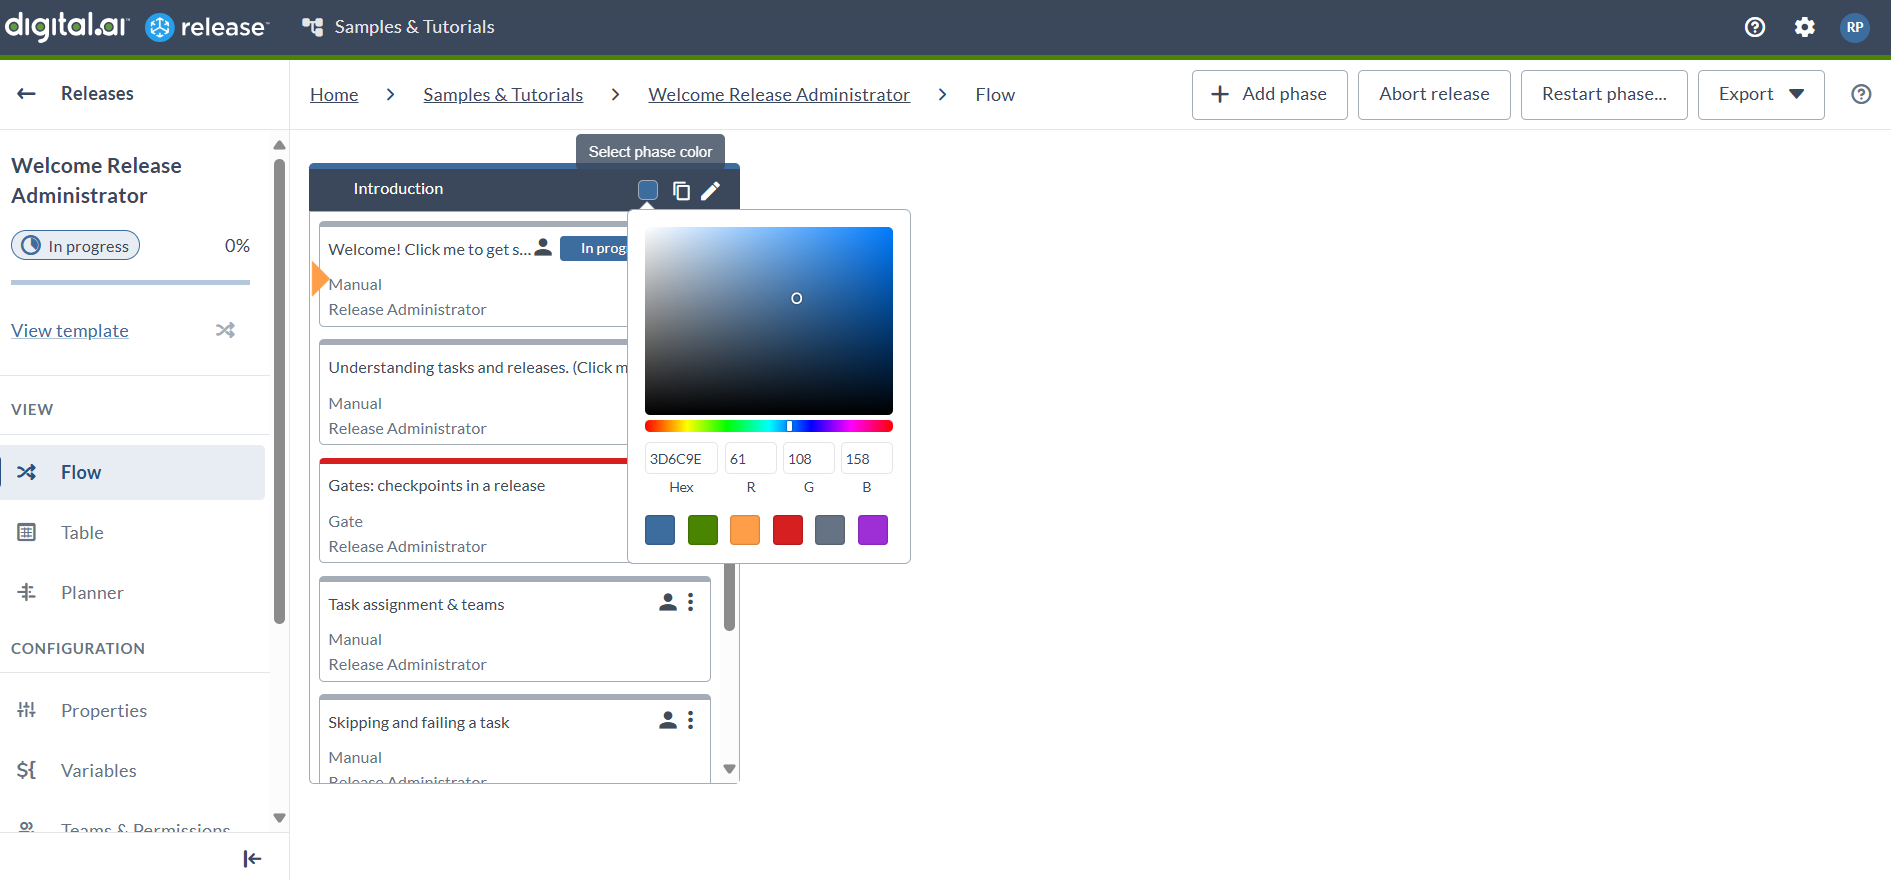
Click the phase title to change it. Optionally, you can:
- Move the phase by dragging it.
- Select a phase color using the new color picker, with support for Hex and RGB values in addition to preset colors.
-
To view a description of the phase and its start date, due date, and duration, click
 .
.Release uses the dates and duration when displaying the phase in the planner and calendar. If these dates are not consistent with the release dates, as defined in the release properties, a warning displays.
Copy a Phase
To copy a phase, click ![]() . This is useful during modeling, when you have similar or identical phases. When you duplicate a phase that is active and has running and completed tasks, the tasks in the new phase are all in the planned state.
. This is useful during modeling, when you have similar or identical phases. When you duplicate a phase that is active and has running and completed tasks, the tasks in the new phase are all in the planned state.
Delete a Phase
To delete a phase, click ![]() .
.
You cannot delete a completed or active phase of a running release.
Work with Tasks
Tasks are the actionable items within each phase. They represent the individual steps required to complete a release. Understanding how to add, configure, and manage tasks is essential for effective release planning and execution.
Add a Task to a Phase
To add a task to a phase:
-
In the template or release, select Release Flow from the Show menu.
-
Click Add task within the phase.
-
Click the task title to change it.
-
Select the task type.
noteTo preview the complete list of available tasks, click the 'All Types' icon button. This will display the task tree menu from previous versions.
-
To create the task and add it to the phase, click Add. Optionally, you can:
- Move the task by dragging it.
- Drag the task to another phase.
-
Click the task to edit its details.
Add a Task to a Parallel or Sequential Group
Parallel groups and sequential groups are containers for other tasks.
-
Within a parallel group, all tasks start simultaneously. The parallel group task finishes when all of its children are complete.
-
Within a sequential group, tasks are executed in order. The sequential group task finishes when the last task in the sequence is complete.
To add a task to a task group, click Add task at the bottom of the group. To move a task into a task group, drag and drop it. To collapse or expand a task group, click its arrow.
Set a Precondition on a Task
You can control the execution flow by setting a precondition on a task. A precondition is an if statement for tasks, written in Jython script code.
If the precondition evaluates to True, the task is started. If the precondition evaluates to False, the task is skipped.
If an exception is raised or a compilation error occurs when Release is evaluating the precondition script, the task fails. You can fix the script and retry the task.
There are two methods that can be used to write preconditions.
Boolean Expression
A Boolean expression is restricted to a single statement script. For example:
releaseVariables['jobStatus'] == 'Success'
The task starts only if the variable jobStatus is equal to Success.
Multi-line Script
If you need a more complex script, you must set the result variable. For example:
print("Executing precondition")

...

result = True
Disable Preconditions
You can disable preconditions on certain task types. For example, to disable preconditions on parallel groups, modify ext/synthetic.xml as follows:
<type-modification type="xlrelease.ParallelGroup">
    <property name="preconditionEnabled" kind="boolean" required="true" default="false" hidden="true"
        description="Whether preconditions should be enabled"/>
</type-modification>
The Release server must be restarted for this modification to take effect.
Add Comments to a Task
To add comments to any type of task in a template or release in the Release GUI, open the task and click Add comment.
You can also use the REST API and Jython API to automatically add comments to tasks. For an example, see Using the Release API in scripts.
Comment Size Limit
To prevent performance issues, comments are limited to 32,768 characters.
- If you manually add a comment that exceeds the limit, Release will truncate the comment.
- If a Script task adds a comment that exceeds the limit, Release will truncate the comment. Release attaches the full output of the script to the task, regardless if it was truncated or not.
You can change the comment size limit for each task type in the XL_RELEASE_SERVER_HOME/conf/deployit-defaults.properties file. For example:
#xlrelease.Task.maxCommentSize=32768
To change the comment size limit:
- Delete the number sign (
#) at the beginning of the relevant line. - Change the limit.
- Save the file.
- Restart the Release server.
Edit a Task
To edit a task in a template or release, go to the Release Flow Editor and click the task.
Editing Task Fields
To edit a field in a task:
- Click the task.
- Edit the properties.
- Press Enter or click outside the field to finish editing.
In large text fields, you can press Enter to start a new line and click the checkmark icon to save.
To cancel your changes, press Esc. To cancel your changes in a large text field, click the round cancel icon.
Your changes to the task details are saved immediately.
Title and Description
The task title appears in the top colored bar. Click it to edit the text.
Use the description to describe the purpose of the task and add instructions on how to complete it.
Release supports the Markdown syntax for styled text such as headers, bold text, italicized text, hyperlinks, bulleted lists, and so on. For more information, see Use Markdown in Release.
Use hyperlinks to refer to documents published elsewhere, such as on a wiki or SharePoint server.
Task Status and Transitions
If the task is assigned to you, you can use the following buttons to indicate the actions performed on the task:
-
Complete: The task is done. You can optionally add a comment about the completion of the task. After completion, Release advances to the next task in the phase and sends the appropriate notifications.
-
Skip: No work was needed or could be done, and you have moved on to another task. You can use this option for tasks that are not relevant to the release. You are required to enter a comment explaining why you skipped the task. Release marks the task as skipped and moves on to the next task.
-
Fail: An unforeseen event is preventing the completion of the task or you do not know how to complete the task. This stops the release flow, and Release notifies the release owner.
If you type a comment in the dialog box and then dismiss it by clicking away or closing the dialog box, your comment is preserved and will be restored the next time you open the same action. The comment is only cleared when the status change is submitted or explicitly cancelled.
Task Attachments
The Attachments section is located below the comments.
Task Properties
| Property | Description |
|---|---|
| Status | To signal that the timely completion of a task is at risk or that you require help, without failing the task, use the Status flags in the upper right corner of the task properties. The status flag appears in all overviews to alert the release manager and other users. |
| Scheduled start date | Use the scheduled start date to schedule a task to be performed at an exact time. For example, a deployment with Deploy that must start at midnight or that an email must be sent to all stakeholders at 9:00 AM on Monday. Note: The task will not start on the scheduled start date if it is not yet active in the flow. All previous tasks must be complete before a scheduled task is started and the scheduled start date is reached. If the previous tasks are completed after the scheduled start date, the task will start the moment it becomes active. Click the scheduled start date to select a date and time. When executing the release flow, Release will wait until this time, if it has been set, to execute the task. While waiting, the task is marked with an alarm clock icon and a gray text indicating when it will start. Dates in Release are displayed using the clients operating system's timezone. Dates and times are formatted according to the browser's language settings. |
| Due date | Set a due date on a task to mark the time that the task must be completed. |
| Duration | Instead of explicitly setting the due date, you can use the duration property to indicate how long a task should last. Note: If no dates or duration are set, the "inferred" dates and duration appear in grey. |
| Assigned to | This section indicates the user who owns the task and is responsible for completing it. It also indicates the team that the task is assigned to. Teams are a way to group users who are involved in the release and who have the same role. For example, you could have a DEV team, QA team and an OPS team. During planning, it can be useful to assign a task to a team because you may not know in advance who will participate in a certain release. If a task is assigned to a team but not to a user, all team members receive an email when the task becomes active, if not disabled in the notification settings. To remove an assignment to a user or a team, click the cross icon. |
Change a Task's Type
You can change the type of a task in:
- A template
- A planned release that has not started yet
- An active release, if the task that you want to change has not started yet
To change the type of a task in a template, you need the Edit Template permission on the template. To change the type of a task in a release, you need the Edit Task permission on the release.
To change a task's type:
-
Open the template or release in the Release Flow Editor.
-
Click
 on the task you want to change.
 -
In the menu, hover over Change type.
-
Select a task type.
Release will copy the values of properties that are shared between the task's previous type and the type that you selected.
note- You cannot change the type of an Active, Completed, Failed, Skipped, or Locked task.
- You can change a task to a parallel or sequential group, but you cannot change a parallel or sequential group to a different type of task.
Copy and Paste Task
You can copy and paste tasks within the same release or across different templates, releases and workflows. This feature streamlines task reuse, making it easier to replicate and modify tasks without starting from scratch.
How to Copy a Task
- You cannot copy tasks that are Completed, Aborted, Archived, Skipped, or Locked.
- If a copied task is moved or deleted after copying, attempting to paste it will display an error message.
From the ellipsis menu:
-
Open the Template or Release in the Release Flow Editor
-
Click
on the task you want to copy. -
Select Copy > Copy task from the menu.

From the Task Drawer:
-
Open the Task Drawer by clicking on the task.
-
Click
in the Task Drawer. -
Select Copy > Copy task from the menu.

How to Paste a Task
- You cannot paste a copied task before any task that is currently in progress.
- You cannot paste tasks into in-progress parallel group tasks.
- If no task has been copied, the Paste option in menus will be disabled.
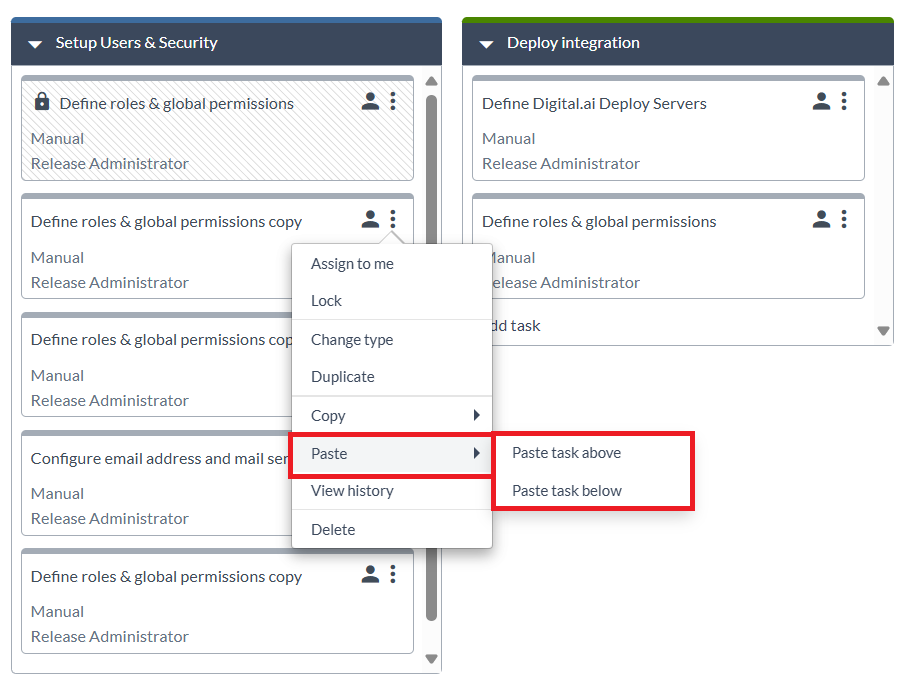
Using the ellipsis menu:
-
Click
where you want to paste the previously copied task. -
Select Paste > Paste task above or Paste task below from the menu, depending on where you want to place the new task.
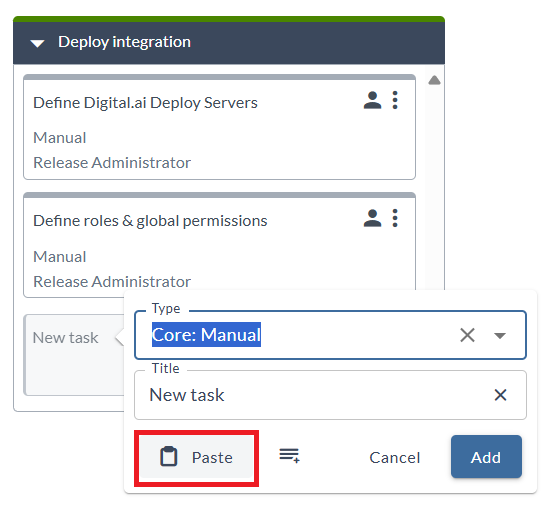
Using the Paste Button:
-
When adding a new task to a Release or Template, click Add task at the bottom of the phase.
-
You can then click the Paste button in the task creation dialog instead of selecting a task type.
Session and Availability:
- Copied tasks remain available across browser tabs and windows during your session.
- After logout or session timeout, copied tasks are no longer available for pasting.
Task Naming:
- When copying a task within the same phase, the copied task name includes a copy suffix (such as
Task Name copy). - When copying a task to another phase, release, or template, the task name remains unchanged.
Variables and Connections:
- Variables: When copying tasks with variables to destinations that don't have those variables, the variables are automatically created. Details about which variables were recreated are provided in the copied task's activity comments.
- Connections: When copying tasks with connections that don't exist in the destination, the connections are cleared (removed) from the copied task. A comment is added in the task's activity tab to notify you which connections were cleared and need to be recreated.
Duplicate a Task
You can duplicate a task within the same release or template to reuse its configuration without creating a new task from scratch.
To duplicate a task:
- Open the template or release in the Release Flow Editor.
- Click on the task you want to duplicate.
- Select Duplicate from the menu.
note
- When duplicating a task within a release or template, the duplicated task name includes a
copysuffix (such as a duplicated task namedTask Nameappears asTask Name copy). If you duplicate the tasktask1multiple times, you will get multipletask1 copytasks. If you duplicatetask1 copy, then you gettask1 copy copy, etc. - You cannot duplicate tasks that are in any of the following statuses: Completed, Aborted, or Locked.
- When duplicating a task within a release or template, the duplicated task name includes a
Delete a Task
You can remove a task from a release or template if it is no longer needed.
To delete a task:
- Open the template or release in the Release Flow Editor.
- Click on the task you want to delete.
- Select Delete from the menu.
note
You cannot remove tasks that are in any of the following statuses: In Progress, Completed, Skipped, Aborted, or Locked.