Folder Teams and Permissions
This topic explains the structure of users, roles, and permissions in Release, focusing on how they ensure secure and efficient access control.
Users refer to individuals who are authorized to access the Release. In order to log into the Release, users must provide valid credentials such as username and password. This is a security measure to ensure that only authorized individuals have access to the system and its data.
Roles are specific designations that are created to perform specific functions within a Release. They are used to group users with similar responsibilities and access rights. One or more users can be assigned to a role.
Permissions are specific rights that are granted to users in order to control their activity within a Release. They determine what actions a user is allowed to perform within the system. One or more roles can be assigned to a permission. By assigning roles to permissions, organizations can easily control access to specific features and functionality within the Release, based on the specific needs of different teams. This allows organizations to limit access to sensitive data and functionality, while still providing users with the necessary tools to perform their job functions.
Permissions are classified as follows:
Teams are used to group one or more users in a Release. Folder, Template, or Release-level permissions can be assigned to one or multiple teams.
Global Permissions
Global permissions include fine-grained access control across Release.

The following permissions are global in Release:
| Permission | Description |
|---|---|
Admin (admin) | Top-level permission in Release. |
| Login | Allows or restricts the users who can log into the Release application. |
| Edit security | Provides access to the Permissions page to edit security on releases and templates. |
Create template (template#create) | Create a new template. Note: This permission also includes global triggers. |
Create release (release#create) | Create a release from any template. |
| View Reports and Digital.ai Analytics | View global and analytics dashboards. |
| Audit data | Read-only permission for data access and view audit reports. This permission is tied to the Digital.ai Analytics Service User role. |
| Create Custom dashboards | Create, edit, or delete a custom dashboard. |
Edit global variables (global_variables#edit) | Edit global variables that are available in Release 4.8.0 and later. |
Create top level folders (folder#create_top_level) | Create folders. |
Edit blackout periods (global_calendar#edit_blackout) | Create, edit, or delete a blackout period. |
Edit risk profiles (risk_profile#edit) | Create, edit, or delete a risk profile. |
Edit environments (environment#edit) | Create, edit, or delete an environment. Permission is required to create stages and create environment labels. |
Edit applications (application#edit) | Create, edit, or delete an application. |
Edit environment reservations (reservation#edit) | Access the scheduling pages, make a schedule, or reserve an environment. |
| Runner registration | Register Runners for container based tasks. |
| Runner registration | Access ro register Runners. |
Assign Global Permissions
- Click Settings > Users and permissions > Permissions to view the Permissions screen. By default, the Users screen is displayed.
The Permissions screen in Users and permissions settings is accessible only to users with Admin or Edit Security global permission.
- In the Permissions screen, you can view the permissions in the Action column and the assigned roles in Roles column.
- To assign roles to a permission, enter a search text (alphabets or numbers matching the name of the role) in the Roles column to auto-populate the list of roles available.
- Select the relevant role from the list or press Enter. Multiple roles can be assigned to a permission.
- Click Save to apply your changes.
- Click Reset to discard your changes and reload the current settings from the server.
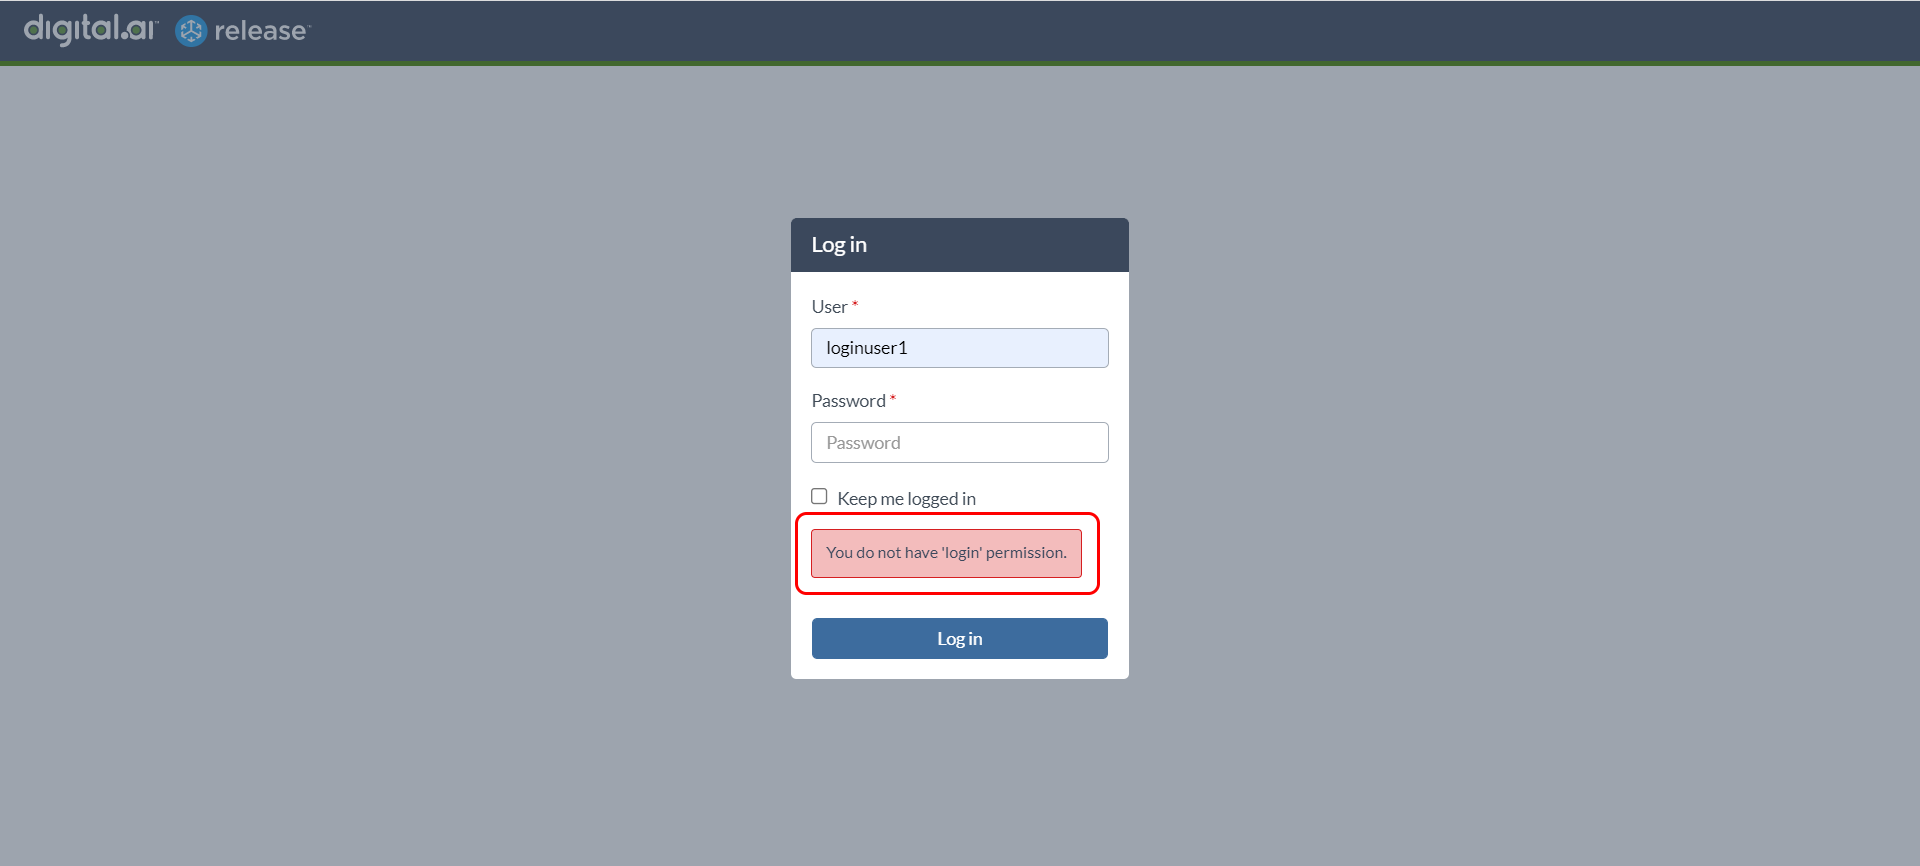
Among all the global permissions, the Login permission is allowed for all the enabled users. To restrict this permission for specific roles, you can add those roles in the Permissions screen.
Note: Role-based access control in Release is equipped with a dedicated Login permission, which allows you to control which users are able to log in to the system. This permission can be assigned to specific roles, so that only users with those roles are able to log in to Release. If a user does not have a role assigned to the Login permission, they will not be able to log in to the Release application. Instead, they will see a message or a screen indicating that they do not have access to the system.
Filter Global Permissions
You can use the Action and Roles search boxes to filter your permissions and roles respectively. It becomes very helpful when you have a number of permissions.
In addition to enforcing global security, you can enforce security on folder, template, and release levels by assigning permissions to teams. This allows you to control access to specific resources and ensure that only authorized team members can view or make changes to them. Additionally, when you design the release flow of a template or a release, you can assign tasks to teams, and team members will be responsible for completing them and will be notified when the task starts.
Folder Permissions
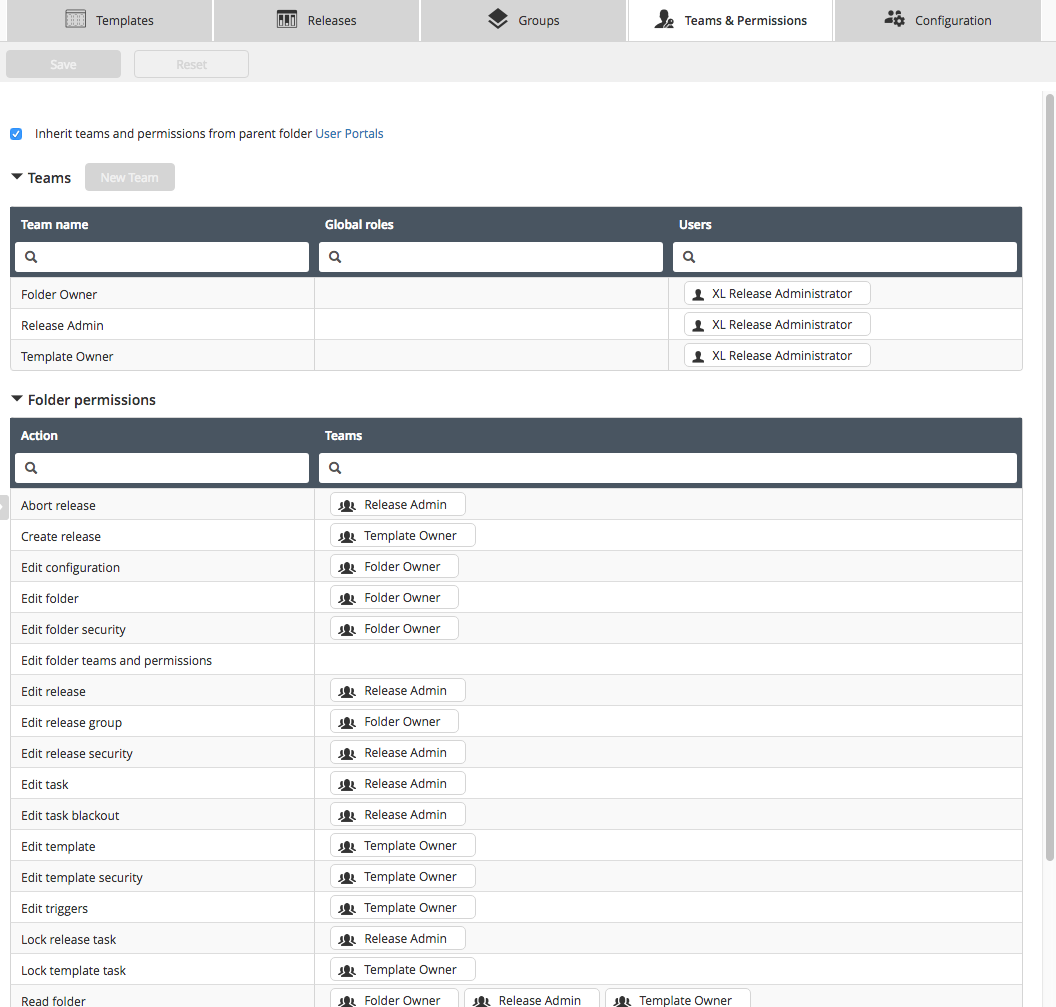
In a hierarchical file system, files and folders inherit the security settings of their parent folder. This means that any templates or releases stored in a folder will inherit the teams and permissions defined at the folder level, and will not have individual settings. Additionally, a subfolder will inherit the settings of its parent folder and so on.
Note: When you create a child folder within a parent folder, the Inherit teams and permissions from parent folder checkbox is selected by default, which means that the child folder will inherit the teams and permissions of the parent folder. If you want the child folder to have different permissions, you will need to clear this checkbox. Then you can set the teams and permissions for the child folder independently. This way, you can control the access to the content in the child folder differently from the parent folder.
The following permissions apply to folders:
Important: The folder-level covers all the permissions. This means that when you set teams and permissions for a folder, those same permissions will apply to any templates or releases that are located within that folder.
Folders
| Permission | Description |
|---|---|
View folder (folder#view) | View the folders in the Folders tab. |
Edit folder (folder#edit) | Add, rename, move, or delete a subfolder to the current folder. |
Edit folder variables (folder#edit_variables) | Edit the folder variables. |
Edit folder security (folder#edit_security) | Configure the teams and permissions on a folder |
Edit folder teams and permissions (folder#edit_teams) | Edit the team composition and the permissions of all the teams within the folder. You can view the Teams & permissions tab in the navigation pane, only if you have the Edit folder teams and permissions permission. However, there are some limitations:
|
Edit folder notifications (folder#edit_notifications) | Edit the notifications of all the teams within the folder. |
Delivery patterns
| Permission | Description |
|---|---|
View delivery patterns (delivery_pattern#view) | View delivery patterns inside the Patterns tab within the selected folder. |
Edit delivery patterns (delivery_pattern#edit) | View, edit, or create delivery patterns. |
Deliveries
| Permission | Description |
|---|---|
View Deliveries tab (delivery#view) | View deliveries inside the Deliveries tab within the selected folder. |
Edit deliveries (delivery#edit) | View, edit, or create deliveries. |
Edit tracked items (delivery#edit_tracked_item) | View deliveries inside the Deliveries tab within the selected folder, and perform operations on their tracked items. |
Dashboards
| Permission | Description |
|---|---|
View Dashboards tab (dashboard#view) | View the Dashboards tab within the selected folder. |
Edit dashboards (dashboard#edit) | Edit custom dashboards in folders. |
Release groups
| Permission | Description |
|---|---|
View release groups (group#view) | View the Groups tab within the selected folder. |
Edit release groups (group#edit) | Edit or create release groups. |
Version control
| Permission | Description |
|---|---|
View version control (folder#view_versions) | View the Version control tab within the selected folder. |
Edit version control settings (folder#edit_versions) | Connect folder to Git, create and apply versions of folder content. |
Create new version (folder#generate_configuration) | Generate configuration for the folder from CLI or version control tab. |
Apply version (folder#apply_changes) | Apply any changes to the folder from the CLI or version control tab. |
Connections
| Permission | Description |
|---|---|
Edit connections (folder#edit_configuration) | Edit entries in the Connections tab within the selected folder. |
Triggers
| Permission | Description |
|---|---|
View triggers (trigger#view_trigger) | View triggers in the Triggers tab within the selected folder. |
Manage triggers (trigger#edit_trigger) | Edit triggers in the Triggers tab within the selected folder. |
Create New Teams
Teams are used to group one or more users in Release. Folder, Template, or Release-level permission can be assigned to one or multiple teams.
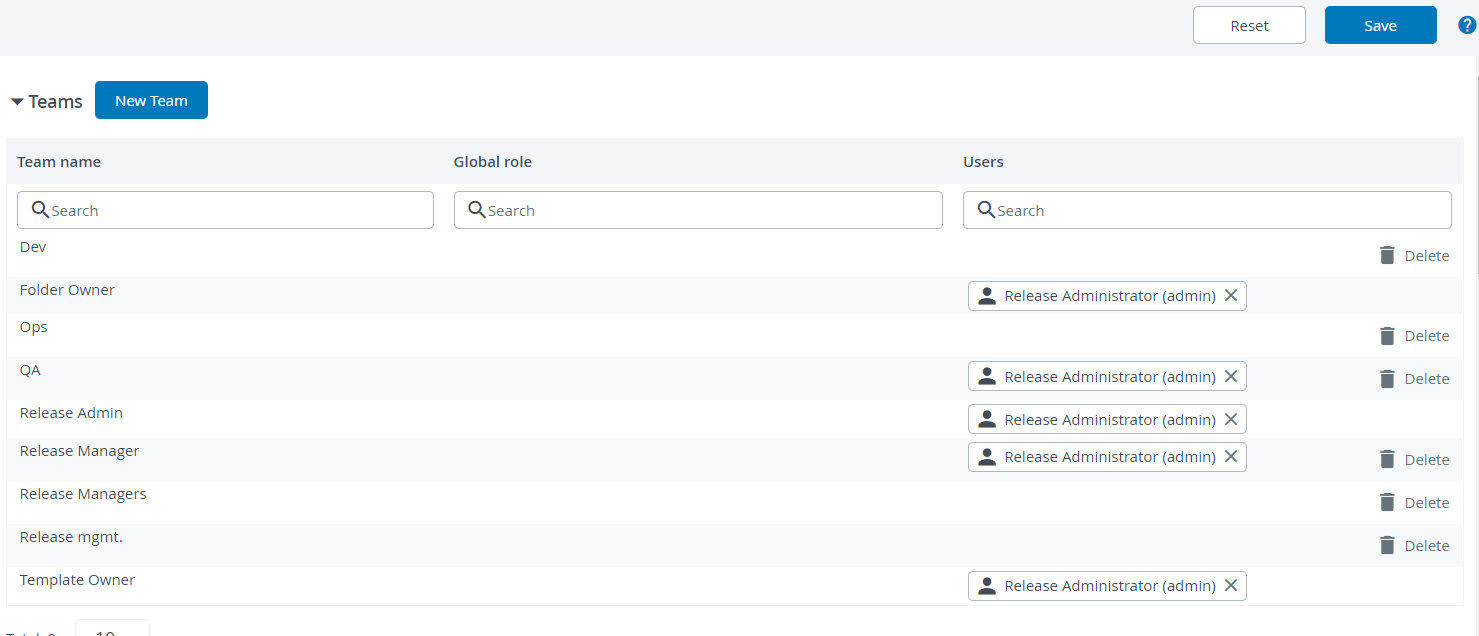
Perform the following steps to create a new team in Release:
- Log in to Release.
- In the left navigation pane, click Folders.
- Click the relevant folder for which you want to create a team.
- In the left navigation pane, click Teams & permissions.
- Click New team. The Create a new team dialog opens.
- Enter a name and click Create.
- Add roles and users by typing in the Global role and Users column respectively. For more information, see how to configure roles and configure users.
- Click Save.
System-defined Teams
System-defined teams are similar to regular teams but have certain permissions assigned to them by default. You can add, remove, and assign users and permissions to system-defined teams just like you would with regular teams. However, you should be careful when modifying the permissions of system-defined teams as it could affect the overall functionality of the system.

The following are the system-defined teams that are created by default in Release, and cannot be removed.
| Team | Description | Default permissions |
|---|---|---|
| Folder Owner | Users who manage folders, subfolders, and folder security. | All folder permissions |
| Release Admin | Users who are responsible for executing the release. Members of this team receive extra notifications. For example, when a task fails and the release is stopped. | All release permissions |
| Template Owner | Users who design templates. | All template permissions |
Revoking some of the permissions from the system-defined teams is not recommended as it may result in unpredictable behavior.
Template Permissions
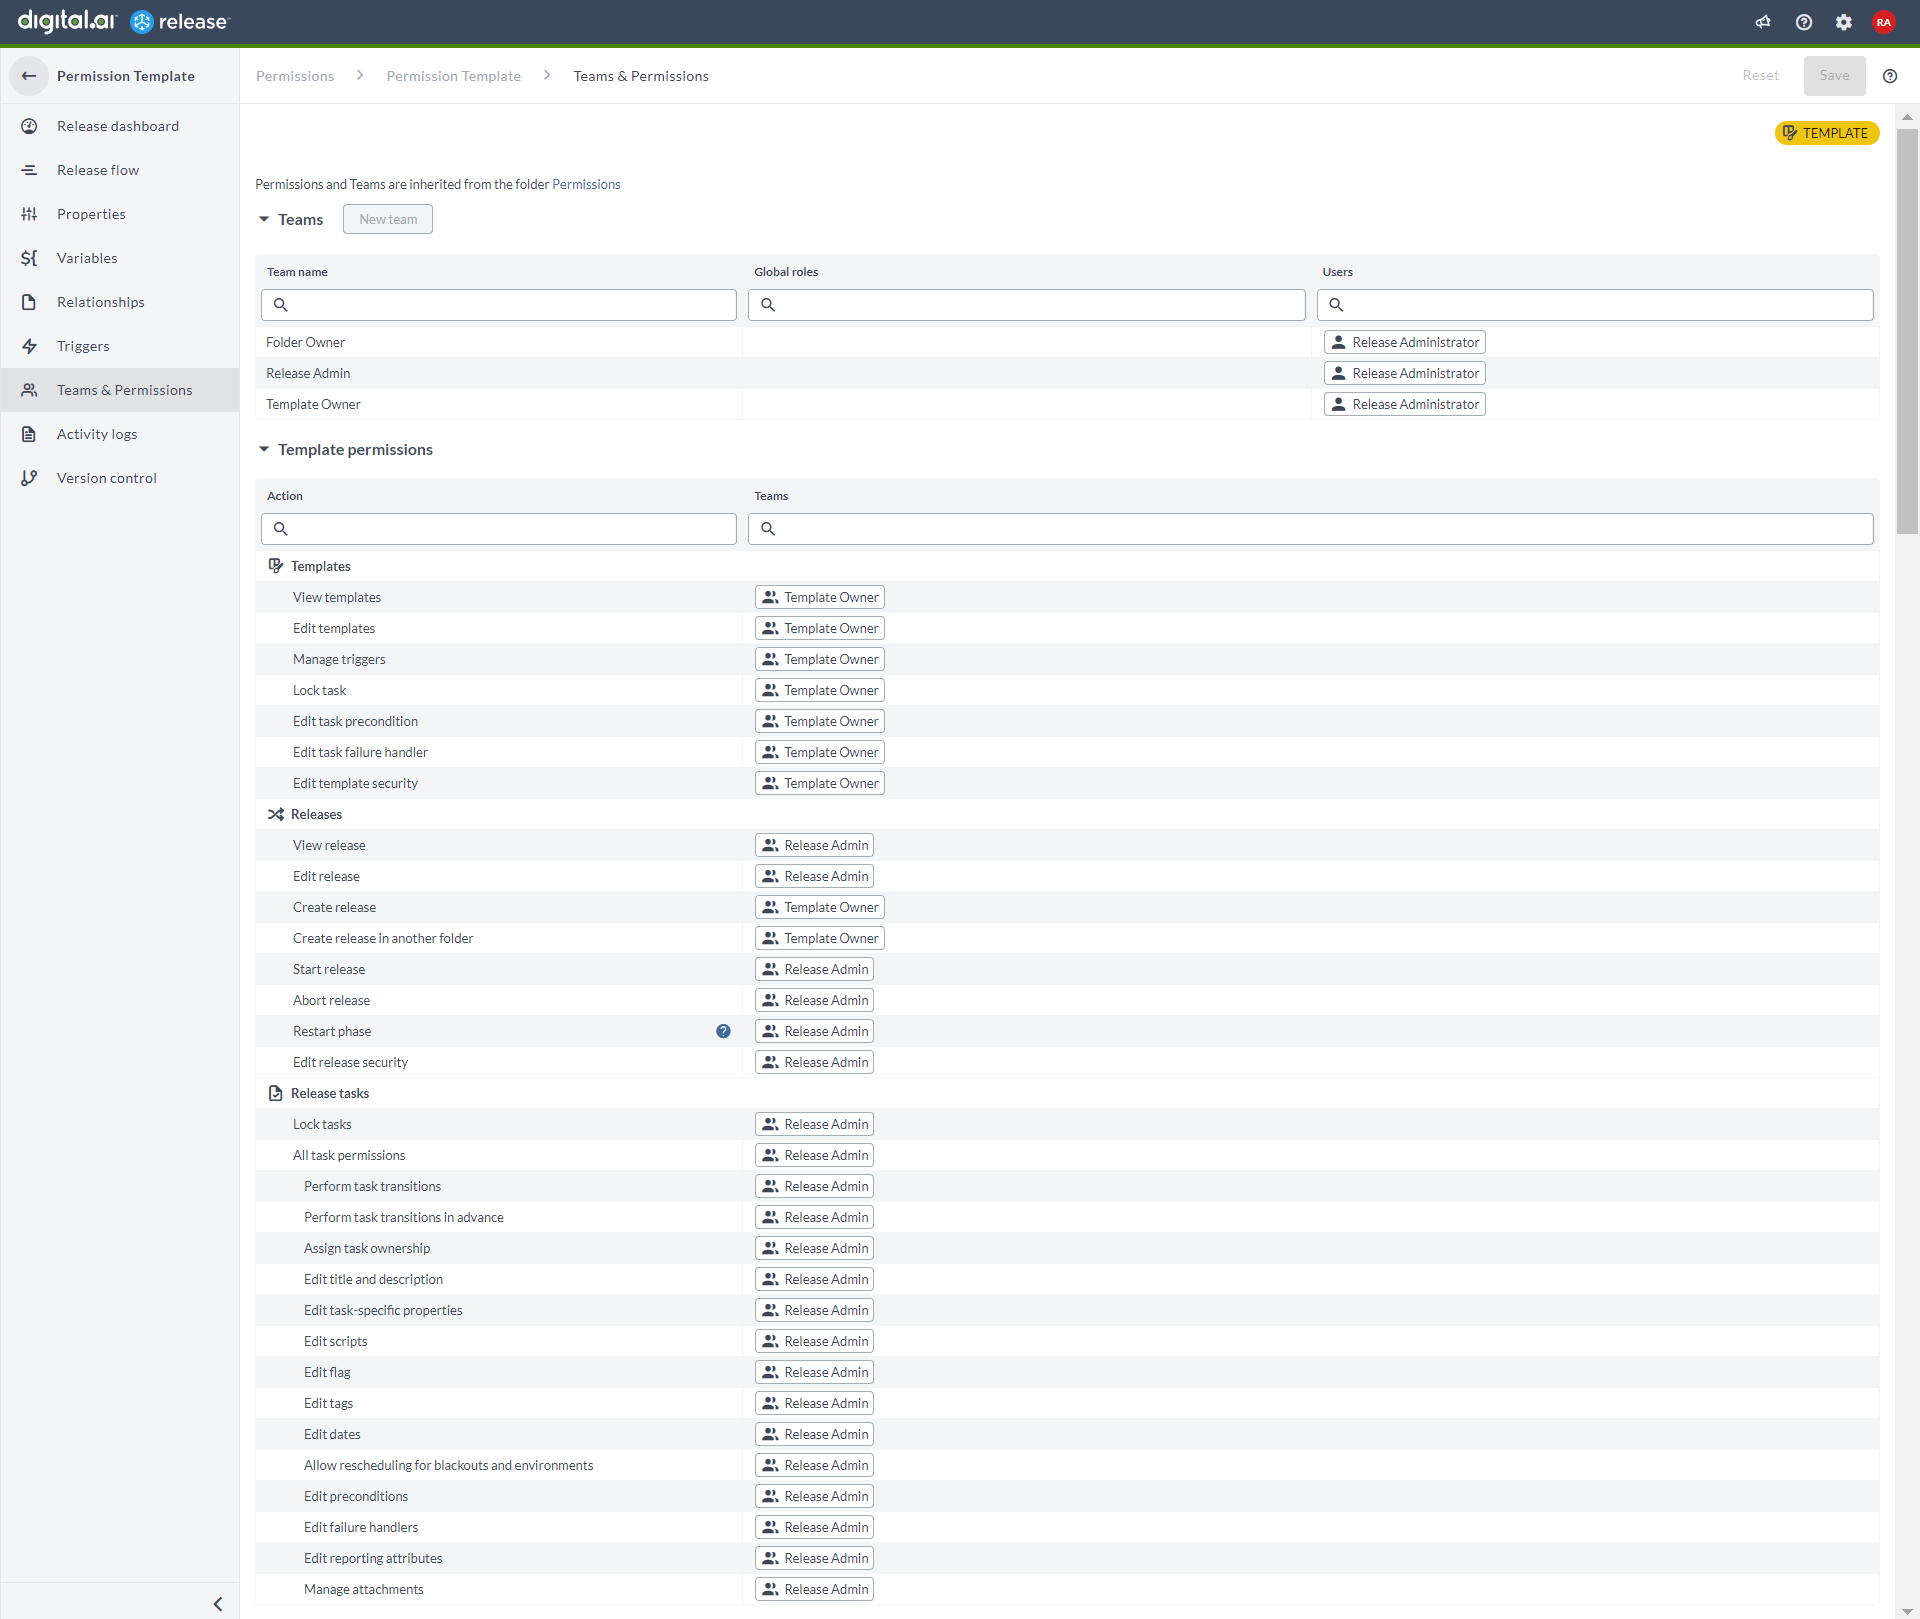
In Release, the following permissions are required for templates and releases that are not stored in a folder:
- The Edit templates permission.
- The Edit release permission, on a specific template or release.
- The Edit security permission.
If a template does not have a folder, permissions can be set in the Teams & Permissions screen in the Show menu. Note that, the Teams & Permissions option which was previously located in the Show menu of the Release Flow Editor is now moved to the left navigation bar when you select a Template. This change in location allows for a more user-friendly navigation, making it easier to find and access the permissions settings for a specific template.
Template View

To avoid confusion while managing permissions, it is generally considered a best practice to move all templates into folders. This allows you to set specific teams and permissions for each folder, which will then be inherited by all templates within that folder. This makes it easier to manage access to different templates and ensure that only the appropriate users have access to them. By moving all templates into folders, you can ensure that your permissions are organized and easy to understand, making it simpler to manage and maintain access to your templates. For more information, see Migrating templates to folders.
Important: Starting from Release 9.6, the global Manage triggers permission has been removed. This means that any existing global triggers will now inherit the global Create template permission. As a result, users will no longer be able to use triggers for any template that is not located in a folder. If you are upgrading with root-level templates that have trigger permissions, it is recommended to migrate those triggers into folders. This will ensure that the triggers continue to work correctly after the upgrade.
The following permissions apply to templates:
Templates
| Permission | Description |
|---|---|
View templates (template#view) | Can see templates organized by folder in the Folders screen and listed together in the Templates screen. |
Edit templates (template#edit) | Change the template by adding and editing tasks and phases. |
Manage triggers (template#edit_triggers) | Edit the triggers related to that specific template from which the releases are created. |
Lock task (template#lock_task) | When a template task is locked only users with lock permissions are able to edit or unlock it. A locked task appears striped to indicate that it is locked. For more information, see Configuring lock tasks. |
Edit task precondition (template#edit_precondition) | Edit the task's precondition in a template. |
Edit task failure handler (template#edit_failure_handler) | Edit the task failure handler on a task in a template. |
Edit template security (template#edit_security) | Edit teams and permissions templates that are not in a folder. |
Release Permissions
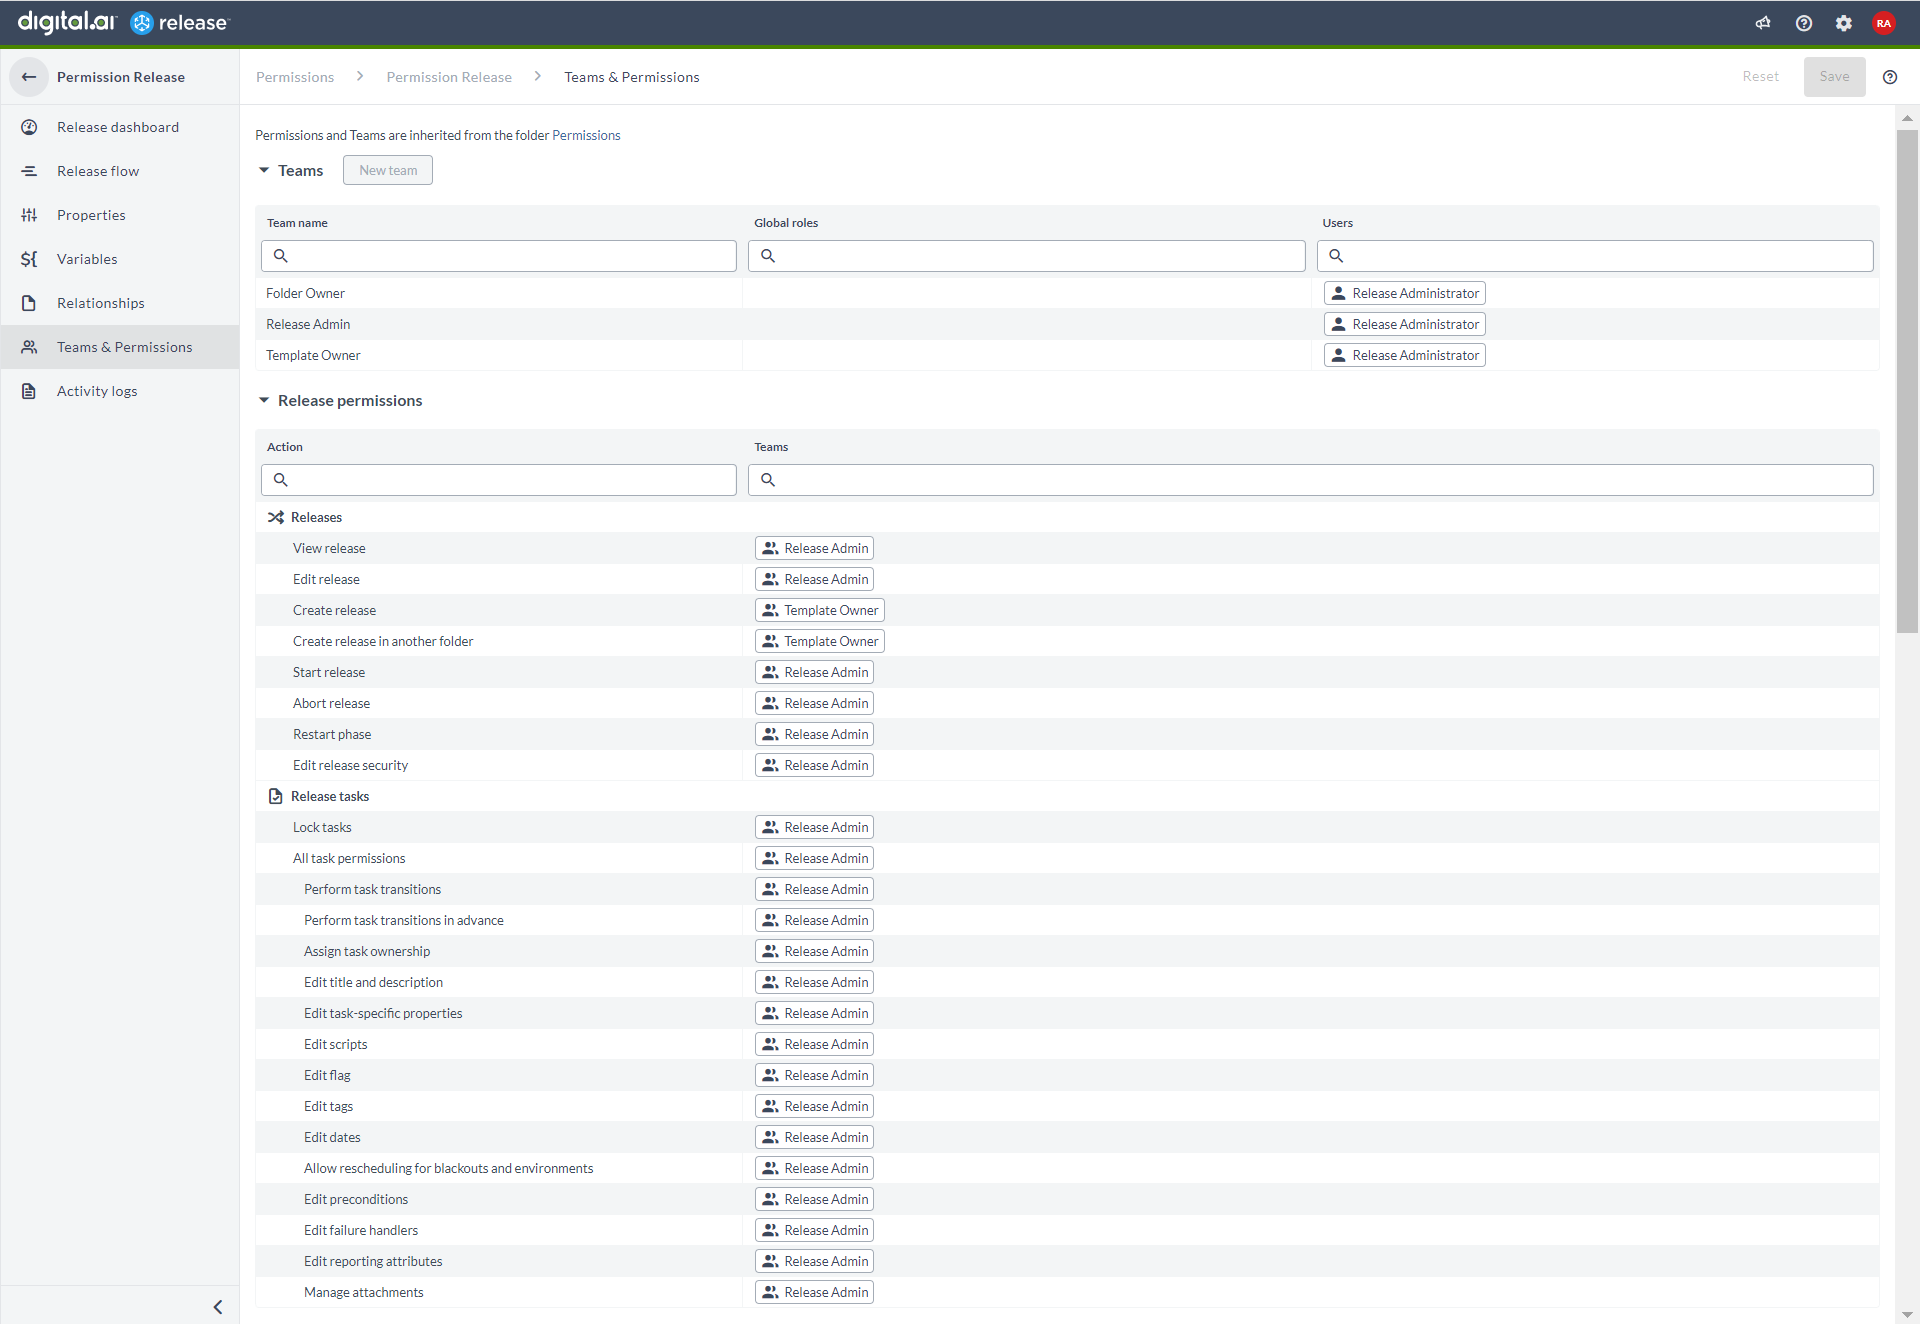
If a release does not have a folder, permissions can be set in the Teams & Permissions screen in the Show menu. Note that, the Teams & Permissions option which was previously located in the Show menu of the Release Flow Editor is now moved to the left navigation bar when you select a Release. This change in location allows for a more user-friendly navigation, making it easier to find and access the permissions settings for a specific release.
Release View

The following permissions apply to releases:
Releases
| Permission | Description |
|---|---|
View release (release#view) | View all releases in this folder and any releases that do not have a folder. |
Edit release (release#edit) | Edit the release by adding and moving tasks and phases. Edit release properties and variables. |
Create release (release#create) | Create a release from a template. |
Create release in another folder (template#create_release_other_folder) | Create a release from a template in other folder. |
Start release (release#start) | Start a planned release. |
Abort release (release#abort) | Abort an active or planned release. |
Restart phase (release#restart_phase) | Restart a phase in a running release and resume the release (in-progress release). |
Edit release security (release#edit_security) | Edit teams and permissions in a release (if the release hasn't already started in a folder). |
Release tasks
| Permission | Description |
|---|---|
Lock tasks (release#lock_task) | Lock tasks to prevent users without lock permissions from editing them. |
| All task permissions | Inherits all release task permissions that follow in this section (not including the lock task permission). |
Perform task transitions (release#task_transition) | Can change the state of a task including Complete, Skip, Fail, Retry, Abort, and Reopen. |
Perform task transitions in advance (release#advance_task_transition) | Can change the state of a task in advance, such as Complete or Skip for tasks assigned to current user. |
| Assign task ownership | Assign tasks to another user or team. If the user has task ownership, this permission is given by default. |
Edit title and description (release#edit_task_description) | Edit task title and description. |
Edit task-specific properties (release#edit_task_input_output_properties) | Edit configuration data that is specific for the task type. |
Edit scripts (release#edit_task_script) | Edit Jython, Groovy or External script task types. |
Edit flag (release#edit_task_flag) | Change the alert status and description for tasks. |
Edit tags (release#edit_task_tags) | Add or remove tags on tasks in a release. |
Edit dates (release#edit_task_dates) | Change start date, end date and duration for a task. |
Allow rescheduling for blackouts and environments (release#edit_blackout) | Enable or disable the Postpone during blackout period setting at the task level. |
Edit preconditions (release#edit_precondition) | Edit preconditions on tasks in a release. |
Edit failure handlers (release#edit_failure_handler) | Edit failure handlers on tasks in a release. |
| Edit reporting attributes | Edit reporting attributes on tasks in a release. |
Manage attachments (release#edit_task_attachments) | Add or remove attachments from tasks in a release. |
Note: In versions of Release prior to 22.1, a Release Owner had the ability to complete, skip, or abort a task without the Perform task transitions or Edit tasks permissions. However, starting from Release 22.1, this behavior has been changed and Release Owners can no longer perform task transitions without the required permissions. To allow Release Owners to perform task transitions, you will need to set the
xl.features.release-owner.task-transition.allowed = truein thexl-release.conffile. By default, the value is set tofalse, so you will need to explicitly enable this feature in order for Release Owners to perform task transitions. This change in behavior is implemented for better security and control over the release process, ensuring that only authorized users can perform task transitions.