User Settings
This topic explains user management in Digital.ai Release, including how users are identified and authenticated through valid credentials.
Who are users?
Users are individuals, who must have valid credentials to log into Release. Username acts as a unique identifier for the user.
Release’s user management functionality enables you to manage users, roles, and permissions. Additionally, it provides a role-based security system for the users to perform a variety of operations over the Release application.
Types
- Internal: Users are managed and controlled by Release Administrators.
- External: Users are managed in an external system (LDAP repository) such as Active Directory.
Tip: Only after you configure LDAP security, external users are stored in Release and can log in to the application.
You can assign Internal users, External users, and External user groups to global roles. For more information, see Configure roles.
Important: The Users page in Users and permissions settings is visible only to users with Admin or Edit Security global permissions.
Users page
Select Settings > Users and permissions to view the Users page. By default, the Users page is displayed.

Create internal users
Perform the following steps to create an internal user:
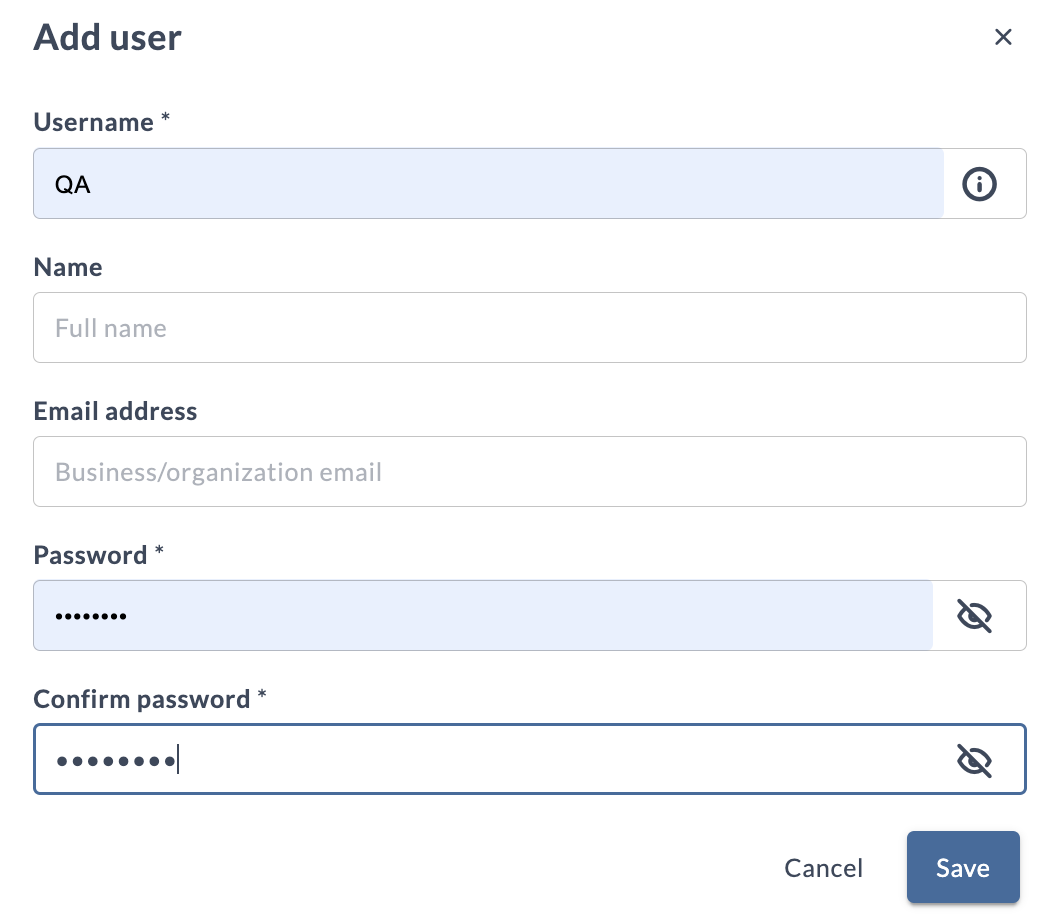
- Click New user.
The User dialog appears.

- In the Username field, enter a unique name for the user.
Note: Different users cannot have the same username. This needs to be a unique identifier of the user and is used for login.
- In the Name field, enter the user's full name. This name is used for search and filter criteria for assigning roles and so on.
- In the Email field, enter the email address of the user.
- In the Set password field, enter a password for the user.
Note: The password must meet the password strength requirements.
- In the Confirm password field, enter the same password you entered in the Set password field.
- Click Save.
In the Users page, now you see the new user is created and displayed in the table. When multiple users are created, they are displayed in separate rows in the table.
Change internal user properties
Perform the following steps to change internal user properties:
- In the Users page, click the relevant user’s row in the table that you want to change. The User dialog opens.
- Change the required details.
Note: The Username field cannot be modified.
- Click Save.
Important: If you are logged in with Admin or Edit Security permission, then an additional field called Previous Password is displayed. You can use this field to reset your old password when you have Admin or Edit Security permission. Meanwhile, for users with other permissions this field will not be displayed.
External users
You cannot change the properties of external users from the Release interface because they are maintained in LDAP.
To change password strength requirements, see Password strength requirements.
Disable users
You can disable a user by clearing the Enabled checkbox from the relevant user row in the table. Disabled users cannot log in to Release.
Delete users
Perform the following steps to delete a user:
- In the Users page, click the Delete button in the relevant table row.
The Delete User dialog appears.

- Click Delete.
Filter users
You can use the Filter search box to filter your users. This filtering becomes very helpful when you have multiple number of users.