Feature Settings
The Feature Settings page allows you to toggle or configure the optional features in Digital.ai Release.
To configure the feature settings, from the navigation bar, click Settings > System Settings, and then click Feature flags tab.
The Feature flags page is only available to users who have the Admin global permission.
To configure the feature settings, from the navigation bar, click Settings > System Settings, and then click the Feature flags from the left pane. The Feature flags page is only available to Admin users only. For more information, see global permission.
The Feature flags page has Stable and Incubating tabs.
Note: The features in the Incubating tab are in Technical Preview.
Stable Tab Settings
Product Analytics and Guidance Feature
This feature delivers in-app walkthroughs, guidance and release notes in Release using the Pendo.io platform. Anonymous usage analytics are collected in order to improve the customer experience and business value delivery.
See Pendo analytics and guidance for more information.
- You can enable or disable the Product Analytics and Guidance feature from the Product analytics and guidance group by selecting or clearing the Analytics and guidance check box.
- Product analytics and guidance is enabled by default.
- By default, the feature is active for all users in the Release instance.
- select the Allow users to opt-out check box to let individual users opt out of sharing usage analytics (via the User profile page).
GitOps-enabled Version Control
GitOps-enabled version control allows you to store folder content like templates, variables and configuration as YAML code in Git and enables a GitOps style workflow to author, review and promote content between Release environments.

External ID for User Profile
You can use the External ID field to add additional details for the external users as per your requirement. For example Employee id or GitHub id.
To add this Feature to the User Profile,
- Select the checkbox for Show External ID.
- In the Label field, enter the label for external Id.
- Click Save.

Enable or Disable Task Drawer for Tasks—Users With Administrator Permissions
-
Log in to Digital.ai Release.
-
On the top-right corner, click Settings > System settings.
The System settings screen appears.
-
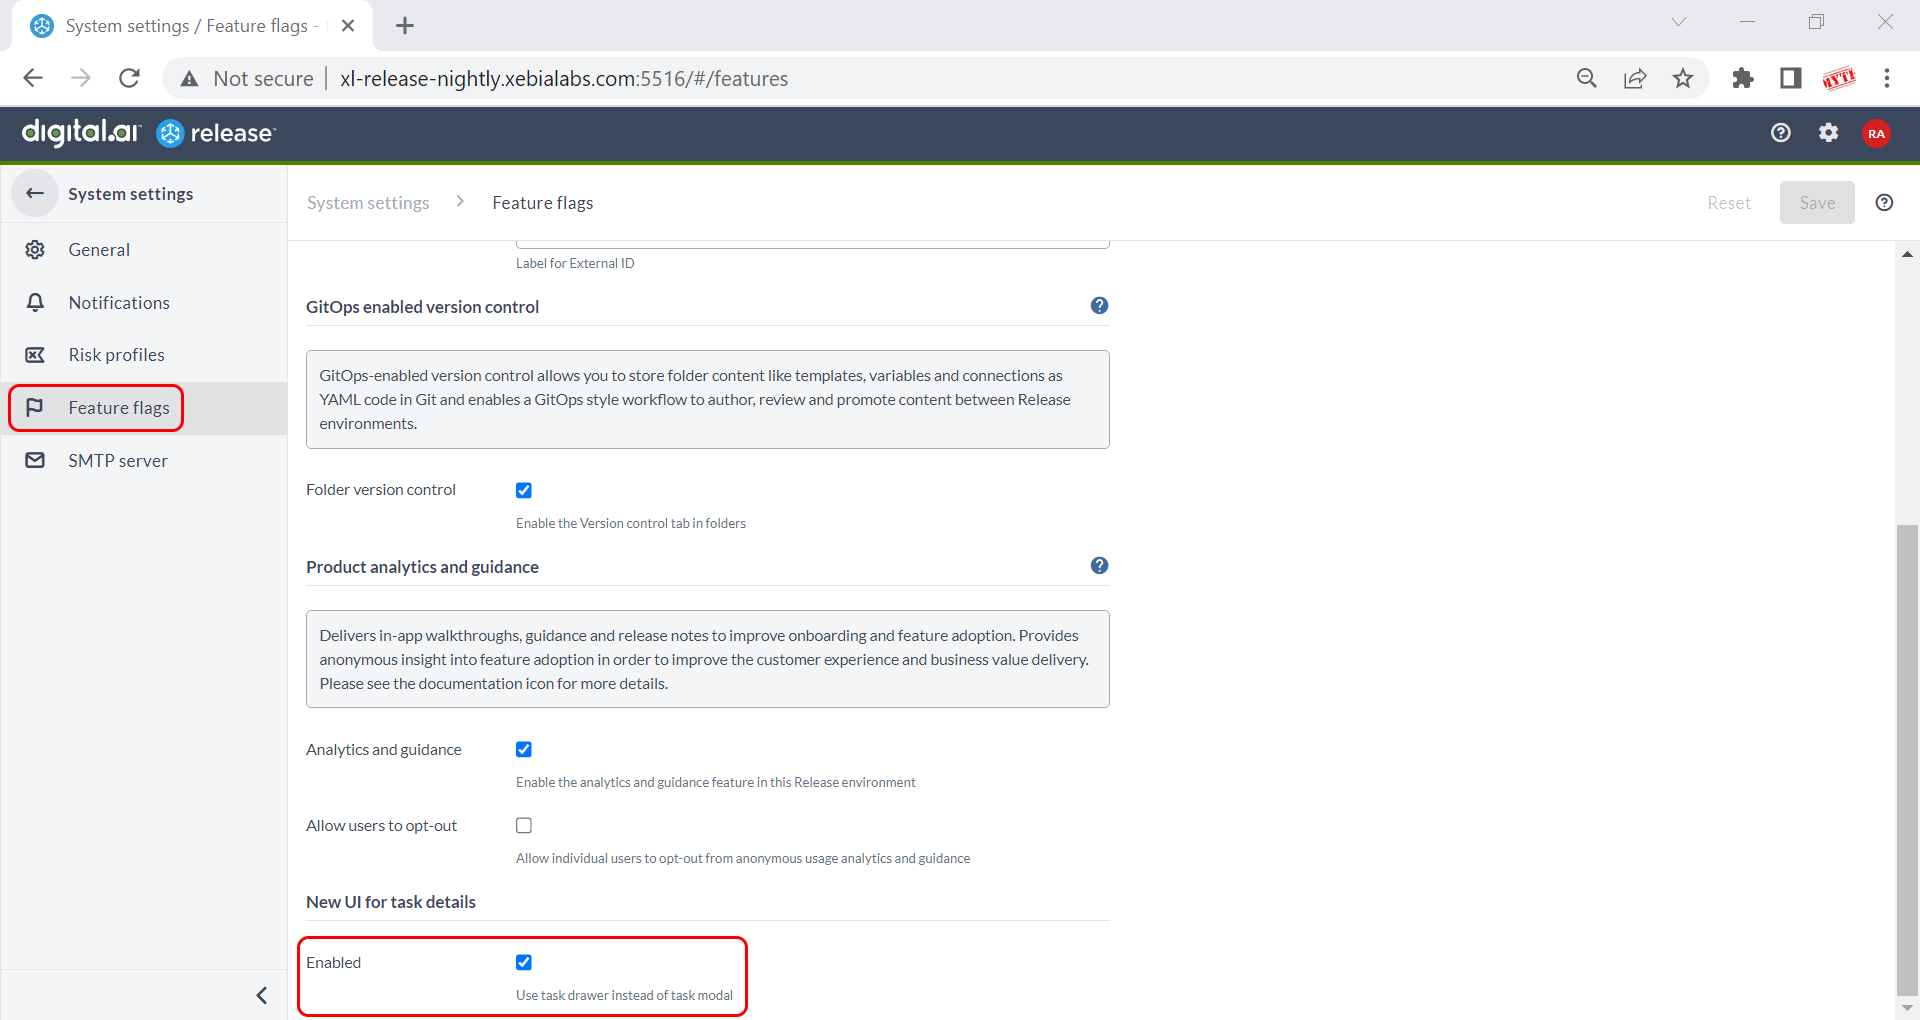
Click Feature flags from the left-navigation bar.
-
Select the Stable tab.
In the Task details (redesigned UI) section, the Use new Task details version check box is selected by default. This means the new Task Drawer for tasks is enabled by default.
Note: If you want to use the Task Modal for tasks instead of the new Task Drawer, clear the Use new Task details version check box and click Save.
Enable or Disable Task Drawer for Tasks—Opt Out of Task Drawer
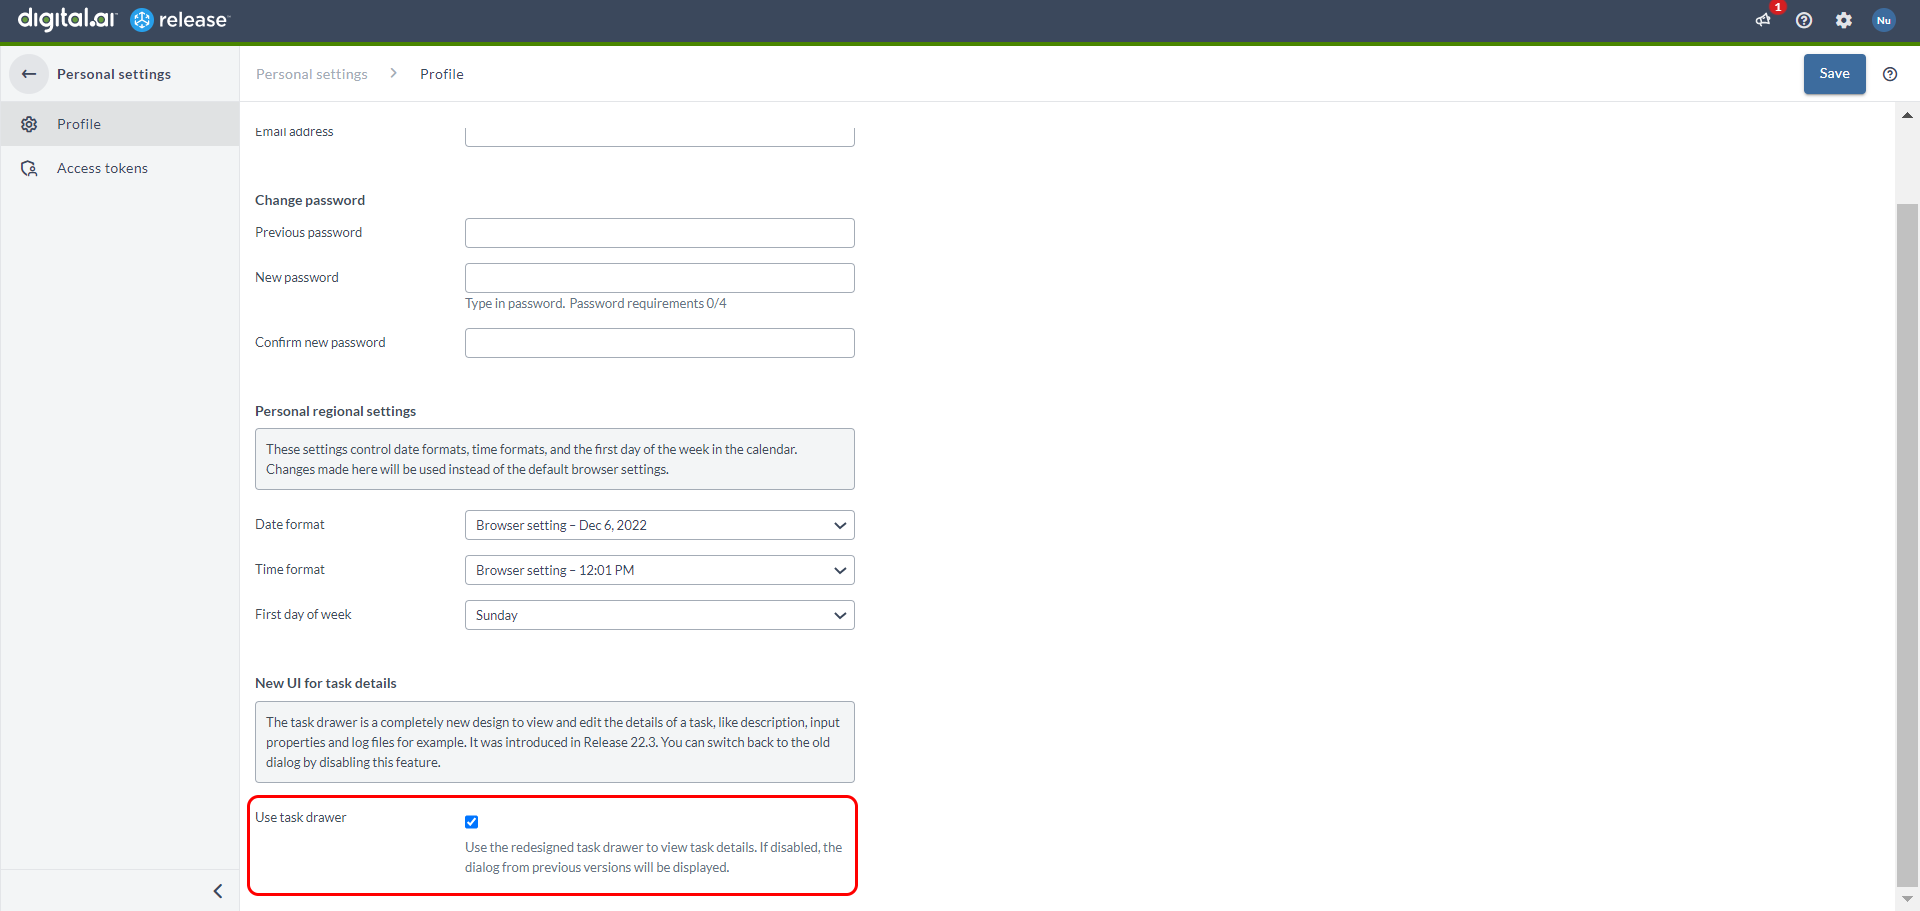
Digital.ai Release 23.1 and later allows non-admin users to enable or disable the Task Drawer feature. This is possible if and only if your Administrator has enabled the new Task Drawer and you want to opt out of it in favor of the Task Modal.
-
Log in to Digital.ai Release.
-
In the Profile page, under the New UI for task details section, clear the Use task drawer check box to opt out from the Task drawer and use the Task modal instead.
Limit Folder Depth in Release
A nested folder structure with more than five or six levels becomes cumbersome to deal with and can adversely impact the performance and lead to the following issues:
- General slowness
- High CPU usage
- CLI tasks become unreliable
- Create release task is not usable
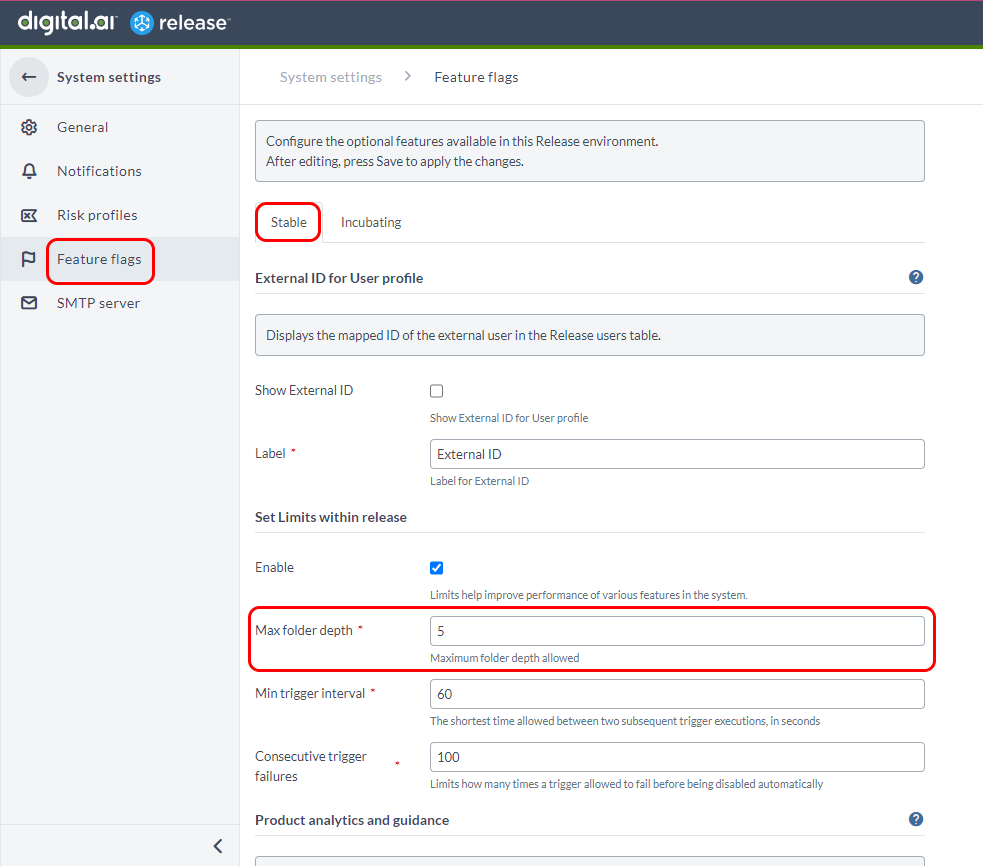
Configure the folder depth in Release via Settings > System Settings > Feature Flags > Set Limits within release section:
- Select the Enable checkbox to enable this feature and limit the folder depth based on the value set in the Max folder depth field.
- Set the folder depth value in the Max folder depth field.
Note: The default folder depth is set to
5. However, admin users can increase the folder depth to more than5based on the requirements.
Limit Minimal Trigger Polling Interval
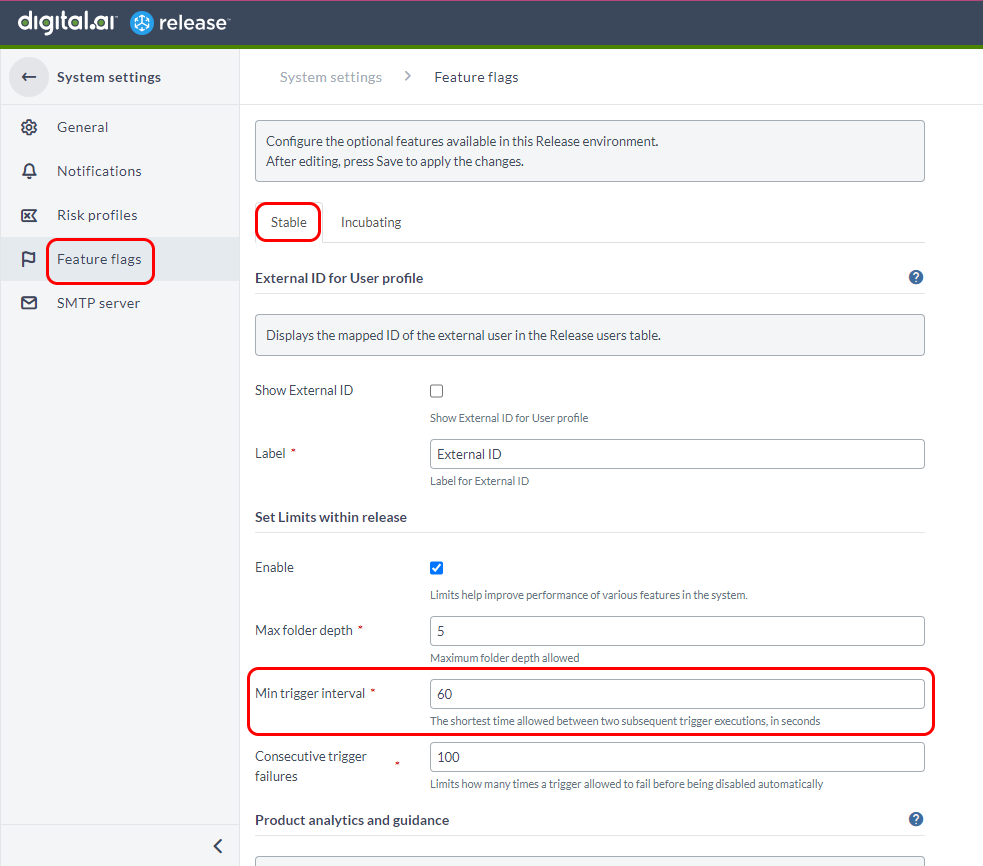
Currently, the minimum polling interval for triggers is 1 second. This causes increased load in Release and other third-party systems. To overcome this performance issue, the minimum polling interval for triggers is changed to 60 seconds.
Configure the minimum polling interval in Release via Settings > System Settings > Feature Flags > Set Limits within release section:
- Set the minimum polling interval value in the Min trigger interval field.
Enhancements to Triggers
You have the option to set the maximum number of trigger failures that can occur before a trigger is disabled. To configure this value, navigate to Settings > System settings > Feature Flags. In the Set Limits within release section, you can enter a value or select an option from the drop-down menu for the Consecutive trigger failures field.
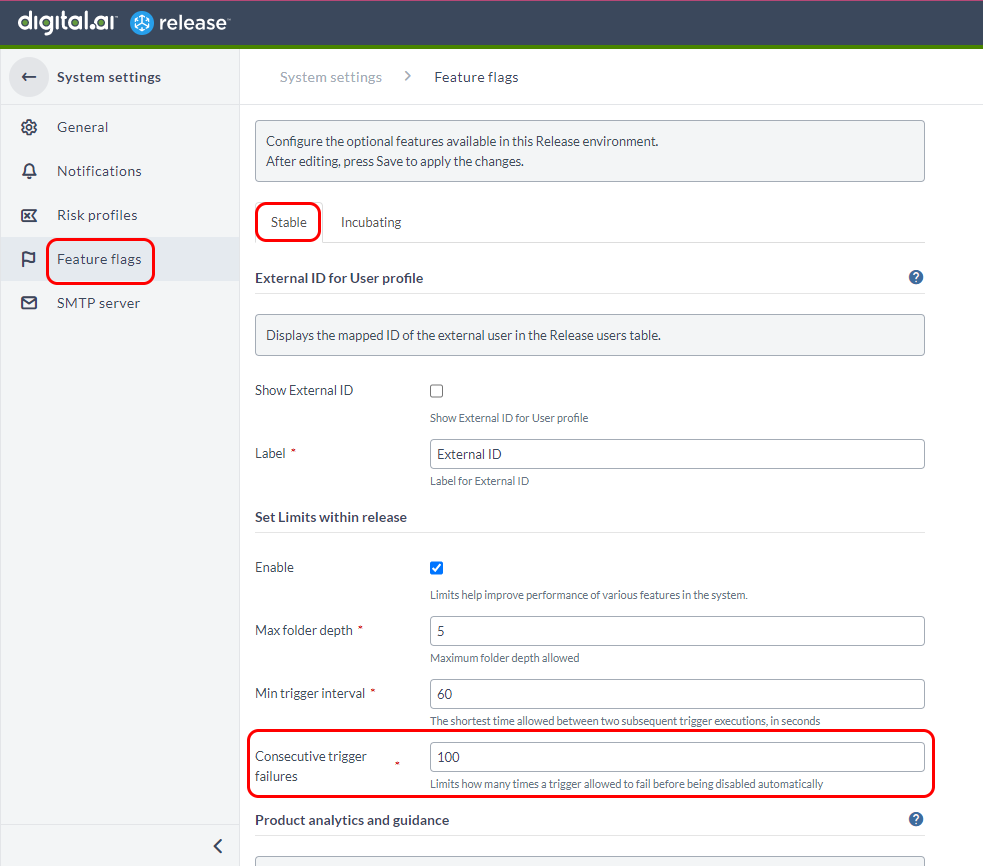
Furthermore, when a trigger is disabled, a notification is sent to the System Administrator.
Incubating Tab Settings
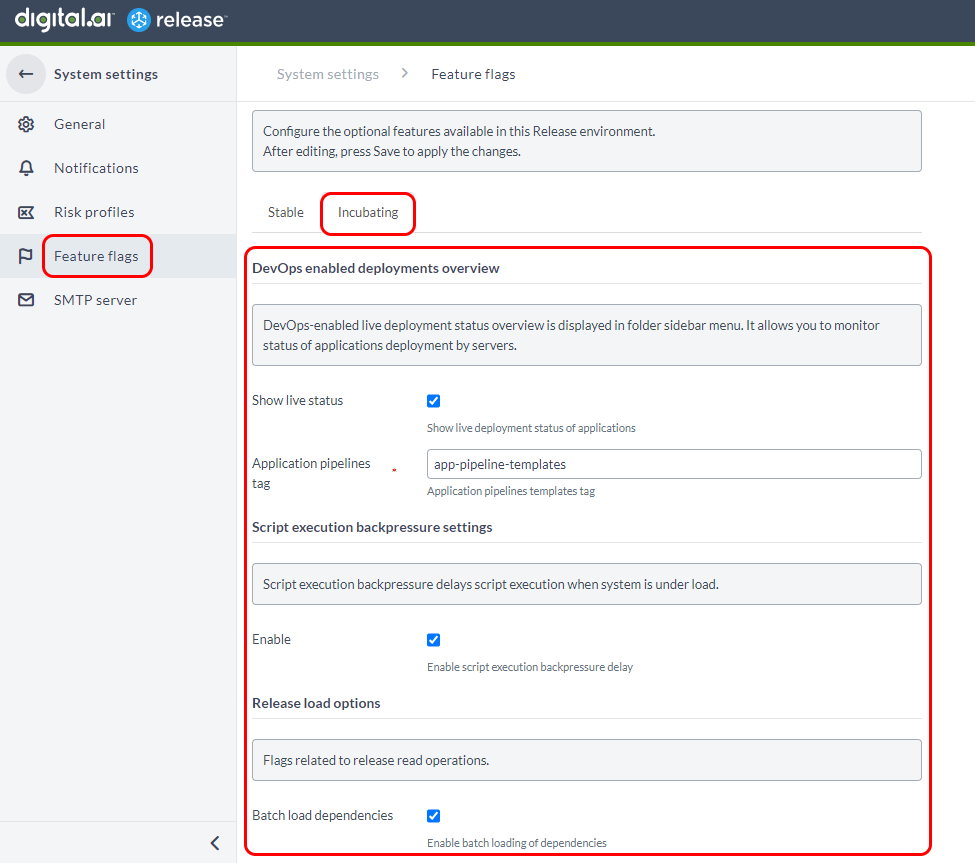
Go to Settings > System settings > Feature flags > Incubating.
Script Execution Backpressure Settings
Note: Prior to Digital.ai Release 23.1, the Script execution backpressure configuration cannot be turned off. By default, this configuration is enabled.
You can turn the Script execution backpressure setting on or off to delay the execution of scripts in case the Release server is overloaded.
Select the Enable check box to turn this feature on.
Release Load Options
- Unlike Release 22.3 and earlier with which task dependencies were loaded one-by-one, you can now batch-load task dependencies with Release 23.1 and later.
- To optimize the number of select statements that are processed, you can batch-load task dependencies along with the Release.
- This means that the dependencies can be loaded simultaneously with the Release, resulting in more efficient processing.
- Enable this feature by selecting the Batch load dependencies check box.
- This setting is enabled by default.
Monitor Status of Deployment Applications
- Log in to Digital.ai Release.
- Click Settings > System settings. The System settings screen appears.
- In the left-navigation bar, click Feature flags.
- Select the Incubating tab.
- In the DevOps enabled deployments overview section, clear the Show live status checkbox. This disables the Application deployments dashboard.
- In the Application pipelines tag field, Application pipelines templates tag is available by default. Keep this handy, to use it in the tags field of your Release.
- Click Save.