GitOps in Deploy
GitOps in Deploy supports bidirectional exchange of infrastructure and environment CIs with a Git repository using YAML files. It enables Infrastructure-as-Code workflows by allowing you to export CIs from Deploy to Git for versioning and review, and to import CIs from Git into Deploy to create or update them. Import and export are performed through a control task.
The following Git providers are supported: GitHub, GitLab, Azure DevOps, and Bitbucket. Currently, only HTTPS repository URLs are supported.
With GitOps in Deploy, you can:
- Define and maintain infrastructure and environment CIs as YAML files (compatible with
xl apply) - Store infrastructure and environment CIs as YAML in Git repositories for version control, review, and auditing
- Import infrastructure and environment CIs from Git into Deploy to create or update them
- Export infrastructure and environment CIs from Deploy to YAML files in Git
Supported Configuration Item Types
The following CI types are supported:
- Infrastructure: Host and container definitions
- Environments: Environment structures
For details on the YAML structure for these types, see Work with the YAML format for Deploy.
:::note Limitation Dictionaries and encrypted dictionaries for Environment values and secret/key fields are not supported for GitOps import/export. :::
Prerequisites
Before configuring GitOps in Deploy, ensure the following prerequisites are met:
-
A Git repository that contains the YAML files you want to import/export, stored under a folder that you will reference in the GitOps configuration.
-
Any CI that needs to be exported or imported through Git must be grouped under a folder in Deploy. For example, infrastructure CIs should be under a folder like
Infrastructure/devand environment CIs underEnvironments/dev. -
YAML file names are determined by the
kindthey represent:infrastructure.yaml- used for CIs withkind: Infrastructureenvironments.yaml- used for CIs withkind: Environments
During export, Deploy generates the appropriately named file based on the kind. During import, Deploy reads the matching file for each kind.
-
Git credentials with access to the repository and a classic personal access token (PAT) generated from your Git provider. Fine-grained tokens are not supported.
For most workflows, keep both infrastructure and environment configuration in the same repository and directory to ensure they stay aligned.
Step 1: Create a Git Source CI
A Git Source (git.GitSource) is a CI that defines how Deploy connects to a specific Git repository.
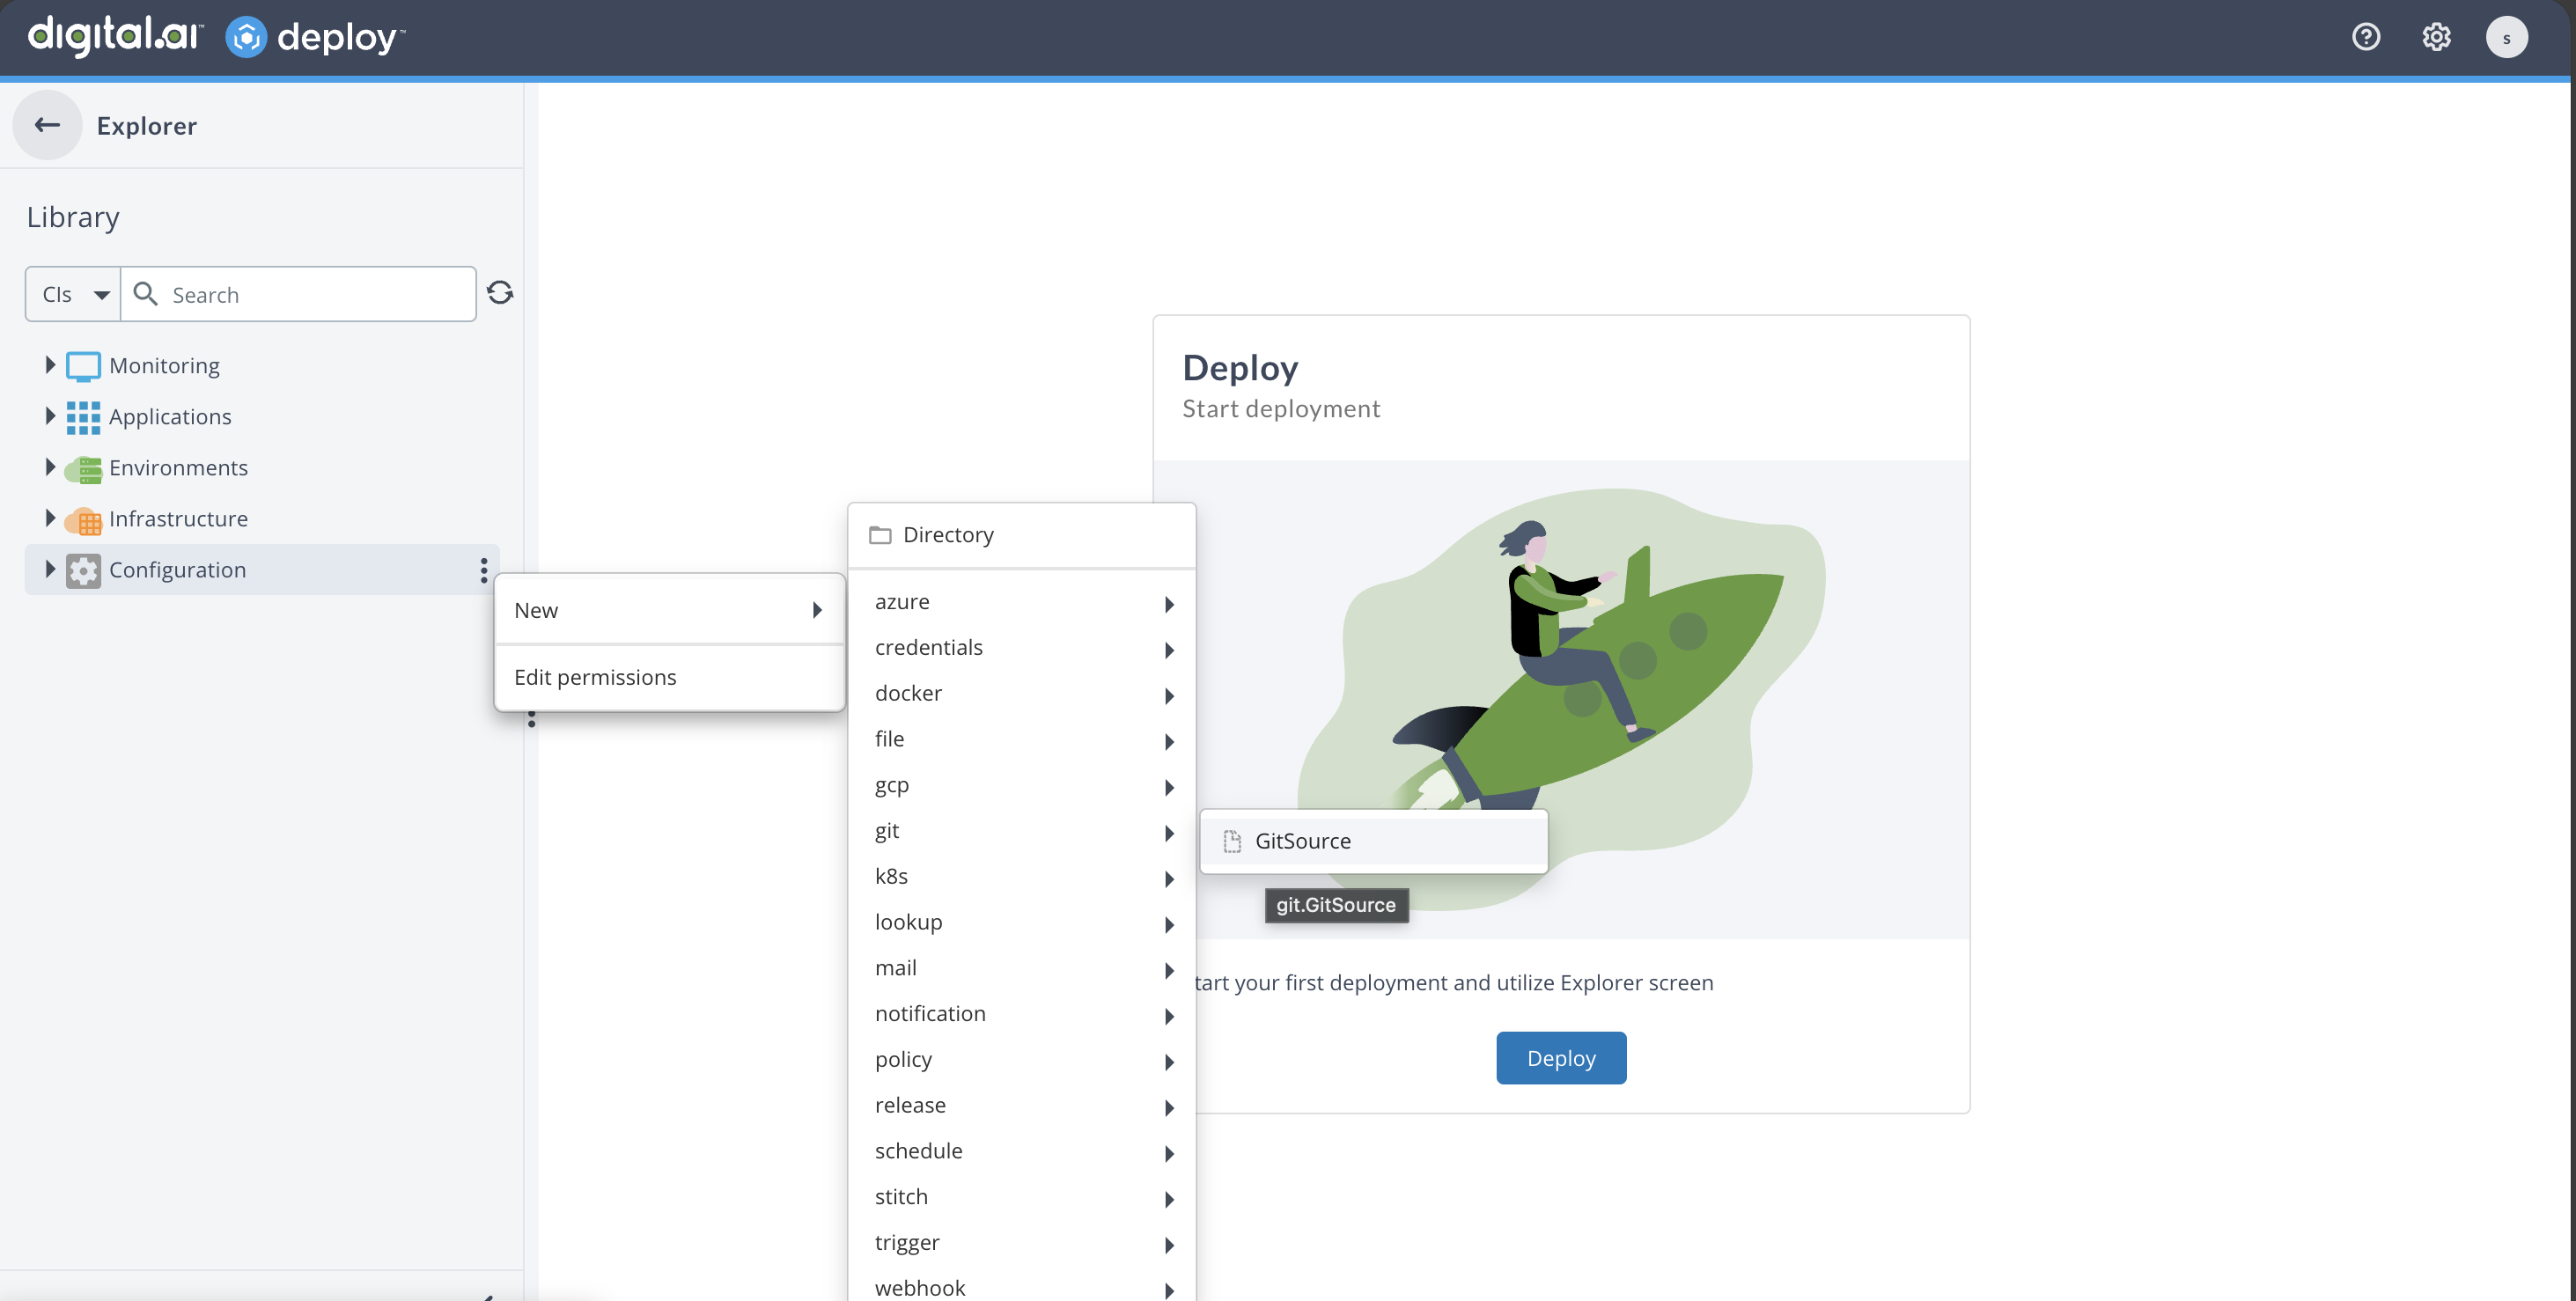
- In Deploy, go to Configuration.
- Create a new CI of type
git.GitSource. - Provide the following details:
- Name: A name for this Git Source CI
- URL: The Git repository URL. Currently, only HTTPS is supported
- Username: The Git account username
- Password: A classic personal access token (PAT) generated from your Git provider. Fine-grained tokens are not supported
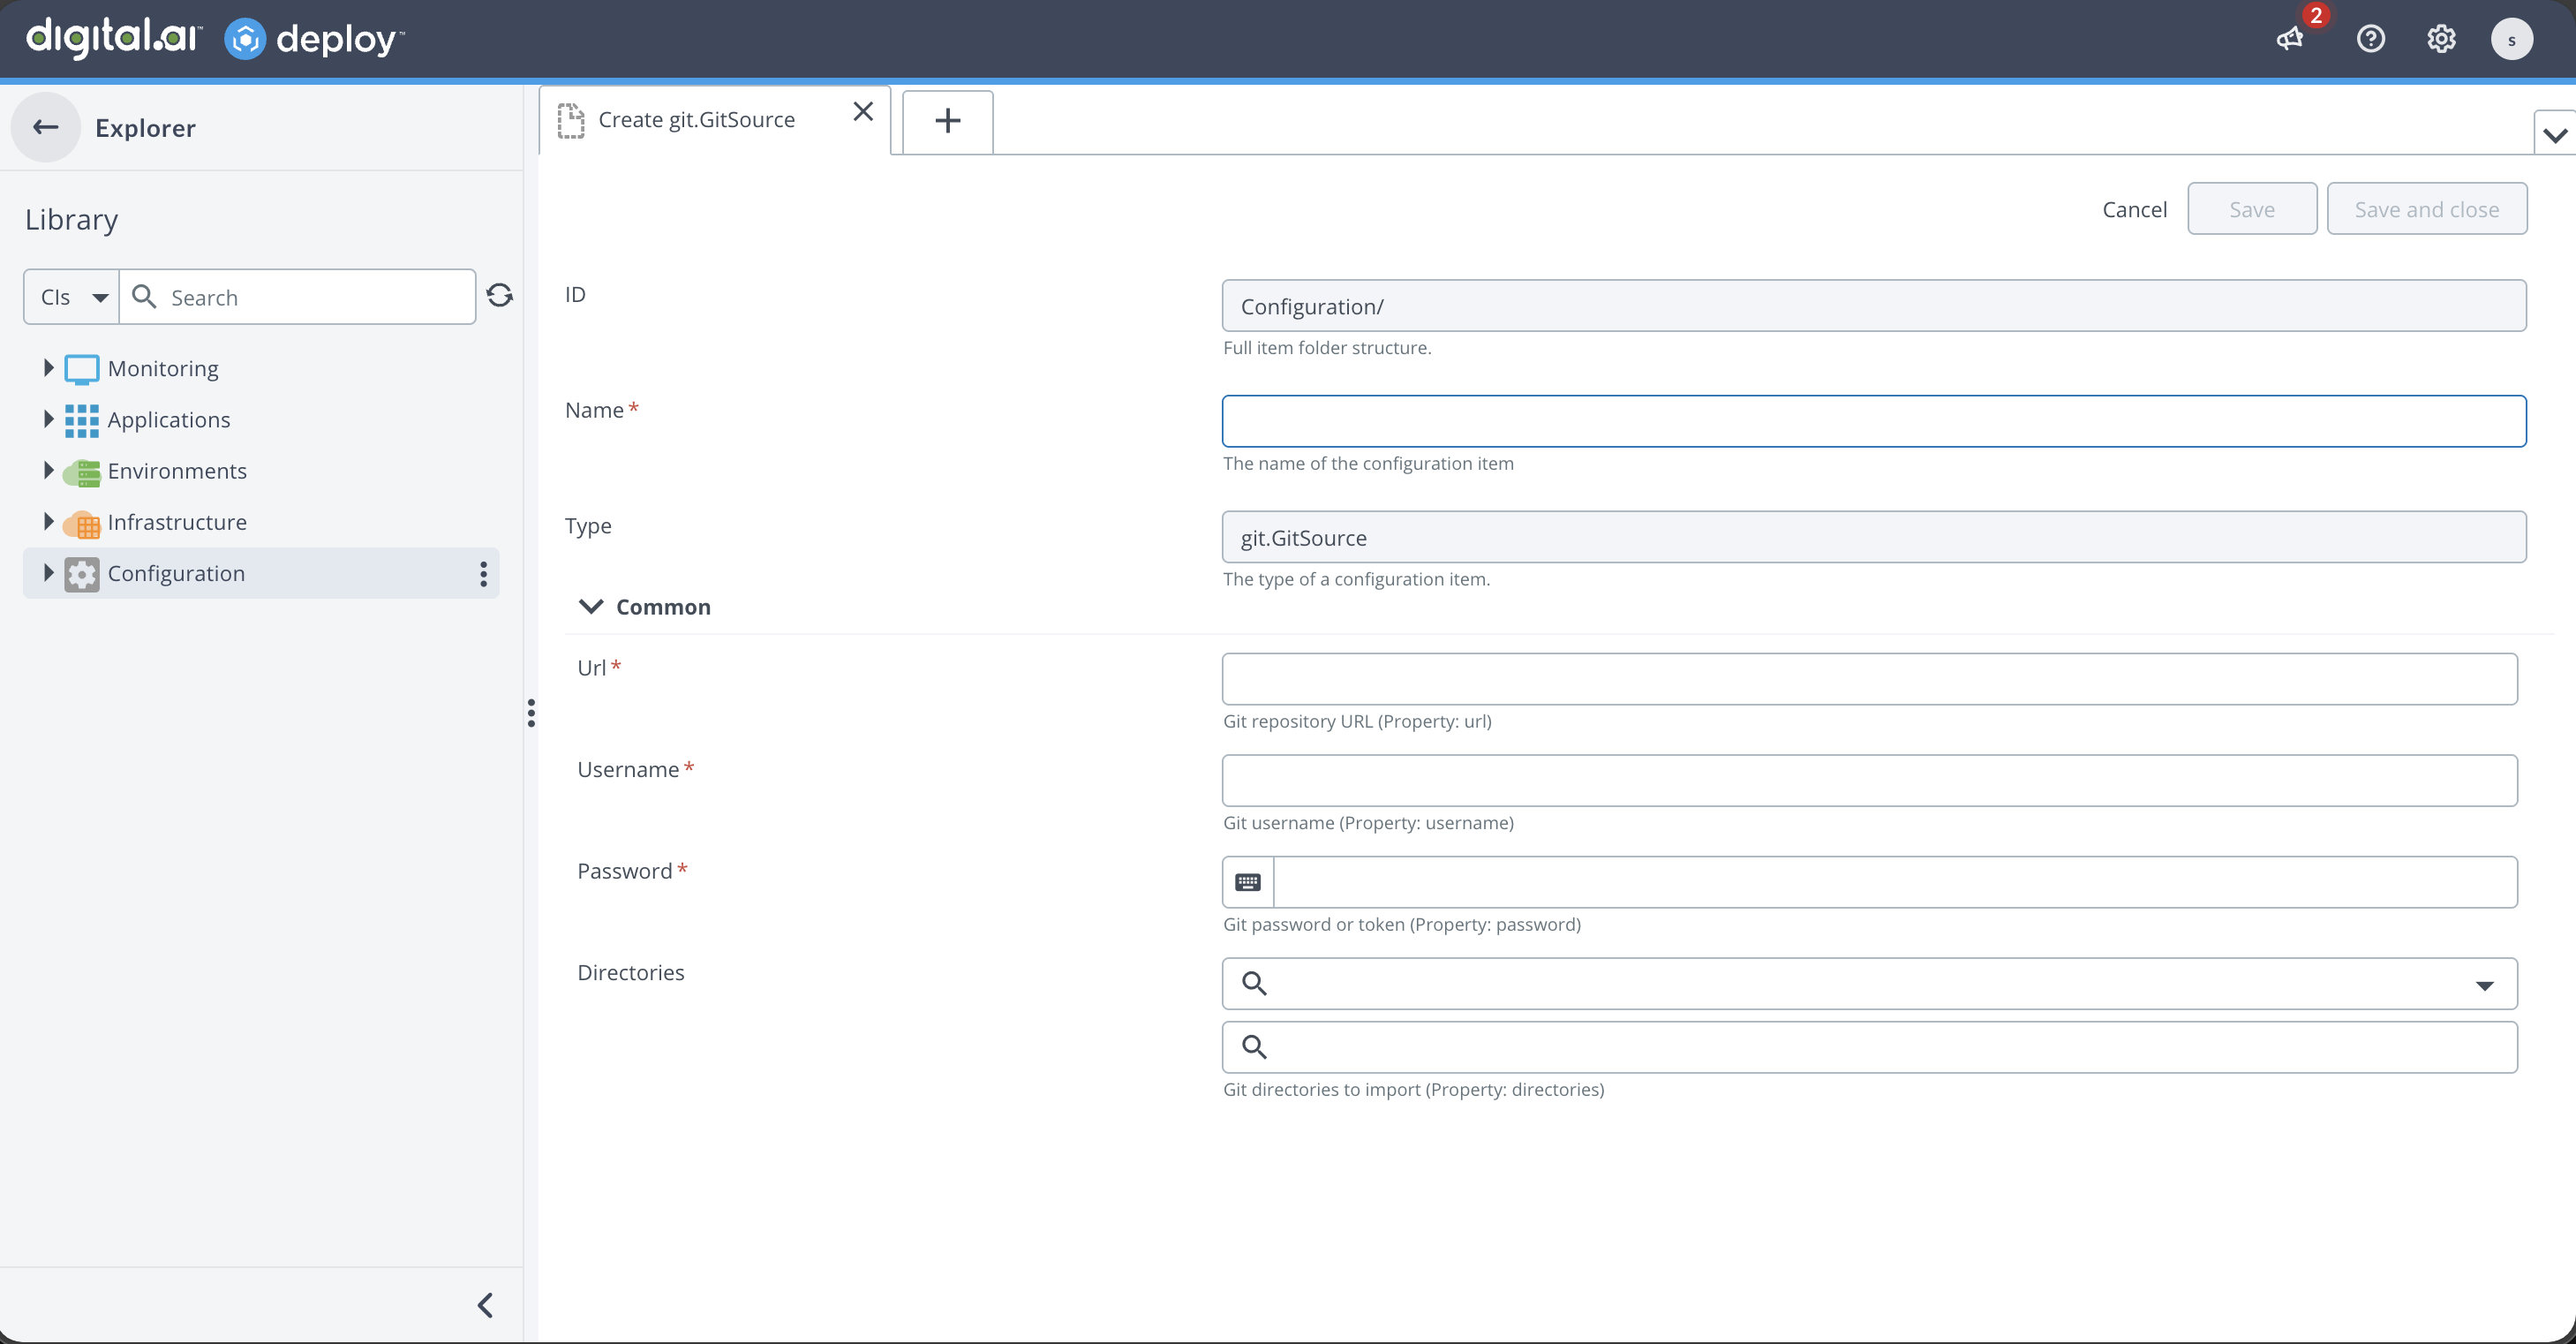
:::tip Use a classic PAT with the minimum required permissions Generate a classic personal access token (PAT) from your Git provider's settings. Fine-grained tokens are not supported.
- For import-only, read access to the repository is sufficient.
- For export, Deploy updates YAML files in the repository, so the PAT must have write access to the target path/branch. :::
Step 2: Verify Repository Connectivity
Verifying the connection confirms that Deploy can authenticate and reach the Git repository.
- Open the Git Source CI.
- Click Check Connection.
- Execute.
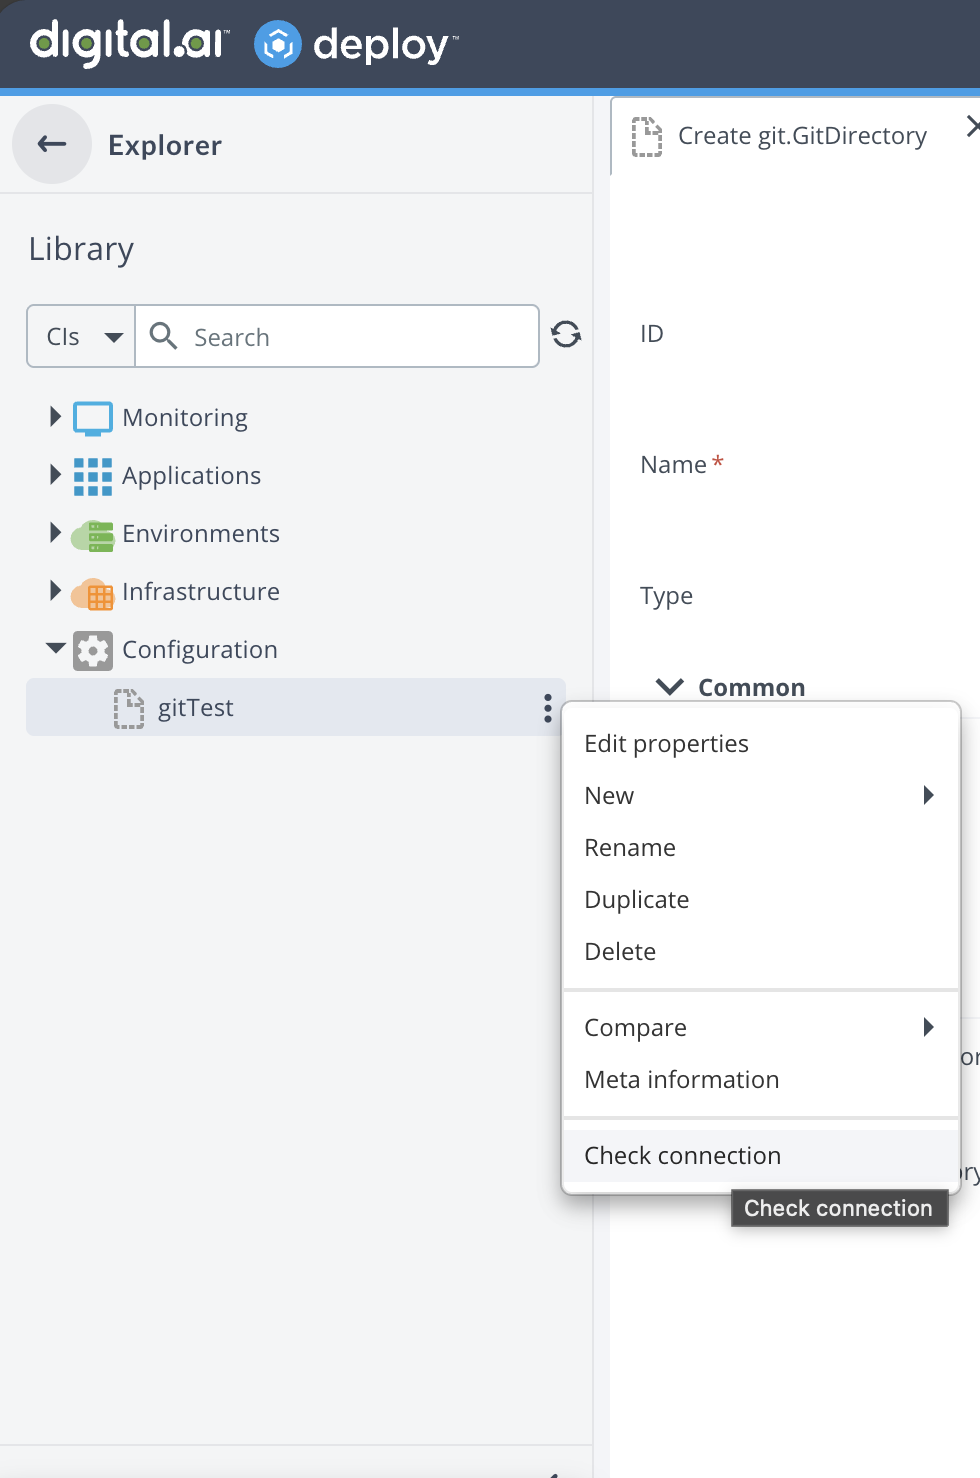
If the check succeeds, Deploy confirms that the repository is reachable and the credentials are valid.

If the check fails, verify that your credentials are correct and that Deploy has network connectivity to the Git server.
Step 3: Create a Git Directory CI
A Git Directory (git.GitDirectory) is a CI in Deploy that maps a folder in Git by defining its branch and repository path. Using a Git Directory, you can import and export infrastructure and environment CIs as YAML.
Create a Git Directory CI under your Git Source.
- In the Configuration tree, find your git.GitSource CI.
- Right-click the git.GitSource CI and select New → git → GitDirectory.
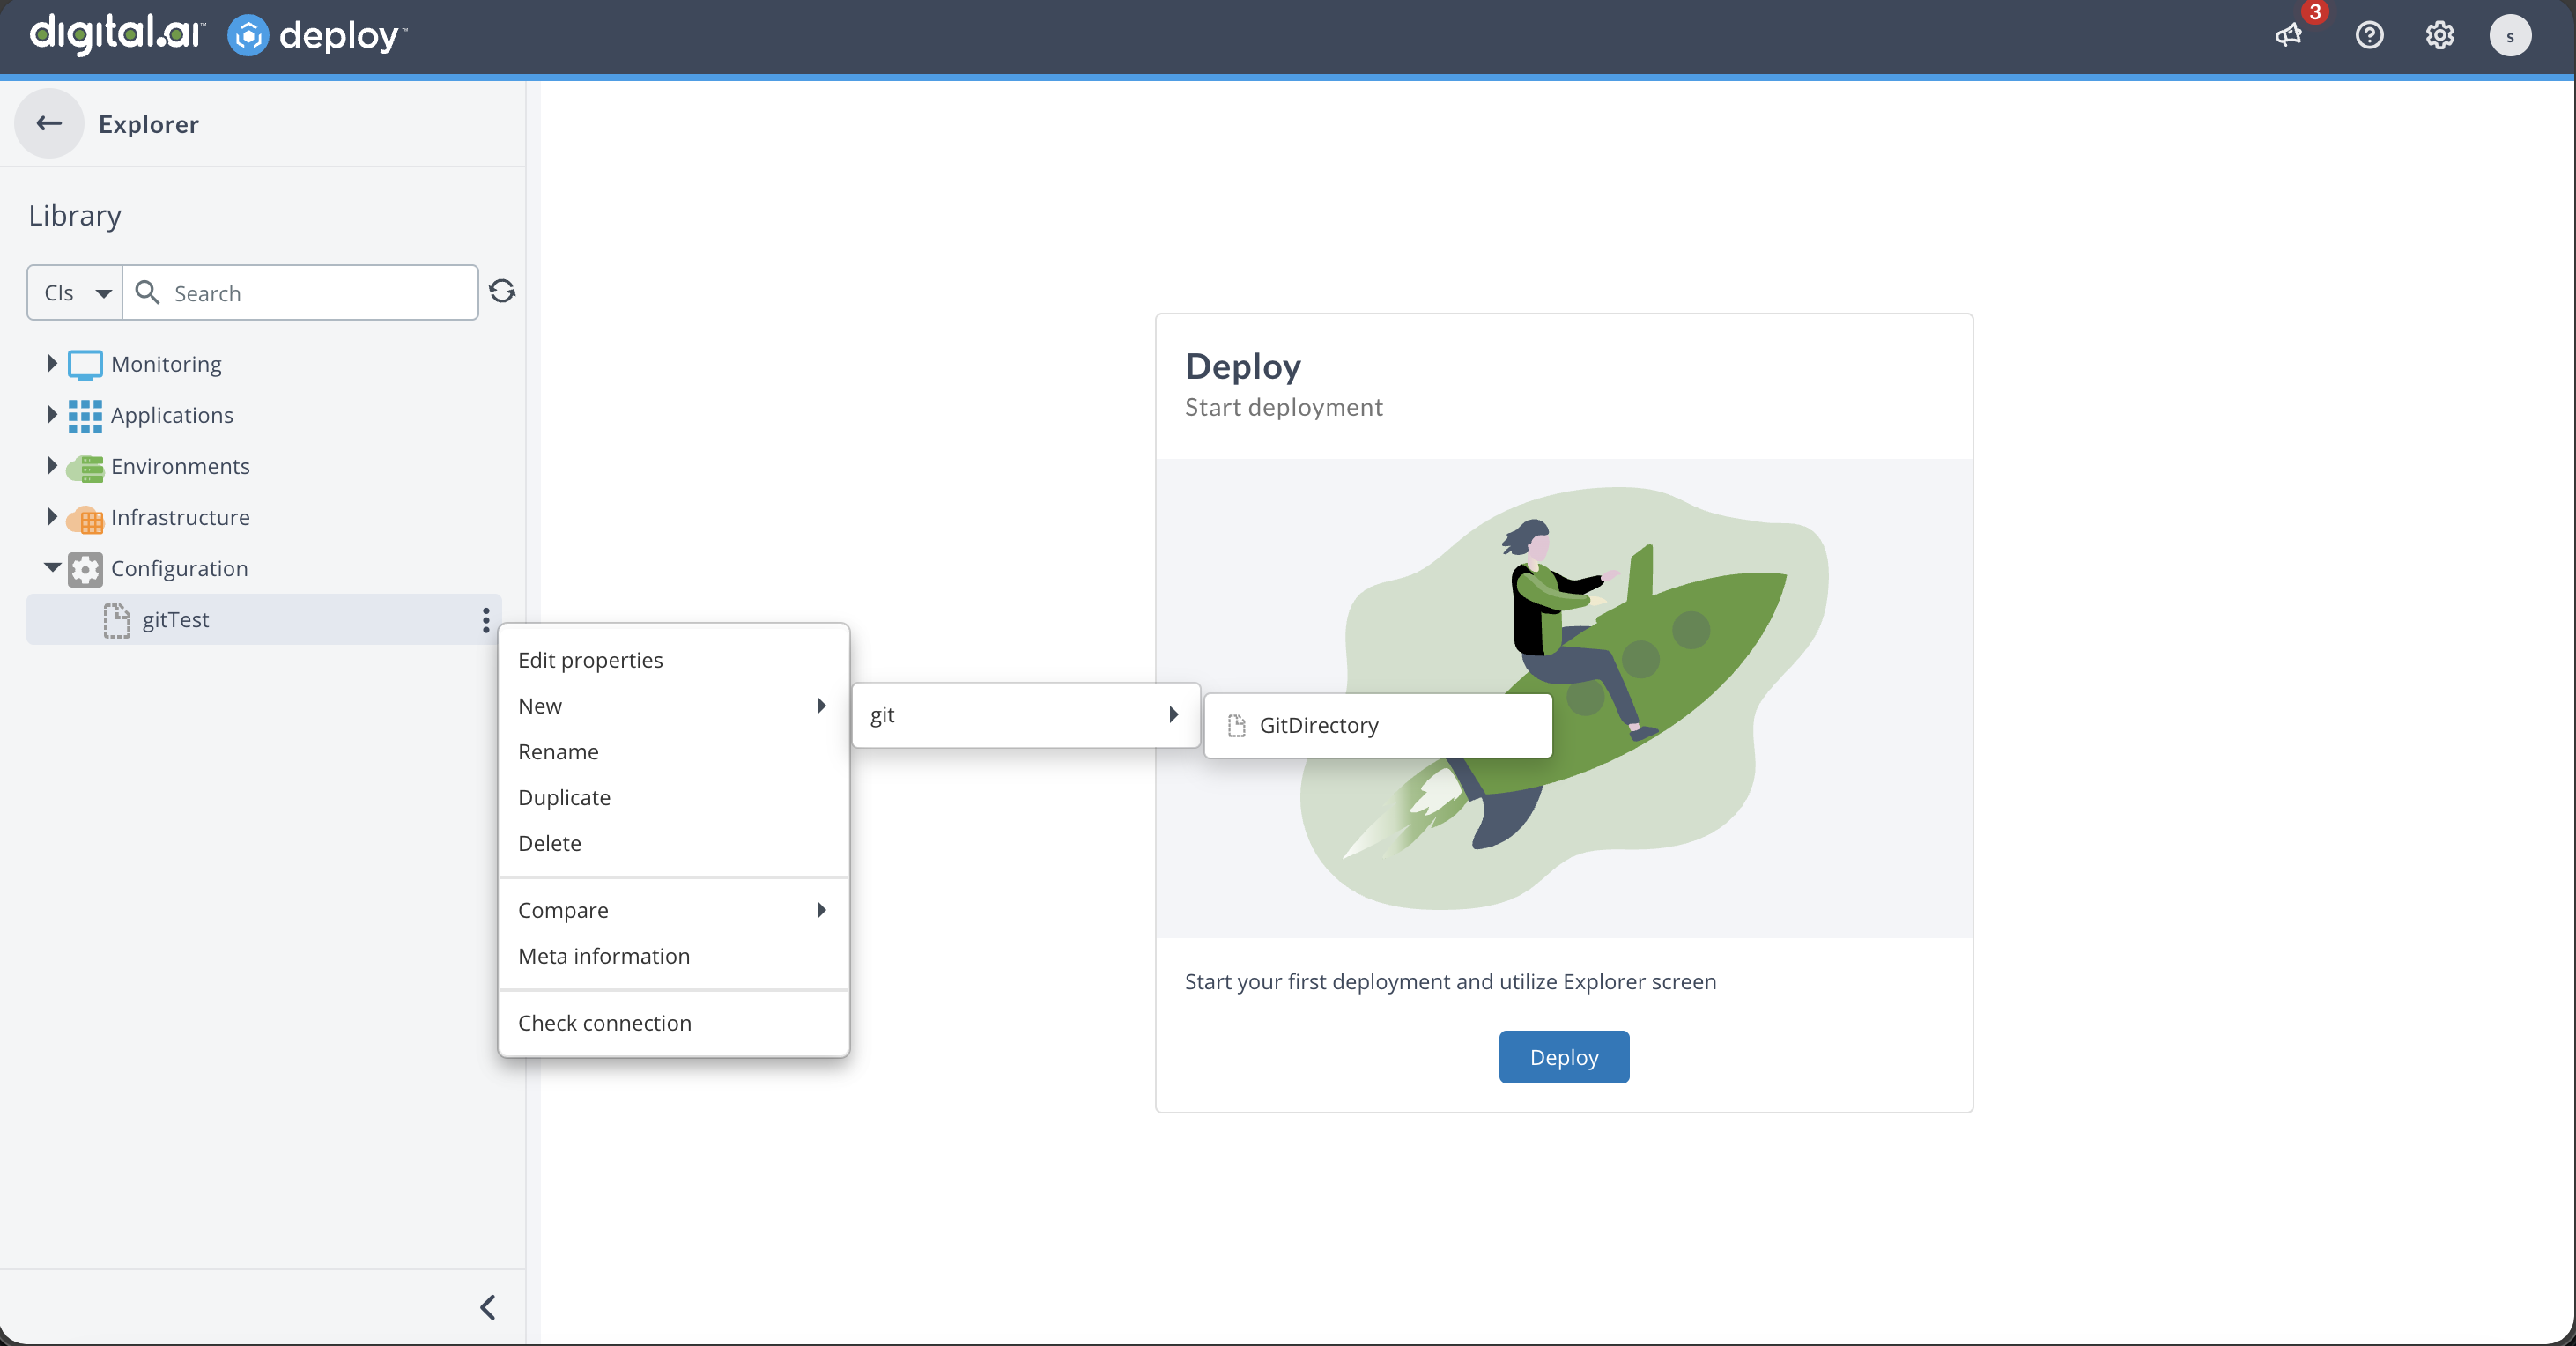
- Provide the following details:
- Name: The name of the CI
- Branch: The Git branch to use
- Git repository path: Path to the folder within the Git repository
Export fields (optional for import):
The following fields are only required for export operations. They define which directories in Deploy to export from.
- Infrastructure source directory: The directory path under Infrastructure to export. For example,
Infrastructure/dev. - Environment source directory: The directory path under Environments to export. For example,
Environments/dev.
When you use import only, you can leave them empty.

A single git.GitSource can have multiple git.GitDirectory CIs, each pointing to different folders or branches in your repository.
Export CIs to Git
Deploy supports exporting infrastructure and environment CIs to YAML files in a Git repository for version control and reuse. Any infrastructure or environment CIs can be exported at a directory level.
To export, you must have a folder created under Infrastructure or Environments in Deploy. For example, Infrastructure/dev or Environments/dev.
Export requires a valid directory path. You cannot export without a folder under Infrastructure or Environments in Deploy.
Before exporting, ensure the Git Directory CI includes:
- Infrastructure source directory: The path under Infrastructure from which CIs will be exported (for example,
Infrastructure/dev) - Environment source directory: The path under Environments from which CIs will be exported (for example,
Environments/dev)
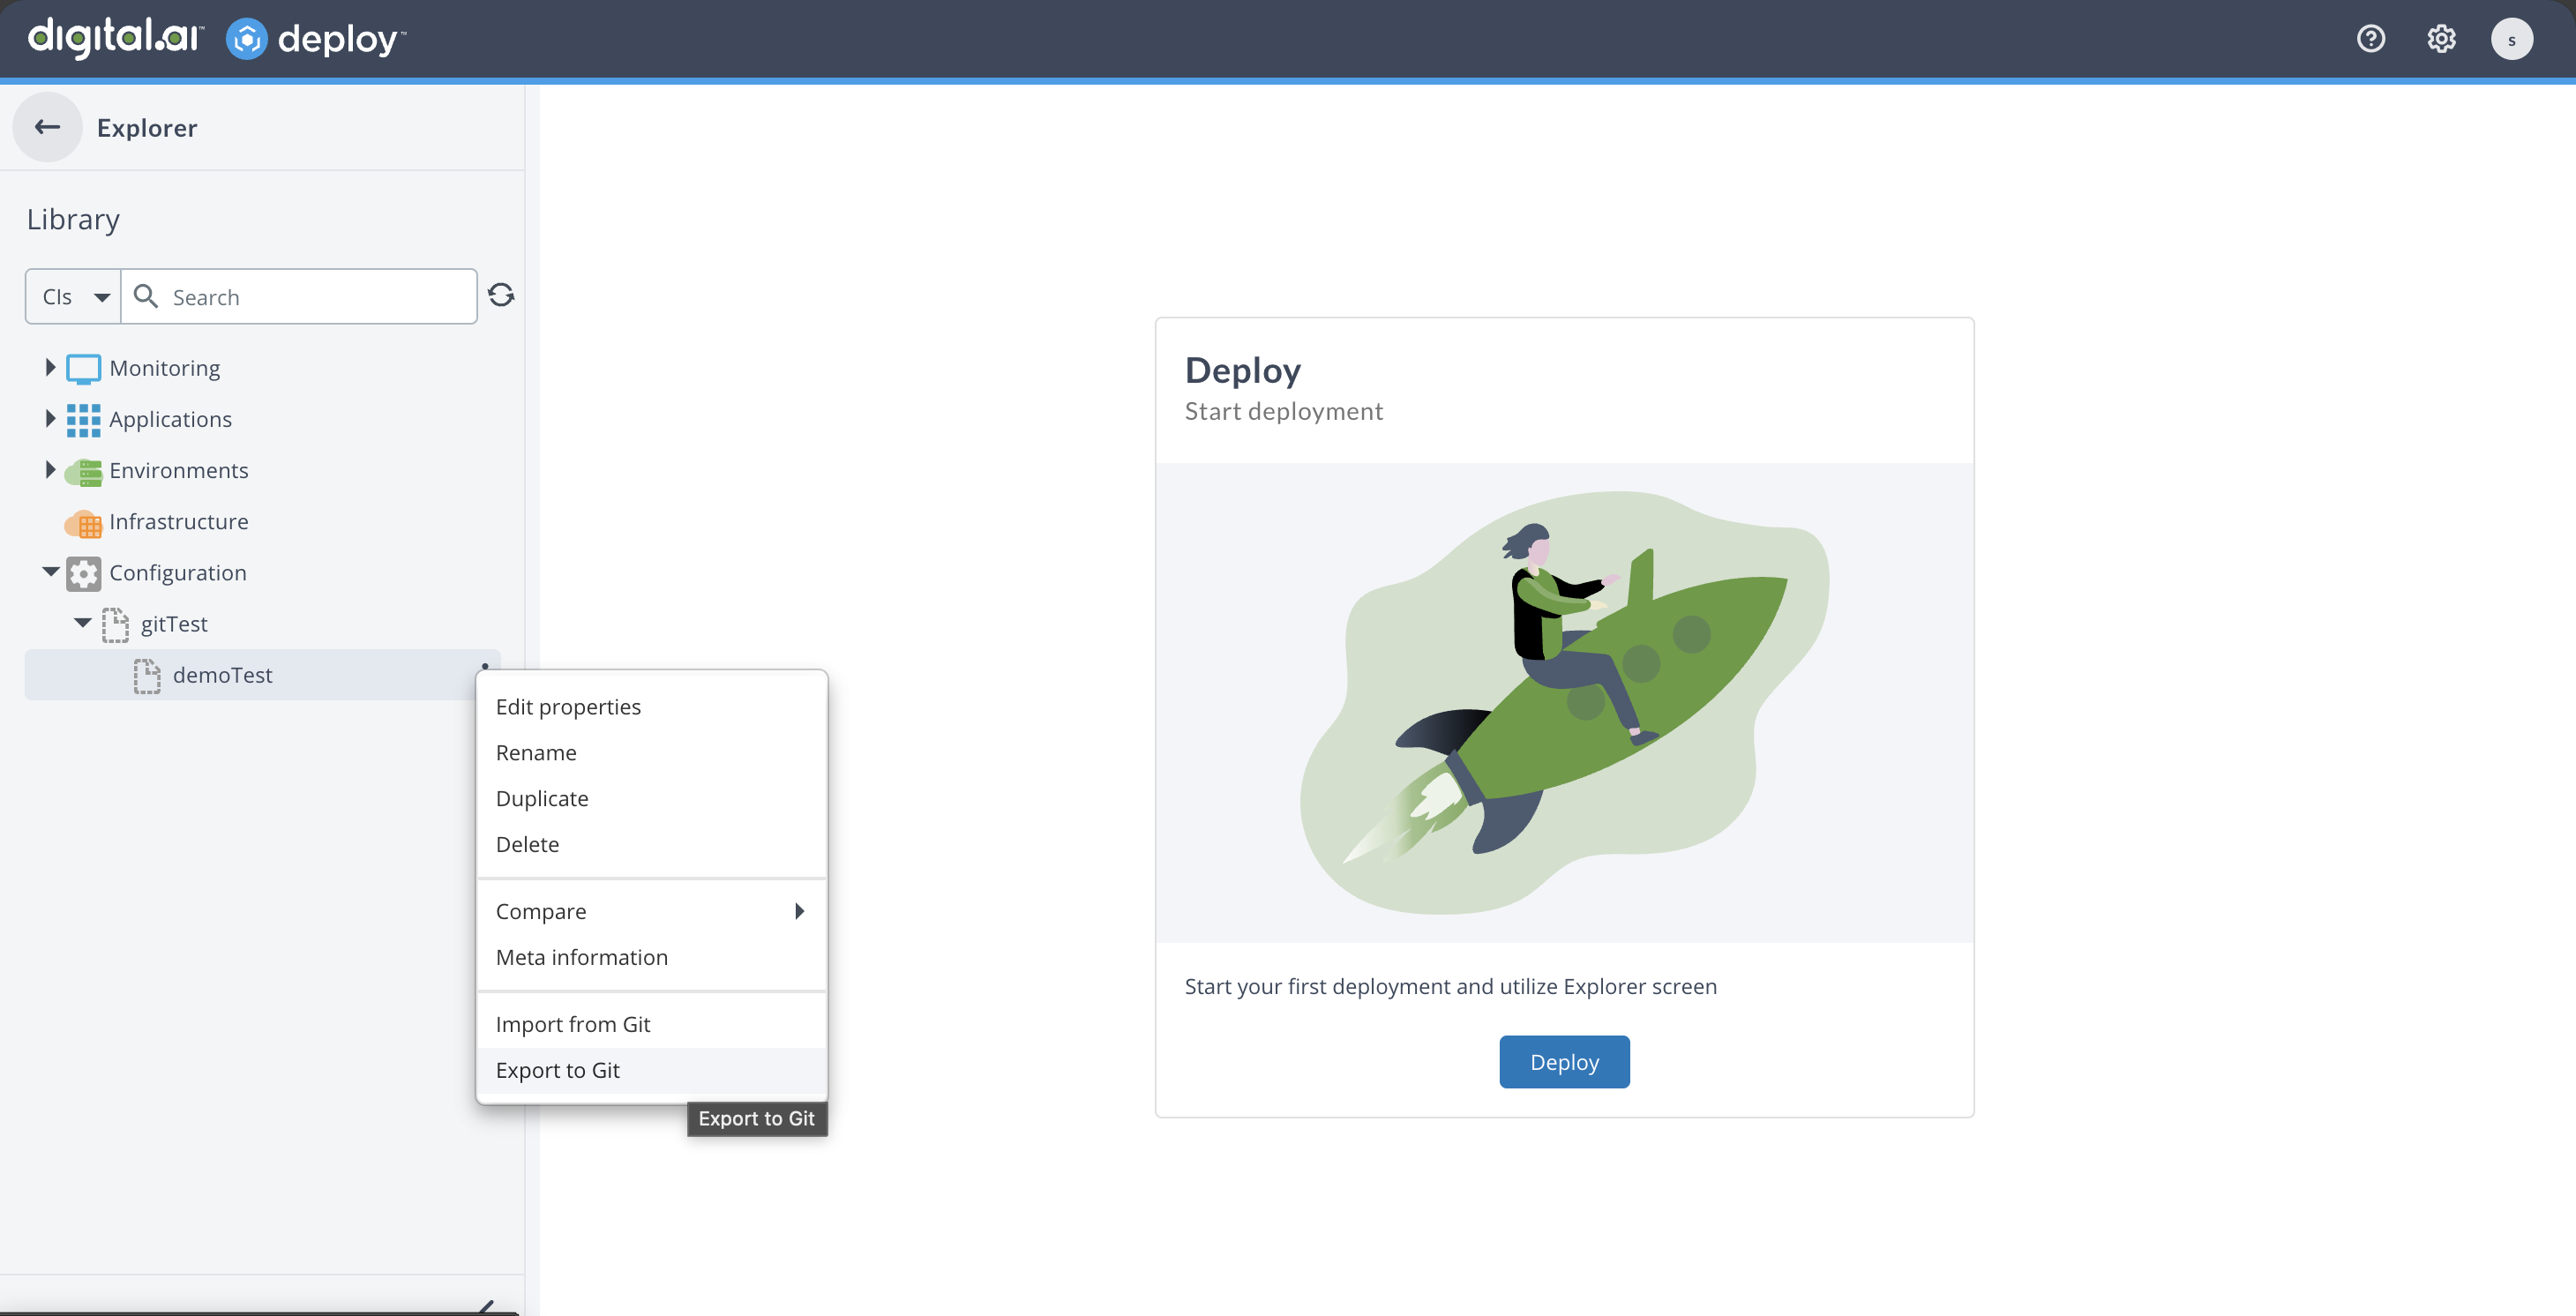
Exporting CIs to Git
- Right-click the
git.GitDirectoryCI under thegit.GitSource. - Select Export to Git to start the export workflow.
- Enter a Tag name and Commit message. The tag name is optional, but the Commit Message is mandatory to proceed to the next step.
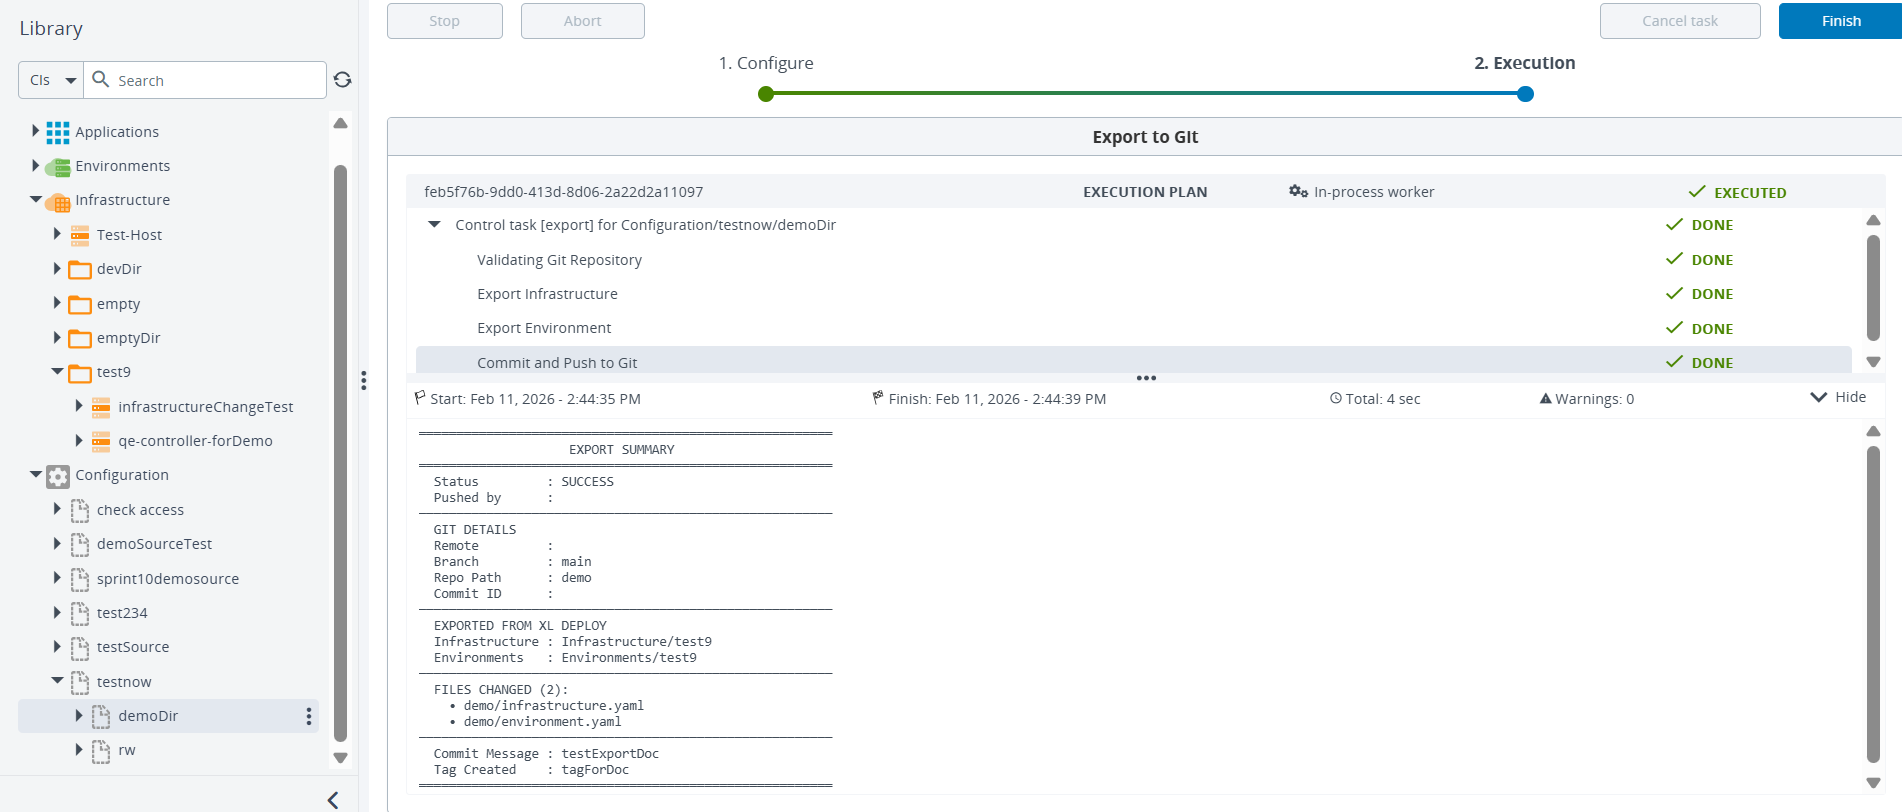
- Deploy generates YAML files and pushes them to the Git repository.
During export, Deploy updates the YAML files in the configured Git repository path with the latest CIs.
Once the task is executed successfully, the tags are created in the Git repository along with the CI changes.
If you encounter errors during export, see Troubleshooting.
Import CIs from Git
Import reads YAML from the configured Git repository path and creates or updates the corresponding CIs in Deploy.
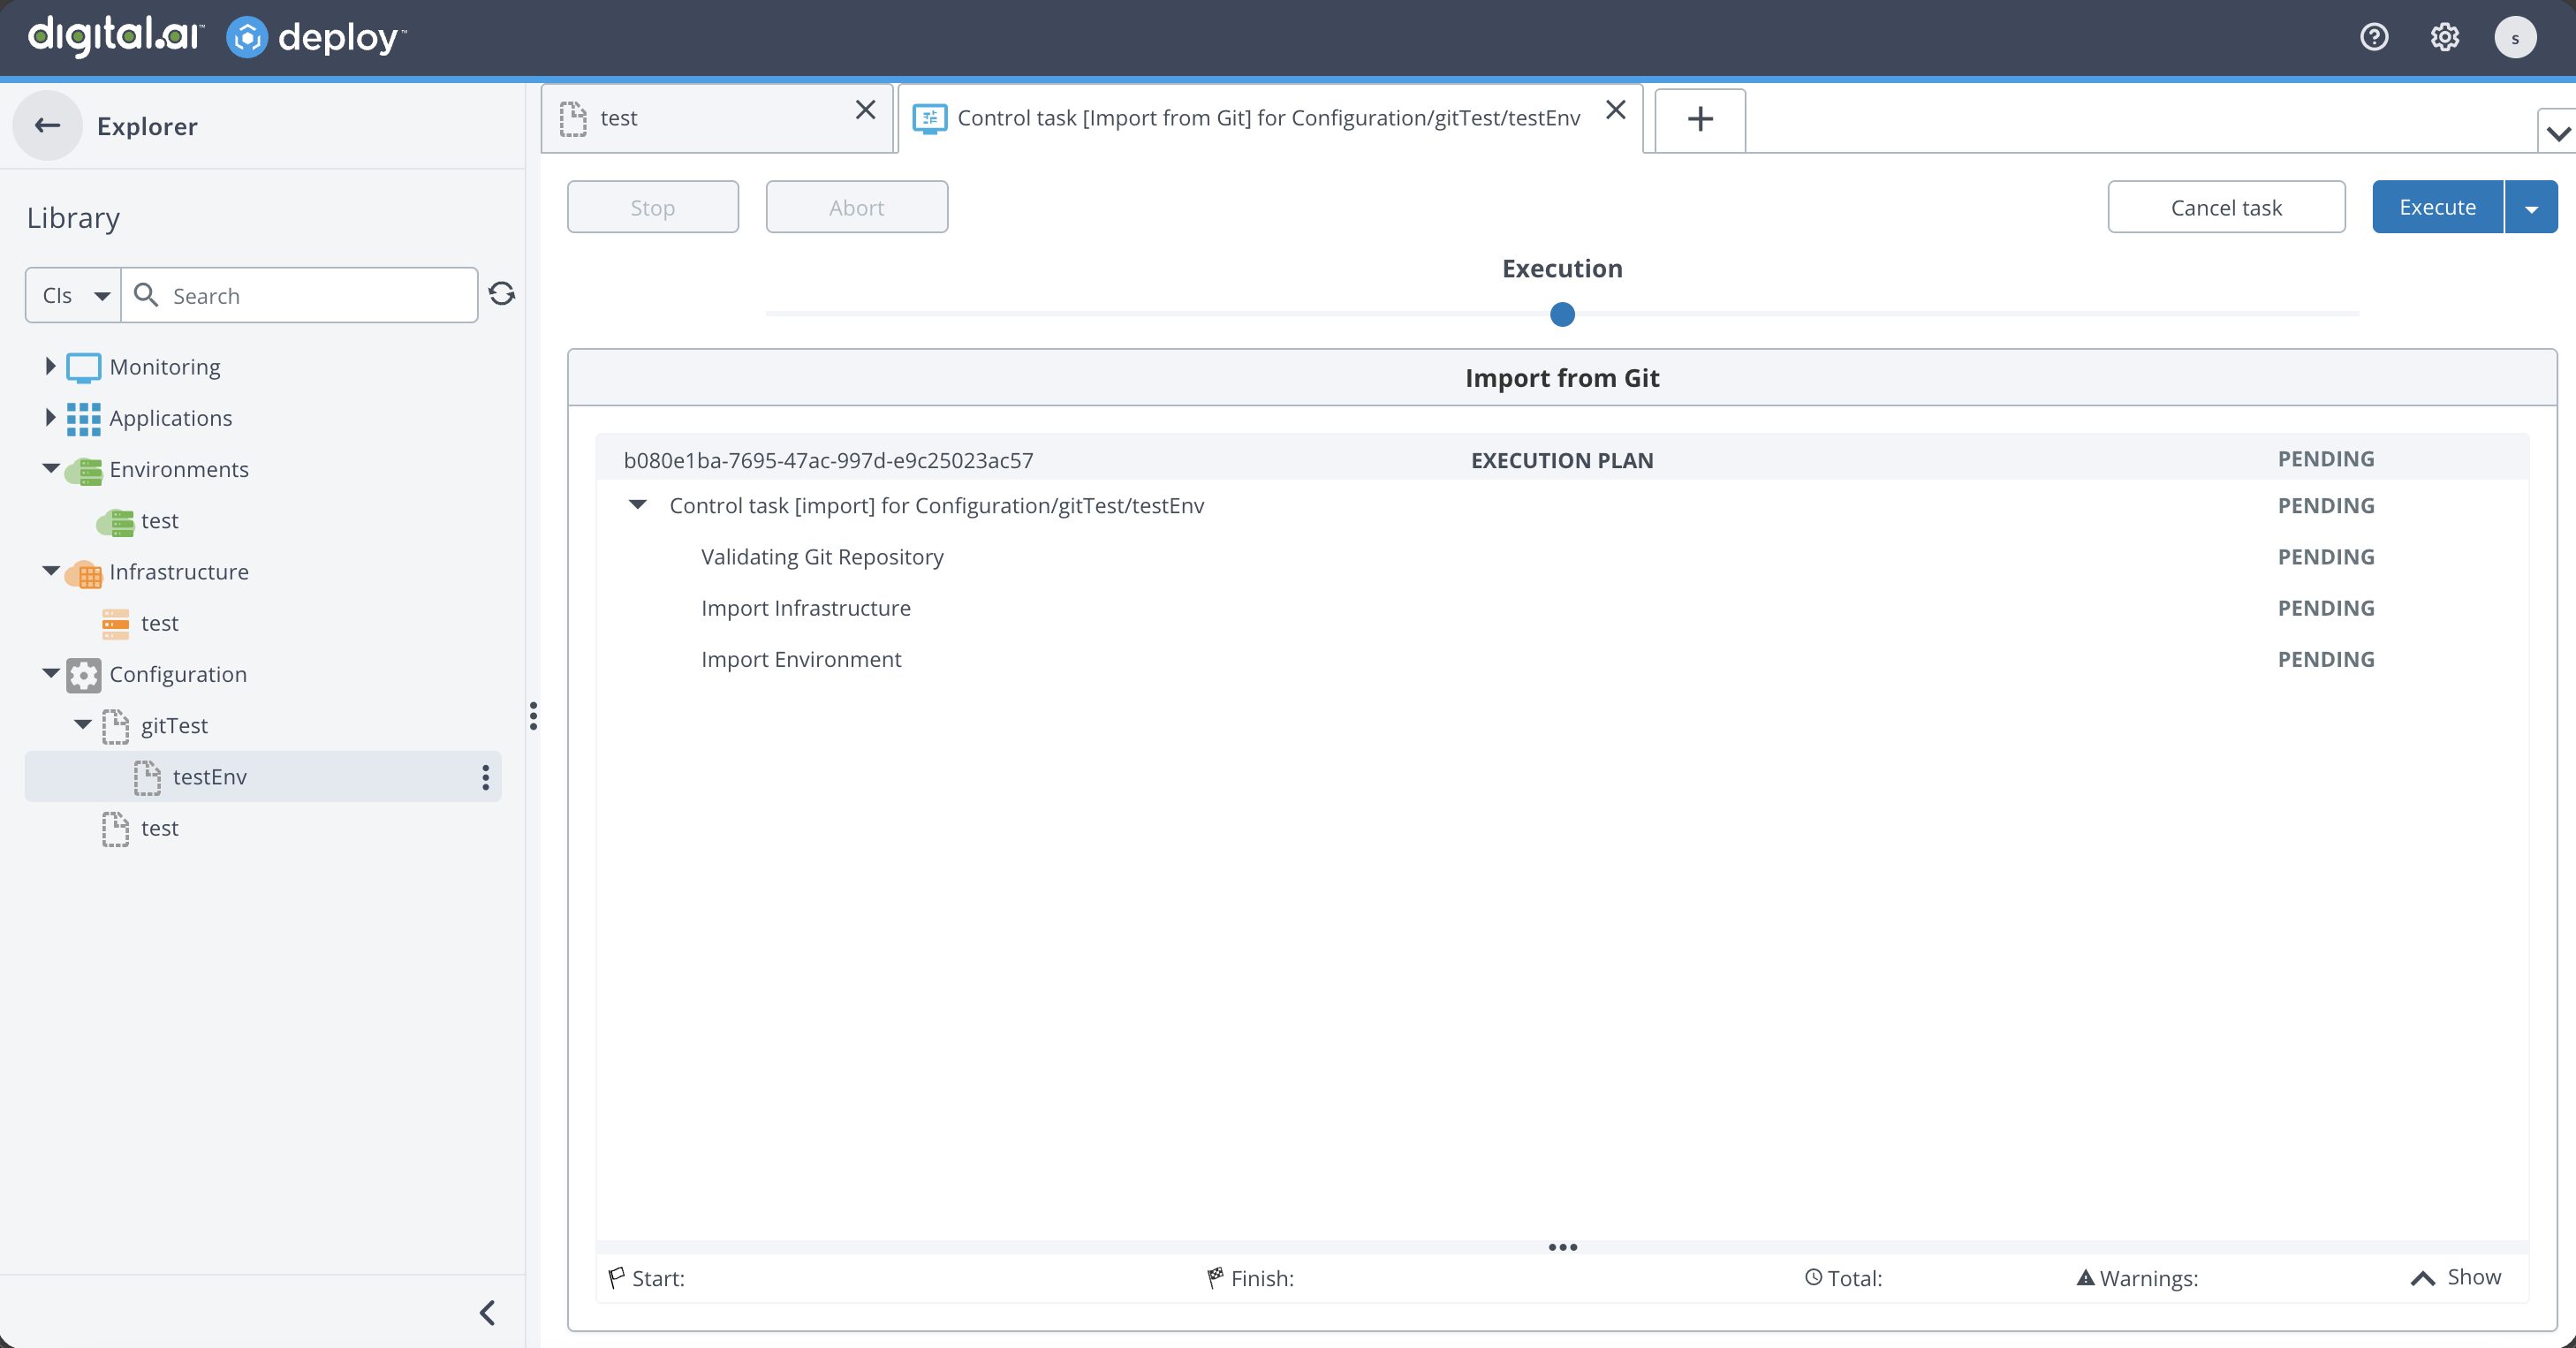
- Right-click the
git.GitDirectoryCI under thegit.GitSource. - Select Import from Git to start the import workflow.
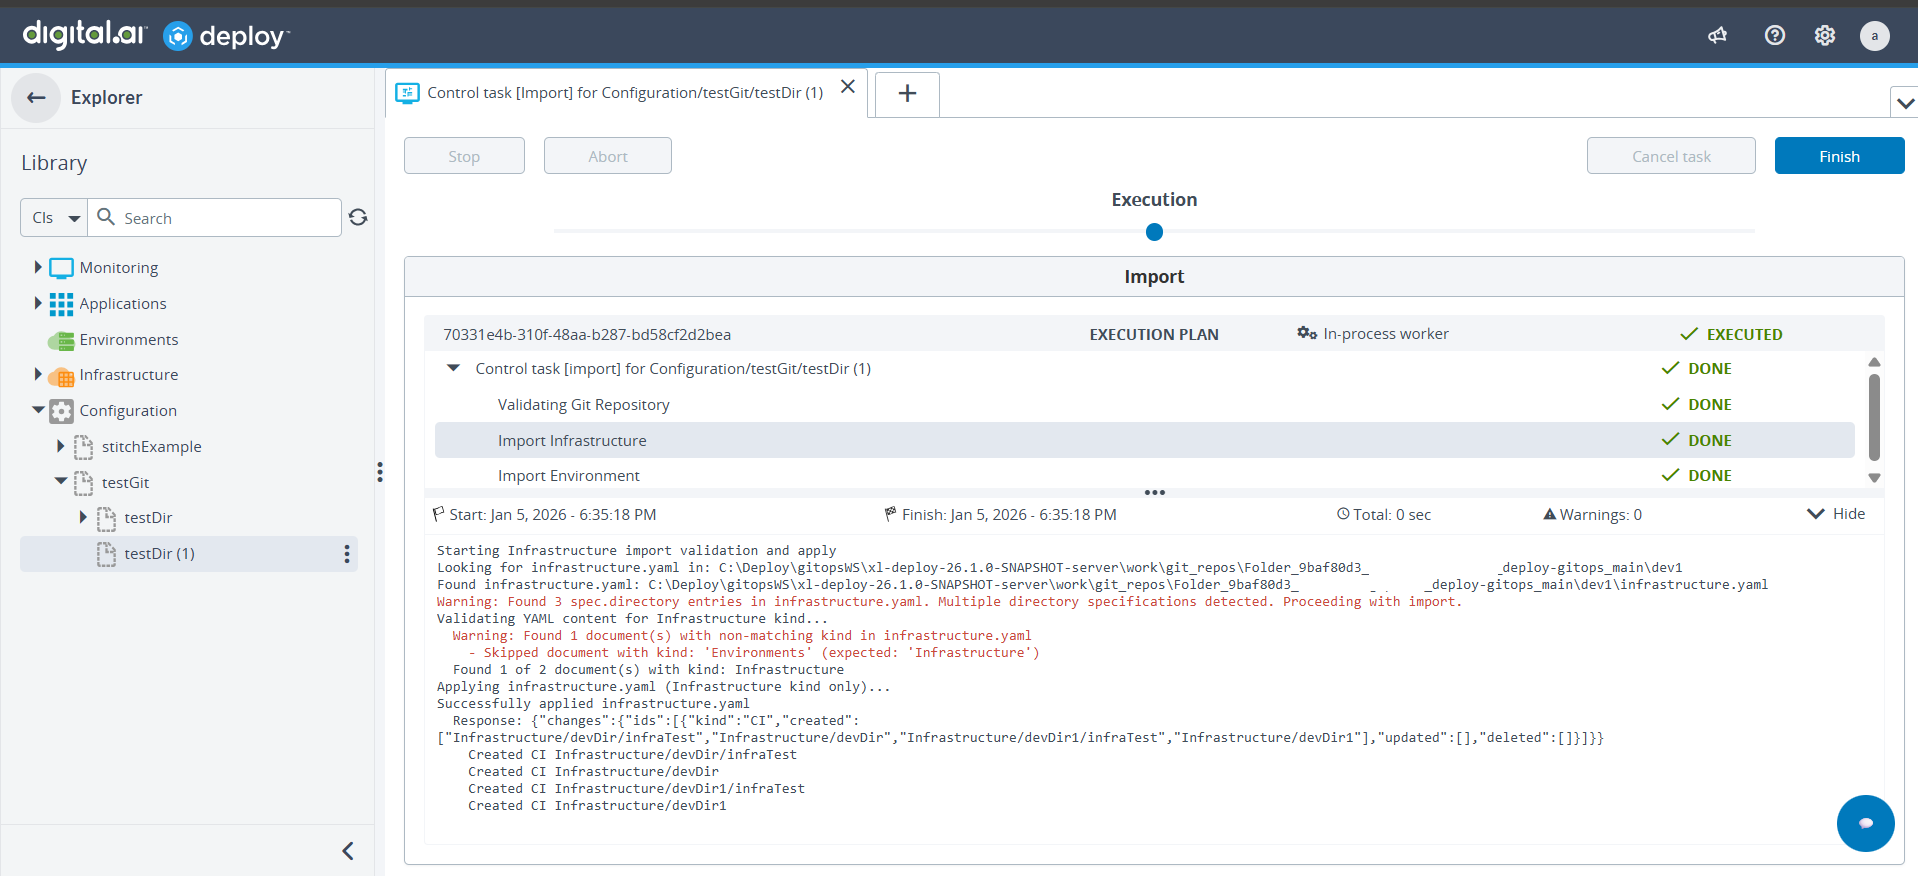
- Execute and wait for Deploy to validate the repository and scan your YAML files.

Keep YAML files organized into folders to simplify maintenance and make scanning predictable.
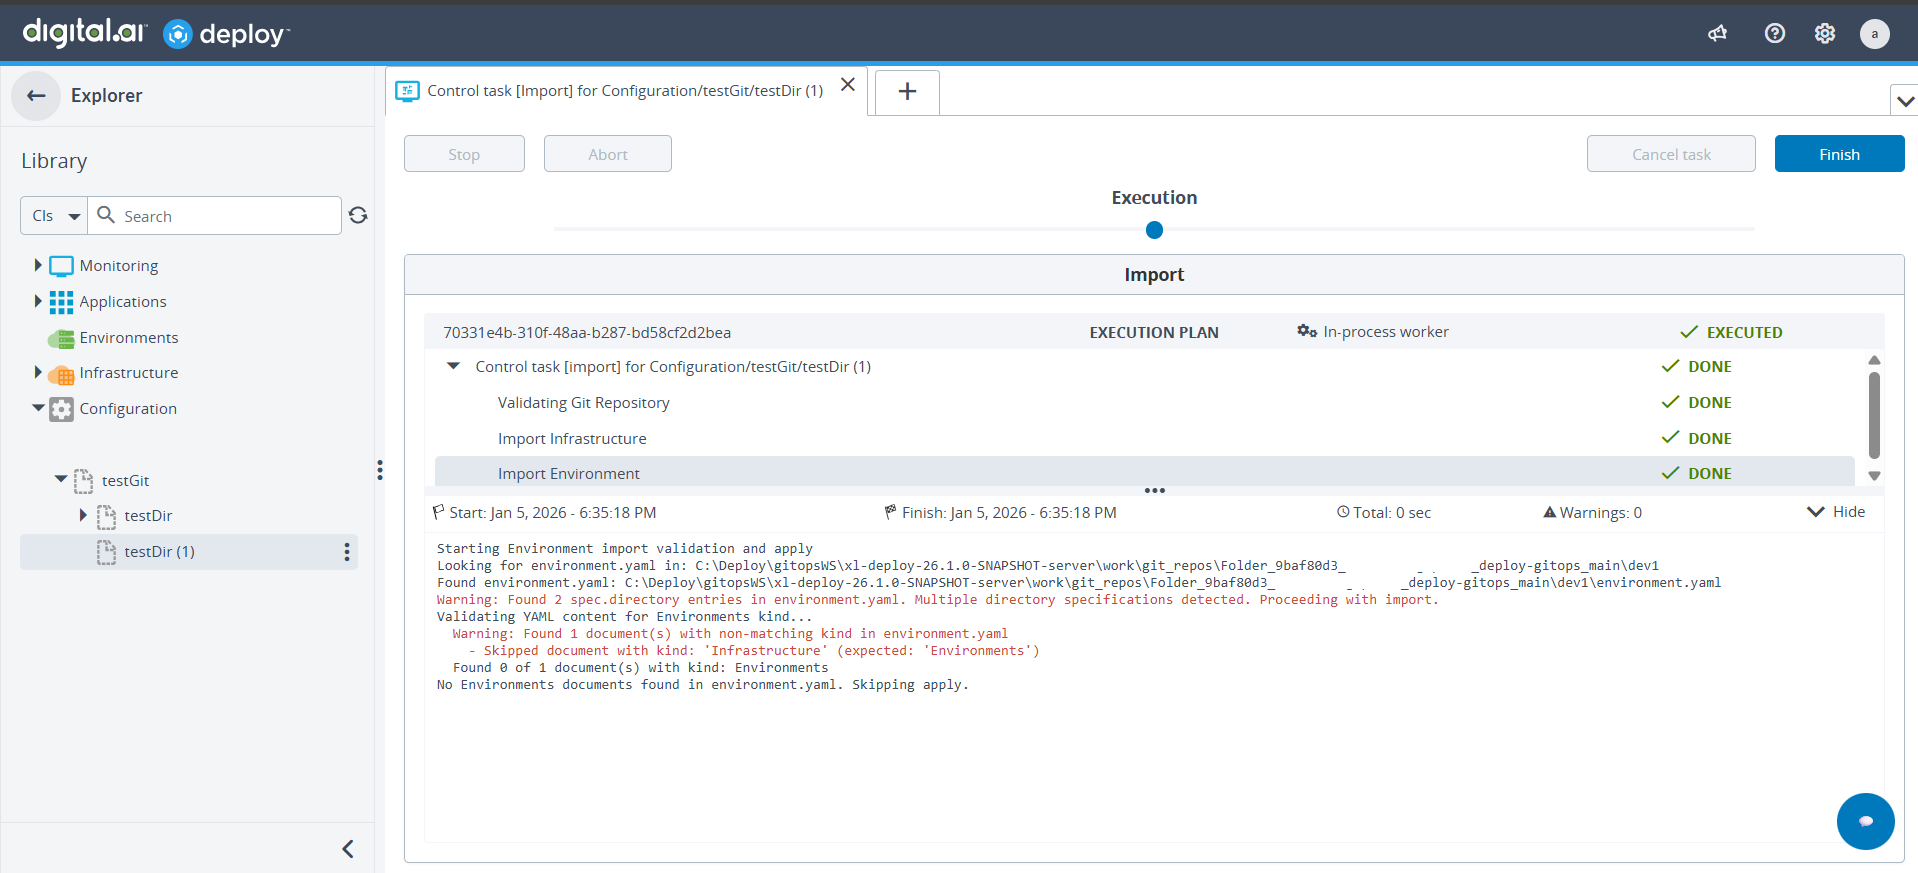
Import Behavior with Multiple Kinds
When importing YAML files, Deploy processes only the matching kind for each step and skips non-matching kinds with a warning.
Scenario 1: YAML file contains multiple kinds
If infrastructure.yaml contains both kind: Infrastructure and kind: Environments then during the Import Infrastructure step, only kind: Infrastructure is processed. The kind: Environments section is ignored with a warning. If multiple spec.directory entries exist within a single kind, Deploy logs a warning but proceeds with the import.
Scenario 2: YAML file contains a non-matching kind
If environment.yaml contains only kind: Infrastructure instead of kind: Environments:
During the Import Environment step, Deploy finds no matching kind: Environments and skips the apply step with a message indicating no matching documents were found.
Troubleshooting
If you encounter errors during import or export, the Deploy UI displays descriptive error messages. Common issues include:
| Issue | Cause |
|---|---|
| Branch not found | The specified branch does not exist in the Git repository |
| Path not found (Import) | The Git repository path does not exist |
| Path not found (Export) | The Infrastructure or Environment source directory does not exist in Deploy |
| No matching kind | The YAML file does not contain the expected kind for the import step |
| YAML file not present | The expected YAML file is missing from the repository |
| Sub-folders not supported | Export only supports root-level directories |
| Duplicate tag | The specified tag name already exists in the repository |
| Empty directory | The target directory contains no configuration items to export |
When a YAML file contains multiple kind definitions, Deploy imports only the matching kind for the current step and logs a warning for ignored kinds.