Selenium with C Sharp
If you prefer to run your Selenium tests using C Sharp, select one of the sample tests below to see our platform in action.
All the scripts below makes use of the grid access key. In order to run the test do the following
- Get your access key
- Replace it with <YOUR_ACCESS_KEY>, in the sample tests below.
Replace <server> with the appropriate URL.
- Public Continuous Testing Cloud - https://cloud.seetest.io/wd/hub/.
- Dedicated Continuous Testing Cloud environment - Your own domain. For example: https://company.experitest.com/wd/hub/
- On-premises Continuous Testing Cloud environment - Your designated URL. For example: https://company.com/wd/hub
Selenium 3 with C Sharp Expand source
using System;
using OpenQA.Selenium;
using OpenQA.Selenium.Remote;
using NUnit;
using NUnit.Framework;
using OpenQA.Selenium.Support.UI;

namespace selenium_csharp_first_test
{
    [TestFixture]
    public class QuickStart
    {
        private string ACCESS_KEY= "<YOUR_ACCESS_KEY>";
		private string CLOUD_URL = "<server>";

        private string testName = "Quick Start Test";

        protected RemoteWebDriver driver = null;

        DesiredCapabilities dc = new DesiredCapabilities();

        [SetUp()]
        public void SetupTest()
        {
			dc.SetCapability("testName", testName);
            dc.SetCapability("accessKey", ACCESS_KEY);
            dc.SetCapability("initialBrowserUrl", "https://seetest.io");
            dc.SetCapability(CapabilityType.BrowserName, <BROWSER_NAME>);
            driver = new RemoteWebDriver(new Uri(CLOUD_URL), dc);
        }

        [Test()]
        public void QuickStartTestWithSelenium()
        {
             for (int i = 0; i < 7; i++)
            {
                driver.Navigate().GoToUrl("https://www.google.com");
                new WebDriverWait(driver,TimeSpan.FromSeconds(10) ).Until(driver => driver.FindElement(By.Name("q")));
                IWebElement searchBar = driver.FindElement(By.Name("q"));
                searchBar.Click();
                searchBar.SendKeys("Experitest");
                searchBar.SendKeys(Keys.Enter);
            }
        }

        [TearDown()]
        public void TearDown()
        {
            driver.Quit();
        }
    }
}
Selenium 4 with C Sharp Expand source
using NUnit.Framework;
using System;
using OpenQA.Selenium.Remote;
using OpenQA.Selenium;
//for Chrome
using OpenQA.Selenium.Chrome;
//for FireFox
using OpenQA.Selenium.Firefox;
//for Microsoft Edge
using OpenQA.Selenium.Edge;
//for Safari
using OpenQA.Selenium.Safari;
using OpenQA.Selenium.Support.UI;

namespace selenium_csharp_first_test
{
    public class QuickStart
    {
        private string ACCESS_KEY = "<YOUR_ACCESS_KEY>";
        private string testName = "Quick Start Test";

        private string CLOUD_URL = "<server>";
        protected RemoteWebDriver driver = null;

        //for Chrome
		ChromeOptions options= new ChromeOptions();
		//for FireFox
		FirefoxOptions options= new FirefoxOptions();
		//for Microsoft Edge
		EdgeOptions options= new EdgeOptions();
		//for Safari
		SafariOptions options= new SafariOptions();

        [SetUp]
        public void SetupTest()
        {
			options.AddAdditionalOption("experitest:accessKey",ACCESS_KEY);
			options.AddAdditionalOption("experitest:testName",testName);
            driver = new RemoteWebDriver(new Uri(CLOUD_URL), options);
        }

        [Test]
        public void QuickStartTestWithSelenium()
        {
            for (int i = 0; i < 7; i++)
            {
                driver.Navigate().GoToUrl("https://www.google.com");
                new WebDriverWait(driver,TimeSpan.FromSeconds(10) ).Until(driver => driver.FindElement(By.Name("q")));
                IWebElement searchBar = driver.FindElement(By.Name("q"));
                searchBar.Click();
                searchBar.SendKeys("Experitest");
                searchBar.SendKeys(Keys.Enter);
            }
        }

        [TearDown]
        public void TearDown()
        {
            driver.Quit();
        }
    }
}
Before you begin, make sure to install Selenium dependencies.
Installing the Selenium Package
you can install the Selenium Package in one of two ways:
Installing using NuGet Package Manager
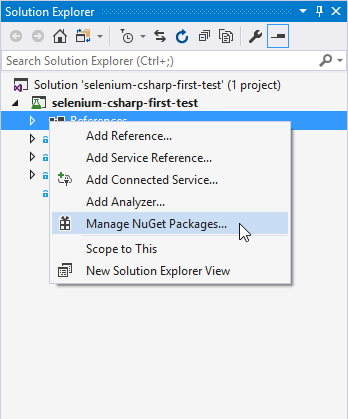
In your Visual Studio project, look for the References object in the Solution Explorer. Right Click on it and select Manage NuGet Packages.


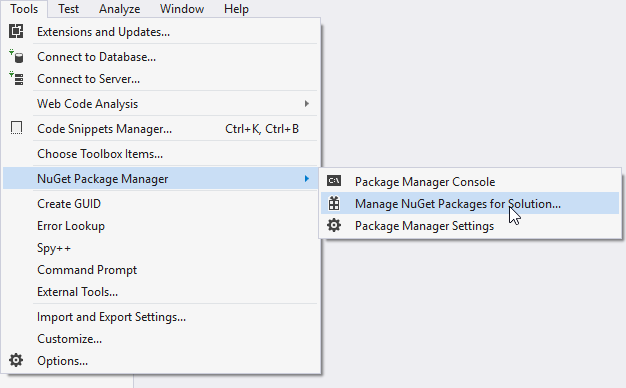
Alternatively, in Visual Studio upper menu click on Tools → NuGet Package Manager → Manage NuGet Packages for Solution.
Search for Selenium and install the first two packages that appear in the list.

Installing using NuGet Package Manager Console
In Visual Studio upper menu, click on Tools → NuGet Package Manager - Package Manager Console.
Run the commands:
#for latest Selenium 3 version
Install-Package Selenium.WebDriver -Version 3.141.0
Install-Package Selenium.Support -Version 3.141.0
#for latest Selenium 4 version
Install-Package Selenium.WebDriver
Install-Package Selenium.Support
Note that the commands above install a particular version. Follow updates in NuGet repository:
